Lost data on MacBook can cause financial problems and emotional heartache. You probably have hundreds of photos and documents that you can't bear to lose. In data loss situation, you may spend much time on searching for an acceptable solution to get the lost files back. Fortunately, there are some simple methods you can use to recover deleted or lost files from MacBook.
Methods to recover lost files on MacBook:
Data loss can be caused by many reasons or operations. Deletion and format are the two main reasons. You may delete files on MacBook and empty the trash bin or erase a hard drive using Disk Utility without backup. Don't panic, the deleted or formatted data on MacBook is not lost forever, and can be easily recovered with right data recovery solution. Here, we will introduce three methods to help you recover lost files on MacBook.
1. Recover deleted files from trash bin on MacBook.
After you delete a file on MacBook, this file will be moved to the trash bin. Before you empty it from the trash bin, you can easily put it back. Just open trash on your MacBook. Then find the deleted file, select it and put it back to the original location.
![Recover lost files from MacBook]()
2. Recover lost files from MacBook via Backup.
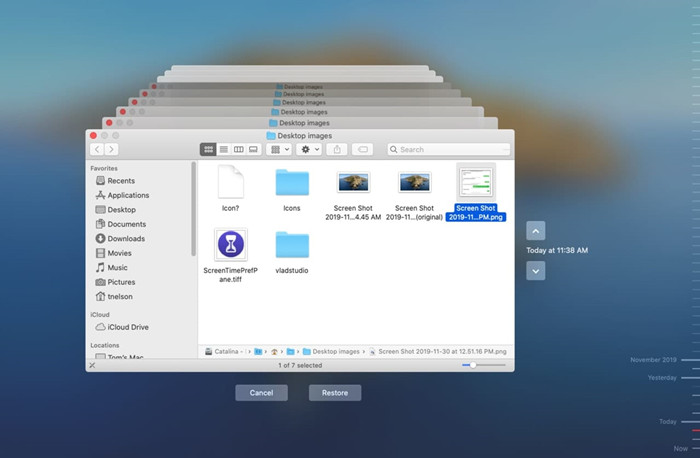
If you have backed up your MacBook with Time Machine, you can try to restore the deleted files from Time Machine backup.
Step 1. Select System Preferences from the Apple menu.
Step 2. Choose the Time Machine icon.
Step 3. Check the box next to Show Time Machine in menu bar.
Step 4. Click Enter Time Machine after clicking the Time Machine icon in the Menu bar.
Step 5. Find the file or folder you want to recover and click Restore.
![Recover lost files from MacBook]()
If you don't back up your Mac with Time Machine and back up your Mac data with other backup software, just find the backup which includes the lost files and then restore lost files from the backup.
3. Recover lost files with MacBook data recovery software.
If the two methods above can't help you recover deleted or lost files on your MacBook, you can try another method to get lost files back. Whether you have emptied the trash bin or have erased your hard drive, MacBook data recovery software is able to completely get the lost files back.
Donemax Data Recovery for Mac is one of the best MacBook data recovery software. It supports to recover lost files on MacBook due to deletion, format, logical error, hard drive crash, virus infection, etc. Follow the steps below:
Step 1. Download and install Donemax Data Recovery for Mac on your computer. Then open it from Launchpad. (It is fully compatible with all OS X and macOS versions, supports T1/T2 and M1 chip Mac.)
Step 2. Run Donemax Data Recovery for Mac on your MacBook, then select the hard drive where you delete or lose your files. It supports to recover lost files from MacBook HDD, SSD, external hard drive, memory card, USB flash drive, digital camera, RAID, etc.
![Recover lost files from MacBook]()
Step 3. Click on Scan button. This MacBook data recovery software will deeply scan the selected hard drive and find all lost files.
![Recover lost files from MacBook]()
Step 4. Once the scan is completed, you can preview all recoverable files. Then select the wanted files and save them to your MacBook.
![Recover lost files from MacBook]()
Donemax Data Recovery for Mac is pretty simple to use. As you've seen, it takes only three steps to get all lost files back. It also supports to recover lost data from iMac, Mac Mini, MacBook Pro, MacBook Air, Mac Pro, Mac Server, etc.
In Conclusion
When you lose data on MacBook, you can try to recover the lost data from trash bin or backup. If you don't have a backup and can't find the lost files in trash bin, you can use Donemax Data Recovery for Mac to help you completely get lost files back.
Making a regularly backup of your MacBook data is the best way to prevent data loss. You can back up your MacBook with Time Machine or with an easy-to-use Mac cloning software, such as - DMclone for Mac
.


