![MacBook Air Data Recovery]()
Is there vital information you accidentally erased or lost on your MacBook Air? It isn't very pleasant when your MacBook files disappear. In cases where files are truly lost, but the operating system cannot see them, data recovery on a MacBook Air or other Mac models is possible.
The files on your MacBook Air are not immediately removed from the hard disk when you erase them using macOS Disk Utility or empty the files from Trash. A file's contents remain accessible until they are overwritten by new data, even when the space it occupies is designated as free. Here we'll go over retrieving lost files from a MacBook Air's hard drive.
Causes of Data Loss on A MacBook Air
- Having deleted the contents from your MacBook Air by accident.
- Malware has damaged the MacBook Air.
- Deleted Items in Mac's Trash.
- Physical damage to a MacBook Air might render it inoperable, making it difficult to access stored information.
- Disruptions to the data transfer process will lead to lost information.
- The hard drive has been erased by Disk Utility.
- Device is formatted or get Not Format error.
Recover Deleted Files on MacBook Air without Software
Without data recovery software, there is only one way to retrieve files that have been deleted from the Trash. To restore the deleted files, you must access a backup before the data is overwritten.
![MacBook Air Data Recovery]()
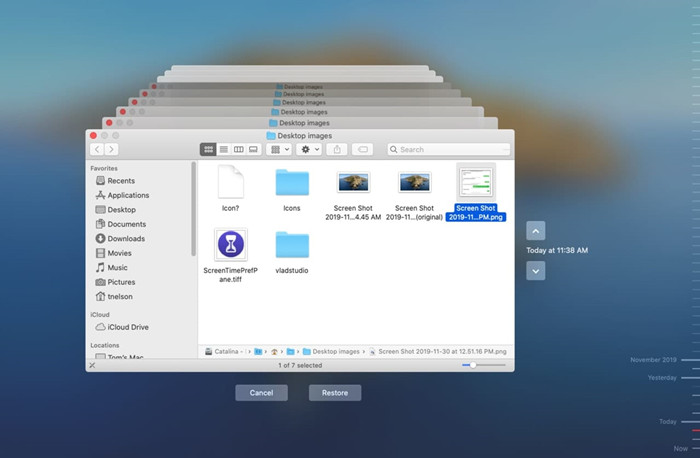
Time Machine, Apple's built-in backup service, is recommended for regular data saving. When you need to restore files that were deleted inadvertently, that's when backups truly shine. Using this method, you can retrieve deleted garbage on a MacBook Air without spending a dime.
Step 1: Open your Mac's Time Machine
By clicking the clock icon on MacBook Air's menu bar, you may access Time Machine. In addition to the Time Machine menu, the Terminal program can manage the program. Managing multiple computers and retrieving backup information from Time Machine is a breeze with Terminal.
Step 2: Locate the Required File
Time Machine document restorations necessitate the availability of the media used to make backups of your MacBook Air. If you have made backups with Time Machine, it's only natural to want to look through them.
Step 3: Find files in their original locations
Find any files that were accidentally deleted from a previous backup that was made before the deletion date.
Step 4: Choose the File to Recover
To restore the missing files to your hard disk when you've located them, select Recover. The Trash on your Mac can be sorted through, and your files salvaged in this manner.
![MacBook Air Data Recovery]()
Recover Data from Dead MacBook Air
You probably won't plan for the day that your perfectly functional MacBook Air dies on you. However, if you haven't backed up your data, or if you haven't backed it up completely, you could lose everything at any time.
Getting data off the hard drive appears to be the only option. When it comes to hard drive recovery on a MacBook Air, most consumers are prepared to turn to Apple.
Recover Lost Data from MacBook Air Using Recovery Software
Suppose you have lost data on a MacBook Air or storage device and do not have a backup. In that case, you will need to use software designed specifically for Mac data recovery to retrieve lost data.
If you're wondering how to recover deleted or lost files on your MacBook Air, Donemax Data Recovery for Mac is a fantastic data recovery application that provides a one-click solution. Given that it works with every popular file type and system, it can recover any files you could have accidentally deleted.
1. Download Donemax Data Recovery for Mac for Mac:
When attempting data recovery, avoiding accessing the storage device where the lost data was stored is best. The files you need to recover are likely to be located on a different drive or partition, so it makes sense to download and install Donemax Data Recovery for Mac there and install it on your MacBook Air.
Donemax Data Recovery for Mac
- Recover deleted and permanently lost files on MacBook Air.
- Unformat hard drive on MacBook Air.
- Recover inaccessible or corrupted data on MacBook Air.
2. Search for lost files:
Select the hard drive where you delete or lose your files, click on Scan button.
![Recover Lost Data on macOS Ventura]()
Give Donemax Data Recovery for Mac> time to scan your disk and find the missing files.
![Recover Lost Data on macOS Ventura]()
3. Preview the found files and recover them:
Look at the results list and pick the files you need to restore. You'll also have to designate a place for data retrieval. The data must be recovered to a different storage device from the one from which they were deleted to prevent overwriting of the originals.
When you select files, you can click the "Recover" option to bring them back to their original location.
![Recover Lost Data on macOS Ventura]()
Conclusion:
We wish you luck in your data recovery efforts and hope this information will be useful. It's essential always to take numerous backups of your data because data loss is inevitable. Do not fret if you have neglected to make a copy. Donemax Data Recovery for Mac is an efficient and potent instrument with an innovative scan engine that can recover files lost due to numerous complex data loss circumstances. Download it to completely recover lost data from MacBook Air.


