Written byLucienUpdated on Apr 06, 2025
HFS+ Data Recovery on Mac | Mac OS Extended Data Recovery on Mac
Approved byGerhard Chou
Before we start: If you want to recover lost data from a HFS+ drive on Mac, you can try Donemax Data Recovery for Mac. This Mac data recovery software can help Mac users easily and completely to recover deleted, formatted and lost data from a HFS+ drive on Mac.
PAGE CONTENT:
HFS+ (Hierarchical File System Plus) has been the primary file system for Mac computers for many years. While it has served users well, it is not immune to data loss. Accidental file deletion, disk corruption, or formatting errors can all lead to lost files and folders, making data recovery an essential skill for Mac users.
In this article, we will explore the HFS+ file system, the reasons behind data loss, and the different methods available for recovering lost data from a HFS+ (Mac OS Extended) drive on Mac. Whether you are an individual user or an IT professional, understanding these techniques will help you restore important files and prevent future data loss.
Understand HFS+ and Its Vulnerabilities
What is HFS+?
HFS+ (also known as Mac OS Extended) is a file system developed by Apple in 1998 to replace the older HFS file system. It introduced improvements such as support for larger file sizes, journaling, and better performance. Over the years, HFS+ became the default file system for Mac computers until the introduction of APFS (Apple File System) in macOS High Sierra (2017).
Common Issues with HFS+
Despite its improvements over HFS, HFS+ has several vulnerabilities that make data loss more likely. Some of the most common issues include:
- Fragmentation: Over time, HFS+ partitions can become fragmented, leading to slow performance and potential corruption.
- Journal Corruption: HFS+ uses a journaling system to track changes, but this can sometimes become corrupted, making data recovery difficult.
- Bad Sectors: Hard drives and SSDs using HFS+ can develop bad sectors, leading to unreadable files or complete partition failures.
Differences Between HFS+ and APFS
Since 2017, Apple has shifted towards APFS, a more modern file system designed for SSDs with features like snapshots, encryption, and improved speed. However, many Mac users still rely on HFS+ because they are using older macOS versions or external drives formatted in this system.
Common Causes of HFS+ Data Loss
Data loss on HFS+ file systems can occur for various reasons. Here are the most common causes:
1. Accidental File Deletion
- Files may be mistakenly deleted by the user.
- The Trash may be emptied before realizing a file is needed.
2. Disk Corruption and File System Errors
- Power failures during file transfers can lead to disk corruption.
- Sudden system crashes may leave the file system in an inconsistent state.
3. Formatting or Partition Loss
- A drive may be mistakenly formatted while installing macOS or partitioning.
- Accidental deletion of partitions can lead to total data loss.
4. macOS Upgrade Issues
- Some macOS updates (especially moving from HFS+ to APFS) can result in data loss.
- Incomplete installations or system crashes during an update can lead to corruption.
5. Physical Damage to Storage Devices
- Hard drives and SSDs can fail due to overheating, aging, or manufacturing defects.
- Water damage, drops, or power surges can result in an unreadable drive.
Best 3 Methods for HFS+ Data Recovery on Mac
There are several ways to recover lost data from an HFS+ formatted Mac. The best method depends on the cause of data loss and the tools available.
Method 1. Recover HFS+ Drive Using Built-in macOS Tools
Apple provides built-in recovery options that can help in certain data loss scenarios. While these tools may not always work for severe cases, they should be the first step in any recovery process.
1. Restoring from Time Machine
Time Machine is macOS's official backup tool, designed to create regular snapshots of your data. If you've been using Time Machine, restoring lost files is relatively straightforward.
When to Use This Method:
- If the lost files were previously backed up.
- If you deleted a file and need to restore it to an earlier state.
Steps to Restore Files from Time Machine:
- Connect Your Backup Drive – If Time Machine is set up on an external drive, connect it to your Mac.
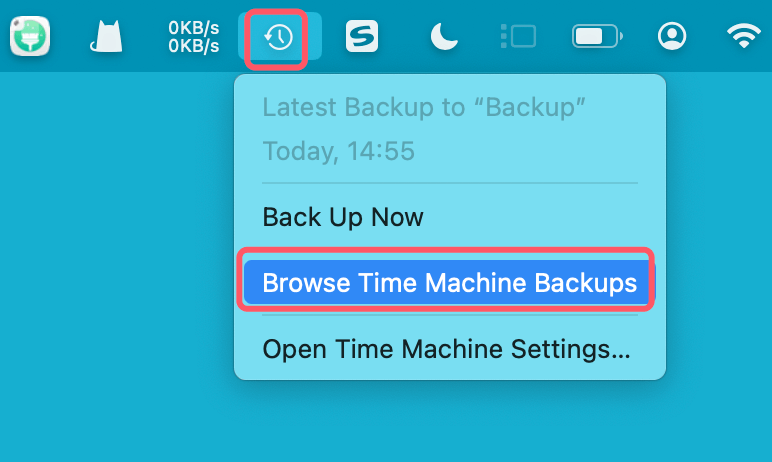
- Enter Time Machine – Choose "Enter Time Machine" or "Browse Time Machine Backups" after clicking on the Time Machine icon in the menu bar.
![Enter Time Machine]()
- Move Through Snapshots – Use the timeline on the right side to browse backups from different dates.
- Find the Lost File – Locate the missing file or folder in its original location.
- Click Restore – The original location of the file will be restored.
![Click Restore]()

Troubleshooting:
- If you can't find the file, check older snapshots by going further back in time.
- If Time Machine isn't set up, this method won't work. You'll need to use third-party software instead.
2. Repairing the Drive with Disk Utility
If an HFS+ drive is corrupted or not mounting, Disk Utility can attempt to fix it using the "First Aid" feature.
When to Use This Method:
- If your drive is showing errors when accessed.
- If files are missing due to corruption but the drive is still recognized.
Steps to Use Disk Utility First Aid:
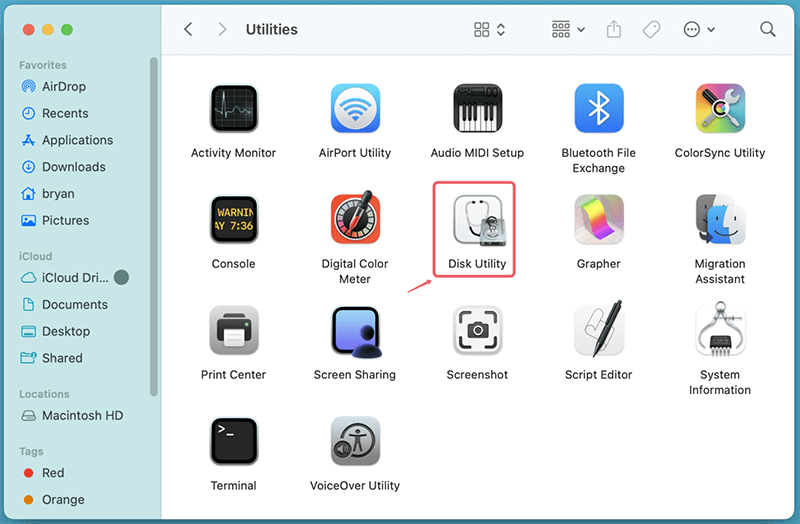
- Open Disk Utility – Go Disk Utility from Utilities via Applications.
![Open Disk Utility]()
- Select the Affected Drive – Click on the drive or partition that needs repair.
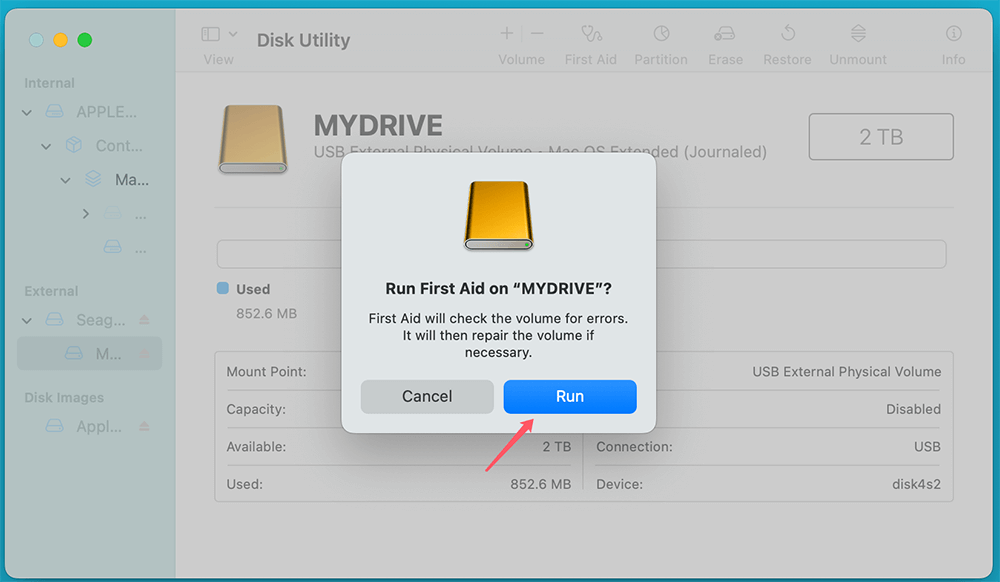
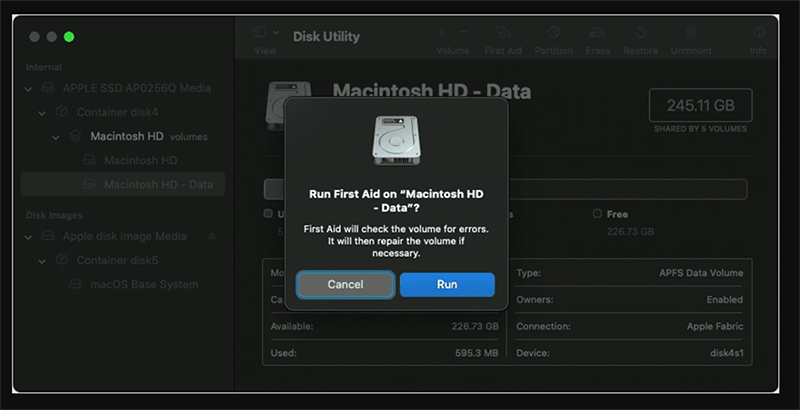
- Run First Aid – Click on "First Aid" and select "Run."
![Run First Aid]()
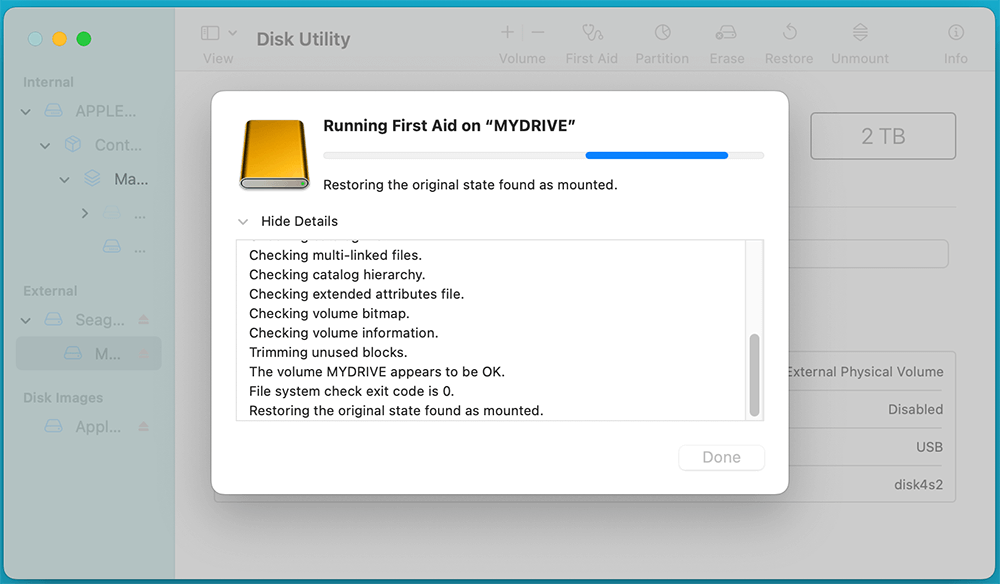
- Wait for the Scan to Complete – Disk Utility will check for errors and attempt repairs.
![Wait for the Scan to Complete]()
Troubleshooting:
If First Aid fails, try running it again in macOS Recovery Mode:
- Boot into macOS Recovery:
- For Intel-based Mac: Hold down Command + R after restarting your Mac until the Apple logo appears.
- For Apple silicon Mac: Shut down the Mac, then press and hold Power button until you see Loading startup options. Then select Options, click Continue.
- Open Disk Utility from the macOS Utilities window.
- Select your disk and run First Aid again.
![Select your disk and run First Aid again]()
If Disk Utility reports that the drive is unrepairable, consider using third-party software.
Method 2. Use Data Recovery Software to Recover HFS+ Drive on Mac
If macOS tools fail, third-party software can scan the HFS+ drive and recover lost data.
Best HFS+ Recovery Software:
- Donemax Data Recovery for Mac - Securely and completely recover deleted/formatted and lost data.
- Disk Drill – Offers deep scanning and easy recovery.
- EaseUS Data Recovery Wizard – Provides a user-friendly interface with high success rates.
- Stellar Data Recovery – Best for professional-grade recovery.
Steps to Recover Data Using Third-Party Software:
- Download and Install the Software – Choose a reliable tool and install it on a different drive (not the affected one).
- Select the Affected HFS+ Drive – Open the software and choose the drive or partition to scan.
- Run a Deep Scan – Some tools offer quick and deep scans. A deep scan takes longer but finds more lost files.
- Preview and Select Files – After scanning, preview recoverable files to ensure they are intact.
- Recover Files to a Safe Location – Save the recovered files to a different drive to prevent overwriting.
For example, you can use data recovery software - such as Donemax Data Recovery for Mac to securely and completely recover lost data from a HFS+ drive on Mac:
Step 1. Download and install Donemax Data Recovery for Mac.
Step 2. Open Donemax Data Recovery for Mac, select the HFS+ drive to start data recovery.

Step 3. Click on Scan button to deeply scan the HFS+ drive and find all recoverable files.

Step 4. Once the scan is completed, you can preview all recoverable files. Then select the wanted files, click on Recover button to save them.

Troubleshooting:
- If the tool doesn't detect your drive, check if macOS recognizes it under Disk Utility.
- Running multiple scans with different tools can improve recovery chances.
Method 3. Professional Data Recovery Services
If all software methods fail, professional services may be your last resort.
When to Seek Professional Help:
- If your drive is making clicking noises, which indicates mechanical failure.
- If the disk isn't recognized at all in Disk Utility or Terminal.
- If your data is extremely valuable and must be recovered at all costs.
How Data Recovery Services Work:
- Initial Diagnosis – The service provider evaluates the drive and gives an estimate.
- Data Extraction – Engineers use specialized tools to retrieve data from the damaged drive.
- Data Restoration – Once recovered, your files are returned on a new storage device.
Top Data Recovery Companies:
- DriveSavers – Known for recovering data from severe physical damage.
- Ontrack Data Recovery – Offers remote recovery services.
- Secure Data Recovery – Provides a no-recovery, no-charge policy.
By following the above methods, you have a high chance of recovering lost files from an HFS+ drive. Always remember to back up important data to avoid future recovery headaches!
Prevent HFS+ Data Loss in the Future
To avoid future data loss, follow these best practices:
- Regular Backups: Use Time Machine or cloud services like iCloud, Google Drive, or Dropbox.
- Disk Maintenance: Run First Aid in Disk Utility regularly.
- Avoid Overwriting Data: If data is lost, stop using the affected drive to prevent overwriting.
- Upgrade to APFS: If possible, transition to APFS for improved security and reliability.
Conclusion
Recovering lost data from an HFS+ drive on Mac is possible using macOS tools, third-party data recovery software, or professional recovery services. The best approach depends on the cause of data loss. However, prevention is always better than recovery - regular backups and proper disk maintenance can save you from future headaches.
By following this guide, you can maximize your chances of successfully restoring lost files and keeping your Mac storage safe and reliable.
FAQs About HFS+ Data Recovery on Mac
1. How to recover permanently deleted files from a HFS+ drive on Mac?
First of all, check if you recover the deleted files from trash bin or Time Machine backups. If can't, try to recover the deleted files by using data recovery software - such as Donemax Data Recovery for Mac.
- Download and install Donemax Data Recovery for Mac, open it.
- Select the HFS+ drive to start data recovery.
- Click on Scan button to deeply scan the HFS+ drive.
- Preview and recover files after scanning.
2. Is it possible to recover lost data after erasing a HFS+ drive?
Yes, you can use Donemax Data Recovery for Mac to deeply scan the HFS+ drive and recover all deleted/erased files.
3. How to repair a corrupted HFS+ drive on Mac?
Step 1. Use data recovery software - such as Donemax Data Recovery for Mac to recover files from the corrupted HFS+ drive.
Step 2. Open Disk Utility, select the HFS+ drive, click on First Aid > Run to repair the HFS+ drive.
4. What is the best HFS+ drive data recovery software for Mac?
Here is the list of top 5 HFS+ drive data recovery software for Mac:
- Donemax Data Recovery for Mac
- Disk Drill
- EaseUS Data Recovery for Mac
- Do Your Data Recovery for Mac
- Stellar Data Recovery for Mac
Donemax Data Recovery for Mac
Donemax Data Recovery for Mac is one of the best Mac data recovery software. It is easy-to-use and can help in recovering deleted, formatted, inaccessible or lost data from Mac HDD/SSD, external disk, USB drive, SD card, camera or other storage devices.
Related Articles
- Nov 19, 2024Full Guide: Recover Lost Data on macOS Catalina
- Jun 11, 2024Best Free Seagate Data Recovery Software for Mac
- Apr 03, 2025How to Recover Deleted Apps on Mac? [5 Methods]
- Jan 14, 2025How to Recover Lost Data from Fusion Drive on Mac?
- Jan 30, 2024Fixes for Uninitialized External Hard Drive on Mac
- Mar 03, 2024Recover Lost Data from Seagate Backup Plus Drive on Mac

Contributing Writer
Lucien
Lucien is a writer and a chief programmer of Donemax software who has worked in the company for 5+ years. He has written much of the content on the site and devotes to providing troubleshooting and solution for Windows and Mac users including disk cloning, data recovery, migration, eraser, error fixes.

Editor in chief
Gerhard Chou
In order to effectively solve the problems for our customers, every article and troubleshooting solution published on our website has been strictly tested and practiced. Our editors love researching and using computers and testing software, and are willing to help computer users with their problems