Before we start: Donemax Data Recovery for Mac is a powerful Mac data recovery program. It can help you recover permanently deleted files on Mac, recover deleted items which are not in trash.
PAGE CONTENT:
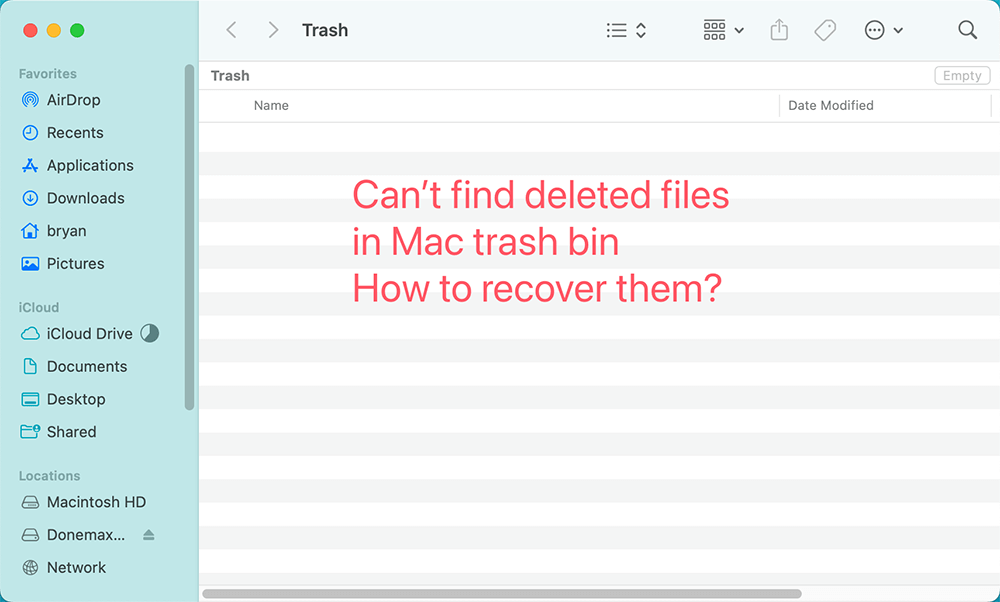
One of the biggest advantages of macOS is its user-friendly design, making tasks like deleting files simple and quick. However, a problem arises when deleted files don't show up in the Trash. You expected them to be there, safely waiting for retrieval, only to find that the Trash is empty. This situation can lead to panic, especially if the files are important or irreplaceable. Fortunately, not all hope is lost when this happens. There are multiple ways to recover deleted files, even if they're not visible in the Trash.

In this article, we'll explore the common reasons why deleted files might not appear in the Trash and present a variety of solutions, including file recovery methods using Mac's built-in tools, third-party recovery software, and professional data recovery services. Additionally, we’ll cover how to prevent this problem from happening again by implementing a robust backup strategy.
Let's dive into the details!
Why Deleted Files May Not Appear in Trash?
When files go missing from the Trash, there are several possible explanations. Understanding these scenarios is crucial for selecting the most appropriate recovery method. Below are the main reasons why deleted files may not appear in the Trash:
- Permanent Deletion
- If you accidentally delete files using Command + Option + Delete, these files bypass the Trash completely. Permanent deletion can also happen if you're using certain third-party apps that bypass macOS's standard deletion process.
![Permanent Deletion]()
- If you accidentally delete files using Command + Option + Delete, these files bypass the Trash completely. Permanent deletion can also happen if you're using certain third-party apps that bypass macOS's standard deletion process.
- Large File Sizes
- Files that are too large for the Trash may be permanently deleted instead. macOS has size limits for files that can be stored in the Trash, and once a file exceeds that limit, it's deleted without passing through the Trash.
- Automatic Emptying of Trash
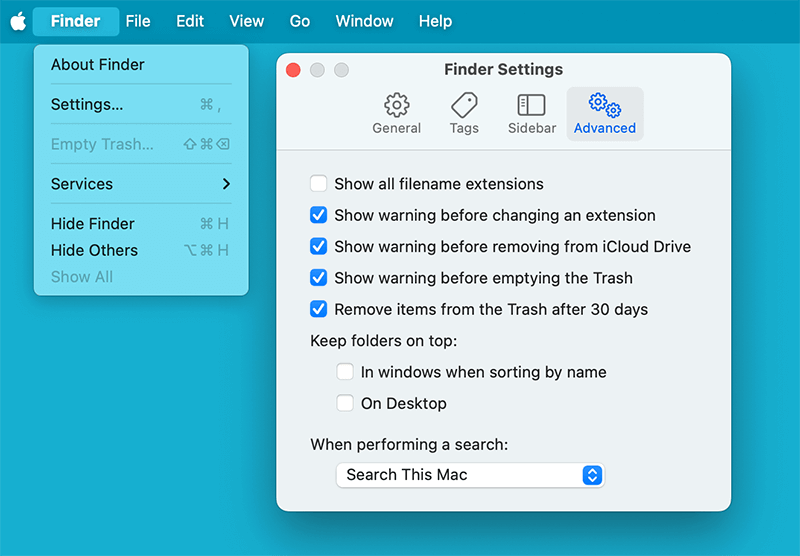
- In some cases, the Trash may be configured to automatically empty after 30 days or at specific intervals. If you haven’t checked your Trash recently, the files may have been permanently deleted according to these settings.
- File System Errors or Corruption
- Occasionally, file system errors can cause deleted files to disappear without reaching the Trash. Problems with the APFS (Apple File System) or HFS+ (Hierarchical File System) might result in lost files that never enter the Trash. In such cases, manual recovery efforts might be necessary.
- Emptied Trash
- You may have emptied the Trash either manually or automatically without realizing it, causing files to be permanently removed. If this is the case, traditional methods of retrieving files from the Trash will no longer work.
Once you identify why the files are missing from the Trash, you can take the appropriate recovery steps, which are outlined in the following sections.
Immediate Actions to Take If You Want to Recover the Deleted Files
Before you start any file recovery process, it's critical to follow some important guidelines to increase the chances of successful recovery.
- Stop Using the Affected Drive
When files are deleted, they are not immediately removed from your Mac's storage. Instead, macOS marks the space as free and available for new data. Therefore, it's important to stop using the drive where the files were deleted to avoid overwriting the space previously occupied by those files.
- Avoid Restarting the Mac
Restarting your Mac could trigger background processes that write new data onto the disk, which could reduce the likelihood of successfully recovering your deleted files.
By following these steps, you give yourself the best chance of recovering your deleted files.
👍Methods to Recover Deleted Files If Can't Find Them in Mac Trash
Method 1. Recover Deleted Files from Backup
One of the easiest ways to recover missing files is by restoring them from a backup. Mac users have access to a couple of built-in tools, such as Time Machine and iCloud, which can make the recovery process much simpler if these services have been previously configured.
Using Time Machine Backup
Time Machine is Apple's built-in backup solution, and it's one of the most reliable tools for restoring deleted files. If you’ve enabled Time Machine on your Mac, you can easily recover files that have been deleted from the Trash. Here's how:
- Connect Your Time Machine Drive: Plug in the external drive where your Time Machine backups are stored.
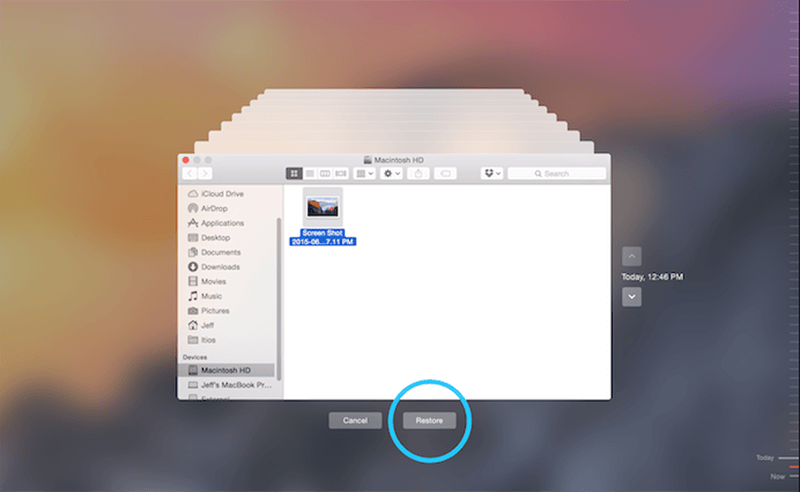
- Open the Time Machine Interface: Go to the folder where your deleted file was originally stored. Then click on the Time Machine icon in the menu bar and choose Browse Time Machine Backups.
- Find the Deleted File: Use the timeline on the right side of the screen to go back to a time before the file was deleted. Browse through the available backups to locate your missing file.
- Restore the File: Once you've found the file, select it and click Restore. The file will be returned to its original location.
![Using Time Machine Backup]()
Using iCloud Backup
iCloud Drive offers another way to restore files if you've been using it for cloud storage. Here's how to recover deleted files via iCloud:
- Open iCloud on a Web Browser: Go to iCloud.com and log in with your Apple ID.
- Access the Recently Deleted Folder: Once logged in, go to iCloud Drive and click on the Recently Deleted folder. This folder contains files that were deleted from iCloud Drive in the last 30 days.
- Restore the Files: Click Restore after selecting the files you wish to recover. The files will be returned to their original iCloud Drive locations, and they'll also sync back to your Mac.
Method 2. Use Mac Data Recovery Software
If you haven't set up Time Machine or iCloud, you still have a good chance of recovering your files using third-party data recovery software. These programs can scan your Mac's storage and retrieve files that haven't been overwritten.
Donemax Data Recovery for Mac is a powerful Mac data recovery program. It can help you recover permanently deleted and erased files from Mac's internal drive or external device.
Step 1. Download and install Donemax Data Recovery for Mac on your Mac, open it from Launchpad.
Step 2. Open Donemax Data Recovery for Mac, select the drive where you delete the files.

Step 3. Click on Scan button to deeply scan the drive and find all lost files.

Step 4. Once the scan is completed, you can preview all recoverable files. Then select the wanted files, click on Recover button to save them.

Method 3. Professional Data Recovery Services
If none of the above methods work or you're dealing with a highly sensitive or irreplaceable file, you may need to consider professional data recovery services. These services have specialized equipment and software that can retrieve data from even the most damaged drives.
When to Consider Professional Help:
- When the drive is physically damaged.
- When multiple recovery attempts have failed.
- When dealing with highly valuable or sensitive data.
What to Expect from Professional Services:
- Evaluation Process
- The service will evaluate your drive and give you a quote based on the complexity of the recovery.
- Pricing
- Professional recovery can be expensive, with prices ranging from $300 to over $1,000, depending on the situation.
- Recovery Time
- Recovery may take anywhere from a few days to a few weeks, depending on the extent of the damage.
Preventive Tips for the Future
Once you've successfully recovered your deleted files, it's worth taking steps to prevent this from happening again. Below are some preventive measures you can adopt:
- Set Up Regular Time Machine Backups: Regular backups are one of the best ways to protect your data. Set up Time Machine to automatically back up your files at regular intervals.
- Use iCloud or Other Cloud Services: Storing important files in the cloud can give you an extra layer of protection. Services like iCloud, Google Drive, and Dropbox can automatically sync your files and allow for easy recovery.
- Enable Warnings Before Emptying Trash: Go to Finder > Settings > Advanced and enable the option to warn you before emptying the Trash. This will help prevent accidental permanent deletions.
![Enable Warnings Before Emptying Trash]()
- Regularly Monitor Storage Space: Keep an eye on your storage and avoid filling your hard drive to its capacity, as this can lead to file corruption and loss.
Conclusion
Losing important files from your Mac can be a stressful experience, but with the right recovery methods, you can often retrieve those missing files even if they don't show up in the Trash. From using Time Machine or iCloud backups to running third-party data recovery software or seeking professional help, there's a solution for almost every situation. The key is to act quickly, avoid overwriting the lost data, and implement a solid backup strategy going forward to prevent future loss.
By understanding why files may not appear in the Trash and how to recover them, you'll be well-equipped to handle any future file deletion mishaps on your Mac.


Donemax Data Recovery for Mac
Donemax Data Recovery for Mac is one of the best Mac data recovery software. It is easy-to-use and can help in recovering deleted, formatted, inaccessible or lost data from Mac HDD/SSD, external disk, USB drive, SD card, camera or other storage devices.
Related Articles
- Feb 17, 2025Recover Lost Data from XQD Card on Mac: A Complete Guide
- Feb 22, 2024How to Recover Lost Data from External Hard Drive, USB Drive, SD Card on macOS Sonoma?
- Jun 06, 2023Top 6 Best Recuva Alternatives for Mac in 2025
- Nov 01, 2024Best 5 Mac Data Recovery Software: Recover Lost Files Quickly and Safely
- Jan 21, 2025How to Recover Data From FileVault Hard Drive on Mac?
- Nov 18, 20247 Methods to Undo Deleting Files on Mac

Lucien
Lucien is a writer and a chief programmer of Donemax software who has worked in the company for 5+ years. He has written much of the content on the site and devotes to providing troubleshooting and solution for Windows and Mac users including disk cloning, data recovery, migration, eraser, error fixes.

Gerhard Chou
In order to effectively solve the problems for our customers, every article and troubleshooting solution published on our website has been strictly tested and practiced. Our editors love researching and using computers and testing software, and are willing to help computer users with their problems


