Written byMariaUpdated on Mar 03, 2025
How to Wipe a USB Flash Drive on Mac: A Comprehensive Guide
Approved byGerhard Chou
Before we start: Donemax Data Eraser for Mac is one of the best disk wipe software for macOS. It can help you securely wipe a USB flash drive on your Mac and permanently erase all data from the USB flash drive, making data recovery be impossible.
PAGE CONTENT:
Wiping a USB flash drive is an essential step when repurposing, selling, or securely disposing of your storage device. Unlike simply deleting files, a proper wipe ensures that data is unrecoverable, protecting sensitive information from unauthorized access. Whether you're troubleshooting a corrupt USB drive, preparing it for a fresh installation, or securely erasing personal data, macOS provides several methods to achieve this.
This guide covers everything you need to know about wiping a USB flash drive on a Mac, including basic formatting, secure deletion, and advanced Terminal commands, powerful disk wipe tool. By the end of this article, you'll be able to choose the best method for your needs and ensure your data is permanently erased.
Understand the Difference: Erase vs. Secure Wipe
Before diving into the wiping process, it's crucial to understand the difference between simply erasing a USB drive and securely wiping it.
▪️ Basic Erase (Formatting)
When you format a USB drive using macOS's Disk Utility, the operating system removes the file system references, making the data appear deleted. However, the actual data still exists on the drive until it is overwritten by new information. This means that deleted files can be recovered using data recovery tools.
Check how to recover lost data from a drive which is erased by Disk Utility >>
▪️ Secure Wipe (Irrecoverable Deletion)
A secure wipe overwrites the existing data with random information, making it impossible to retrieve the original files. macOS allows users to perform secure wipes through Disk Utility or Terminal. This is especially important when handling sensitive information, such as financial records, business documents, or personal data.
▪️ When to Use Each Method
- Basic erase: When reformatting a USB drive for reuse within a trusted environment.
- Secure wipe: When disposing of or selling a USB drive, or when dealing with confidential data.
Top 3 Methods to Wipe a USB Flash Drive on Mac
Now that we understand the importance of securely erasing data, let's explore different ways to wipe a USB flash drive on a Mac.
Method 1. Erase the USB Flash Drive on Mac with Disk Utility
Disk Utility is the easiest way to erase a USB flash drive on macOS. Follow these steps to format your USB drive:
Steps to Erase a USB Drive in Disk Utility:
Step 1. Insert the USB Flash Drive into your Mac's USB port.
Step 2. Open Disk Utility:
- Press Command + Space and type Disk Utility, then hit Enter.
- Alternatively, go to Applications > Utilities > Disk Utility.
Step 3. Select the USB Drive from the left panel. Ensure you choose the correct device to avoid wiping the wrong drive.
Step 4. Click Erase at the top of the window.
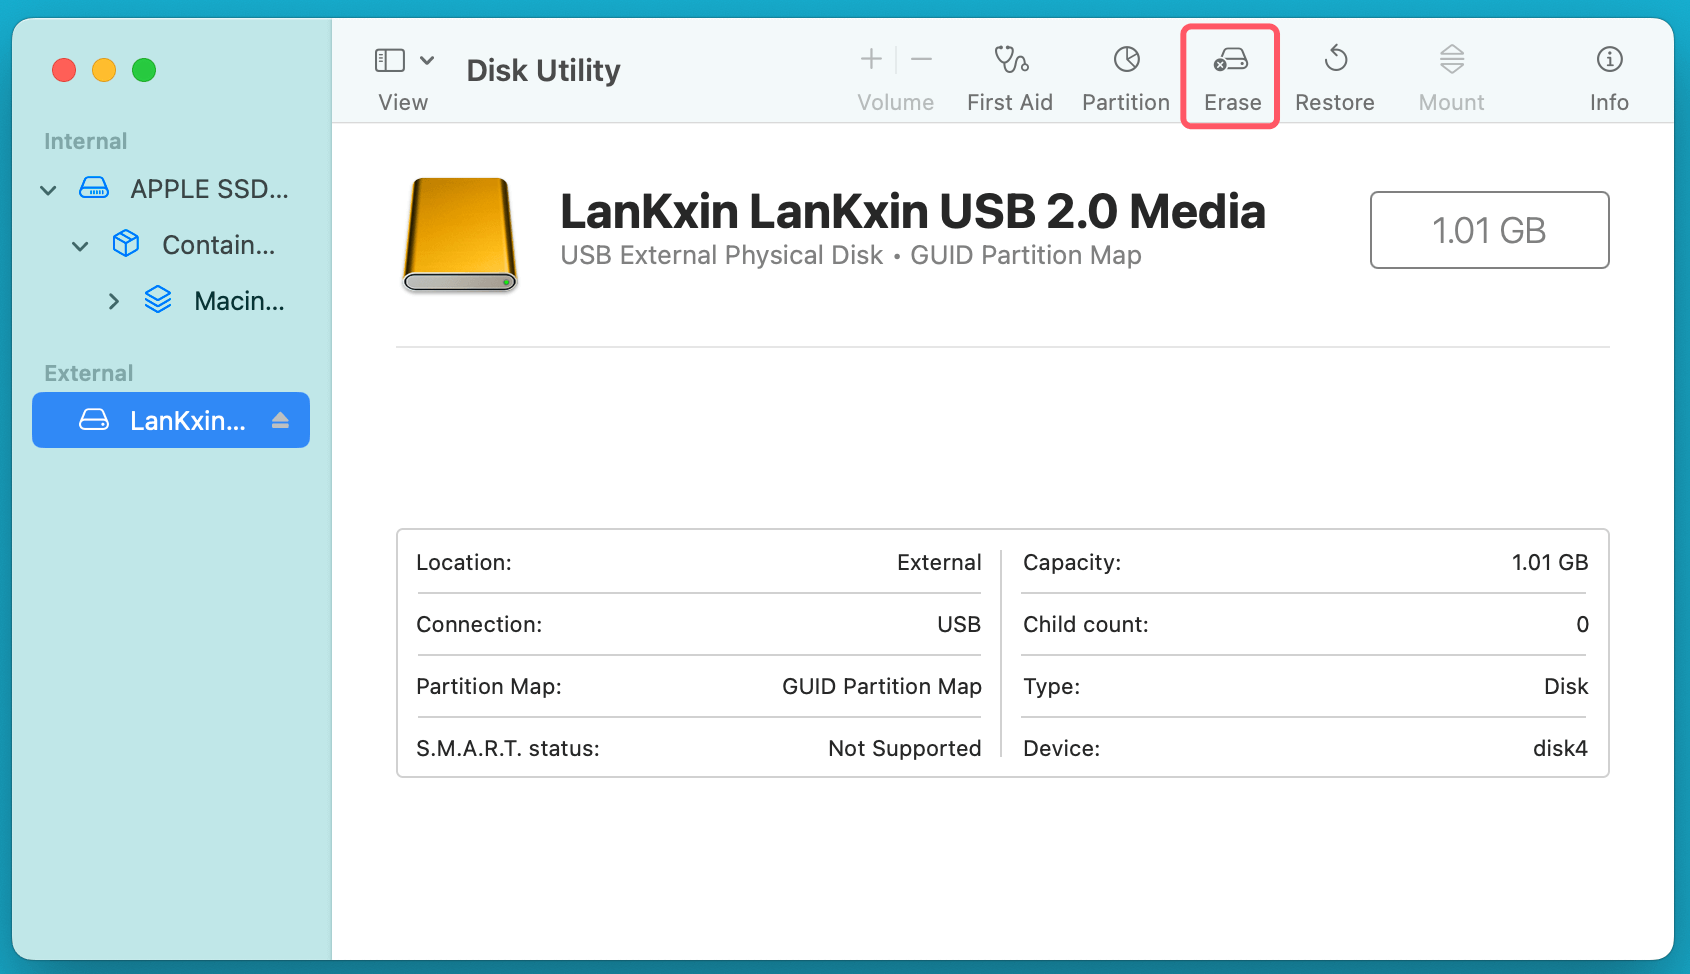
Step 5. Choose a Format:
- APFS (for modern macOS users with SSDs).
- Mac OS Extended (Journaled) (for older macOS compatibility).
- ExFAT (for compatibility with Windows and macOS).
- FAT32 (for maximum compatibility but with a 4GB file size limit).

Step 6. Enter a Name for the USB drive.
Step 7. Click Erase and wait for the process to complete. When it gets finished, click Done.

This method erases the drive, but data can still be recovered. For a secure wipe, proceed to the next section.
Securely Wiping the USB Flash Drive with Disk Utility:
macOS offers a built-in method to securely erase USB flash drives by overwriting data.
Steps to Securely Erase a USB Drive in Disk Utility:
Step 1. Follow Steps 1–4 from the Basic Erase Method above.
Step 2. Click Erase, then select Security Options (only available for external USB storage drives).

Step 3. Choose a security level:
- Fastest: Only removes file references (data remains recoverable).
- 1-pass overwrite: Writes zeros across the entire drive (better security).
- 3-pass overwrite: Writes random data three times (recommended for personal data).
- 7-pass overwrite: Overwrites data seven times (best for highly sensitive information).

Step 4. Click Erase and wait for the process to finish.

A 3-pass or 7-pass overwrite ensures that your data is nearly impossible to recover.
Method 2. Erase the USB Flash Drive on Mac Using Terminal (Advanced Users)
For those who prefer command-line tools, Terminal offers a powerful way to wipe a USB drive.
Step 1: Identify the USB Drive
- Open Terminal (Command + Space, type Terminal, press Enter).
- Type the following command to list all drives:
diskutil list
![wiping a USB flash drive on a Mac]()
- Identify the USB flash drive (e.g., /dev/disk4).

Step 2: Erase the Drive
Use the following command to format the drive to ExFAT:
diskutil eraseDisk ExFAT "USBDriveName" /dev/disk4
Replace "USBDriveName" with your preferred name and /dev/disk4 with the correct disk identifier.

Step 3: Securely Wipe the Drive
To securely erase data, use:
diskutil secureErase 2 /dev/disk4

The number (2 in this case) represents the security level:
- 0 – Fastest (not secure, removes file references only).
- 1 – Single-pass overwrite with zeros.
- 2 – 3-pass overwrite with random data (DoD standard).
- 3 – 7-pass overwrite (NSA standard).
- 4 – 35-pass overwrite (Gutmann method, extreme security).
A 3-pass (2) or 7-pass (3) method is usually sufficient.
Method 3. Wipe the USB Flash Drive on Mac with Donemax Data Eraser
Some of the files which are erased by Disk Utility or Terminal are still recoverable. If you are going to sell, donate or dispose of your old USB flash drive, you'd better permanently erase all data (existing data and deleted/formatted/lost data included) from the drive, ensure no file is recoverable, no trace left.
Third-party disk wipe software - such as Donemax Data Eraser for Mac can help in securely and completely wipe the USB flash drive on your Mac. It offers certified data erasure standards including DoD 5220.22-M, NIST 800-88, U.S. Army AR380-19 to securely and permanently erase any data from the USB flash drive.
Step 1. Download and install Donemax Data Eraser for Mac on your Mac and insert the USB flash drive into your Mac or connect the USB flash drive to your Mac via USB hub.
Step 2. Open Donemax Data Eraser for Mac, choose Erase Hard Drive mode. Then select the USB flash drive, click on Erase Now button.

Step 3. Select a data erasure standard, then completely wipe the USB flash drive. It will permanently erase all existing data, hidden data, deleted/formatted/lost data from the USB flash drive, no trace left.

Once the process gets finished, all data stored on the USB flash drive is lost for good, cannot be recovered by any method.
How to Verify That the Data Stored on the USB Flash Drive Is Lost Forever?
Once you've wiped your USB flash drive, it‘s crucial to verify that the data is truly gone. Simply formatting or erasing a drive doesn’t necessarily mean the data is unrecoverable, as recovery software can sometimes retrieve deleted files unless they have been securely overwritten. Below are the steps and methods to confirm that your wipe was successful.
1. Check with macOS Finder
After wiping your USB drive, start with a basic check in Finder:
- Reconnect the USB Drive: Remove and reinsert the drive into your Mac.
- Check for Leftover Files:
- Open Finder and navigate to the USB drive.
- Make sure the drive is completely empty.
- Check Storage Information:
- Right-click on the drive and select Get Info.
![wiping a USB flash drive on a Mac]()
- The Available space should be equal to the total storage capacity of the drive.
![wiping a USB flash drive on a Mac]()
- If space is missing, hidden files or incomplete formatting might be the issue.
- Right-click on the drive and select Get Info.


💡 Tip: Press Command + Shift + . (dot) in Finder to reveal hidden files and ensure there‘s nothing left on the drive. Or use third-party software such as DMmenu for Mac to quickly unhide files on the USB flash drive.
2. Use Terminal to Confirm Data Removal
For a more technical verification, you can use Terminal to check if files remain on the drive.
Check for Files on the USB Drive:
- Open Terminal (Command + Space, type Terminal, press Enter).
- Type the following command to list all files (including hidden ones) on the USB drive:
ls -la /Volumes/USBDriveName
Replace "USBDriveName" with the actual name of your USB drive.
![wiping a USB flash drive on a Mac]()
- If the output only shows . and .., then the drive is empty.

Check Storage Usage:
You can also confirm that the drive has no residual data using:
df -h

This command displays the disk usage of all connected drives. Locate your USB drive in the list and check that it is using 0% of storage.
3. Use Third-Party Recovery Tools
Even after a wipe, remnants of data may still exist. To confirm that your data is completely gone, try using data recovery software. These tools scan storage devices for recoverable files and can help verify that your wipe was effective.
Recommended Data Recovery Tools:
- TestDisk (Free, Open Source)
- A powerful command-line tool that can scan for recoverable partitions and files.
- Download from: https://www.cgsecurity.org/wiki/TestDisk
- After running a scan, if no files are found, your wipe was successful.
- Donemax Data Recovery for Mac (Best for Mac Users)
- Offers a graphical interface for scanning drives.
- If EaseUS cannot recover anything, your data is likely erased.
- Disk Drill (Freemium, Advanced Features)
- Provides deep scan capabilities to find lost files.
How to Perform a Recovery Scan:
- Install and open the recovery tool.
- Select your USB flash drive as the target device.
- Run a deep scan.
- If no files appear after scanning, your wipe was successful.
💡 Pro Tip: If you still see recoverable files, perform another secure erase using the 3-pass or 7-pass method described earlier.
4. Test with Overwrite Data
A foolproof way to ensure your old data is completely erased is to overwrite the entire USB drive with new data. This method involves filling the drive with random files and then deleting them.
Steps to Overwrite the USB Drive:
- Copy large, non-sensitive files (such as videos or dummy files) onto the USB drive until it is full.
- Delete all the files and empty the Trash.
- Perform another basic format using Disk Utility.
This ensures that even if recovery tools try to scan the drive, they will only find the new, meaningless data rather than your old files.
FAQs About Wiping a USB Flash Drive on Mac
1. How to securely erase a USB flash drive with Disk Utility?
Disk Utility is a built-in took for disk erasure. It an help you securely erase a USB flash drive with Security Options:
- Go to Applications > Utilities > Disk Utility, open Disk Utility.
- Select the USB flash drive, click Erase.
- Click Security Options, then select the erasure method.
- Click Erase again to erase the USB flash drive.
2. How to completely wipe a USB flash drive on Mac?
To completely erase all data from the USB flash drive, you can use disk wipe software - such as Donemax Data Eraser for Mac to wipe the USB flash drive.
- Download and install Donemax Data Eraser for Mac, open it.
- Choose Erase Hard Drive mode, select the USB flash drive.
- Click on Erase Now button to securely wipe the USB flash drive.
3. What is the best USB disk wipe software for macOS?
Here is the list of top 5 USB disk wipe software for macOS:
- Donemax Data Eraser for Mac
- DoYourData Super Eraser for Mac
- AweEraser for Mac
- BitEraser for Mac
- ShredIt for Mac
4. Is it possible to recover data after wiping the USB flash drive?
No, if the data is wiped by Donemax Data Eraser for Mac, the data is lost for good, can't be recovered by any data recovery method.
Conclusion
Wiping a USB flash drive on a Mac is a straightforward process, but choosing the right method depends on your needs.
- Use basic formatting for quick erasure and use Disk Utility's secure erase for personal or sensitive data.
- Use Terminal's secureErase command for military-grade data destruction.
- Use third-party disk wipe software (Donemax Data Eraser for Mac) for 100% permanent erasure.
By following these steps, you can ensure your data is permanently removed and prevent unauthorized access. Always double-check your selections before wiping a drive to avoid accidental data loss.
💡 Final Tip: If you frequently work with sensitive data, consider using encrypted USB drives or macOS's built-in FileVault for extra security.
Donemax Data Eraser for Mac
100% safe and powerful Mac data erasure program. It offers certified data erasure standards including U.S. Army AR380-19, DoD 5220.22-M ECE to help in securely and permanently erase data from Mac HDD/SSD and external storage device, making data recovery be impossible.
Related Articles
- May 24, 2024Top 7 Best Disk Wiping Software For Mac
- Nov 13, 2023How to Permanently Erase Data from Mac Startup Disk?
- Nov 26, 2024Factory Reset macOS Sonoma: A Comprehensive Guide
- Apr 08, 2024How to Wipe Everything on MacBook Air with Apple Silicon Chip?
- Mar 11, 2025Wipe All Data Before Selling a Mac Which Is Running OS X 10.11 El Capitan
- Nov 27, 2024Factory Reset macOS 13 Ventura: A Comprehensive Guide

Contributing Writer
Maria
Maria is one of the senior writers & editors of Donemax who lives and works in Sydney, Australia. She loves PC, Mac and Internet Technology. She has 6 years of writing articles about data recovery on PC/Mac, disk cloning solution, data eraser and computer OS optimization, etc. She is also interested in testing various software and digital products.

Editor in chief
Gerhard Chou
In order to effectively solve the problems for our customers, every article and troubleshooting solution published on our website has been strictly tested and practiced. Our editors love researching and using computers and testing software, and are willing to help computer users with their problems