Hi, I will sell my M3 chip MacBook Air. Is there any way to factory reset it and delete everything?
PAGE CONTENT:
Welcome to the world of Apple Silicon's MacBook Air, where cutting-edge technology meets ease of use. Our step-by-step guide will simplify the process if you want to erase everything from your Apple silicon MacBook Air. Since Apple switched to processors that were custom-made for the company, speed and efficiency have gotten a lot better.
If you want to fix problems, sell your Mac, or give it to someone else, you must know how the process works. This easy-to-understand guide will show you how to delete all the data on your MacBook Air with Apple Silicon, giving you the skills to complete this important job confidently. Let's begin this journey to wipe all data from your MacBook Air with Apple silicon chip.
![]()
Before Erasing Everything from the Apple Silicon MacBook Air:
Before you erase everything from the Apple silicon MacBook Air, you should make a backup of your important data. You can use Time Machine to back up the MacBook Air or use a disk cloning app to clone everything from it to an external hard drive.
For example, you can use Donemax Disk Clone for Mac to create a full bootable clone backup for your Apple silicon MacBook Air:
Step 1. Download and install Donemax Disk Clone for Mac on your MacBook Air, then connect an external hard drive to the MacBook Air.
Step 2. Open Donemax Disk Clone for Mac, then choose OS Clone mode. Select the external hard drive as the destination drive.

Step 3. Click on Clone Now button to securely and completely clone everything from the MacBook Air to the external hard drive, creating a full bootable clone.

Steps to Wipe Everything from Your Apple Silicon MacBook Air
![]()
To avoid losing everything on your MacBook Air, you should ensure that all your essential data is backed up safely. Apple offers its customers a service called Time Machine, which is an effective backup solution. Install a backup using Time Machine and connect an external drive to your computer to ensure your data, apps, and settings will be saved. Then, follow the steps below to erase everything from the Apple silicon MacBook Air:
#1 Open Erase All Content and Settings
Step 1. Click Apple menu and choose System Settings, then go to General > Transfer and Reset.
![]()
Step 2. Find Erase All Content and Settings, click it to open Erase Assistant.
![]()
#2 Erase All Data from the Apple Silicon MacBook Air
When erase assistant opens, click on Continue button.
![]()
Then click on Erase All Content & Settings button to start erasing.
![]()
Then follow the onscreen instructions to erase everything from your Apple silicon Mac.
You also can use Disk Utility to erase all data from your MacBook Air with Apple silicon:
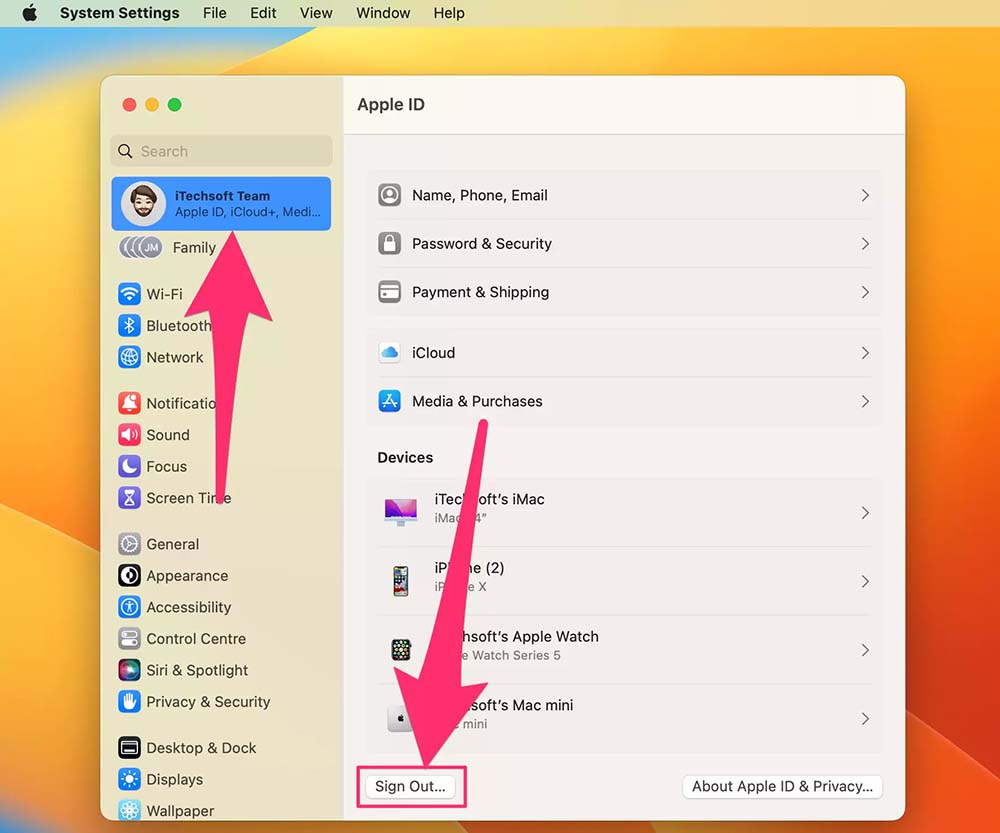
Step 1. Sign Out of iCloud.
Signing out of iCloud is the first step in disconnecting your MacBook Air from your Apple ID. You may access your Apple ID by going to "Apple menu > System Settings > Apple ID" and click Apple ID, scroll down. Choose "Sign Out" and then follow the instructions on the screen. After the wipe, your Apple ID will no longer be associated with the device because of this action.
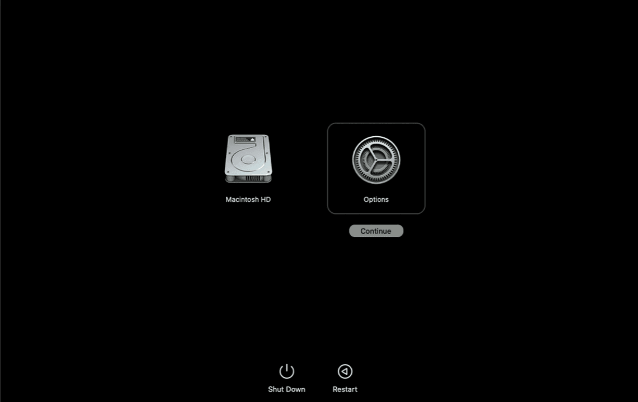
Step 2. Restart in macOS Recovery.
Maintaining pressure on the Power button when restarting your MacBook Air will allow you to view the available startup options. To proceed, select "Options" and then "Continue." It will cause your MacBook Air to boot into macOS Recovery, giving you access to various applications, including Disk Utility.
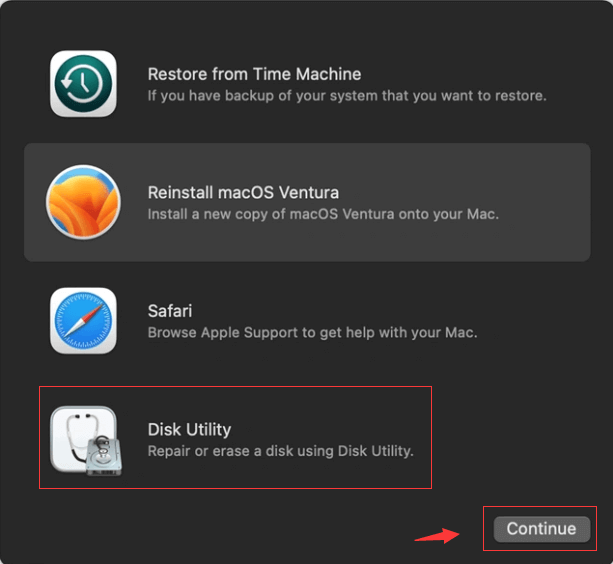
Step 3. Open Disk Utility.
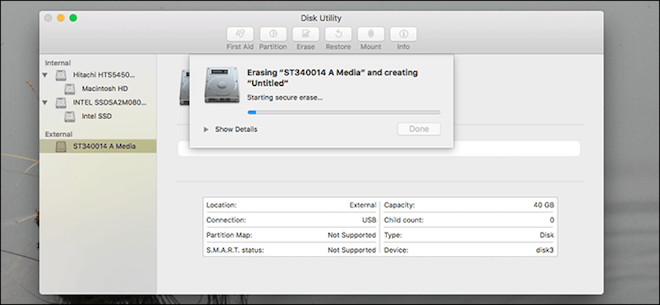
Select "Disk Utility" once you are in the macOS Recovery interface, and then click "Continue." A list of the drives that are available to you will be displayed in Disk Utility. Select the internal drive of your Mac, which is typically referred to as the Macintosh HD, and then click on the "Erase" button located in the toolbar.
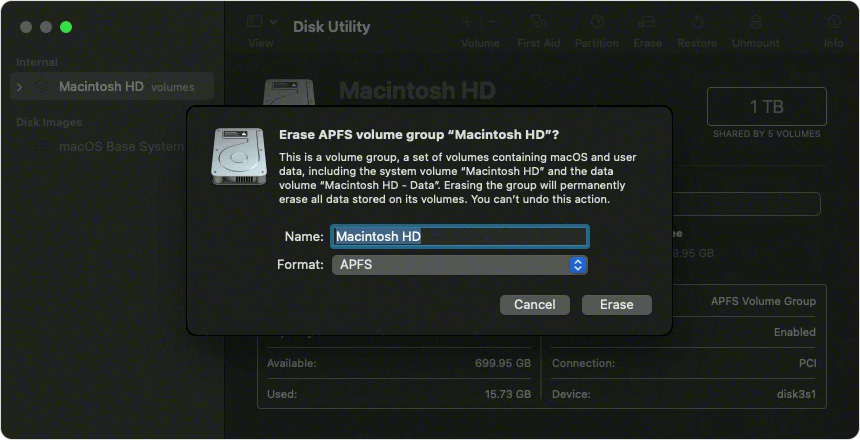
Step 4. Choose File System and Format.
Make your selection for the file system format within the erase dialog. You should select "APFS" (Apple File System) for optimal compatibility. You can also select the scheme known as "GUID Partition Map." After you have made your selections, you can start the formatting process by clicking the "Erase" button. This action deletes all of the data on the specified drive irreversible.
Step 5. Exit Disk Utility.
When you finish the erasing procedure, you should close Disk Utility so that you may return to the main screen of macOS Recovery. To reinstall a new copy of the operating system on your drive, which is now empty, pick "Reinstall macOS" from the menu that appears.
Step 6. Reinstall macOS.
To reinstall macOS, follow the instructions that appear on the screen. This technique will update your MacBook Air to the latest macOS version by downloading and installing it online. To ensure everything works well, connect your device to a stable Wi-Fi network before installing anything.
Note: The lost data which is erased by Disk Utility is not lost for good and it still can be recovered by Mac data recovery software.
Recover Lost Data from Erased Mac Disk
Donemax Data Recovery for Mac can help you recover lost data from a hard drive with is erased by Disk Utility.
If you will reuse the MacBook Air, just do more two steps:
Set Up Your MacBook Air:
After macOS installation, the setup assistant will show you the ropes during the first setup and give you the rundown. There will be a prompt to create an account when you choose your language and region. After a full wipe, this account will have administrative privileges on your MacBook Air.
Restore from Time Machine Backup:
After completing the first step, which involved creating a backup using Time Machine, you can restore your data, programs, and settings. Transferring your data back to your MacBook Air can be accomplished by following the on-screen instructions after choosing the "Restore from Time Machine Backup" option during setup.
Permanently Erase Data from Apple Silicon MacBook Air
If you will sell, donate or dispose of your MacBook Air, you should permanently wipe all sensitive data to avoid potential data recovery. After erasing the startup disk, just use a data erasure tool to wipe free disk space of the disk, permanently erasing all deleted/lost data.
Step 1. Download and install Donemax Data Eraser for Mac, then run it from Launchpad.
Step 2. Choose Erase Free Space mode, select the MacBook Air’s startup disk, click on Erase Now button. It will wipe free disk space of the disk and erase all deleted/lost data permanently.

Once the process gets finished, all deleted/lost data stored on the MacBook Air is gone for good, can not be recovered by any method.
Conclusion:
If you follow these steps, wiping everything on your MacBook Air with Apple Silicon is easy. You can use this guide to ensure your MacBook Air is clean and ready for the next step, whether getting it ready to sell, fixing problems, or just starting over. To ensure you don't lose any important data, always back up your data and be careful during this process.
Donemax Data Eraser for Mac is a powerful data erasure program. It offers powerful erasure standards including Peter Gutmann, U.S. Army AR380-19, DoD 5220.22-M ECE and more to help you securely and permanently erase data from a MacBook Air with Apple silicon. This erasure tool offers flexible data erasure modes, including erasing files, wiping hard drive, erasing free disk space, etc.
Related Articles
- Oct 20, 2025Mac Data Eraser for Seagate Backup Plus
- May 27, 2024How to Wipe All Data Before Selling or Donating iMac?
- Jul 15, 2025Best 3 Methods to Wipe HFS+ Drive on Mac: A Complete Step-by-Step Guide
- Oct 14, 2025Best Data Erasure Software for iMac
- Feb 29, 2024How to Format Mac Startup Disk?
- Mar 04, 20242025 Full Guide to Reset Mac mini [Intel-based and Apple Silicon Supported]

Steven
Steven has been a senior writer & editor of Donemax software since 2020. He's a super nerd and can't imagine the life without a computer. Over 6 years of experience of writing technical solutions and software tesing, he is passionate about providing solutions and tips for Windows and Mac users.

Gerhard Chou
In order to effectively solve the problems for our customers, every article and troubleshooting solution published on our website has been strictly tested and practiced. Our editors love researching and using computers and testing software, and are willing to help computer users with their problems
