PAGE CONTENT:
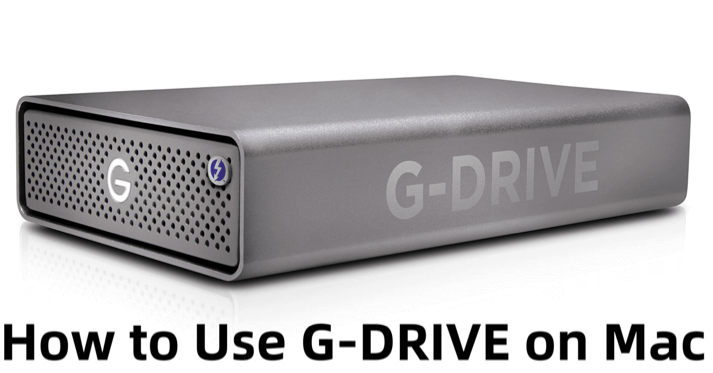
SanDisk Professional G-DRIVE is a popular external storage solution that provides fast and reliable data storage, making it a perfect choice for Mac users who need additional storage or backup solutions. Whether you're a creative professional working with large media files or simply need extra space for your documents and media, G-DRIVE can help you manage your data efficiently. This article will guide you through the process of setting up and using G-DRIVE on your Mac, along with advanced tips and troubleshooting advice.
Overview
External hard drives like G-DRIVE offer an excellent way to store and back up your important files, especially for those who find their Mac's internal storage insufficient. G-DRIVE, developed by G-Technology, SanDisk Professional, is a robust external storage solution designed for Mac users, providing high-speed performance, ample storage space, and reliability.
In this article, we will explore how to use G-DRIVE on your Mac, covering the process of setup, file management, backup, and troubleshooting common issues that might arise.
What is G-DRIVE?
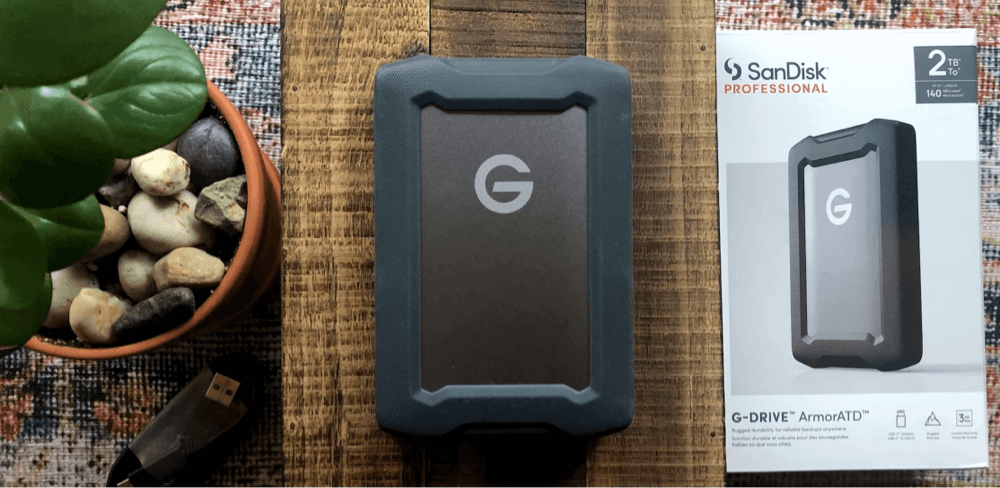
G-DRIVE is an external hard drive designed for professionals who require high-performance storage. Its fast read and write speeds make it particularly useful for media creators, photographers, and videographers who work with large files such as high-resolution images or 4K videos. G-DRIVE offers storage capacities ranging from 1TB to 24TB, making it an ideal choice for both personal use and professional applications.
The drive is compatible with both Windows and macOS, but it's pre-formatted for Mac out of the box. For Mac users, this means you can plug in the drive and start using it immediately. G-DRIVE offers a variety of connection options, including USB, Thunderbolt, and USB-C, allowing for fast data transfers and convenient compatibility with a wide range of Mac models.
How to Set Up G-DRIVE on Mac?
Getting your G-DRIVE up and running on a Mac is a straightforward process, but there are a few steps to follow to ensure you can start using the drive efficiently. This section will guide you through the process, including unboxing, physical setup, formatting the drive (if necessary), and getting it ready for use.
#1 Unbox and Physical Setup
When you purchase a G-DRIVE, it typically comes with everything you need to get started, including the external hard drive itself and the appropriate cables for connecting it to your Mac. The specific type of connection cable will depend on the model you purchase, such as USB-A, USB-C, or Thunderbolt.
Here's a detailed step-by-step guide on how to set up your G-DRIVE:
Step 1: Unbox the G-DRIVE
Carefully remove the G-DRIVE from the packaging. You will find the drive itself, as well as one or two cables designed for connectivity. These cables may vary based on the G-DRIVE model. Many G-DRIVE models now come with both USB-C and USB-A cables, ensuring compatibility with a variety of Mac computers.
Step 2: Connect the Drive to Your Mac
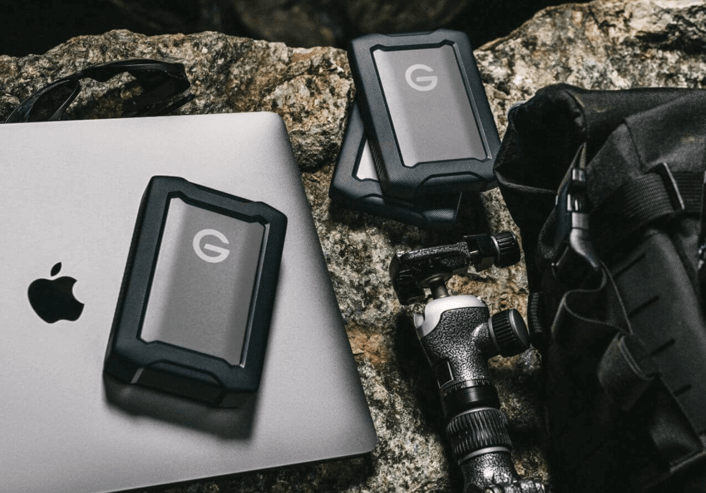
To connect your G-DRIVE to your Mac, simply plug one end of the provided cable into the drive and the other end into your Mac's available port. Depending on your Mac model, the available ports will be either USB-A, USB-C, or Thunderbolt 3 (USB-C). If you're unsure which port your Mac has, the newer MacBook models predominantly feature USB-C/Thunderbolt ports, while older models may have USB-A.
Step 3: Powering the Drive
Some G-DRIVE models are powered via the connection cable (USB-C or Thunderbolt), meaning no additional power source is needed. However, some larger models (especially those with higher capacities or RAID configurations) might come with a separate power adapter. Make sure the drive is powered on, and you should see an LED light indicator showing that the drive is active.
Once you've completed these steps, your G-DRIVE should be visible on your Mac's desktop or in the Finder sidebar as an external device.
#2 Initial Drive Formatting
If the G-DRIVE is new, you may need to format it to be compatible with macOS. Although many G-DRIVE models come pre-formatted for macOS (in HFS+ or APFS format), older models or drives purchased for Windows may need to be reformatted. Here's how to do it:
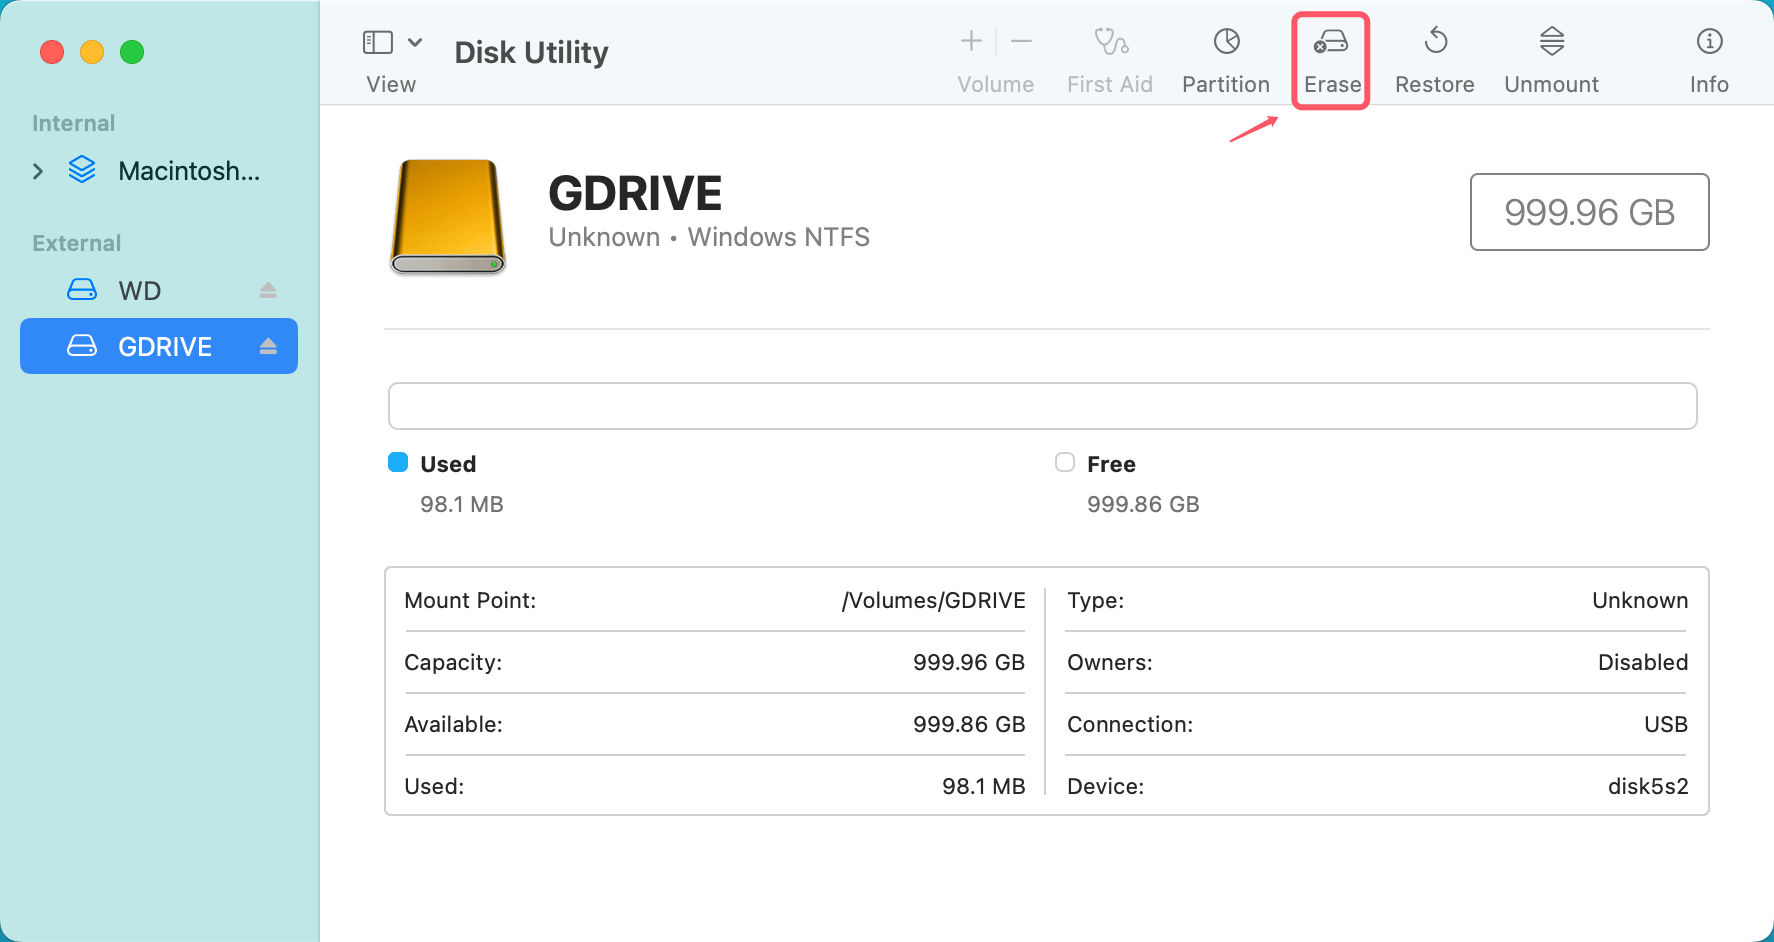
Step 1: Open Disk Utility, which is located in the Applications > Utilities folder.
Step 2: In Disk Utility, select your G-DRIVE from the list of available drives in the sidebar.
Step 3: Click on the Erase button at the top of the window.
Step 4: In the dialog box that appears, choose a name for your drive and select the APFS (Apple File System) format if you're using macOS High Sierra or later. For older versions of macOS, you can select Mac OS Extended (Journaled).
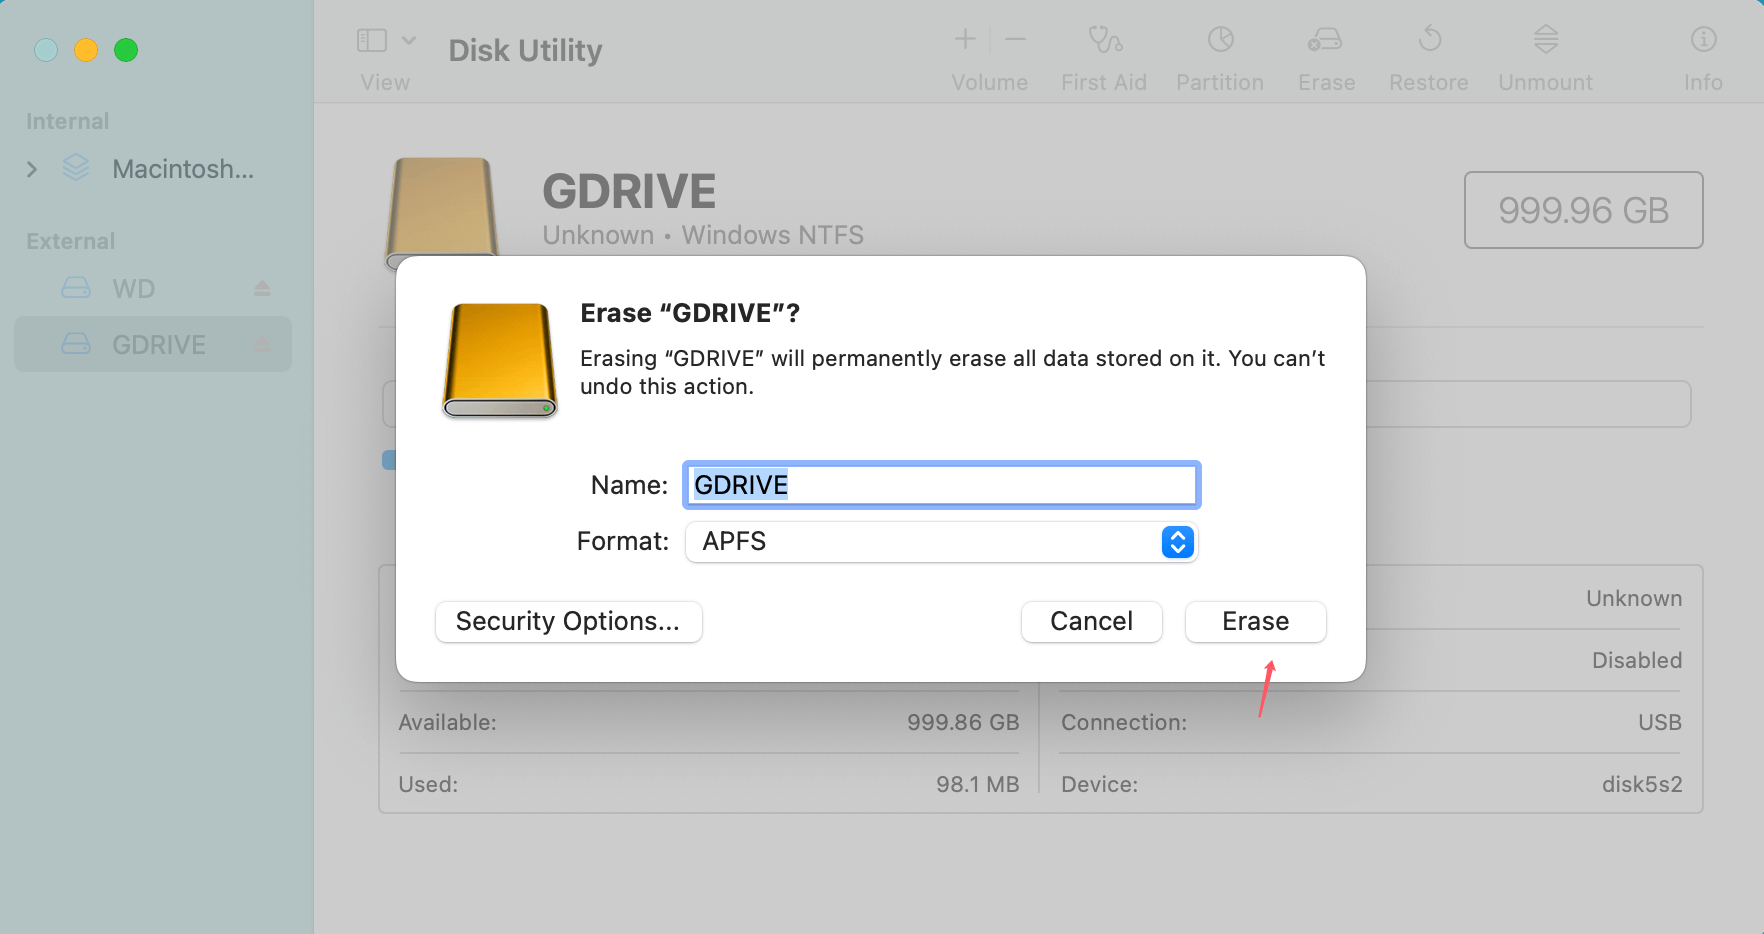
Step 5: Click Erase to begin the formatting process. This will prepare your G-DRIVE for use with your Mac.
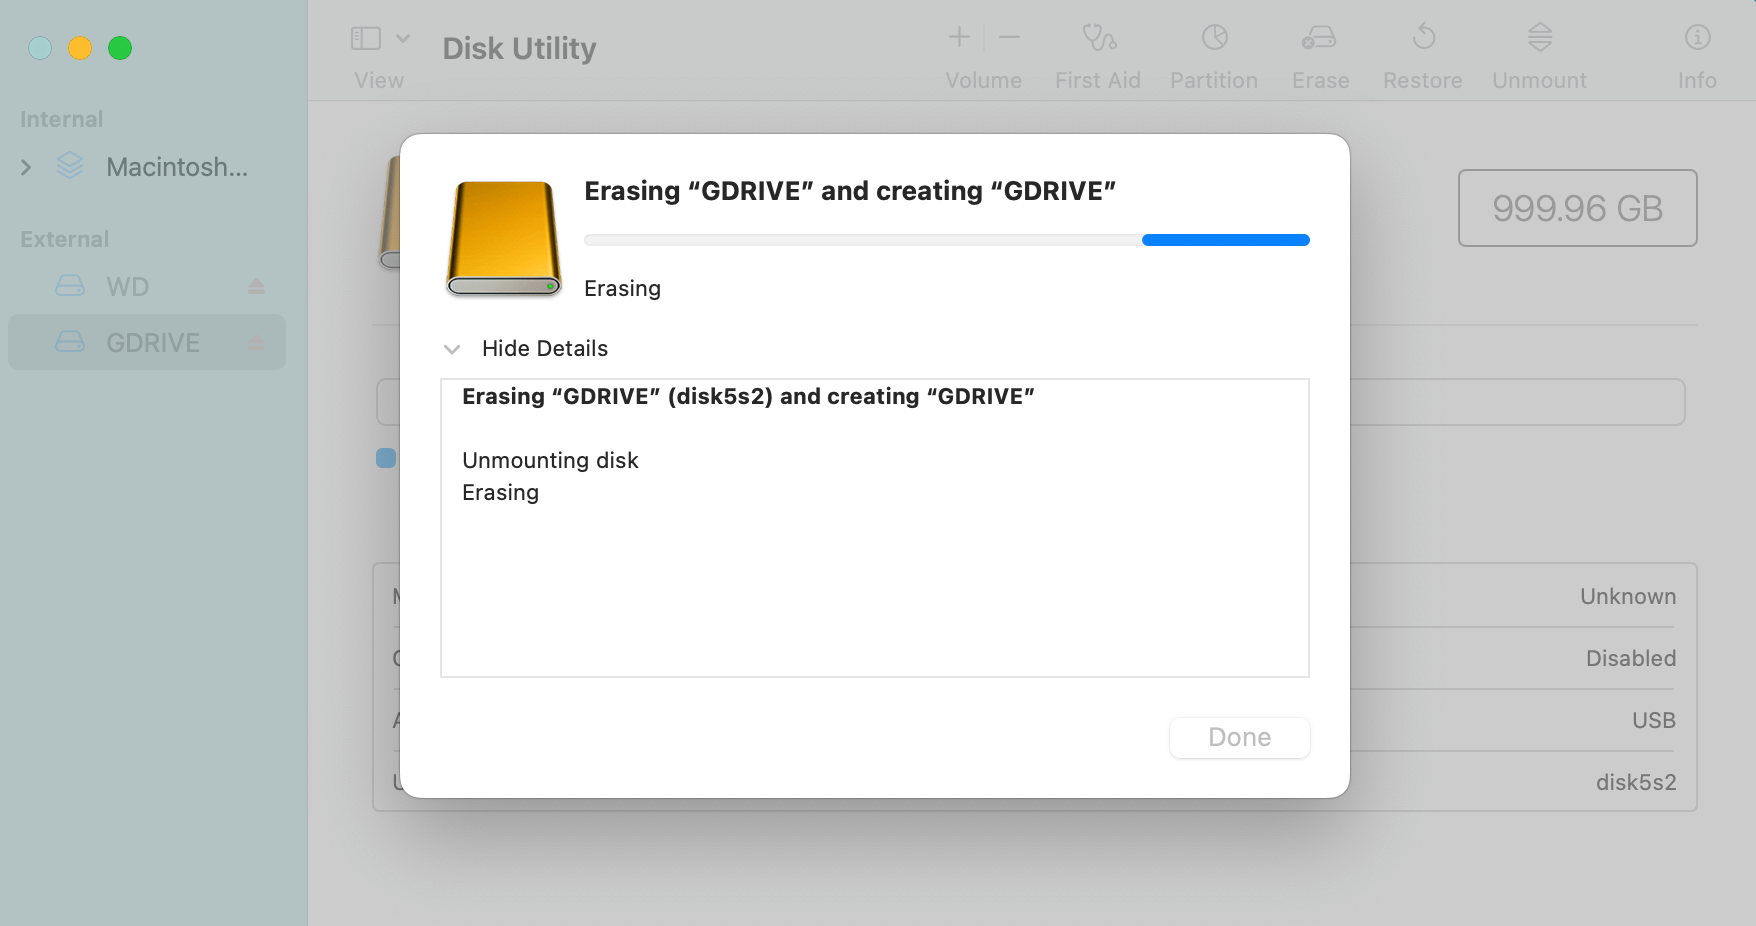
Once the drive is formatted, it will be ready for use.
#3 Access Files on G-DRIVE
After setting up your G-DRIVE, it's time to start using it for file management. Accessing and organizing files on your G-DRIVE is straightforward:
- Accessing Files: Your G-DRIVE will appear in the Finder sidebar under Locations. Clicking on it will open the drive's contents. If you've set up folders on the drive, you can browse through them to access your files.
- Transferring Files: Moving files between your Mac and G-DRIVE is as simple as dragging and dropping. To transfer files, open the location on your Mac where the files are stored, and drag them to the G-DRIVE window. Similarly, to move files from G-DRIVE to your Mac, drag them from the drive window to the desired folder on your Mac.
- Organizing Files: It's a good practice to organize files on your external drive to keep things tidy. You can create folders for different types of files, such as "Photos," "Videos," "Documents," and so on. G-DRIVE also supports file tagging and searching, which can help you quickly locate specific files.
#4 Use G-DRIVE for Backup
One of the most important uses of external hard drives like G-DRIVE is for backup purposes. macOS includes a built-in backup tool called Time Machine, which works seamlessly with G-DRIVE to back up your entire system, ensuring that your data is safe in case of a system failure.
#5 Set Up Time Machine with G-DRIVE
To set up Time Machine with your G-DRIVE:
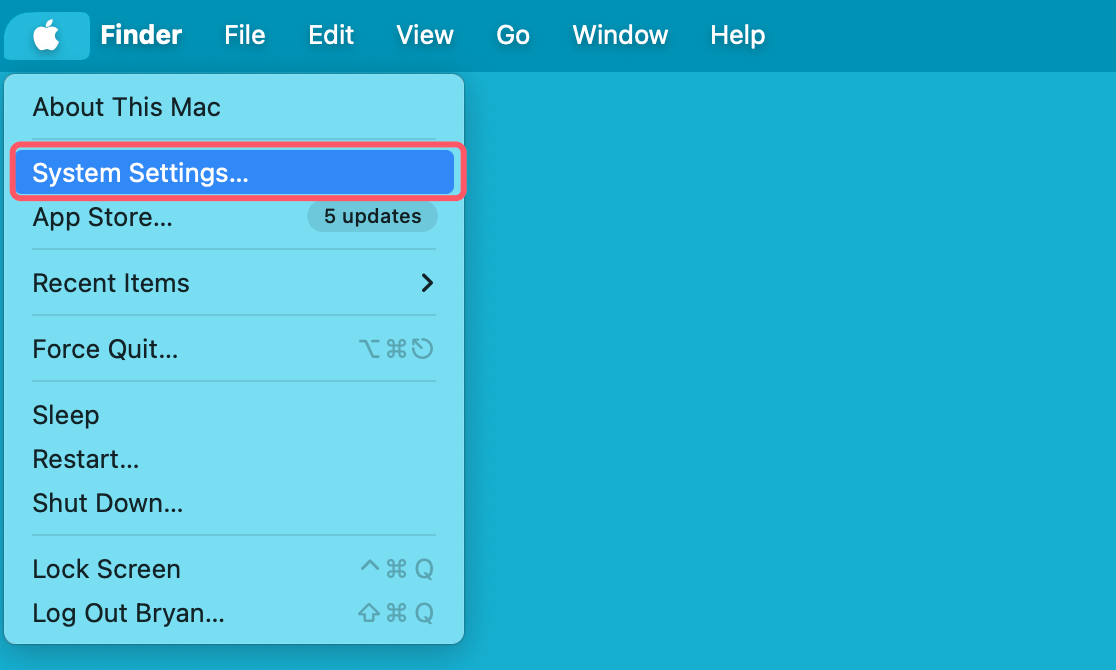
Step 1: Open System Preferences from the Apple menu. For macOS Ventura or later, choose System Settings.
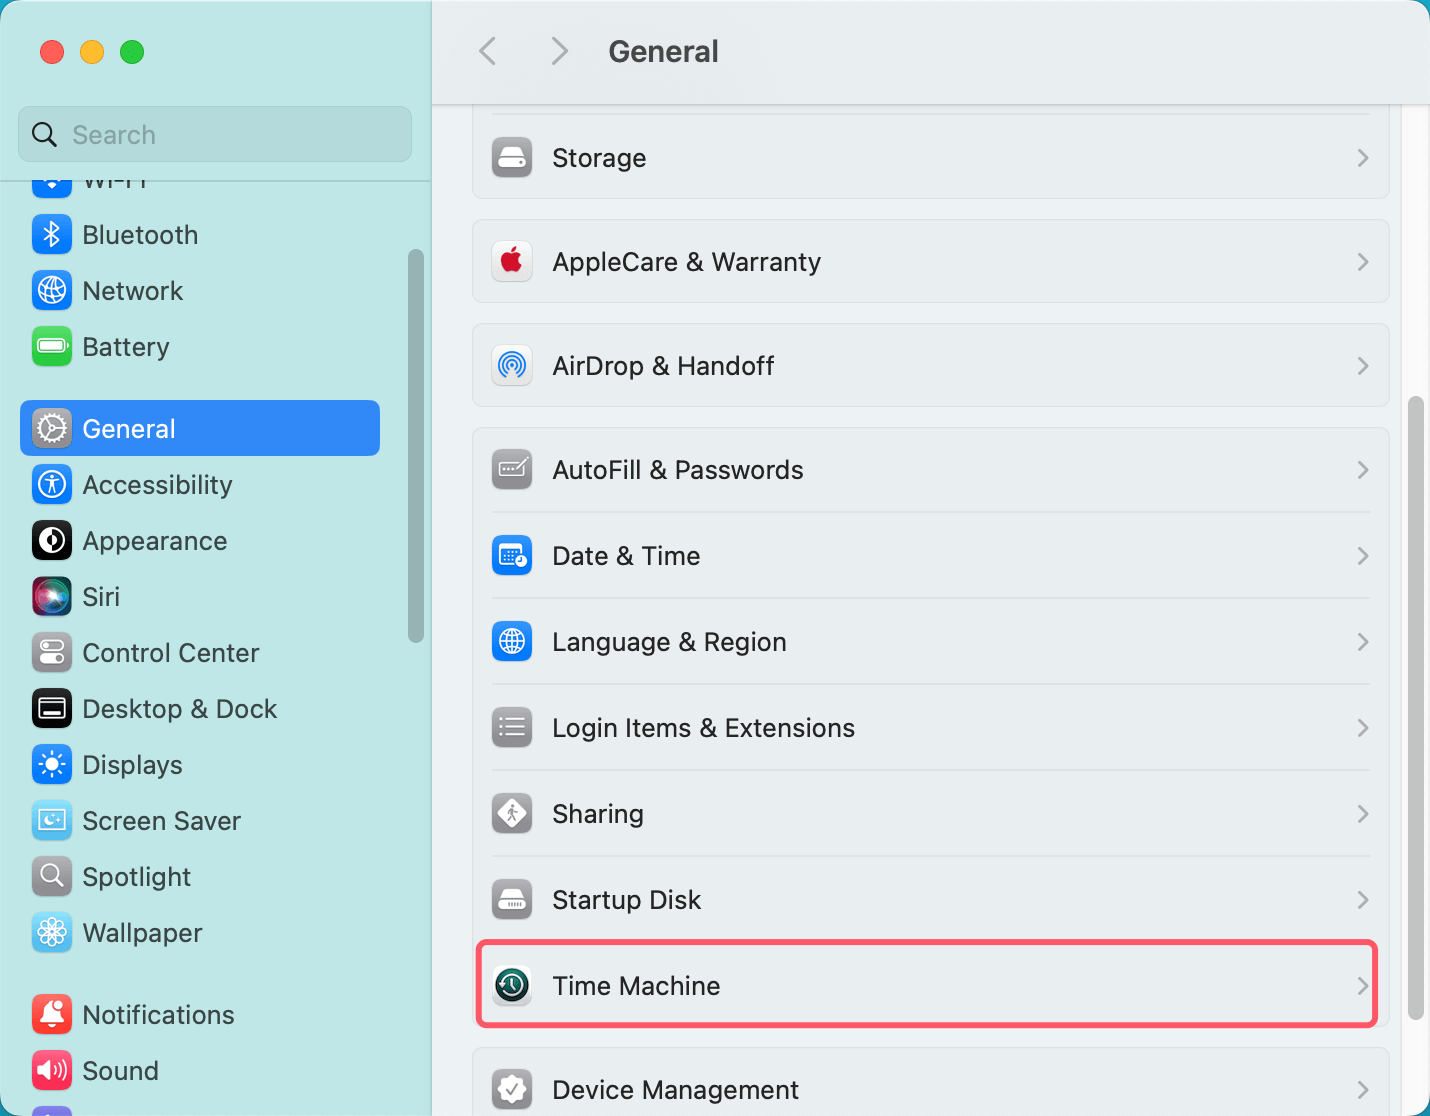
Step 2: Click on Time Machine or General > Time Machine.
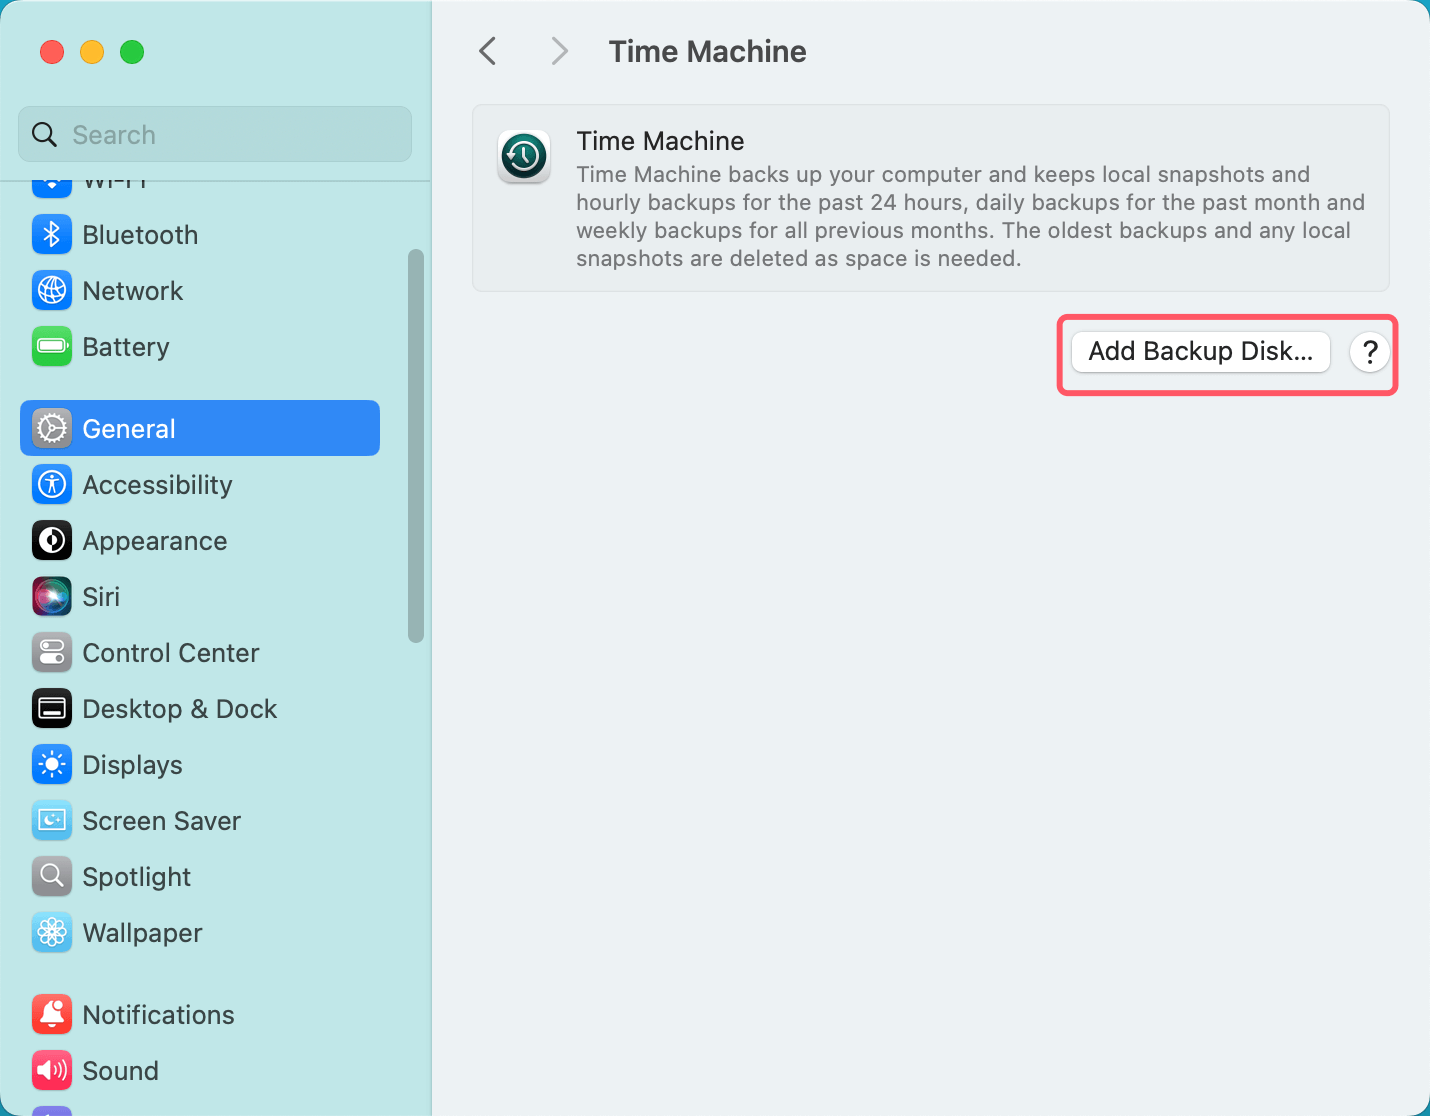
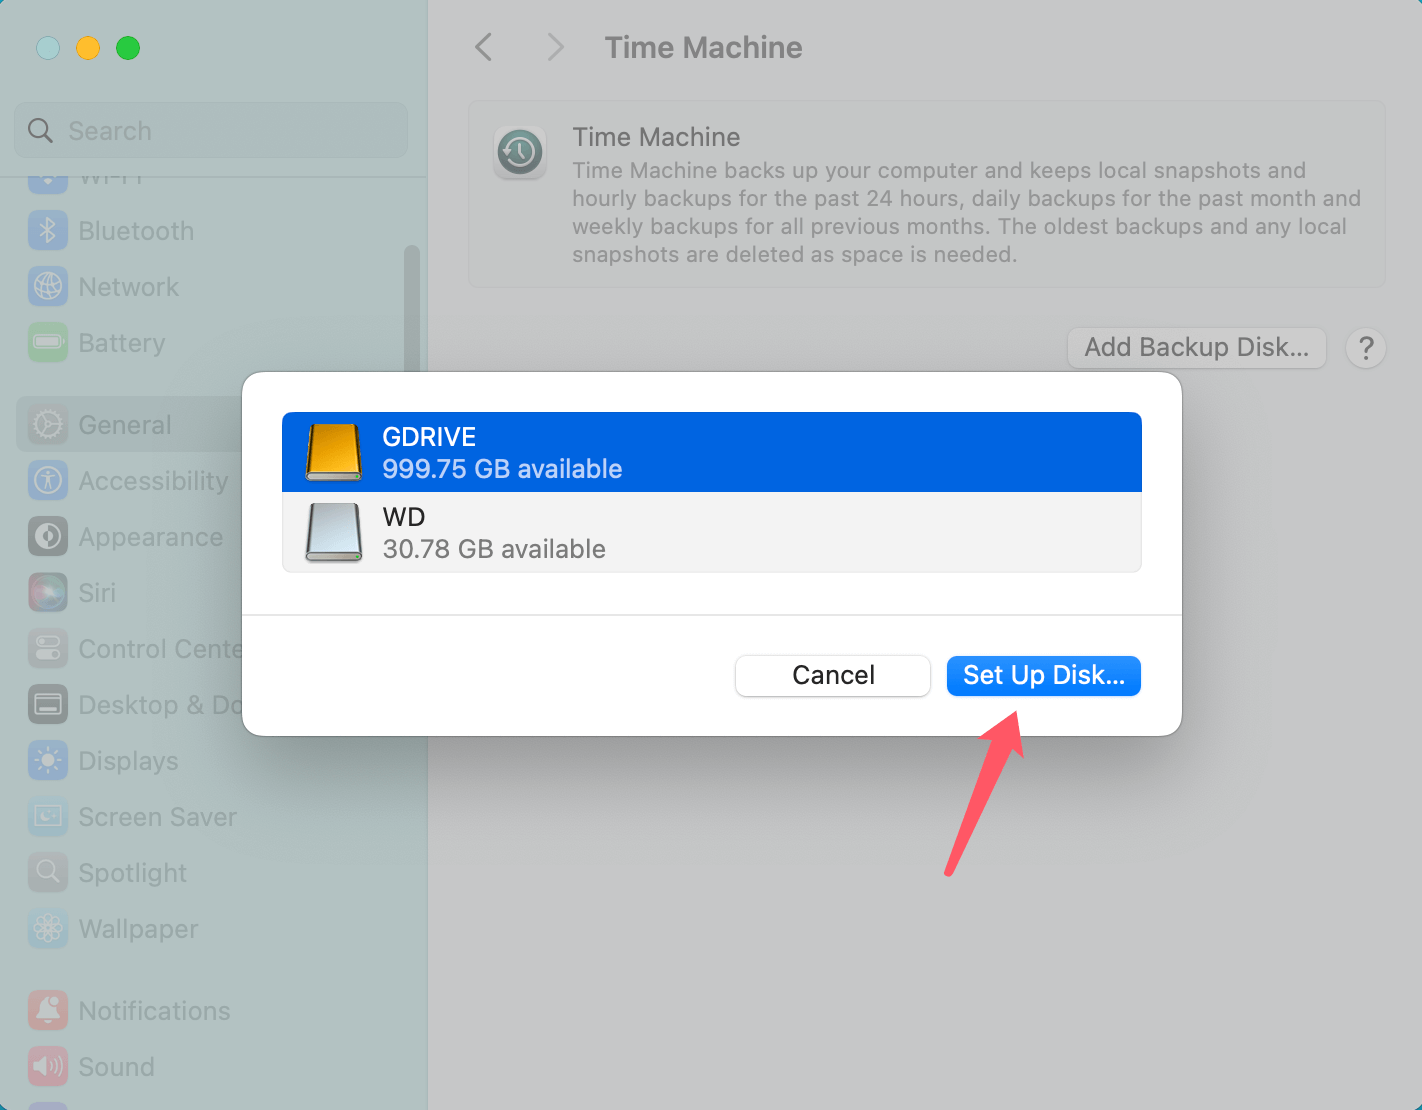
Step 3: Click Select Disk or Add Backup Disk and choose your G-DRIVE from the list of available drives.
Click on Set Up Disk.
Step 4: Time Machine will begin backing up your data to the G-DRIVE. You can select the option to back up automatically, and Time Machine will perform hourly backups of your system. The first backup may take a while, depending on the amount of data, but subsequent backups will be faster as Time Machine only backs up changed files.
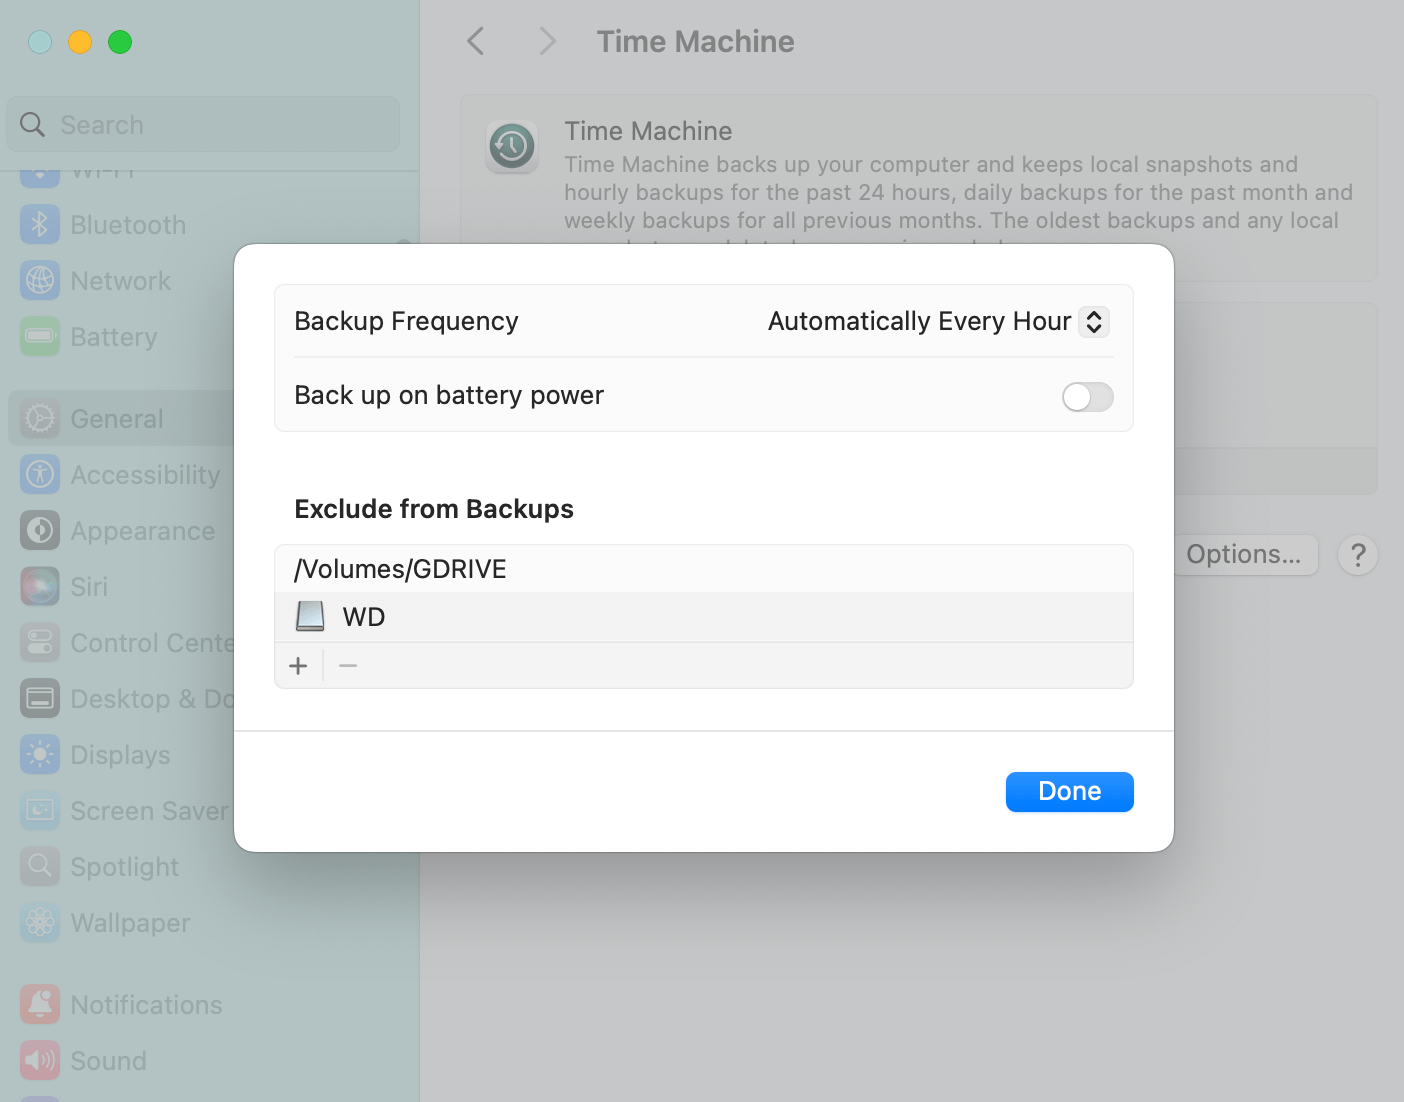
Once the initial backup is complete, Time Machine will run in the background, creating backups of new files and updates to existing files.
Scheduling Backups:
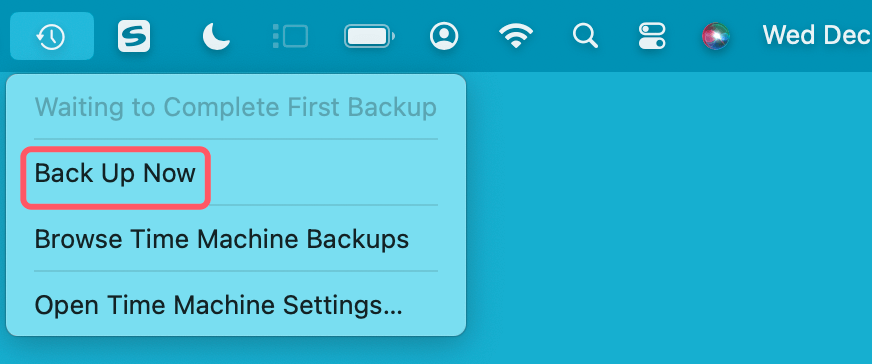
By default, Time Machine runs automatically, but you can manually control when backups occur by turning off the automatic backups feature in Time Machine preferences. You can choose to back up at specific intervals or on-demand by selecting Back Up Now from the Time Machine menu in the menu bar.
#6 Use NTFS G-DRIVE on Mac
If the G-DRIVE has been formatted to NTFS file system, you need to install third-party NTFS driver so that you can write data to it on your Mac.
Step 1. Download and install the reliable NTFS driver - Donemax NTFS for Mac.
Step 2. Open Donemax NTFS for Mac, select the NTFS G-DRIVE, then click on Enable Writable button.

Open your G-DRIVE, check if you can copy files from your Mac to it.
Troubleshooting Common Issues
Though G-DRIVE is generally reliable, you may encounter some issues while using it. Here are some common problems and solutions:
G-DRIVE Not Appearing in Finder:
If your G-DRIVE is not appearing in Finder, try the following solutions:
- Ensure the drive is properly connected to your Mac.
- Try using a different port or cable to rule out hardware issues.
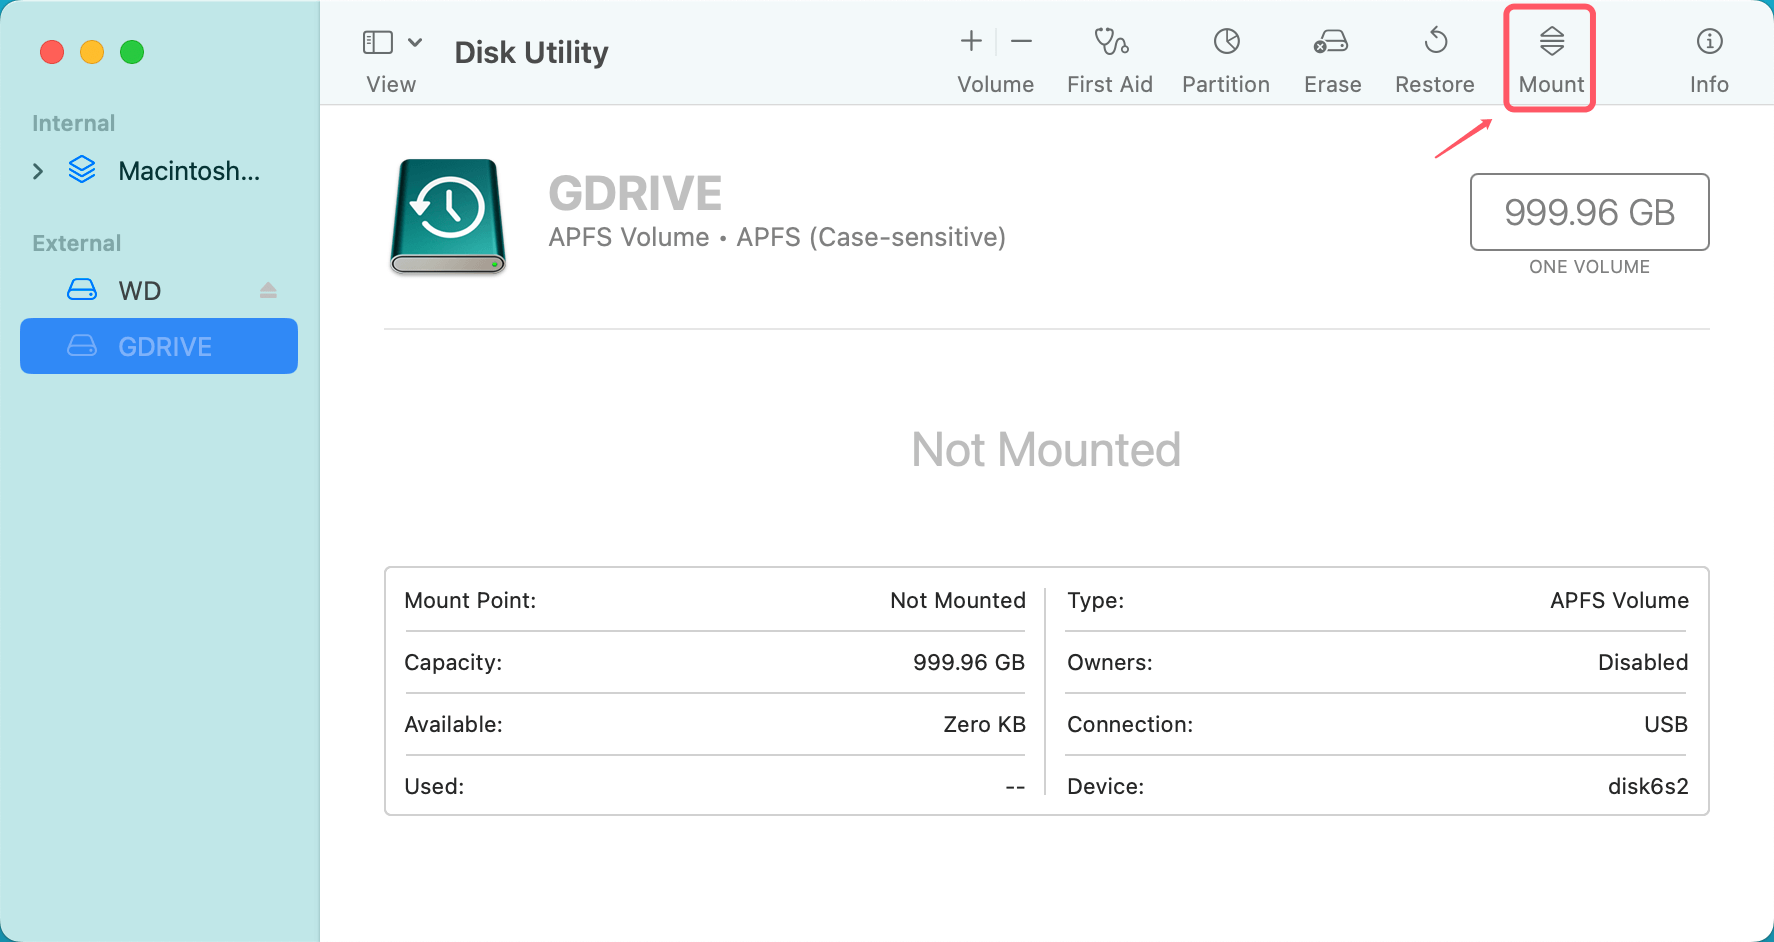
- Open Disk Utility to check if the drive is recognized but not mounted. If it appears in Disk Utility but not in Finder, try to mount it manually by selecting it in Disk Utility and clicking the Mount button.
![using G-DRIVE on your Mac]()
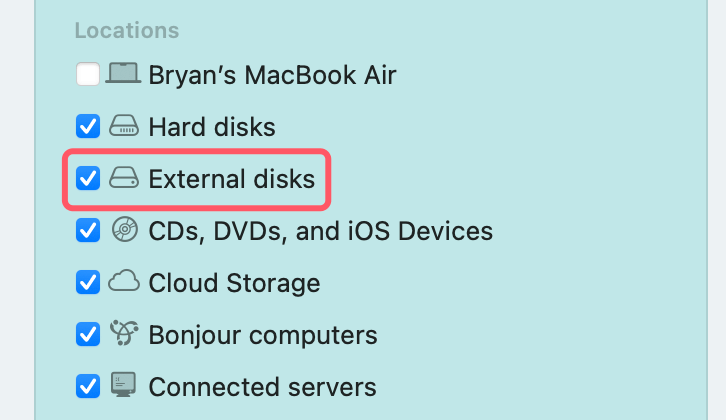
- Ensure External disks is selected in Finder Settings.
![using G-DRIVE on your Mac]()
- Restart your Mac to see if that resolves the issue.
Issues with Formatting or Disk Mounting:
If the drive fails to format or mount, you may need to reformat it. If Disk Utility doesn't work, you can try third-party disk management tools or consult G-Technology support for assistance.
Slow Transfer Speeds:
If you notice slow transfer speeds, check the following:
- Ensure that you're using the fastest connection (Thunderbolt or USB-C) available.
- Disconnect other devices that might be using the same port or bus.
- Check the health of the drive with Disk Utility to ensure it's functioning properly.
🔗 Also read: fix G-DRIVE not working on Mac.
Advanced Features
Using G-DRIVE with Cloud Backup:
Some G-DRIVE models come with additional software that enables cloud backup integration, such as Google Drive, Dropbox, or other cloud services. This provides an extra layer of security by backing up your data to the cloud in addition to your local G-DRIVE storage.
Customizing G-DRIVE Settings:
Many G-DRIVE models allow you to customize certain settings. These may include turning off the LED lights for a more discreet setup or adjusting the sleep settings to save energy when the drive is not in use.
Conclusion
Using G-DRIVE on a Mac is an excellent way to expand your storage, back up your data, and enhance your workflow. Whether you're a photographer, videographer, or just need more space, G-DRIVE offers a reliable and fast external storage solution. By following the steps in this article, you can easily set up your G-DRIVE, transfer files, perform backups with Time Machine, and troubleshoot any issues that arise. Make sure to take advantage of the drive's advanced features to further optimize your experience.
With G-DRIVE, you'll have the peace of mind knowing your important data is safe, organized, and accessible whenever you need it.

Donemax NTFS for Mac
An easy-to-use NTFS for Mac tool to help you enable writable for NTFS drives on Mac so that you can read-write NTFS drives on Mac without any limitation. It also can help you mount, format, repair, rename, open drive on your Mac.
Related Articles
- Jul 04, 2024Cannot Format Seagate External Hard Drive on Mac? Fix It Now
- Sep 15, 2023How to Wipe An NTFS Hard Drive on Windows or Mac?
- Feb 17, 20256 Solutions to Fix Can't Access WD My Passport on Windows 11/10/8/7?
- Feb 21, 2025How to Fix Overheated Hard Drive?
- May 13, 2024How to Unlock USB Flash Drive?
- Jan 08, 2024How to Format or Unformat Crucial X10 Pro Portable SSD on Windows/macOS?

Christina
Christina is the senior editor of Donemax software who has worked in the company for 4+ years. She mainly writes the guides and solutions about data erasure, data transferring, data recovery and disk cloning to help users get the most out of their Windows and Mac. She likes to travel, enjoy country music and play games in her spare time.

Gerhard Chou
In order to effectively solve the problems for our customers, every article and troubleshooting solution published on our website has been strictly tested and practiced. Our editors love researching and using computers and testing software, and are willing to help computer users with their problems
