Written byCoco LinUpdated on May 18, 2024
Mac Keeps Booting Into macOS Recovery Mode, Fix It Now
Approved byGerhard Chou
PAGE CONTENT:
You can use basic tools in macOS Recovery Mode even if your Mac won't start up right. This function is very useful because it lets you delete your startup disk, reinstall macOS, fix your internal hard drives, use Terminal, and do other things.
Read this to get out of macOS Recovery Mode on your Mac. If your Mac gets stuck in this loop, a bigger problem must be fixed. This guide will look at the possible reasons why your Mac keeps starting up in macOS Recovery Mode and give you ways to correct the problem.
Fix Mac Keeps Booting into macOS Recovery Mode Issue
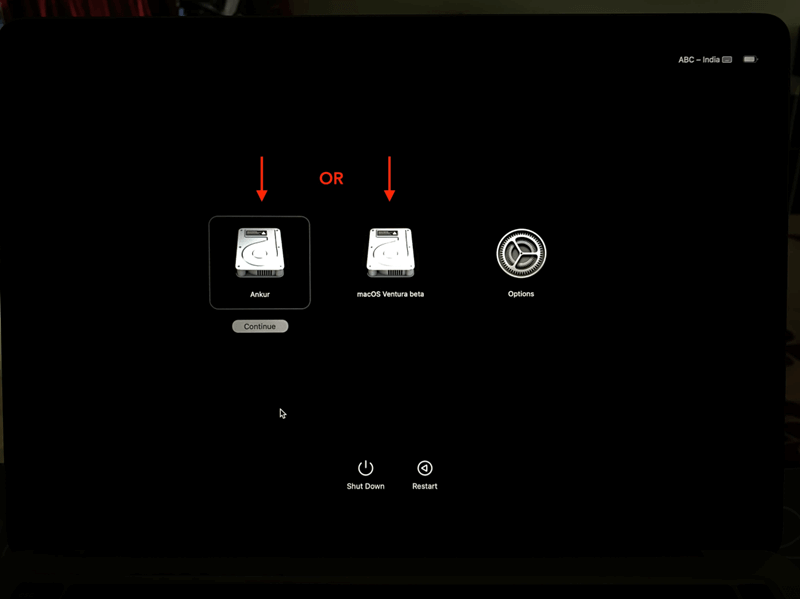
1. Manually Choose Your Startup Disk
If your MacBook or desktop Mac is stuck in macOS Recovery Mode, pick your starting disk manually. A small problem may be stopping your Mac from choosing the right startup drive. If you select the correct starting disk, your Mac will start up normally.
2. Install macOS Again
The operating system and other important files for your Mac to work properly are on your starting disk and internal hard drive. If it's lost or damaged, your Mac won't be able to start up with it, which means you can't use it normally. It will start with macOS Recovery Mode instead. Reinstall macOS to get back to a working operating system. It will put in a new copy of the operating system and keep all of your files.
- Just choose Options, click on Continue button.
- Choose Reinstall macOS xxx, then follow the onscreen instructions to reinstall macOS.

3. Repair Using Disk Utility
What if your Mac gets stuck in macOS Recovery Mode? It could be because the hard drive inside it is damaged. The "First Aid" tool in Disk Utility lets you check for and fix disk damage.
- To get out of macOS Recovery Mode, choose Disk Utility and click Continue.
- To see your internal hard drive and its files, go to View > Show All Devices.
- Select the last part of your starting disk and click "First Aid."
- Repair again on the next box in the series until the physical disk inside the computer is fixed.
- After that, you can restart your Mac to get out of macOS Recovery Mode.

4. Change the Recovery Mode
This type of Mac has two recovery modes: Internet Recovery Mode and built-in macOS Recovery Mode. There are three ways to go into Recovery Mode.
- Pressing Command + R (For Intel Mac) or Power button (For Apple silicon Mac) will put your Mac into built-in Recovery Mode and let you reload the most recent macOS version.
- You can enter Internet Recovery Mode by pressing Option + Command + R. This will allow you to reload the most recent version of macOS that works with your Mac.
- Once you press Shift, Option, Command, and R, your Mac will start up in Internet Recovery Mode. It will let you reload the macOS that came with it or the most recent version that is still available.
If your Intel Mac gets stuck in Internet Recovery Mode, try entering Recovery Mode with a different set of keys. Then, try any of the above methods again to exit Recovery Mode.
5. Clear the NVRAM
NVRAM, or "nonvolatile random-access memory," is a small piece that saves settings like the startup disk, time zone, sound volume, and more. It can get damaged sometimes, so your Mac won't start from the right disk. You can clear the NVRAM on your Mac to get it out of the Recovery Mode loop.
6. Clear the SMC
The SMC (system management processor) controls your Intel-based Mac's hardware. When it doesn't work right, it can mess up your Mac's power management, system speed, status light, and other parts. Resetting this may help fix the problem if your Mac won't start. Remember that Apple silicon Macs don't have SMC exit, so this method will only work on Intel-based Macs.
7. Start up in Safe Mode
If the problem started after you recently installed an app, you can start your computer in Safe Mode to figure out what's wrong. In Safe Mode, you can stop third-party apps, plugins, and startup items from loading. It will also clear the system caches and check the internal hard drive. You can get to your screen and do things like you would on a normal boot.
8. Erase Your Mac
If none of these work to remove your Mac from Recovery Mode, you should erase it and install macOS again. Before you do this, ensure you have a copy of the important files on your Mac because it will delete everything. If you don't have a copy, you can use Target Disk Mode to connect the Mac to another Mac and access its data.
- Choose Options and click on Continue button in macOS Recovery mode.
- Select Disk Utility, click on Continue button.
- Select the Mac startup disk, click Erase.
- Select APFS or Mac OS Extended as the file system, click Erase again to start erasing the Mac startup disk.

Once the erasing process gets finished, click on Done button. Then backup to Utilities window and choose Reinstall macOS to install macOS.
How to Recover Lost Data After Erasing Mac Hard Drive?
To fix this issue “Mac keeps booting into macOS Recovery mode,” you may need to erase the Mac startup disk. If you don’t have a backup, you need special data recovery tool to help you get the lost data back.
Donemax Data Recovery for Mac is a powerful Mac data recovery program which can recover deleted, erased or lost data form Mac HDD/SSD or external storage device.
Donemax Data Recovery for Mac
- Recover permanently deleted files on Mac.
- Recover lost data from erased Mac hard drive.
- Recover lost data from HDD, SSD and external storage device.
Step 1. Click the Download button, then download Donemax Data Recovery for Mac, then click to start installing this software on your Mac. Open it from Launchpad after installing, select the Mac startup disk to start data recovery.

Step 2. Click on Scan button. Donemax Data Recovery for Mac will deeply scan the erased hard drive and find all recoverable files, including the existing files, deleted files, erased files, etc.

Step 3. Once the scan is completed, you can preview all recoverable files. Then select the wanted files, click on Recover button. Choose a location to save the recovered files.

Conclusion:
If your Mac keeps entering macOS Recovery Mode, it can be frustrating, but several effective methods can be used. You can fix the problem by manually choosing the starting disk, reinstalling macOS, repairing the disk with Disk Utility, or resetting NVRAM and SMC.
If none of the above works, starting up in Safe Mode or considering a fresh macOS update might help. By following these steps to fix the problem, you can get out of the Recovery Mode loop and get your Mac back to normal.
Related Articles
- Oct 03, 2024My External Hard Drive Won't Let Me Add Files on Mac, How Fix It?
- Feb 05, 2025External Hard Drive Is Detected, but Can't Open It: How to Fix It
- Jul 02, 2024Cannot Format Samsung SSD? Fix It Now
- Dec 28, 2024(Solved) Delete Many Files on Mac, But Can't Free Up Disk Space
- Feb 24, 2025How to Repair a Corrupted Android SD Card: A Complete Guide
- Feb 06, 2024Lexar Portable SSD Is Not Showing Up on Windows PC, Fix It Now

Contributing Writer
Coco Lin
Coco has been a writer and a chief programmer at Donemax software since 2018. Over 10 years of experience of writing troubleshooting articles in the software industry, she is passionate about programming and loves to providing solutions to Windows and Mac users. Also she enjoys music and palying tennis in her free time.

Editor in chief
Gerhard Chou
In order to effectively solve the problems for our customers, every article and troubleshooting solution published on our website has been strictly tested and practiced. Our editors love researching and using computers and testing software, and are willing to help computer users with their problems
Hot Donemax Products

Clone hard drive with advanced clone technology or create bootable clone for Windows/Mac OS.

Completely and easily recover deleted, formatted, hidden or lost files from hard drive and external storage device.

Certified data erasure software - permanently erase data before selling or donating your disk or any digital device.