PAGE CONTENT:
ExFAT (Extended File Allocation Table) is a popular file system format used primarily for external storage devices such as USB drives, external hard drives, and SD cards. One of its key advantages is that it is cross-platform compatible, meaning it can be used on both Mac and Windows systems without the need for additional drivers or software. This makes it an ideal choice for those who often move files between the two operating systems.
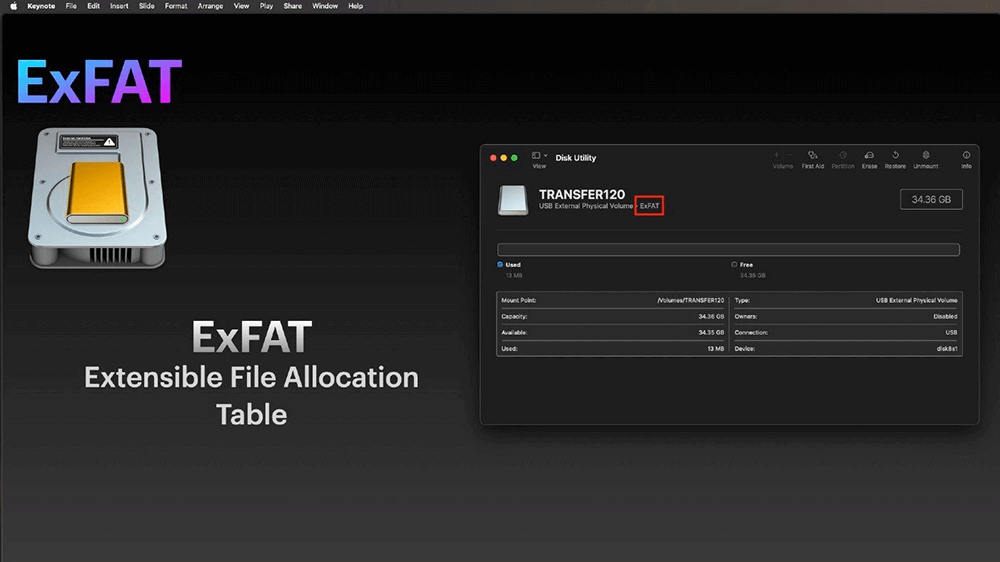
However, despite its convenience, there are times when an ExFAT drive might not work as expected on a Mac. You might find that the drive isn't recognized, or it might not mount properly when connected. In some cases, the drive may even show up as unreadable or display errors when you attempt to access it.
In this article, we will explore the common causes for ExFAT drive issues on Mac and provide a step-by-step guide to troubleshooting and fixing these problems.
Common Causes for ExFAT Drive Issues on Mac
Before fixing unrecognized or unmountable ExFAT drive on Mac, it's important to understand the possible reasons why the drive might not be working on your Mac. Here are some common causes:
1. Incompatible macOS Version
While macOS generally supports the ExFAT format, older versions of macOS might have issues with certain ExFAT drives. For example, earlier versions of macOS might not fully support larger ExFAT partitions or newer formatting methods used on external drives. If your Mac is running an outdated version of macOS, this could lead to compatibility issues.
2. Drive Errors or Corruption
One of the most common reasons why a drive doesn't work on a Mac is corruption in the file system. Corrupted drives can cause the system to fail in recognizing the drive altogether, or the drive might be recognized but inaccessible due to errors in its structure. A corrupted drive may also cause the system to slow down or crash when trying to access files.
3. Connection Issues
Sometimes the issue lies not with the drive itself, but with the connection. External drives rely on USB, Thunderbolt, or other cables for data transfer, and a faulty cable, USB port, or adapter can result in a drive not mounting or being recognized by your Mac. If the connection is loose or the port is damaged, the drive may not function properly.
4. Power Supply Problems
Some external hard drives, especially larger models or drives that are USB-powered, may require more power than what a Mac's USB port can provide. This is particularly common with drives that have larger storage capacities or are powered through the USB port alone. If your drive is not receiving adequate power, it may not be recognized by your Mac.
5. Permissions or Ownership Problems
In some cases, the issue may not be related to the drive's file system but rather to the permissions or ownership settings on your Mac. If your Mac is unable to access the drive due to restrictions in place for file permissions, the drive may not work as expected.
How to Troubleshoot an ExFAT Drive Not Working on Mac?
Now that we have a clearer understanding of what might cause an ExFAT drive to malfunction on a Mac, let's walk through the steps you can take to troubleshoot and resolve these issues.
Step 1. Check Physical Connections.
The first step in troubleshooting an ExFAT drive that isn't working on your Mac is to check the physical connection. Follow these steps:
- Check the Cable: Make sure the USB or Thunderbolt cable you are using to connect the drive is not damaged. A faulty cable could be the reason why your drive is not being recognized. If possible, try using a different cable to rule out this possibility.
- Try a Different Port: If you are using a MacBook or an iMac, try connecting the drive to a different USB or Thunderbolt port. Sometimes, the issue could be as simple as a faulty port.
- Test the Drive on Another Mac or Computer: To ensure the problem is not with the drive itself, try connecting it to another Mac or Windows computer. If it works on a different system, then the issue is likely specific to your Mac. If it doesn't work on another machine, the drive might be malfunctioning.
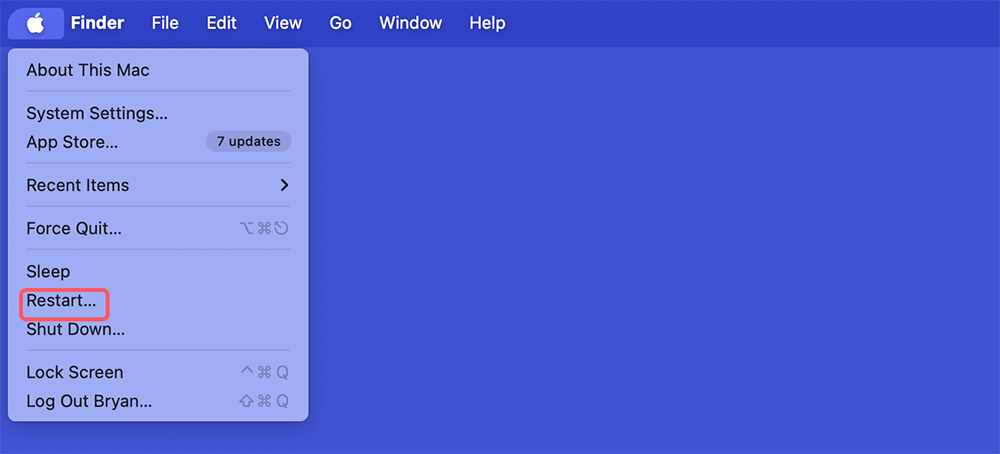
Step 2. Restart Your Mac.
Sometimes, a simple restart can resolve a variety of hardware issues. If the drive is not recognized, restart your Mac and try connecting the drive again. Restarting refreshes the system's hardware settings, which can sometimes resolve temporary connectivity issues.
Step 3. Check Disk Utility for Errors.
Once your Mac has rebooted, the next step is to check for any errors with the drive. macOS comes with a built-in tool called Disk Utility, which is designed to help diagnose and repair issues with external drives.
To use Disk Utility to check your ExFAT drive:
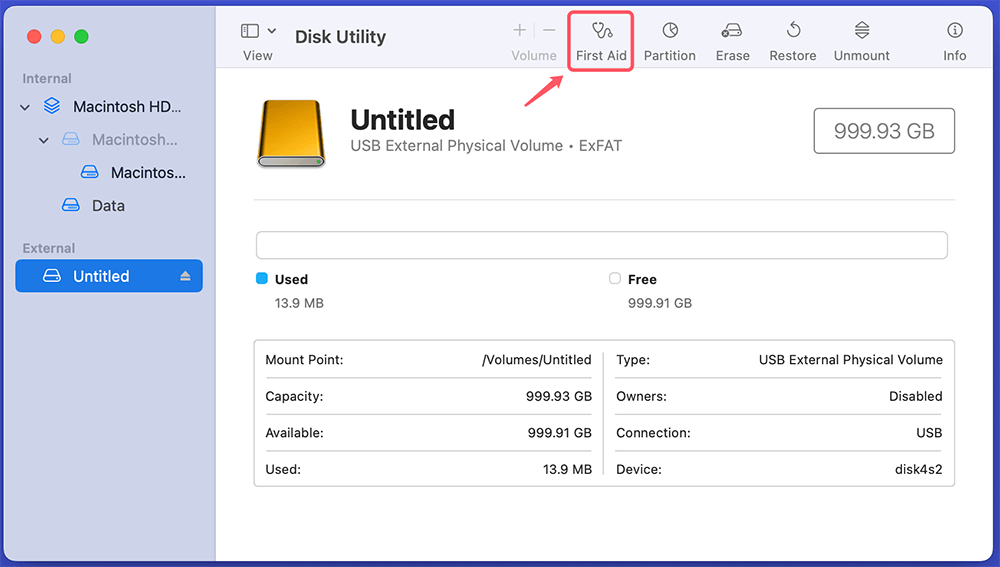
- Open Disk Utility (you can find it by searching for it in Spotlight).
- Look for your ExFAT drive in the left-hand sidebar.
- Select the drive, and then click on the First Aid button.
![Select the drive and then click on the First Aid button]()
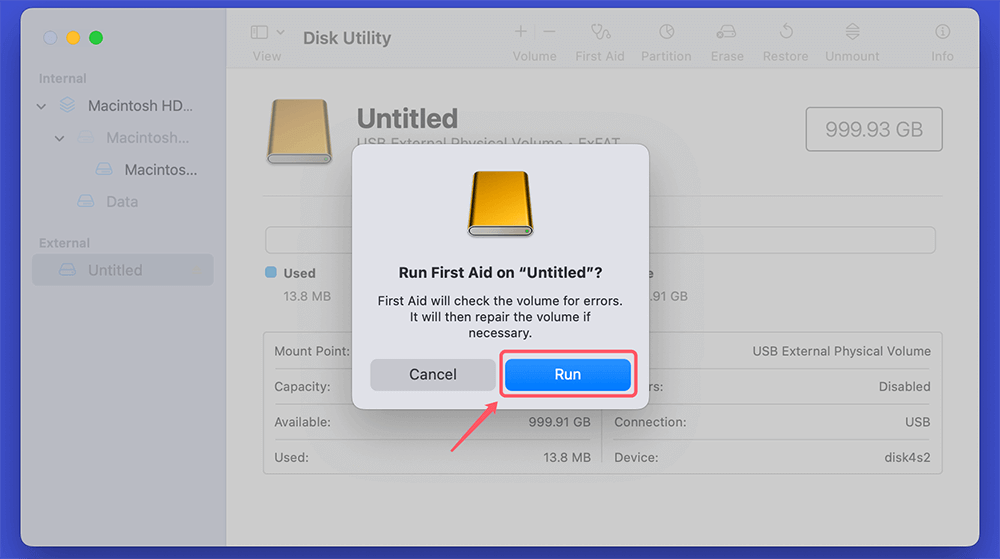
- Click Run to begin the process of checking for any errors or corruption on the drive.
![Click Run to begin the process]()
If Disk Utility finds any issues, it will attempt to repair them automatically. If the repair is successful, try accessing the drive again to see if the issue is resolved.
Step 4. Check if the Drive is Mounting.
If Disk Utility did not resolve the issue, check whether the drive is actually mounting. Sometimes, a drive might not automatically appear on the desktop or in Finder due to a setting or a minor software glitch.
- Check Finder: Open Finder and see if the drive appears under Devices or Locations in the sidebar. If it does, but you cannot access it, try right-clicking the drive and selecting Eject. Then, reconnect the drive to see if it will mount again.
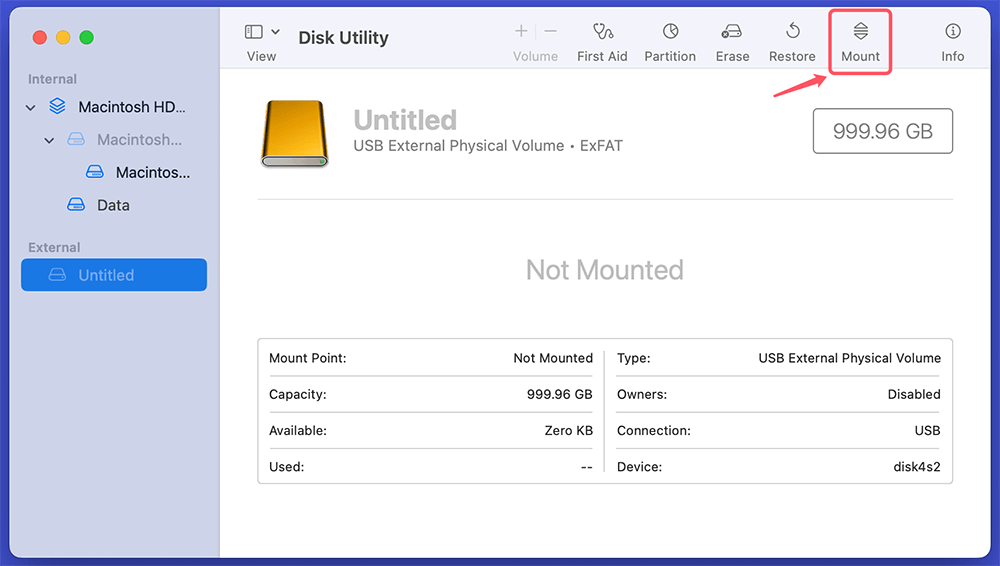
- Mount the Drive Manually: If the drive is visible in Disk Utility but not in Finder, you can try mounting it manually. To do this, select the drive in Disk Utility and click the Mount button.
![Mount the Drive Manually]()
If the drive mounts successfully, you should be able to access its contents from Finder.
Step 5. Update macOS.
If your Mac is running an outdated version of macOS, it could be causing compatibility issues with your ExFAT drive. macOS releases updates regularly, and some of these updates may fix known issues with external drives or improve compatibility with specific file systems.
To check for updates:
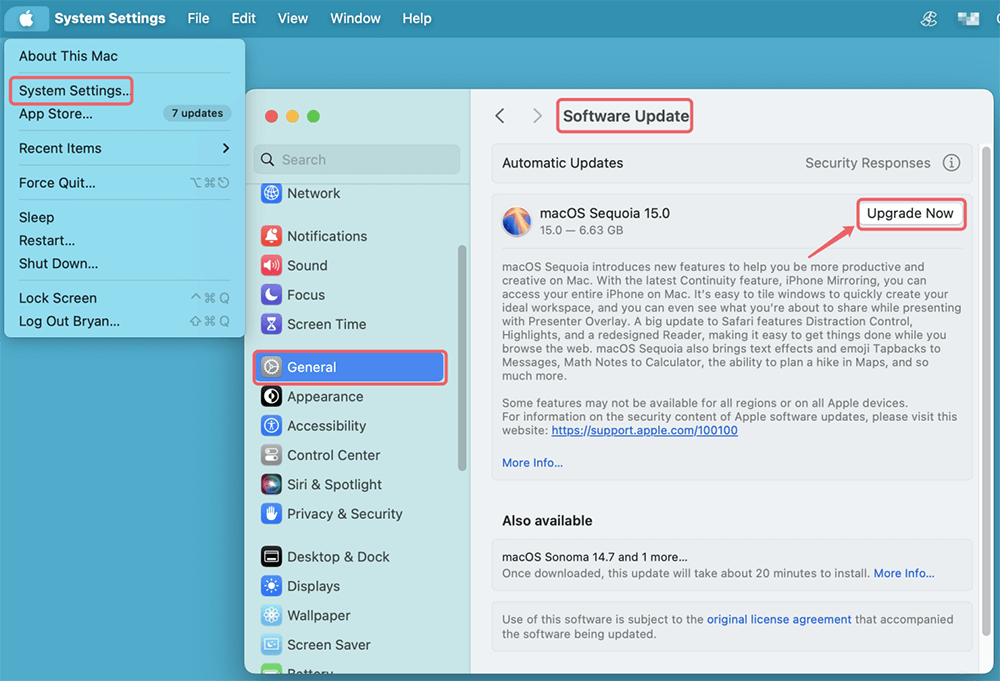
- Click on the Apple logo in the top-left corner of your screen.
- Select System Settings > General > Software Update (or Software Update on older versions).
![Update macOS]()
- If an update is available, install it and restart your Mac.
After updating macOS, reconnect the ExFAT drive and see if the issue is resolved.
Step 6. Repair ExFAT File System.
If the drive is still not recognized or remains inaccessible, you may need to repair the ExFAT file system manually. There are two options: using Terminal or third-party tools.
Option 1: Repair via Terminal
- Open Terminal (found in Applications > Utilities).
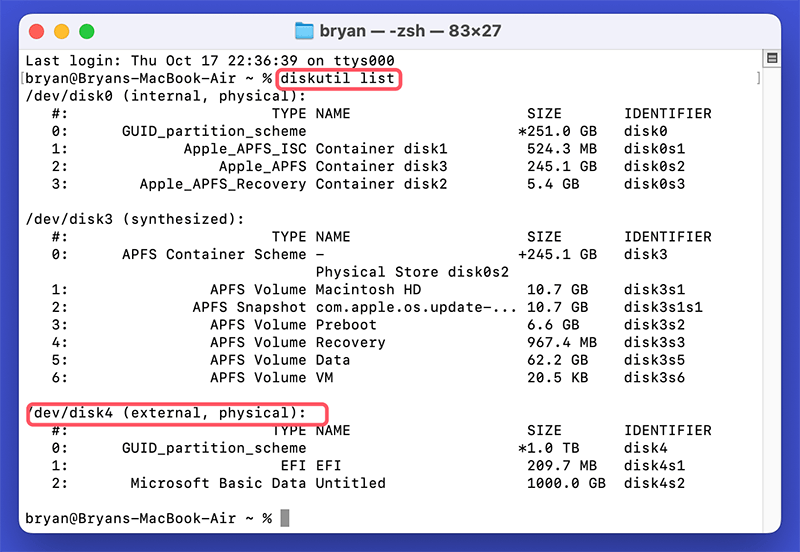
- Type the following command to list all connected drives:
diskutil list
- Locate your ExFAT drive in the list and take note of its identifier (e.g., disk4s2).
![Repair via Terminal]()
- Run the following command to repair the drive:
sudo fsck_exfat -y /dev/disk4s2
![Repair via Terminal]()
Replace disk4s2 with your actual drive identifier. The fsck_exfat command checks and attempts to repair any errors on the ExFAT drive.
Option 2: Use Third-Party Tools
There are several third-party tools available that can help repair a corrupted ExFAT drive. Some popular options include:
- Donemax Data Recovery for Mac: This data recovery software can repair corrupted ExFAT drives and recover lost files.
- iBoysoft Mac Data Recovery: A tool that can fix and recover data from ExFAT, NTFS, and HFS+ drives.
- Wondershare Recoverit: Another data recovery tool with support for ExFAT drives.
These tools often offer more advanced repair options than Disk Utility or Terminal, making them ideal if the drive is severely corrupted or if the built-in macOS tools are unable to help.
Advanced Solutions to Fix Unmounted or Corrupted ExFAT Drive on Mac
If basic troubleshooting steps don't work, you may need to use more advanced techniques to fix your ExFAT drive.
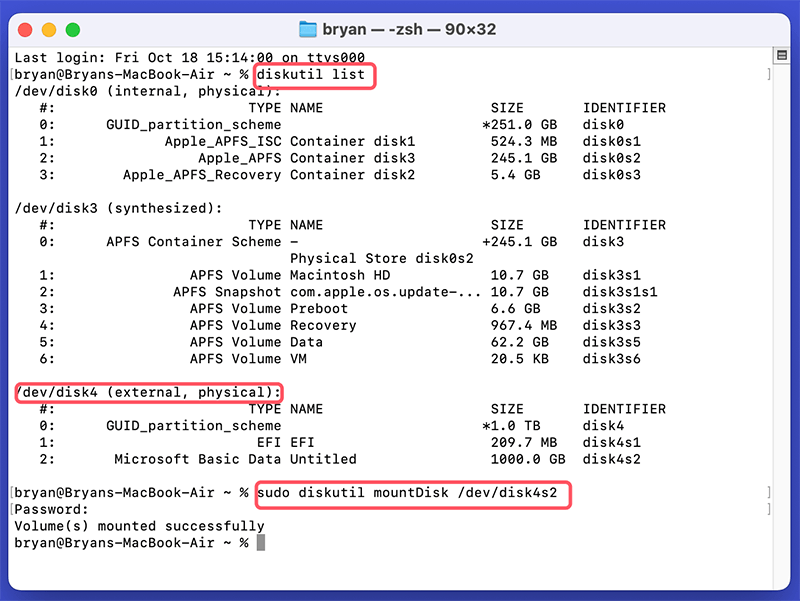
Step 1. Use Terminal to Manually Mount the Drive.
If the drive isn't mounting automatically, you can use Terminal to manually mount it. Here’s how:
- Open Terminal.
- Run the command to list all connected disks:
diskutil list
- Find your ExFAT drive in the list and note its identifier (e.g., disk4s2).
- Run the following command to mount the drive:
sudo diskutil mountDisk /dev/disk4s2
If the drive mounts successfully, you should now be able to access it from Finder.
Step 2. Reformat the ExFAT Drive (if Necessary).
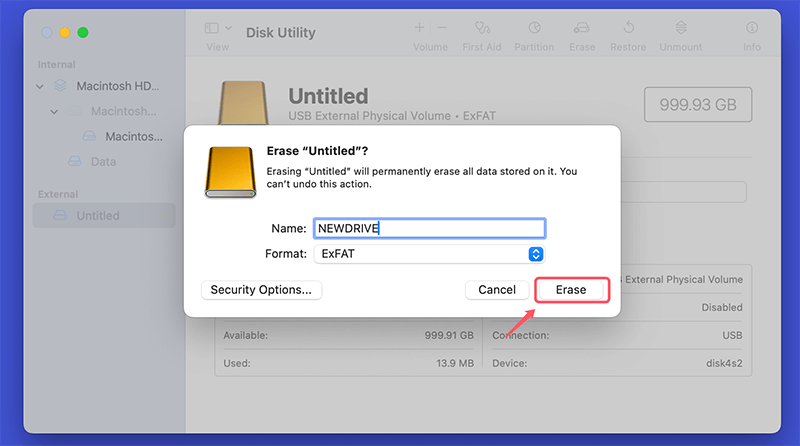
If the drive is still not functioning and no other methods work, you might need to reformat the drive. Warning: Reformatting a drive will erase all data on it, so ensure you have a backup before proceeding.
To reformat an ExFAT drive:
- Open Disk Utility.
- Select the drive in the sidebar.
- Click the Erase button.
- Choose ExFAT as the format, and provide a new name for the drive if desired.
- Click Erase to reformat the drive.
![Reformat the ExFAT Drive]()
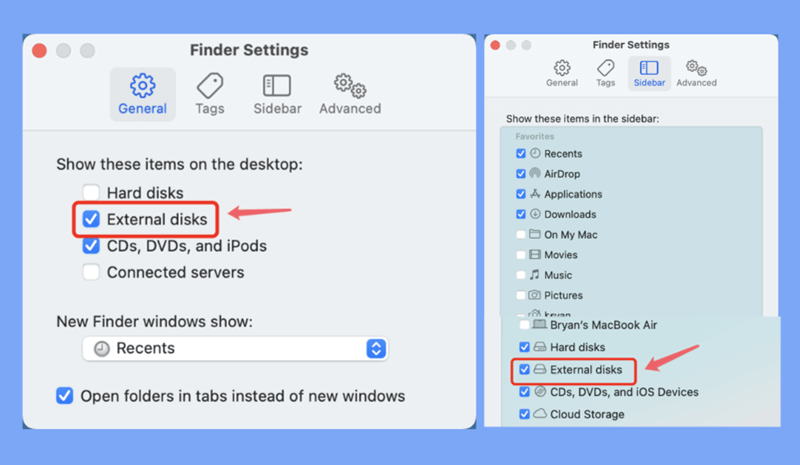
Step 3. Check Finder Settings to Fix ExFAT Drive Not Showing Up.
If the ExFAT drive can be recognized by your Mac, but you can't see it on desktop or Mac Finder's Sidebar, just check Finder Settings.
- Open a Finder, click Finder on Apple menu.
- Choose Settings.
- Click General and Sidebar, make sure External disks has been selected.
![Check Finder Settings to Fix ExFAT Drive Not Showing Up]()
How to Recover Lost Data from Erased, Unmounted or Corrupted ExFAT Drive on Mac?
If you want to recover lost data from the ExFAT drive, you can use Mac data recovery software.
Step 1. Download and install the reliable Mac data recovery software - Donemax Data Recovery for Mac.
Step 2. Open Donemax Data Recovery for Mac, it shows all internal drives and external drives. Select the ExFAT drive to start data recovery.

Step 3. Click on Scan button to deeply scan the ExFAT drive and find all recoverable files.

Step 4. Once the scan is completed, select the desirable files, click on Recover button to save them.

Prevent Future Issues
To prevent issues with your ExFAT drive in the future:
- Always safely eject the drive from your Mac before disconnecting it to prevent file system corruption.
- Regularly check the drive for errors using Disk Utility or a third-party tool.
- Make sure to keep macOS and any relevant software up-to-date to ensure compatibility with external drives.
Conclusion
If your ExFAT drive is not working on your Mac, the problem could stem from a variety of sources, such as connection issues, file system corruption, or even compatibility problems with macOS. However, by following the troubleshooting steps outlined in this guide, you can diagnose and fix most issues with minimal hassle.
Remember that regular maintenance, such as safely ejecting your drive and performing periodic checks with Disk Utility, can help prevent future issues. If all else fails, using third-party repair tools or reformatting the drive might be your best option for restoring functionality.
By staying proactive and using the right troubleshooting techniques, you can ensure that your ExFAT drive continues to work smoothly on your Mac for years to come.
Related Articles
- Mar 04, 20257 Solutions to Fix WD My Book Not Showing Up on Windows 11/10/8
- Nov 29, 2024Disk Utility Partition Tab Greyed Out: Fix It Now
- Dec 26, 2024How to Remove SD Card's Write Protection on Mac? [5 Methods]
- Apr 15, 20258 Solutions to Fix com.apple.DiskManagement.disenter error -119930868 on a Mac
- Mar 17, 20256 Methods to Fix Couldn't Open Device 69877 Error on Mac
- Jan 15, 2025USB Drive Requires to Be Formatted: How to Fix It

Maria
Maria is one of the senior writers & editors of Donemax who lives and works in Sydney, Australia. She loves PC, Mac and Internet Technology. She has 6 years of writing articles about data recovery on PC/Mac, disk cloning solution, data eraser and computer OS optimization, etc. She is also interested in testing various software and digital products.

Gerhard Chou
In order to effectively solve the problems for our customers, every article and troubleshooting solution published on our website has been strictly tested and practiced. Our editors love researching and using computers and testing software, and are willing to help computer users with their problems
Hot Donemax Products

Clone hard drive with advanced clone technology or create bootable clone for Windows/Mac OS.

Completely and easily recover deleted, formatted, hidden or lost files from hard drive and external storage device.

Certified data erasure software - permanently erase data before selling or donating your disk or any digital device.

