PAGE CONTENT:
Error Code 43 is one of those frustrating problems that can occur on macOS when you're trying to move, delete, or copy files. It often comes with the message, "The operation can't be completed because one or more required items can't be found. (Error Code -43)". This error can appear suddenly and prevent you from organizing your files or transferring data, which can be quite annoying.
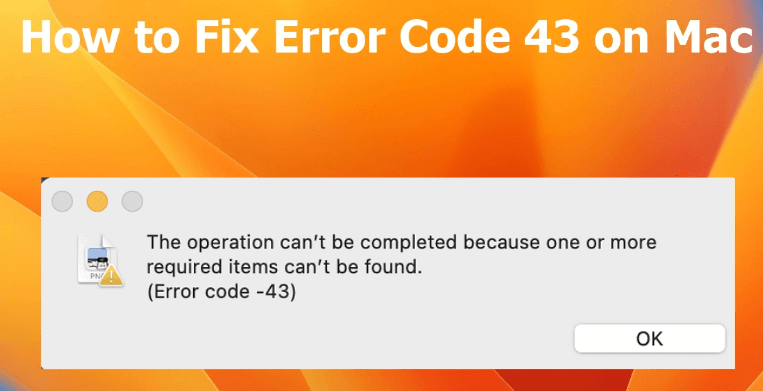
Typically, Error Code 43 is related to issues such as corrupt files, permission conflicts, or even issues with connected external drives. In this article, we'll explore why this error occurs and discuss multiple methods to help you fix Error Code 43 on your Mac.
Understanding Error Code 43 on Mac
Error Code 43 usually appears when Finder can't locate the item you want to move or delete. It's a system error that arises due to different reasons, including:
- Corrupted Files: Files that have become corrupted, either during download or while being used, can trigger this error.
- Incompatible File Names: File names that contain special characters not supported by macOS.
- Missing System Permissions: The user may not have proper permission to modify or access the file.
- Issues with External Drives: Moving or deleting files from an external storage device that has issues such as corrupt sectors or an improper file system.
- Network File System Issues: If the file is stored in a network-attached location, connectivity issues can lead to Error Code 43.
Understanding these possible reasons makes it easier to troubleshoot and resolve the issue.
Solutions to Fix Error Code 43 on Mac
Solution 1: Restart Your Mac
This may seem basic, but sometimes a simple restart is all it takes to resolve Error Code 43. Restarting your Mac clears system caches and can help resolve minor glitches.
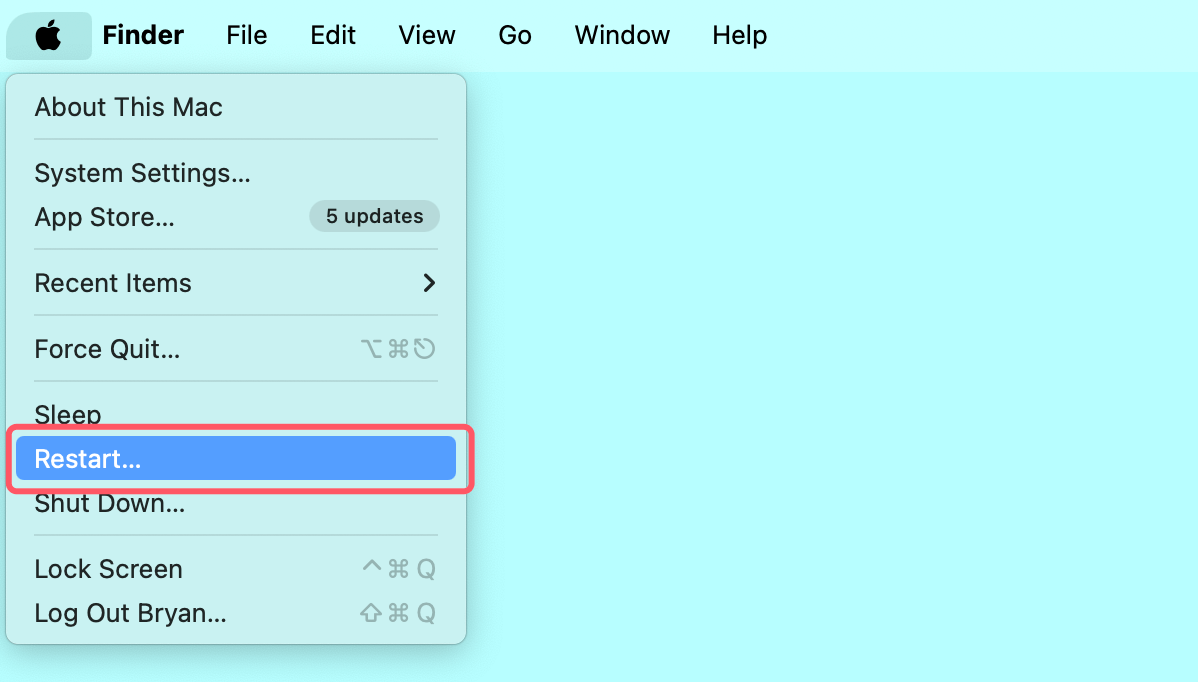
- Tap the Apple logo in the upper-left corner of the screen.
- From the drop-down option, choose Restart.
![Restart Your Mac]()
Once your Mac reboots, try to perform the same operation and see if the error is resolved.
Solution 2: Check File Name and Path
The next thing to check is the file name. Mac systems may throw Error Code 43 if the file you’re trying to access has an unsupported name or is located in a problematic directory.
- Unsupported Characters: If your file name includes special characters such as “!@#$%^&*()”, try renaming it to something simple with only alphabets and numbers.
- Steps to Rename a File:
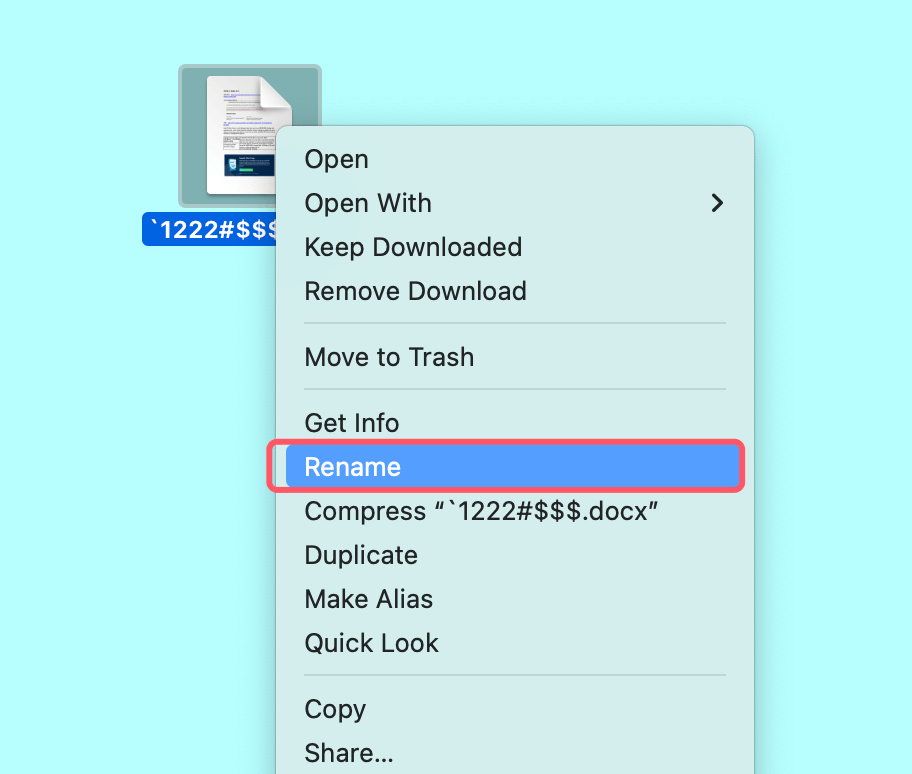
- Right-click on the file.
- Select Rename, and provide a new name that avoids special characters.
![Rename a File]()
Additionally, make sure the file or folder isn't nested too deeply within the file system. Files located in long, complex directory paths may sometimes cause issues.
Solution 3: Use Disk Utility to Repair Disk Permissions
Disk Utility is a built-in tool that allows macOS users to manage their drives and troubleshoot disk errors. If Error Code 43 is occurring because of file corruption or improper permissions, using Disk Utility's First Aid function may help resolve the issue by checking for and repairing disk problems.
Steps to Use Disk Utility to Repair the Disk:
- Open Disk Utility:
- You can find Disk Utility by navigating to Applications > Utilities > Disk Utility.
- Alternatively, open Spotlight Search by pressing Command + Space, type Disk Utility, then hit Enter.
- Select the Disk or Partition:
- Once Disk Utility is open, you’ll see a list of internal and external drives connected to your Mac on the left-hand side.
- Select the disk or partition where the problematic file is located. This could be either your Mac’s internal hard drive (typically named Macintosh HD) or an external drive.
- Run First Aid:
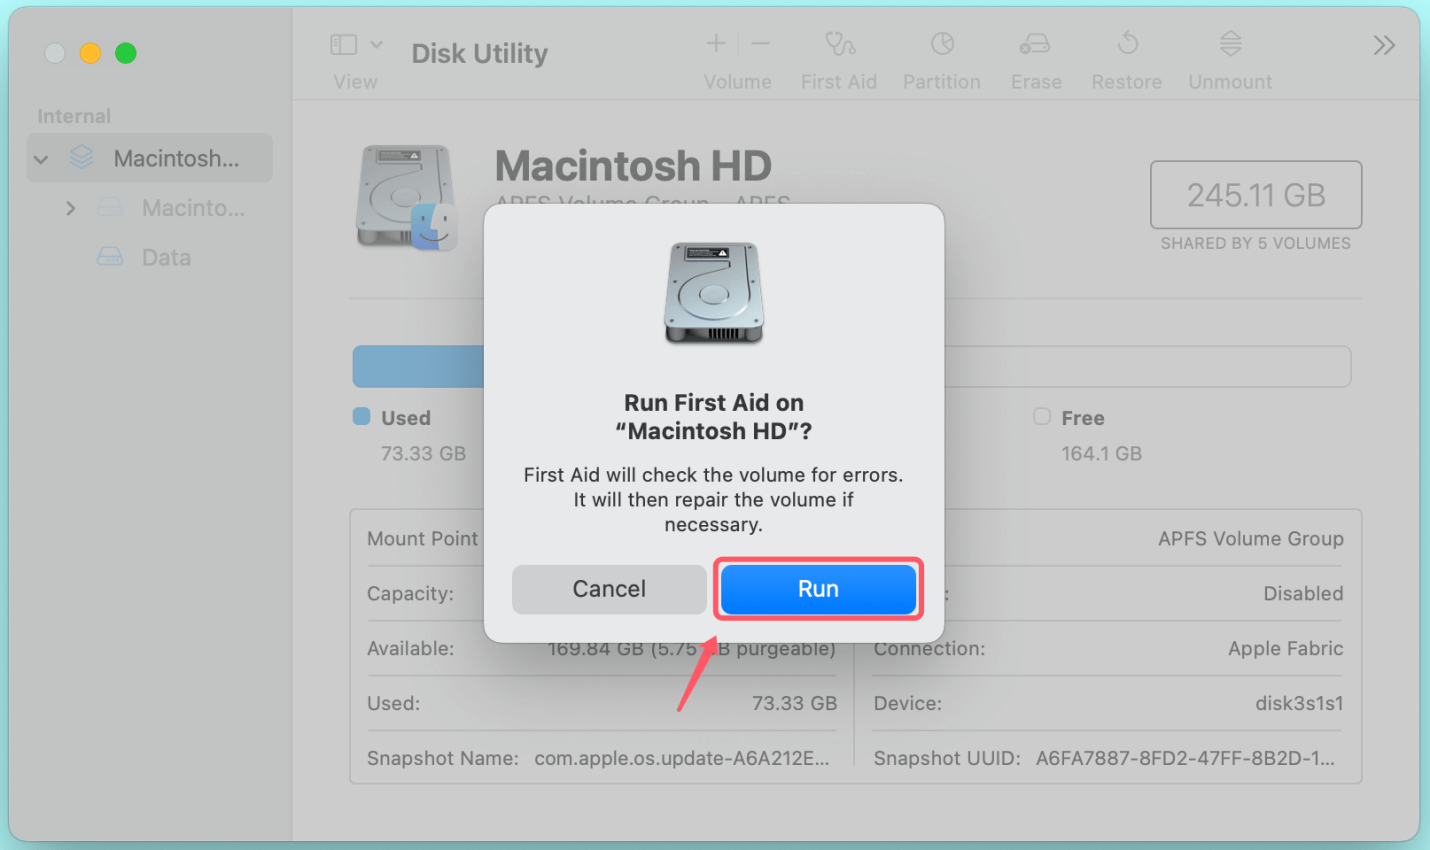
- A First Aid button is located at the top of the Disk Utility window. Press the button.
- A prompt will appear asking for confirmation. Click Run to start the process.
![Run First Aid]()
- First Aid will check the partition for common errors, such as improper file permissions, missing system files, and general disk corruption.
- If any errors are detected, Disk Utility will attempt to fix them.
- Monitor the Results:
- Disk Utility will notify you if any issues were detected and whether they were fixed successfully.
- Once the process is complete, click Done, and close Disk Utility.
💡 Note: If Disk Utility reports that the disk cannot be repaired, it could indicate more severe corruption, potentially pointing to hardware failure. In such cases, consider backing up your data and seeking professional repair.
Using Disk Utility can often resolve Error Code 43 by ensuring the disk's structure is intact and there aren't any permission conflicts preventing you from accessing or modifying specific files.
Solution 4. Force Quit Finder
Error Code 43 could also be caused by Finder glitches. Force quitting and restarting Finder can help resolve this issue.
Steps to Force Quit Finder:
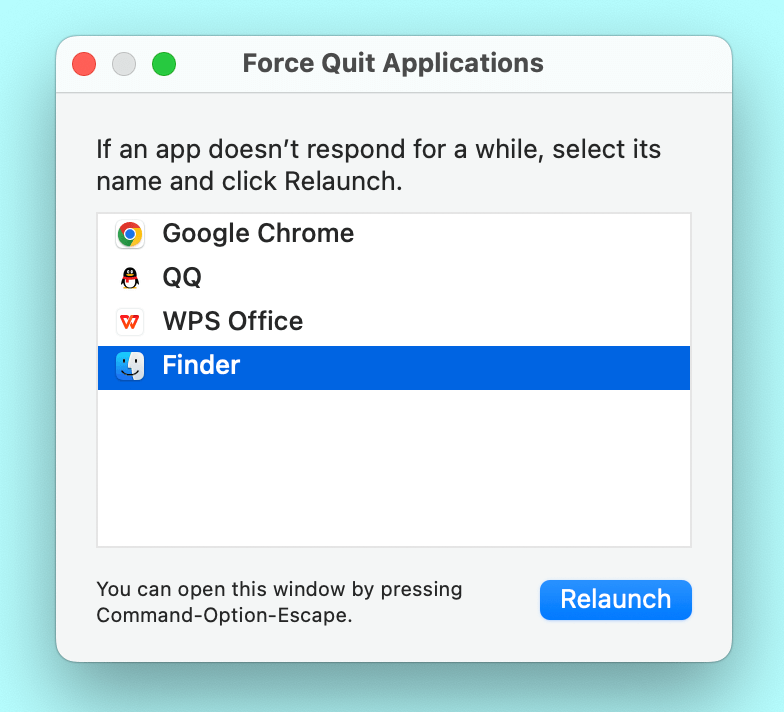
- To right-click the Finder icon on your Dock, hold down the Option key.
- To restart Finder, choose Relaunch.
![Force Quit Finder]()
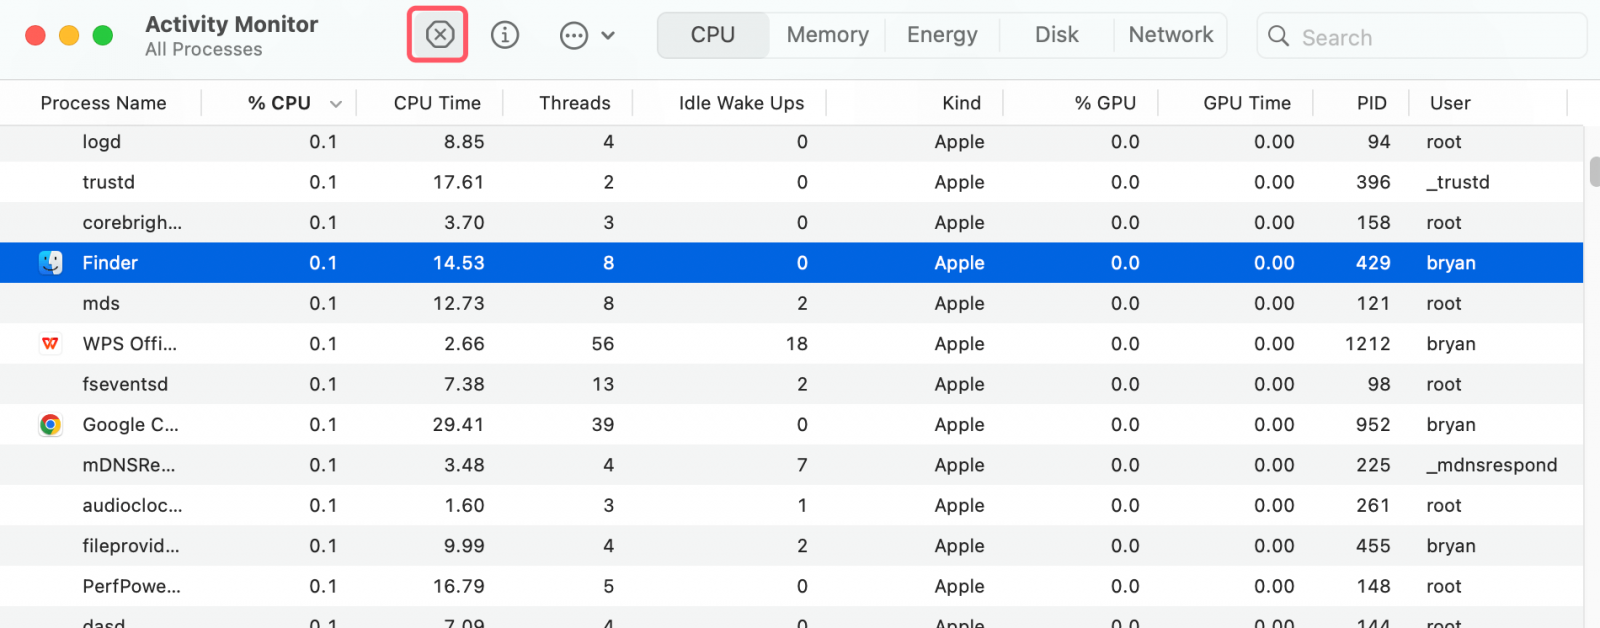
Alternatively, you can use Activity Monitor:
- Open Activity Monitor from Utilities via Applications.
- Locate Finder in the list of running applications.
- Select Finder and click the Stop (X) button to quit and restart it.
![Activity Monitor]()
Solution 5. Use Terminal to Delete Problematic Files
Use Terminal to Delete Problematic Files:
In some cases, Error Code 43 can prevent Finder from deleting a problematic file because the system is unable to access or locate the item properly. If this happens, Terminal - a command-line utility - can be used to forcefully delete the file. Terminal is powerful and bypasses many of the limitations of Finder, but it requires you to be careful, as it doesn't move items to the Trash but instead deletes them permanently.
Using Terminal to Delete Files:
- Open Terminal:
- You can open Terminal by navigating to Applications > Utilities > Terminal.
- Alternatively, press Command + Space to open Spotlight Search, type Terminal, and press Enter.
![Open Terminal]()
- Navigate to the Directory Containing the File:
- Use the cd (change directory) command to navigate to the folder where the problematic file is located.
- For example, if the file is located on the Desktop, type:
cd ~/Desktop
- Press Enter.
- List Files in the Directory (Optional):
- To verify that you’re in the correct directory, you can list the files using:
ls
- This will display all the files and folders in the current directory, allowing you to confirm that the problematic file is there.
- To verify that you’re in the correct directory, you can list the files using:
- Delete the File:
- To delete the file, use the rm command followed by the file name. For example:
rm filename
- If the file name contains spaces, make sure to use quotes, like this:
rm "file name with spaces"
- Press Enter, and the file will be deleted permanently.
- To delete the file, use the rm command followed by the file name. For example:
Using Force Delete (Optional):
- If the file is stubborn and the regular rm command doesn't work, you can use the force delete command:
rm -f filename
- The -f option forces the deletion without asking for confirmation. Be very cautious using this command, as it will permanently remove the file without further prompts.
Deleting Folders Recursively:
- If the problematic item is a folder (directory), you can use the -r flag to delete it along with all its contents:
rm -r foldername
- This will remove the folder and all files/subfolders within it.
⚠️ Warning: Always double-check the file name and directory path before running the delete command, as Terminal doesn't send files to the Trash. Once deleted, recovery can be difficult, especially if you do not have a backup.
Solution 6: Reset NVRAM/PRAM and SMC
Resetting the NVRAM/PRAM and the SMC can resolve system-level issues that lead to Error Code 43.
Steps to Reset NVRAM/PRAM:
- Turn off your Mac.
- Turn it back on and press and hold Option, Command, P, and R right away.
- Hold down the keys until the Mac restarts, which should take around 20 seconds.
Steps to Reset SMC:
- For Intel-based MacBooks (with a non-removable battery):
- Turn off your Mac.
- On the left side of the keyboard, hold down Shift + Control + Option. At the same time, push the power button.
- Hold for ten seconds, then let go of your Mac's power and all keys.
Resetting the NVRAM/PRAM and SMC helps restore system settings that may be affecting Finder and causing the error.
Solution 7: Use Safe Mode
Booting your Mac into Safe Mode can help resolve software conflicts or remove temporary files that may be causing the error.
Steps to Enter Safe Mode:
| For Intel-based Mac | For Apple M-chip based Mac |
|
|
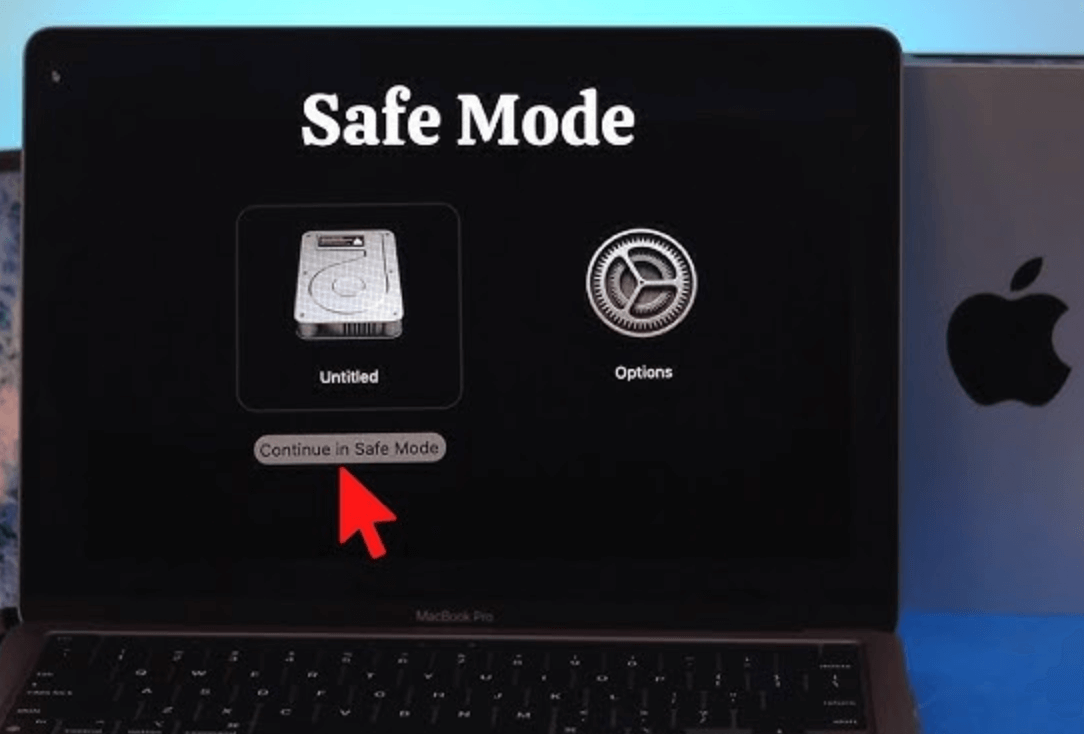
In Safe Mode, macOS will run diagnostics, disable third-party software, and only load essential system extensions. Try deleting or moving the file again to see if the error persists.
What If Error Code 43 Persists? Try Mode Solutions
Consider Using Third-Party Software
There are third-party utilities designed to fix various macOS errors, including Error Code 43. Programs like Donemax Data Eraser for Mac can help resolve errors related to file system permissions or system-level conflicts.
Ensure you download software only from reputable developers to avoid introducing malware to your system.
Seek Help from Apple Support
If none of the solutions work, and Error Code 43 keeps occurring, it's a good idea to contact Apple Support. Persistent errors could indicate a hardware problem that needs to be addressed by professionals. An authorized Apple technician will be able to diagnose the issue more thoroughly and recommend appropriate repairs.
Preventing Error Code 43 in the Future
To minimize the risk of encountering Error Code 43 in the future, it's essential to adopt some best practices:
1. Proper File Management
- Avoid Special Characters: Always name your files with simple alphabets and numbers to avoid potential issues.
- Organize Files Logically: Avoid nesting folders too deeply, which can make files difficult for Finder to access.
2. Safely Eject External Drives
Error Code 43 can arise due to improperly ejected drives. Always eject external drives properly before unplugging them to avoid file system corruption:
- Right-click on the external drive icon and select Eject.
- Wait for the confirmation before disconnecting the device.
3. Keep macOS Updated
Apple frequently releases updates that fix known bugs and improve system stability. To prevent errors like Code 43:
- Go to System Settings.
- Click General, then Software Update.
- If an update is available, click Update Now.
Keeping your macOS up-to-date ensures that your system is protected against known software issues and compatibility problems.
4. Regular Disk Maintenance
Running Disk Utility's First Aid from time to time can help catch and fix minor errors before they become bigger problems. Additionally, use a trusted third-party tool for deeper disk cleaning and optimization.
How to Manage Files Stored in NTFS Drives or Volumes on Mac?
If you find you can't delete, edit-save or add new files to a NTFS drive, you can use NTFS for Mac tool to solve this issue so that you can read-write any NTFS drive on your Mac without any limitation.
Step 1. Download and install the reliable NTFS for Mac software - Donemax NTFS for Mac.
Step 2. Open Donemax NTFS for Mac, then select a NTFS drive, click on Enable Writable button.

Step 3. Open the NTFS drive on Finder, check if you can add new files to it.
Conclusion
Error Code 43 on Mac can be inconvenient, especially if you're in the middle of organizing files or working on an urgent project. Fortunately, by understanding what causes this error and following the solutions discussed above, you can often resolve the problem without needing technical assistance. Restarting your Mac, verifying the file name, using Disk Utility, and even resetting system settings are all effective ways to deal with the issue.
If none of these fixes work, it may be a sign of a deeper problem requiring the expertise of Apple Support. Remember to adopt good practices such as proper file management and safely ejecting external drives to prevent such errors from occurring again.
By following these steps, you can get back to managing your files without the frustration of Error Code 43 getting in your way.

Donemax NTFS for Mac
An easy-to-use NTFS for Mac tool to help you enable writable for NTFS drives on Mac so that you can read-write NTFS drives on Mac without any limitation. It also can help you mount, format, repair, rename, open drive on your Mac.
Related Articles
- Dec 09, 20248 Solutions to Fix Can't Rename an External Hard Drive or USB Drive on Mac
- Mar 17, 202510 Solutions to Fix Seagate External Hard Drive Not Mounting on Mac
- Dec 12, 2024How to Fix USB Drive Won't Mount on Mac?
- Nov 27, 2024How to Fix RAW External Hard Drive, USB Drive, SD Card on Mac?
- May 10, 2024How to Fix Can't Open A Folder On Mac?
- Dec 31, 2024Disk Utility Can't Check and Repair APFS Volumes/Containers on Mac: Fix It Now

Christina
Christina is the senior editor of Donemax software who has worked in the company for 4+ years. She mainly writes the guides and solutions about data erasure, data transferring, data recovery and disk cloning to help users get the most out of their Windows and Mac. She likes to travel, enjoy country music and play games in her spare time.

Gerhard Chou
In order to effectively solve the problems for our customers, every article and troubleshooting solution published on our website has been strictly tested and practiced. Our editors love researching and using computers and testing software, and are willing to help computer users with their problems
Hot Donemax Products

Clone hard drive with advanced clone technology or create bootable clone for Windows/Mac OS.

Completely and easily recover deleted, formatted, hidden or lost files from hard drive and external storage device.

Certified data erasure software - permanently erase data before selling or donating your disk or any digital device.
