Written byStevenUpdated on Apr 22, 2025
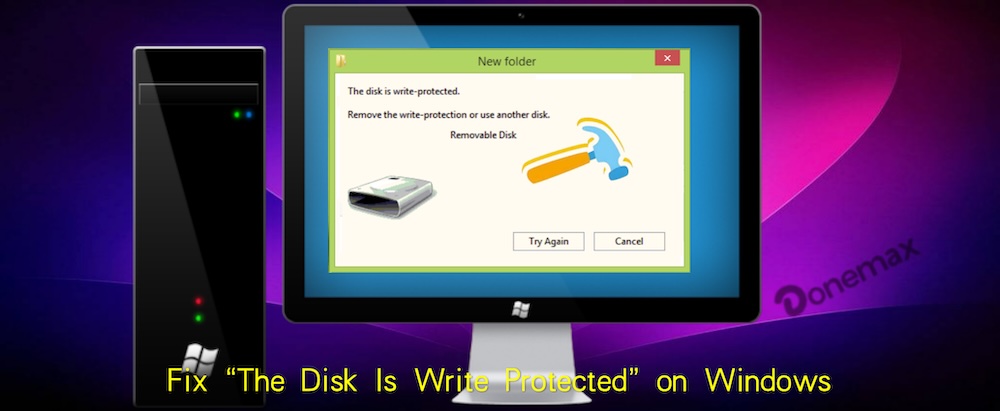
Fix 'The Disk Is Write Protected' in Windows 11/10/8/7
Approved byGerhard Chou
PAGE CONTENT:
If you've ever encountered the frustrating message "The disk is write protected" on your Windows computer, you know how annoying it can be. Whether you're trying to create files, delete data, or format a drive, this error message blocks you from performing essential tasks. Fortunately, this issue is often easy to fix, and in this article, we will walk you through multiple solutions for resolving the "Disk is Write Protected" error on various versions of Windows, including 11, 10, 8, and 7.
What Does "The Disk Is Write Protected" Mean?
A mechanism known as "write protection" stops alterations from being made to a disk or drive. When a disk is write-protected, you can read data from it, but you cannot add, modify, or delete any files. Write protection is typically used as a safeguard to prevent accidental data loss or to protect important files from being tampered with.
In the case of the "Disk is Write Protected" error, Windows is notifying you that the disk (USB flash drive, SD card, external hard drive, etc.) is in a write-protected state. This can happen due to a variety of reasons, and understanding the root cause can help you find the correct solution.
How to Identify If Your Disk is Write Protected
Before you jump into solutions, it's important to first confirm if your disk is, indeed, write-protected. Here's how you can check for write protection in different types of storage devices:
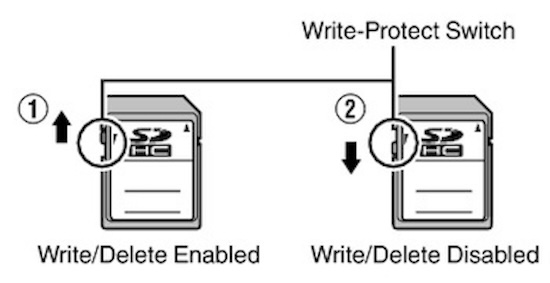
1. External Devices (USB Drives, SD Cards):
A physical switch on a lot of SD cards and USB devices can lock the device in a write-protected mode. Verify that a tiny switch on the drive's side is in the "unlocked" position.

The switch for SD cards is often found on the card's left side. For USB drives, it can vary by brand.
2. Internal Hard Drives and SSDs:
For internal hard drives or SSDs, write protection is typically not caused by a physical switch. If you're encountering this error on an internal drive, the problem is most likely software-related.
3. Using Command Prompt:
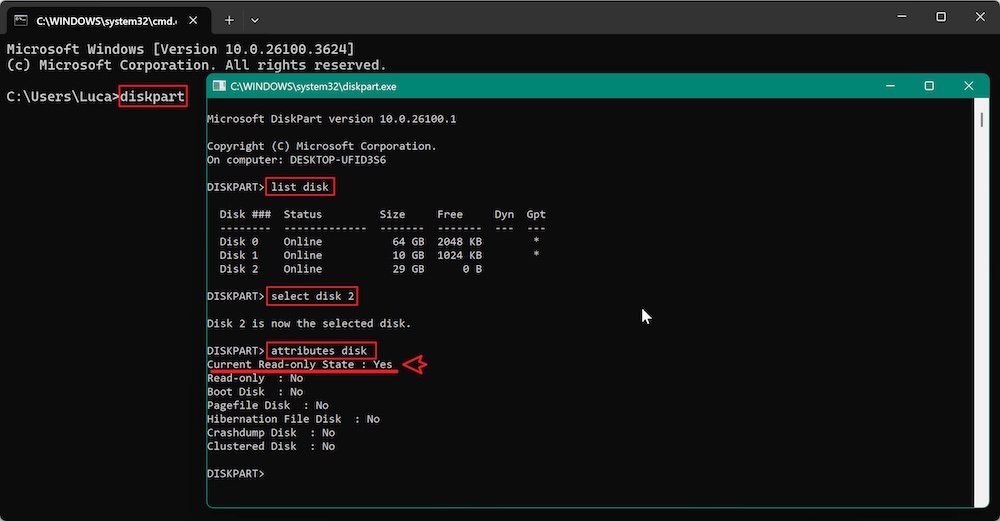
Open Command Prompt and use the diskpart tool to verify the write protection status.
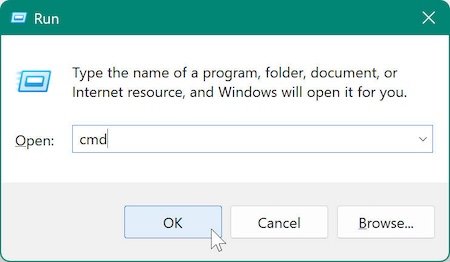
- Hit Win + R, type "cmd," and then press Enter.
![fix 'The disk is write protected' in Windows]()
- Press Enter after entering diskpart.
- To see all attached devices, type list disk when the Diskpart tool opens.
- Type select disk X (replace X with the disk number you want to check).
- Finally, type attributes disk to see if the write protection is enabled. If the "Current Read-only Status" or "Ready-only" attribute is listed as "Yes," then the disk is write-protected.
![fix 'The disk is write protected' in Windows]()
Once you've identified the issue, it's time to explore the various methods to fix it.
Methods to Fix the Write Protection Error
Method 1: Check for Physical Write Protection Switch
The simplest solution may be to check for a physical write protection switch, especially for external storage devices like USB flash drives or SD cards. Many of these devices come equipped with a small switch that, when turned on, activates write protection.
How to Disable the Write Protection Switch:
- Locate the Write Protection Switch:
- On an SD card, the switch is typically on the left side of the card.
- For USB drives, the switch can be found on the side or top of the device. It may be labeled as "Lock" or have a small padlock icon.
- Toggle the Switch:
- To turn off write protection, slide the switch to the unlocked position if it is locked.
- Reinsert the Device:
- To see if the problem has been fixed, safely remove the device and put it back into your computer once the switch has been changed to the unlocked position.
If your device has no physical write protection switch, or the issue persists, proceed to the next solution.
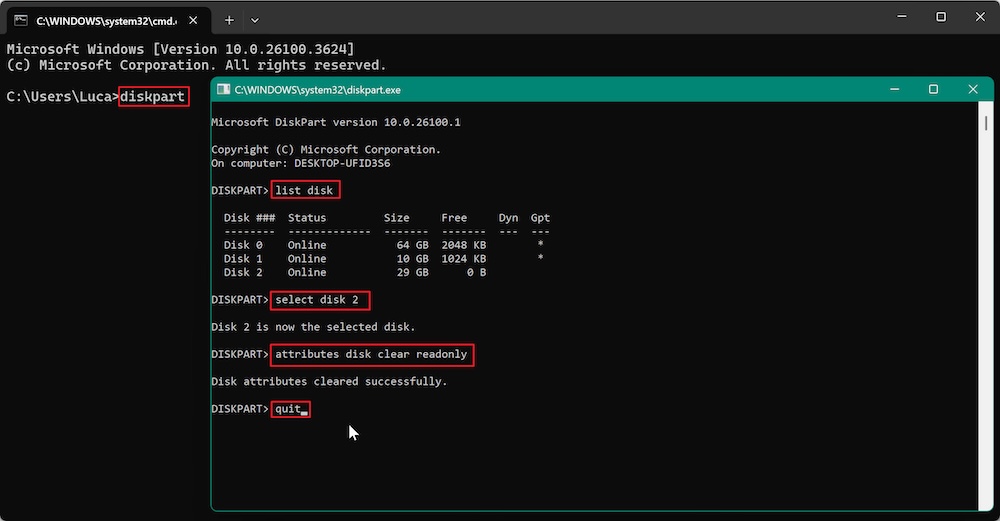
Method 2: Use Diskpart Command in Command Prompt
This tool allows you to modify the attributes of a disk, including write protection.
Steps to Remove Write Protection with Diskpart:
- Open Command Prompt as an administrator. Choose Command Prompt (Admin) or Windows PowerShell (Admin) by pressing Win + X.
- To launch the Diskpart utility, type diskpart and hit Enter. Press Enter after typing list disk.
- This will display all connected disks.
- Find the disk that is write-protected. For example, if your USB drive is listed as "Disk 1," type select disk 1 (replacing 1 with the number of the disk you want to modify) and press Enter.
- Press Enter after typing attributes disk clear readonly. The chosen disk's write protection will be lifted as a result.
- Type quit and hit Enter to exit the diskpart.
- Close the Command Prompt window.
After completing these steps, check the disk to see if write protection has been disabled. If the problem persists, move on to the next solution.
Method 3: Disable Write Protection via the Windows Registry
In some cases, the write protection is caused by a registry setting that prevents the system from writing to the disk. You can disable this protection by editing the Windows Registry, though it's important to back up your registry beforehand to avoid potential issues.
How to Modify the Registry:
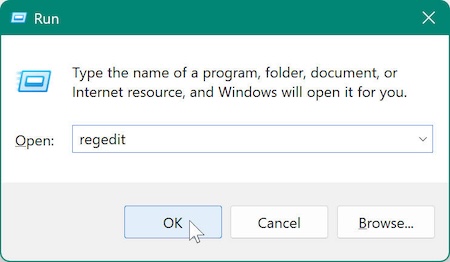
- To launch the Registry Editor, use Win + R to bring up the Run dialog box. Then, type "regedit" and hit Enter.
![fix 'The disk is write protected' in Windows]()
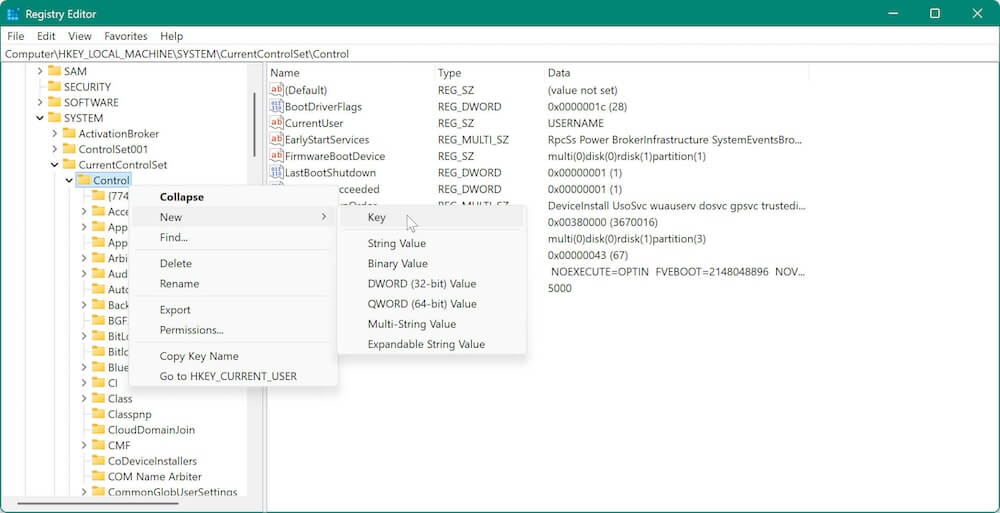
- Go to the registry key shown below:
HKEY_LOCAL_MACHINE\SYSTEM\CurrentControlSet\Control\StorageDevicePolicies
![fix 'The disk is write protected' in Windows]()
- Right-click on the Control folder, choose New > Key, and give it the name "StorageDevicePolicies" if the StorageDevicePolicies folder isn't already there.
![fix 'The disk is write protected' in Windows]()
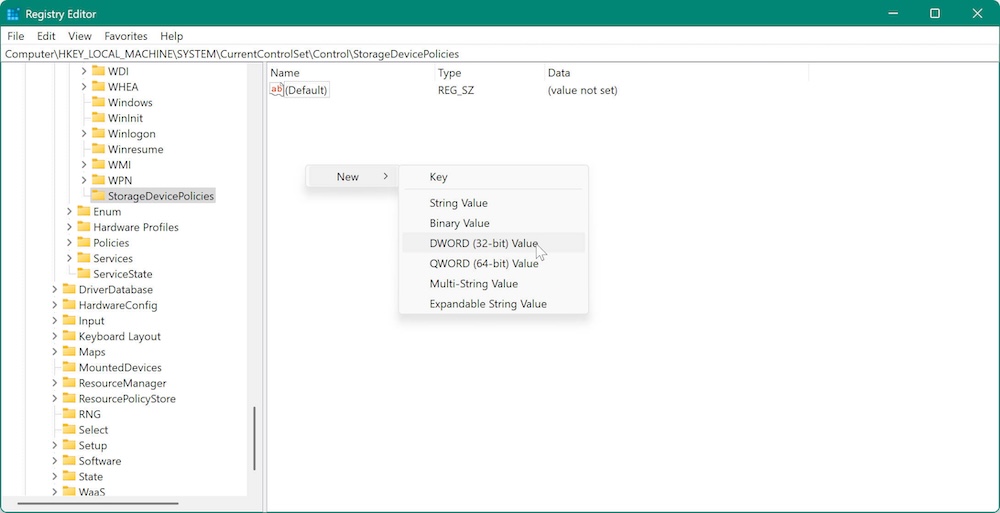
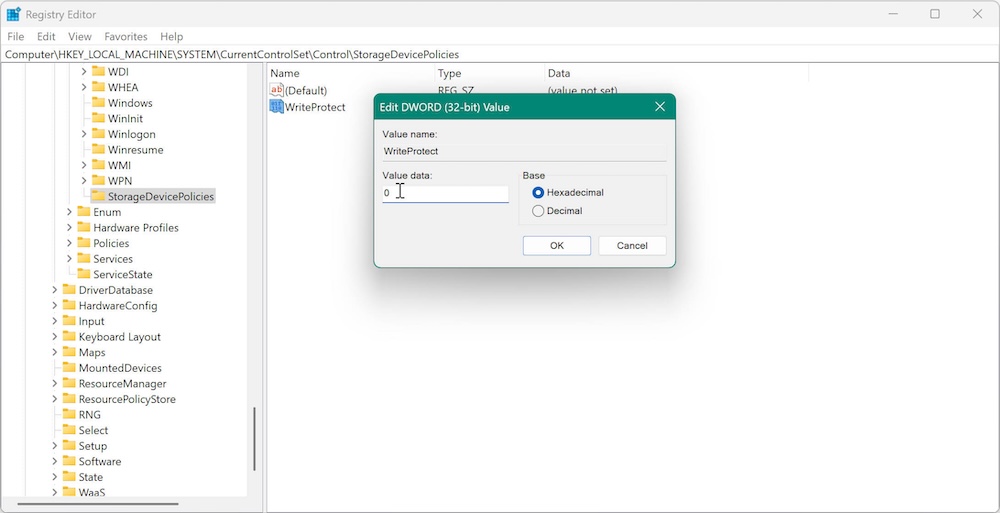
- Right-click on the blank area in the right panel of the StorageDevicePolicies key, then choose New > DWORD (32-bit) Value. "WriteProtect" is the new value's name.
![fix 'The disk is write protected' in Windows]()
- Click OK after double-clicking the WriteProtect value and setting its Value data to 0.
![fix 'The disk is write protected' in Windows]()
- Restart your computer after shutting down Registry Editor.

This method should disable write protection if the issue was caused by the registry settings. If the error still appears, try the next method.
Method 4: Using Group Policy Editor (For Windows Pro Editions)
You can control write protection settings with the Group Policy Editor if you're running Windows Pro or Enterprise. Note that Windows Home editions cannot use this strategy.
Steps to Disable Write Protection Using Group Policy Editor:
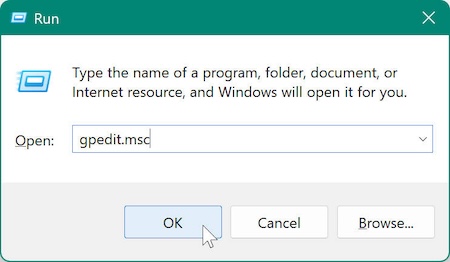
- Press Win + R, type "gpedit.msc", and press Enter to open the Group Policy Editor.
![fix 'The disk is write protected' in Windows]()
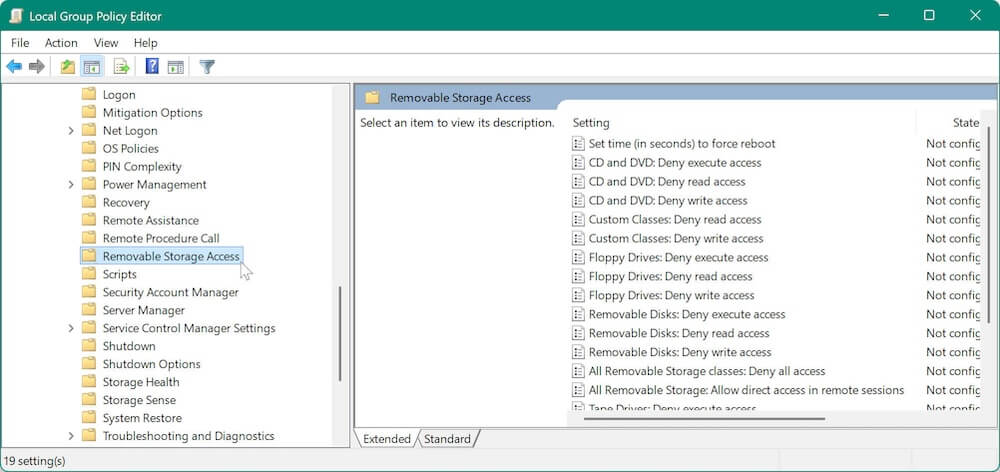
- Navigate to Computer Configuration under Administrative Templates in System under Removable Storage Access.
![fix 'The disk is write protected' in Windows]()
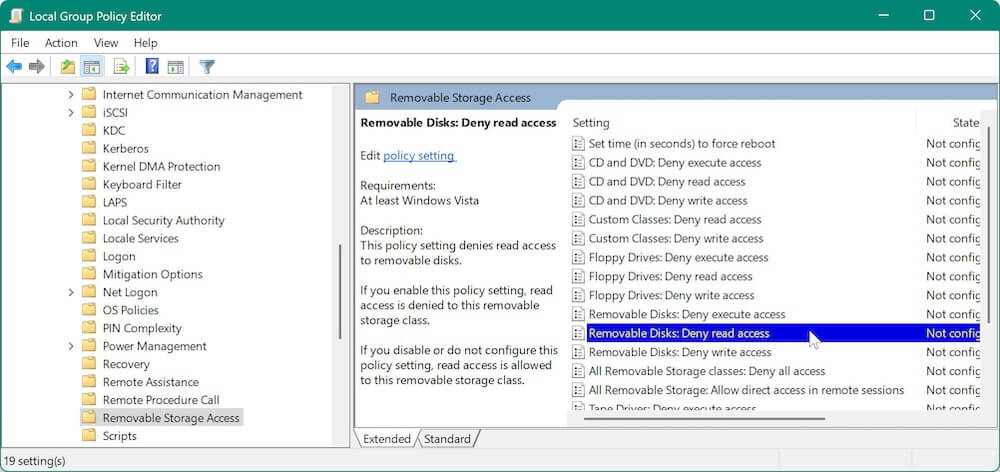
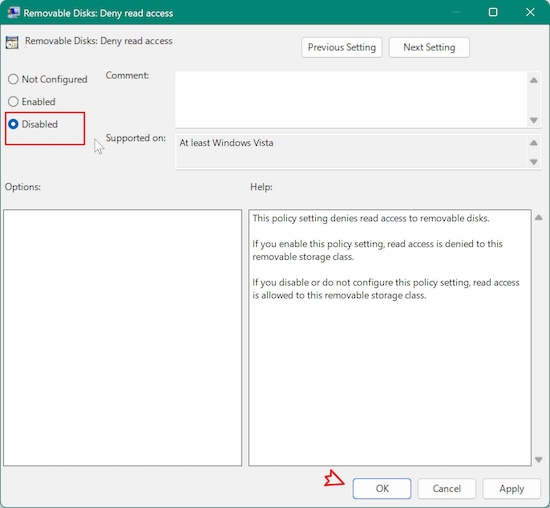
- Double-click Removable Disks in the right pane: Deny write access.
![fix 'The disk is write protected' in Windows]()
- In the window that opens, select Disabled to allow write access to removable disks. Click OK to save the changes.
![fix 'The disk is write protected' in Windows]()
- Restart your computer after closing the Group Policy Editor.
This should resolve the write protection error on external devices. If it doesn't, proceed to the next step.
Method 5: Fix the Write-Protected Drive with Third-Party Tool
Additionally, you can use the third-party software Donemax Data Eraser to repair the drive. Here is how:
Step 1. Download and install the software.
Donemax Data Eraser
- Repair drive and manage disks with multiple useful features.
- Wipe data from hard drive or other devices permanently.
- 100% safe and easy-to-use data erasure tool for Windows/Mac.
Step 2. Repair the drive with the software.
Run the software and change to Disk Tool option. Select the write-protected drive or card, then click Repair button to start.
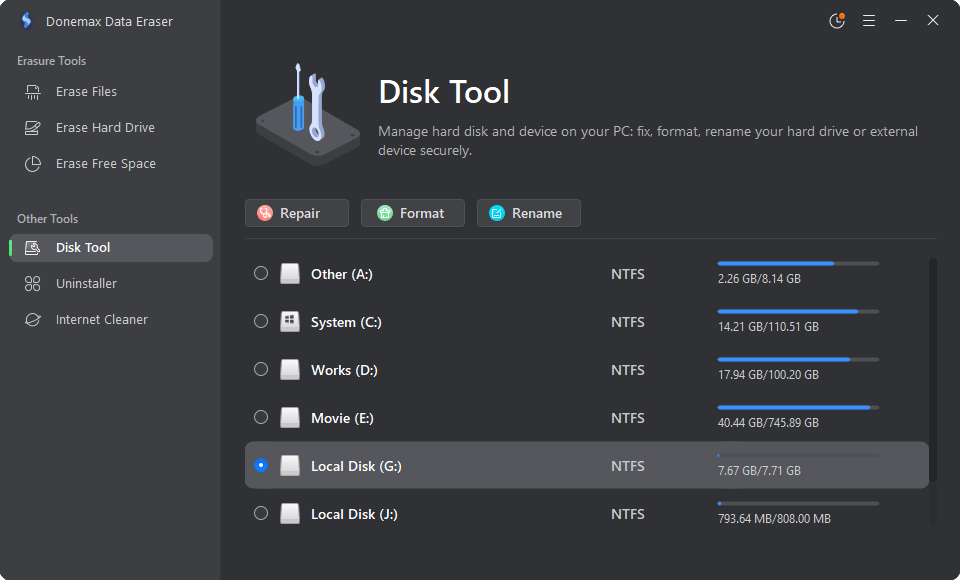
The software will start to check the device and try to fix any found errors. If the repair is successfully, the write-protection will be removed and the drive/card will be writable again.
Method 6. Format Write-Protected Drive
To get rid of write protection, you might have to format the drive if all else fails. Make cautious to backup any vital files before starting, though, as formatting will remove all data from the device.
How to Format the Disk:
You can also use the system built-in tool to format the drive. Here are the steps:
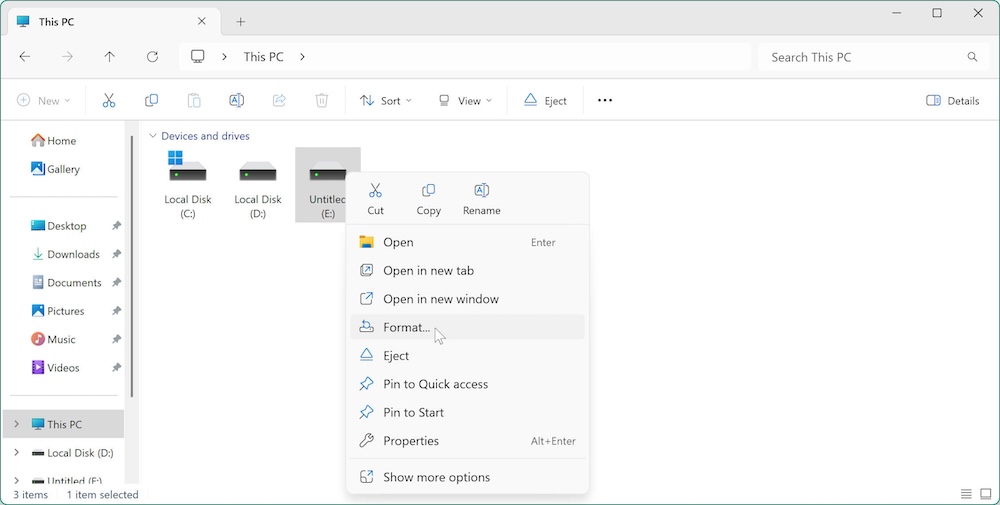
- Select Format from the menu when you right-click on the write-protected disk in File Explorer.
![fix 'The disk is write protected' in Windows]()
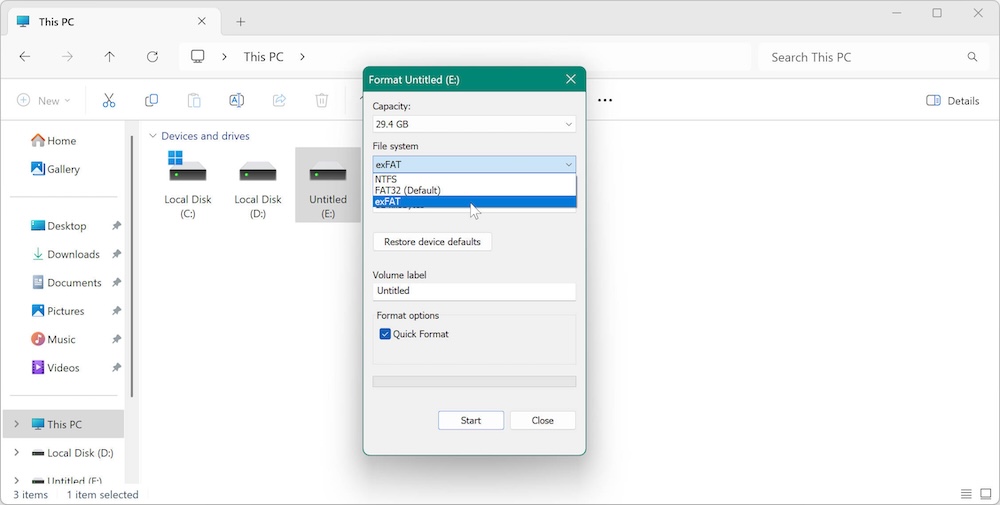
- Select the desired file system in the Format window (typically FAT32 or exFAT for external devices and NTFS for internal drives).
![fix 'The disk is write protected' in Windows]()
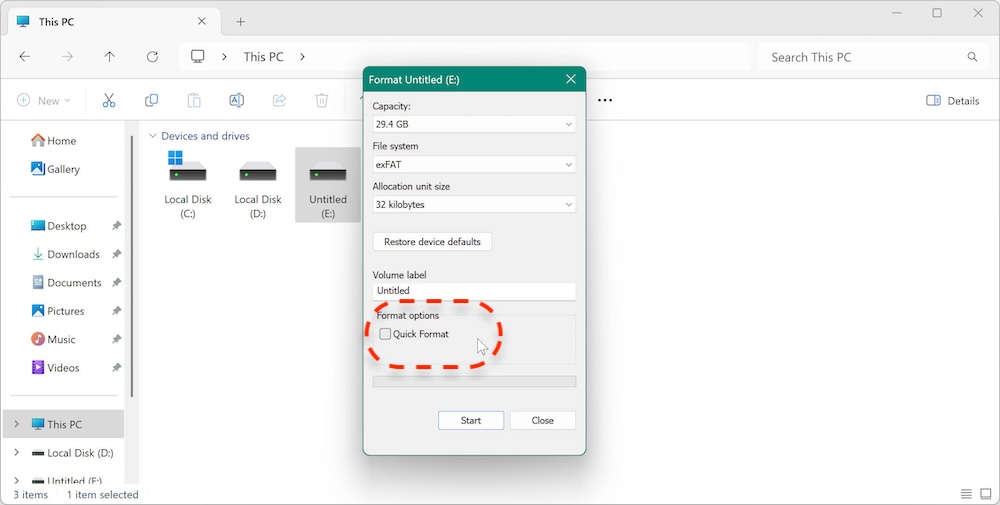
- If you prefer a complete format (which is advised for more extensive repairs), uncheck the Quick Format option.
![fix 'The disk is write protected' in Windows]()
- Press Start and watch for the procedure to be completed.
✍ Note: Sometimes, it's impossible format a write-protected device in Windows; you might end up receiving the same "The disk is write protected" error message. To avoid this, you can reboot Windows and get into safe mode to format the write-protected device.
Once the format is complete, the write protection should be removed. However, if the problem persists, it could be a sign of a deeper issue with the disk or file system.
Troubleshooting Other Potential Causes
If none of the above methods worked, you can try the following additional troubleshooting steps:
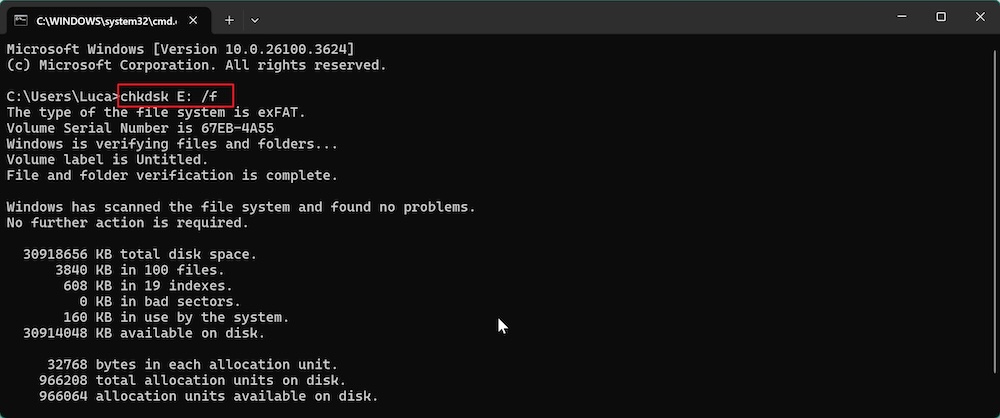
1. Check for Disk Errors Using CHKDSK:
Open Command Prompt and type chkdsk X: /f (replace X with your disk's letter). This will scan the disk for errors and fix any issues found.
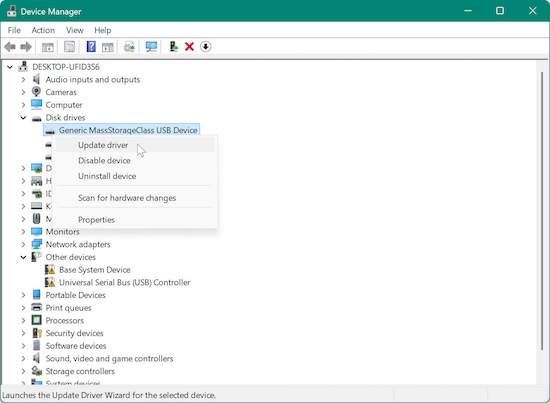
2. Update Device Drivers:
Go to Device Manager, find your external device under Disk Drives, right-click, and select Update Driver.
3. Ensure Sufficient Disk Space:
If the disk is nearly full, it may prevent you from making changes. Check the available space and free up some room if necessary.
Preventing Future Write Protection Errors
To avoid running into the "Disk is Write Protected" error again in the future, follow these best practices:
- Regularly update your operating system and device drivers.
- Eject external devices safely by using the "Safely Remove Hardware" option in Windows to prevent data corruption.
- Check disks regularly for errors using built-in tools like CHKDSK.
- Use anti-virus software to prevent malware from causing disk corruption or write protection issues.
Conclusion
"The Disk is Write Protected" error in Windows can be a frustrating obstacle, but as we've seen, there are several methods to resolve it. By following the solutions provided, you can remove the write protection from your disk and regain full access to your files. Remember to always back up your data before making significant changes, such as modifying the registry or formatting the disk.
If you've tried all the solutions and the issue persists, there may be a deeper hardware issue, and it may be time to replace the disk. But in most cases, these solutions should work and get you back on track in no time.
Donemax Data Eraser
Donemax Data Eraser One of the best data erasure programs for permanently erase data from PC, Mac, HDD, SSD, USB drive, digital camera and other devices. Once the data is erased, it is lost for good, cannot be recovered by any method.
Related Articles
- Nov 27, 2024Fix AppleAPFSMedia Not Mounted Without Data Loss
- Feb 11, 2025(12 Solutions) Fixed: Nothing Happens When Plugging in a USB Flash Drive
- Apr 22, 2025How to Fix 'inaccessible Boot Device (Stop Code 0x0000007b)' Error?
- Jul 19, 2025Fix SD Card Is Blank or Has Unsupported File System - 7 Proven Solutions
- Jul 05, 2024Samsung Portable SSD T9 Is Not Mounting on Mac, Fix It Now
- Dec 28, 2024(Solved) Delete Many Files on Mac, But Can't Free Up Disk Space

Contributing Writer
Steven
Steven has been a senior writer & editor of Donemax software since 2020. He's a super nerd and can't imagine the life without a computer. Over 6 years of experience of writing technical solutions and software tesing, he is passionate about providing solutions and tips for Windows and Mac users.

Editor in chief
Gerhard Chou
In order to effectively solve the problems for our customers, every article and troubleshooting solution published on our website has been strictly tested and practiced. Our editors love researching and using computers and testing software, and are willing to help computer users with their problems
Hot Donemax Products

Clone hard drive with advanced clone technology or create bootable clone for Windows/Mac OS.

Completely and easily recover deleted, formatted, hidden or lost files from hard drive and external storage device.

Certified data erasure software - permanently erase data before selling or donating your disk or any digital device.