Written byLucienUpdated on Feb 17, 2025
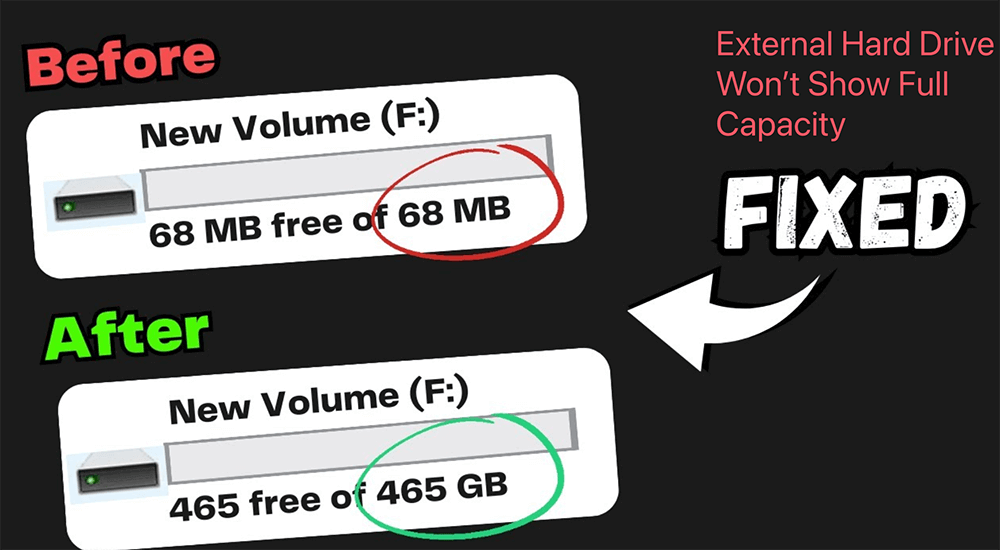
External Hard Drive Won't Show Full Capacity: How to Fix It?
Approved byGerhard Chou
Overview: Imagine purchasing a 1TB external hard drive, only to find it displays only 500GB of usable space. This discrepancy can arise due to several factors, such as partitioning errors, hidden partitions, or file system limitations. Understanding and resolving this issue ensures you get the maximum value from your investment. This guide will walk you through common causes, how to diagnose the problem, and various solutions to help you unlock the full potential of your external drive. If you have lost data from the external hard drive, just use data recovery program - such as Donemax Data Recovery to get the lost data back.
Hi, I have a 1TB Seagate external hard drive and only 3GBs are used. But, I connect it to my computer, it only shows 300GB storage capacity, why, and how to get the full capacity?
PAGE CONTENT:
External hard drives are an essential tool for storing large amounts of data. However, one frustrating issue users often encounter is the drive not showing its full capacity. Whether you've purchased a new drive or are using an old one, seeing a smaller capacity than advertised can leave you puzzled and concerned. In this article, we'll explore the reasons behind this issue, provide detailed steps to diagnose the problem, and outline effective solutions to regain the lost storage space.
Common Causes of Reduced Capacity of External Hard Drive
◾Partition Issues
One of the primary reasons for reduced capacity is improper partitioning. When a drive is not partitioned correctly, part of its storage may remain unallocated, making it invisible to the operating system.
◾File System Format Problems
Different file systems, such as NTFS, FAT32, and exFAT, have varying compatibility and capacity limits. For instance, FAT32, commonly used for cross-platform compatibility, cannot handle individual files larger than 4GB and might not display the full capacity on larger drives.
◾Hidden or Reserved Partitions
Some drives come with pre-installed software, recovery partitions, or system-reserved partitions that occupy a portion of the storage space. These partitions may not be visible in standard file explorer views but can be identified in disk management tools.
◾Corrupted Data or Bad Sectors
Physical or logical corruption of the drive can lead to unusable sectors, reducing the total available storage. Bad sectors are often caused by aging hardware, improper use, or power failures during data transfers.
◾Incorrect Drive Configuration
Misconfigured settings in tools like Disk Management (Windows) or Disk Utility (macOS) can lead to misrepresentation of the drive's capacity. Incorrectly assigned drive letters or unallocated partitions can also contribute.
◾Fake or Counterfeit Drives
A serious but less common issue arises when purchasing drives from unreliable sources. Some counterfeit drives are programmed to show inflated capacities that don't match their actual storage.
Steps to Diagnose the Problem That External Hard Drive Doesn't Show Its Real Storage Size
Before jumping to solutions, diagnosing the issue helps you understand the root cause. Follow these steps to identify the problem:
Step 1: Check in Disk Management (Windows)
- Choose Disk Management with a right-click on the Start menu.
- Refer to the list and locate your external hard disk.
- Look for unallocated space, which appears as a black bar.
![Check in Disk Management (Windows)]()
- Check the drive's partitions and total capacity.

Step 2: Inspect Using Disk Utility (macOS)
- Open Disk Utility from the Utilities folder via Applications.
- Choose your external drive from the left panel.
- Review the partitions and available space.
![Inspect Using Disk Utility (macOS)]()

Step 3: Use a Third-Party Tool
Tools like Donemax Data Recovery, MiniTool Partition Wizard, EaseUS Partition Manager, or AOMEI Partition Assistant provide detailed insights into partitioning, unallocated space, and file system issues.
Step 4: Verify Drive Authenticity
Use tools like H2testw or F3 to confirm if your drive is genuine and matches the advertised capacity. These tools write and read data to detect any discrepancies.
Fix External Hard Drive Not Showing Full Capacity: Fixes for Each Cause
When your external hard drive doesn't show its full capacity, the root cause often dictates the best solution. Below are detailed steps to resolve the most common causes, ensuring you can access the full storage space.
Fix 1: Resolve Partition Issues
Partition issues, such as unallocated or improperly divided space, are among the most common reasons for lost capacity. Here's how to fix them:
1. Create a New Partition for Unallocated Space
If part of the drive is unallocated, it won't be accessible to the operating system.
Windows:
- Press Win + X, then choose Disk Management to launch Disk Management.
- Find the unallocated area, which is denoted by a black bar.
- Pick New Simple Volume from the menu when you right-click the unallocated space.
![Create a New Partition (windows)]()
- Assign a drive letter and format the partition using the preferred file system (NTFS or exFAT) by following the instructions.

macOS:
- Open Disk Utility from Applications > Utilities.
- Select your drive and click Partition.
![Create a New Partition (macOS)]()
- Add a new partition by clicking the + icon and assign the full unallocated space.

2. Merge Existing Partitions
If your drive is divided into multiple small partitions:
Windows:
- In Disk Management, right-click the partition you want to merge with another.
- Select Extend Volume, then choose the adjacent unallocated or smaller partition to merge.
![Merge Existing Partitions (Windows)]()
Note: This works only if the unallocated space is contiguous.

macOS: Use the Erase or Partition options in Disk Utility to combine partitions into one large storage space.

Fix 2: Reformat with a Suitable File System
If your drive is formatted with an incompatible or outdated file system, reformatting can resolve the issue.
1. Why Reformatting Helps
- NTFS: Best for Windows users and supports large files.
- exFAT: Ideal for compatibility across Windows and macOS.
- APFS: Recommended for macOS users but not compatible with older macOS versions or Windows.
2. Steps for Windows
- Open Disk Management and locate your external drive.
- Right-click the drive and select Format.
![Right-click the drive and select Format]()
- Choose the appropriate file system:
- NTFS for Windows users.
- exFAT for cross-platform compatibility.
- Assign a volume label and uncheck Quick Format for a more thorough process.

3. Steps for macOS
- Open Disk Utility and select your drive.
- Click Erase in the top menu.
- Choose a file system (APFS or exFAT) and assign a name.
- Click Erase to reformat the drive.
![Click Erase to reformat the drive]()

Important Note: Formatting erases all data on the drive, so back up your files before proceeding.
Fix 3: Remove Hidden or Reserved Partitions
Some drives contain hidden or reserved partitions, often created by pre-installed software or operating systems.
- Identify Hidden Partitions
- Windows: Open Disk Management and look for partitions without drive letters or those labeled as "System Reserved" or "Recovery."
- macOS: Use Disk Utility to view all partitions on your drive.
- Remove Hidden Partitions (Windows)
- In Disk Management, right-click the hidden partition.
- Select Delete Volume (only if it's not essential for system recovery).
- Once deleted, right-click the main partition and select Extend Volume to reclaim the space.
- Remove Hidden Partitions (macOS)
- Open Disk Utility and click Partition for the external drive.
- Select the hidden partition and click the - button to remove it.
![Remove Hidden Partitions (macOS)]()
- Adjust the primary partition to utilize the newly available space.

Caution: If the hidden partition contains essential data (e.g., a recovery partition), consider whether removing it is necessary.
Fix 4: Repair Corrupted Data or Bad Sectors
Corruption or bad sectors can reduce the usable capacity of your drive. Here’s how to address it:
- Repair Using CHKDSK (Windows)
- Open Command Prompt as an administrator by pressing Win + X and selecting Command Prompt (Admin).
- Type the following command:
chkdsk X: /f /r
Replace X with the drive letter of your external drive.
![Repair Using CHKDSK (Windows)]()
- Press Enter to start the scan and repair process. This checks for bad sectors and repairs file system issues.
- Repair Using First Aid (macOS)
- Open Disk Utility and select your external drive.
- Click First Aid in the top menu.
- Follow the prompts to scan and repair any issues with the drive.
![Repair Using First Aid (macOS)]()
- Use Third-Party Tools for Extensive Repairs
If CHKDSK or First Aid doesn’t resolve the issue, consider using specialized tools:
- Windows: Tools like MiniTool Partition Wizard or EaseUS Partition Manager.
- macOS: Donemax Data Recovery or Disk Drill.


Fix 5: Correct Drive Configuration
Incorrect drive settings can lead to capacity issues. Adjusting the configuration can help.
- Assign or Change Drive Letter (Windows)
- Locate the drive without a letter by opening Disk Management.
- Choose Change Drive Letter and Paths with a right-click.
![Assign or Change Drive Letter (Windows)]()
- Click Add or Change, then assign an available letter.
- Bring Drive Online (Windows)
- If the drive appears offline in Disk Management, right-click it.
- Select Online to make it accessible.
![Bring Drive Online (Windows)]()
- Reset Drive Configuration
If the drive isn't recognized properly, resetting it can help:
- In Disk Management, delete all existing partitions on the drive.
- Make a new partition and set the file system to the one you choose.


Fix 6: Address Fake or Counterfeit Drives
Fake drives often advertise inflated capacities, leading to storage issues.
- Confirm Drive Authenticity
- Use a tool like H2testw (Windows) or F3 (macOS/Linux) to verify the actual capacity.
- These tools write data to the entire drive and check for discrepancies.
- What to Do If the Drive Is Fake
- If purchased recently, request a refund or replacement from the seller.
- Avoid storing critical data on fake drives, as they are unreliable.
- Purchase Drives from Trusted Sources
To avoid counterfeit products in the future:
- Buy from reputable brands like Seagate, Western Digital, or Samsung.
- Purchase through authorized retailers or directly from the manufacturer.
Preventive Measures for Future External Drive Issues
Once you've resolved the issue, take these steps to prevent it from happening again:
- Regularly Check and Manage Partitions: Periodically review your drive's partitions to ensure no space is left unallocated.
- Safely Eject External Drives: Always eject your drives safely to avoid corruption. On Windows, use the Safely Remove Hardware option, and on macOS, drag the drive to the Trash.
- Use Reliable Tools for Formatting: When formatting or partitioning, use trusted tools or the built-in utilities on your operating system.
- Purchase from Trusted Sources: Buy drives from well-known brands and authorized retailers to avoid counterfeit products.
- Update Firmware and Drivers: Keep your drive's firmware and your system's drivers up to date for optimal performance.
How to Recover Lost Data from the External Hard Drive?
Data recovery program - such as Donemax Data Recovery can help you deeply scan the external hard drive and find all lost files including deleted/formatted files or inaccessible files, etc.
Step 1. Click on Download button below to download Donemax Data Recovery, then quickly install it on your computer.
Step 2. Open Donemax Data Recovery, choose the external hard drive to start data recovery.

Step 3. Click on Scan button to deeply scan the external hard drive and find all recoverable files.
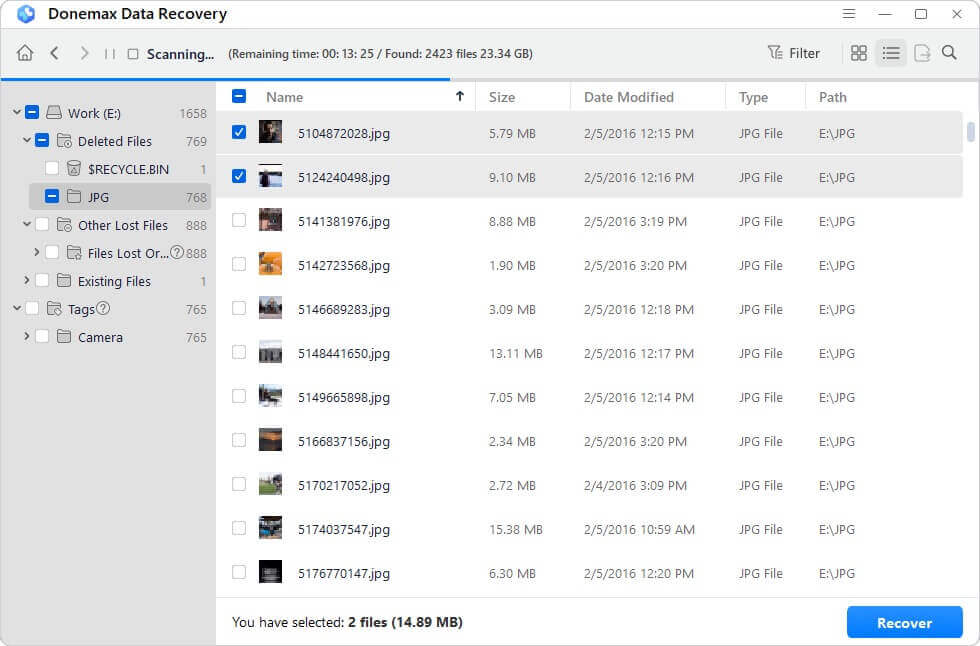
Step 4. After scan, you can preview all recoverable files. Then select the wanted files, click on Recover button to save them.

Conclusion
An external hard drive not showing its full capacity can be a frustrating issue, but it's often solvable with the right approach. By diagnosing the problem using tools like Disk Management or Disk Utility and applying the appropriate fixes, you can regain access to the full storage space.
Remember, prevention is key. Safeguard your drives by managing partitions, safely ejecting them, and ensuring they are genuine. If the issue persists despite your efforts, consider seeking help from a professional data recovery service.
This comprehensive guide equips you with the knowledge and tools to address and prevent capacity issues with your external hard drive. By following these steps, you'll ensure your drive remains a reliable storage solution for years to come.
If you have lost data due to fixing your external hard drive that won't show full capacity, you can use data recovery program - such as Donemax Data Recovery to help you get the lost data back.
Donemax Data Recovery
Donemax Data Recovery is one of the best data recovery software. It is easy-to-use and can help in recovering deleted, formatted, inaccessible or lost data from HDD/SSD, external disk, USB drive, SD card, camera or other storage devices.
Related Articles
- Dec 25, 2024Why Can't I Edit My External Hard Drive on Mac? [4 Methods]
- Mar 11, 2024Fix External Hard Drive Not Mounting on Mac Studio
- Dec 24, 20249 Solutions to Fix Mac Internal Drive Won't Boot
- Dec 12, 2024How to Fix USB Drive Won't Mount on Mac?
- Mar 29, 2024How to Fix Broken External Hard Drive?
- Jul 02, 2024Cannot Format Samsung SSD? Fix It Now

Contributing Writer
Lucien
Lucien is a writer and a chief programmer of Donemax software who has worked in the company for 5+ years. He has written much of the content on the site and devotes to providing troubleshooting and solution for Windows and Mac users including disk cloning, data recovery, migration, eraser, error fixes.

Editor in chief
Gerhard Chou
In order to effectively solve the problems for our customers, every article and troubleshooting solution published on our website has been strictly tested and practiced. Our editors love researching and using computers and testing software, and are willing to help computer users with their problems
Hot Donemax Products
Clone hard drive with advanced clone technology or create bootable clone for Windows/Mac OS.

Completely and easily recover deleted, formatted, hidden or lost files from hard drive and external storage device.
Certified data erasure software - permanently erase data before selling or donating your disk or any digital device.