My Samsung portable SSD T9 is working well on my Windows 11 PC and an old MacBook Pro. However, I connect it to my new Mac Studio, it is not mounting. How to fix this issue?
- Wu Lin
PAGE CONTENT:
Are you having trouble getting your portable hard drive to work with your Mac Studio? Don't worry! Imagine your trusted external drive is full of memories, work, and important files, but your new Mac Studio has chosen to hide it. We understand how frustrating it is, but don't worry - we're here to help you find your way through the maze of problems. In this easy-to-follow guide, we'll figure out why your external hard drive won't mount on your Mac Studio.
We can do everything for you, from checking your cords to giving your Mac a digital pep talk. Sit back with a cup of coffee, and let's start the journey to get your external drive back to working with your Mac Studio.

Steps to Fix External Hard Drive Not Mounting on Mac Studio
Fix1. Check Physical Connections
Making sure the physical connections are safe is the first thing you should do if an external hard drive won't mount on your Mac Studio. Do these things:
- Take the USB or Thunderbolt cord off the external hard drive and look for any damage. If you find any problems, replace the wire with one you know works.
- Switch out the USB or Thunderbolt port on your Mac Studio, where the external hard drive is plugged in. The port itself may be broken sometimes.
- Try the portable hard drive on a different Mac or Windows computer to see if the problem is only with your Mac Studio.
Fix2. Verify Power Supply
A power adapter is needed for portable hard drives, especially the bigger ones. If your external hard drive comes with its power charger, ensure it is plugged in and working correctly. Mounting problems can happen if there isn't enough power.
Fix3. Restart Your Mac Studio
To fix problems, all you have to do is restart your Mac Studio. It can help fix any short-term program problems or conflicts, stopping the external hard drive from mounting. After restarting, connect the external hard drive again and see if it mounts correctly.
Fix4. Use Disk Utility
Disk Utility is a tool with macOS that lets you control storage devices and fix problems with them. To use Disk Utility to check the external hard drive, do these things:
Step 1. Click on "Applications" > "Utilities" > "Disk Utility." Open Disk Utility.
Step 2. On the left tab, find the external hard drive and select it.
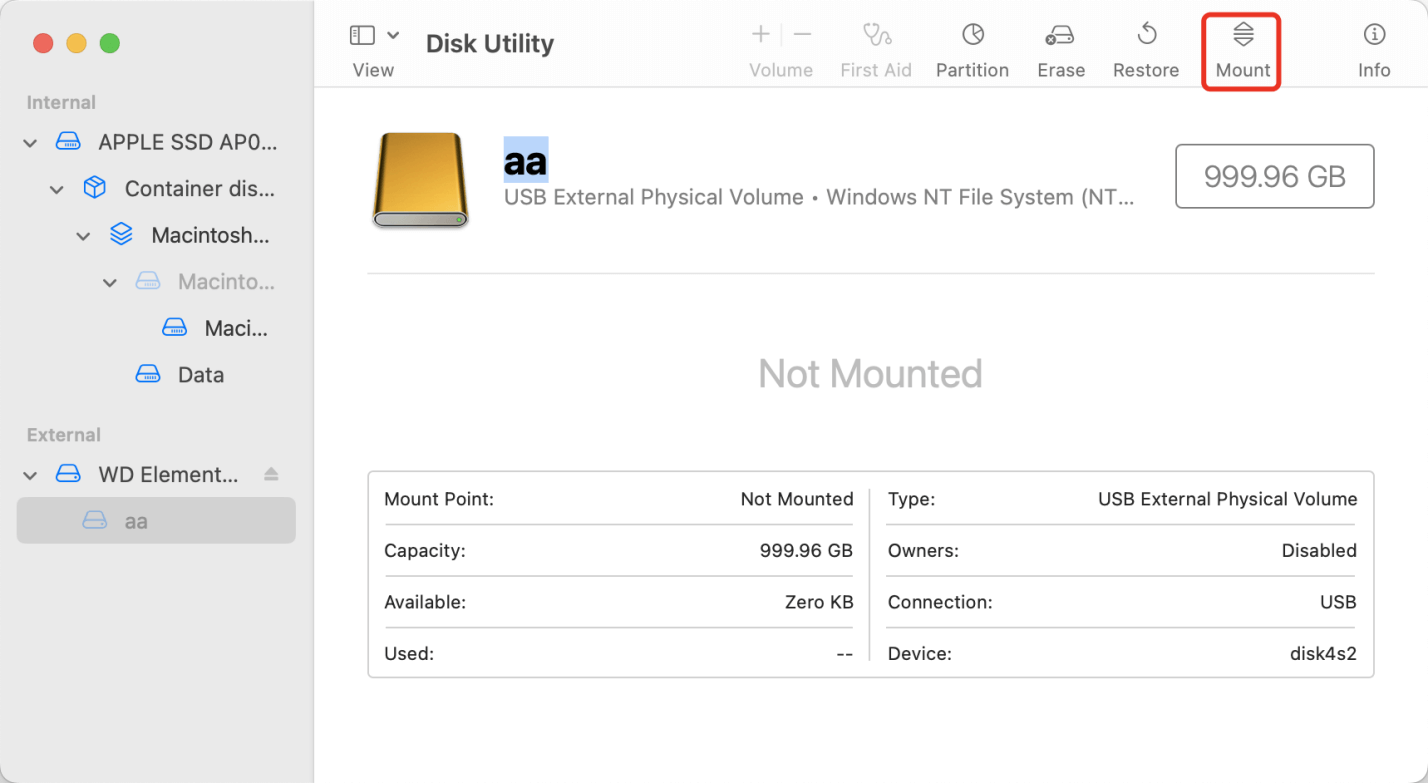
Step 3. Try to click on Mount button to mount the external hard drive on your Mac Studio.
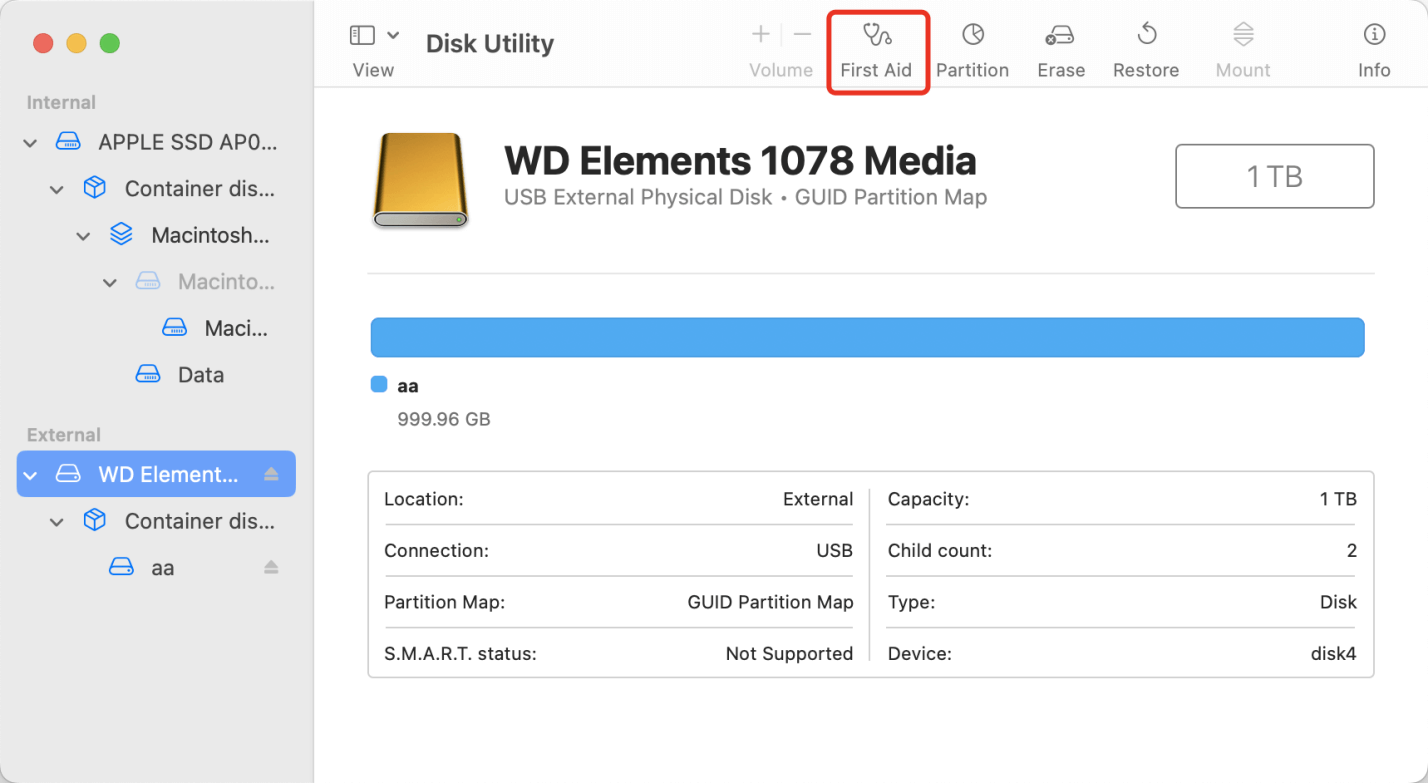
If Mount button is not working, click on First Aid button to repair the external hard drive.
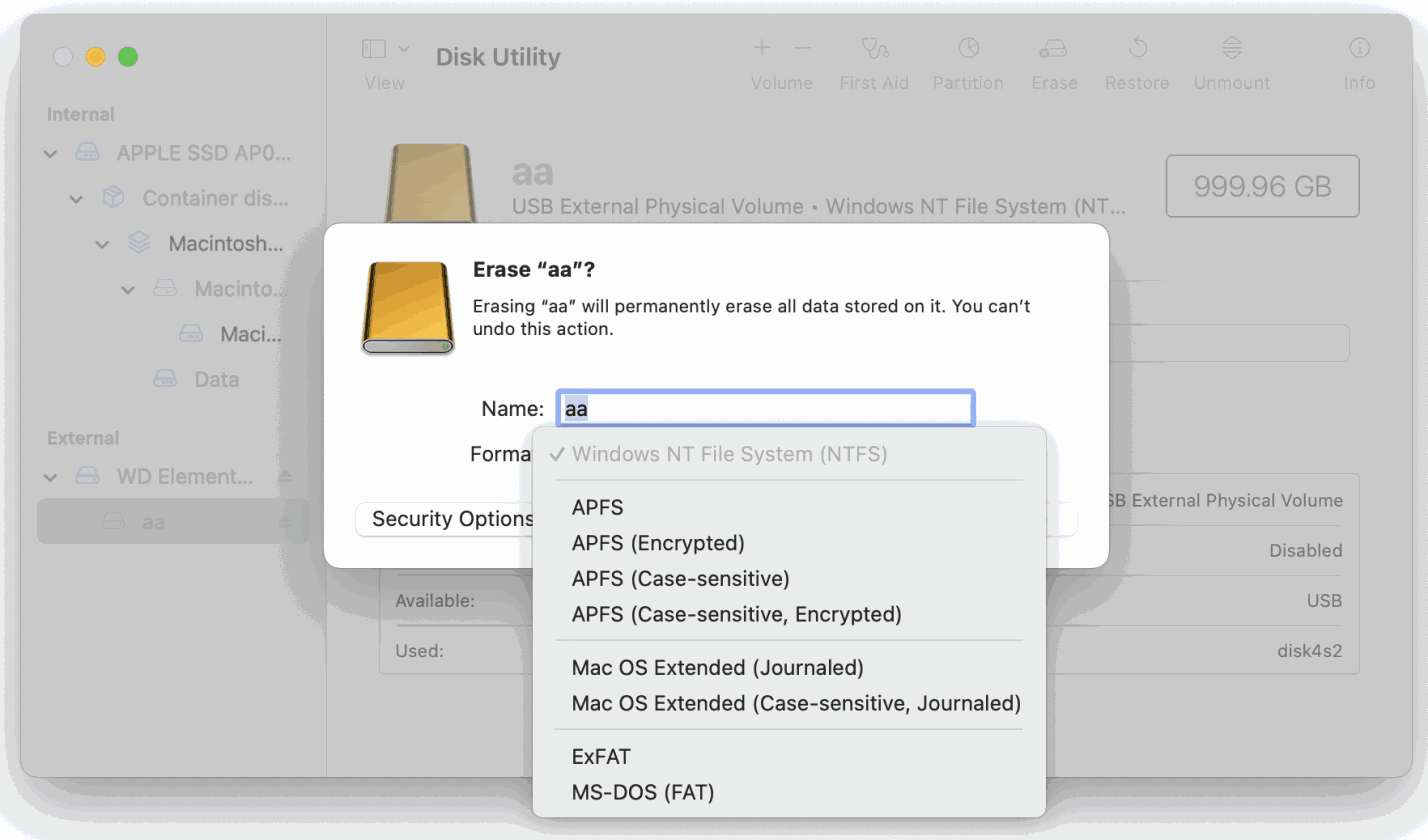
If the file system of the external hard drive is not supported by macOS, click on Erase button to format the drive to ExFAT, APFS, Mac OS Extended, etc.
Before or after fixing the external hard drive, you can use data recovery software to scan the drive and export all data from it to a safe location.
Step 1. Download and install the reliable Mac data recovery software - Donemax Data Recovery for Mac.
Donemax Data Recovery for Mac
- Recover deleted or erased files from the external hard drive.
- Export existing files from the unmounted external hard drive to your Mac.
- Unformat the drive and recover all formatted data.
Step 2. Open Donemax Data Recovery for Mac, then select the external hard drive.

Step 3. Click on Scan button to deeply scan the external hard drive and find all recoverable files including existing files, deleted files, formatted data, etc.

Step 4. Once the scan is completed, preview the recoverable files. Then select the wanted files and save them.

Fix5. System Information for External Drive Recognition
The System Information tool provides much information about the linked hardware on macOS. To see if your Mac Studio sees the external hard drive, do these things:
- Click the Apple icon > "About This Mac."
- Right-click on "About This Mac" and choose "System Report."
- Choose "USB" or "Thunderbolt" from the list of "Hardware" on the left, based on how your external hard drive is connected.
Find your external hard drive among the gadgets that are linked. It means the Mac Studio knows about the external drive if it is mentioned.
Fix6. Reset PRAM/NVRAM
NVRAM, or parameter RAM or PRAM, is a part of your Mac that saves settings and configurations. Sometimes, resetting NVRAM or PRAM can fix problems with hardware devices. Do these things:
- Shut down your Mac Studio.
- After you turn it back on, press and hold the Option, Command, P, and R keys immediately
- Hold down the keys until you hear the second starting chime. Then let go of the keys.
- Once you're done, check if the external hard drive can be mounted.
Fix7. Update macOS and Drivers
Outdated software can make it hard to connect to external devices. Check to see if your Mac Studio has the most recent version of macOS and that the firmware and drivers for the external hard drive are also up to date. Do these things:
- Click on Apple Menu, choose Settings.
- Pick "Software Update" and put in any available macOS changes.
- Go to the company website that made the external hard drive to see if there are any firmware or driver changes.
Fix8. Test on Another Mac
If the external hard drive still doesn't mount, try it on a different Mac to see if the problem is with the drive or your Mac Studio. If the drive can be mounted on another Mac, the issue might be how the hardware or software is set up on your Mac Studio.
Fix9. Check Finder Settings
If the the external hard drive is mounted in Disk Utility, but you still can’t see the drive on your Mac Studio, just check the Finder Settings.
Step 1. Open a Finder, then click Finder on Apple menu.
Step 2. Choose Settings, then open Finder Settings window.
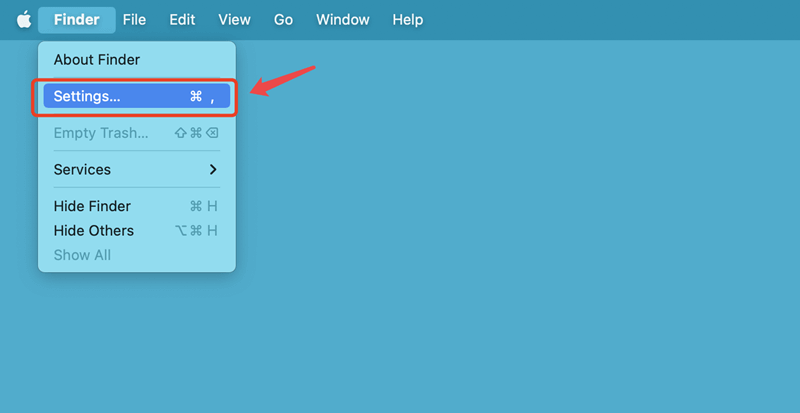
Step 3. Make sure External disks is selected under General and Sidebar.
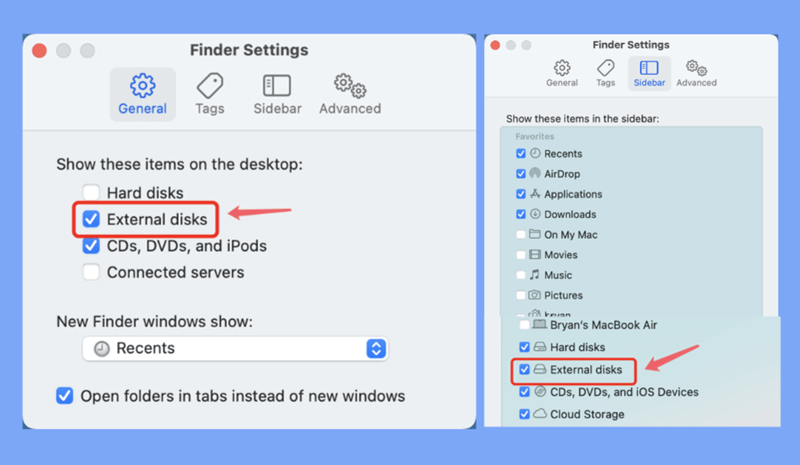
Then close the Finder Settings, check if you can see the external hard drive on desktop and Finder.
Fix Unmounted External Hard Drive on Mac Studio Using NTFS for Mac
New Mac Studio may not mount an external drive or USB drive which has been formatted to NTFS file system. If you want to use an NTFS drive on Mac Studio, a reliable NTFS for Mac can help.
Step 1. Download and install Donemax NTFS for Mac on your Mac Studio. It is one of the best NTFS for Mac tools and is trusted by millions of users.
Step 2. Open Donemax NTFS for Mac, find the external hard drive and click on Mount button.

Step 3. Then click on Enable Writable button so that you can read-write the external hard drive on your Mac Studio without any limitation.

Conclusion:
It can be annoying when an external hard drive won't mount on your Mac Studio, but by following a pattern of steps, you can usually find and fix the problems at their source. You can mount your external hard drive and get to your important files more easily if you check the hardware connections, ensure the power supply is working, use Disk Utility, and do the other things this guide tells you to do. If the problem continues, you should seek help from a professional.
Related Articles
- Jul 11, 2024WD External Hard Drive Has No Drive Letter? Fix It Now
- Oct 12, 2024External Hard Drive Not Appearing In Finder (Mac), Fix It Now
- Jan 12, 20255 Fixes for Fixing Partition Map Error on Mac
- Feb 06, 20255 Solutions to Fix Dash Cam Keeps Saying Format SD Card
- Mar 08, 2024Fix WD My Passport Drive Is Not Detected on Windows
- Mar 17, 20256 Methods to Fix Couldn't Open Device 69877 Error on Mac

Lucien
Lucien is a writer and a chief programmer of Donemax software who has worked in the company for 5+ years. He has written much of the content on the site and devotes to providing troubleshooting and solution for Windows and Mac users including disk cloning, data recovery, migration, eraser, error fixes.

Gerhard Chou
In order to effectively solve the problems for our customers, every article and troubleshooting solution published on our website has been strictly tested and practiced. Our editors love researching and using computers and testing software, and are willing to help computer users with their problems
Hot Donemax Products

Clone hard drive with advanced clone technology or create bootable clone for Windows/Mac OS.

Completely and easily recover deleted, formatted, hidden or lost files from hard drive and external storage device.

Certified data erasure software - permanently erase data before selling or donating your disk or any digital device.