
Written byChristinaUpdated on Jun 03, 2026
SSD Not Showing Up on Windows 10/11? 8 Ways to Fix It Safely
Approved byGerhard Chou
Before we start: Before fixing SSD not showing up on Windows 10, you can use data recovery program - such as Donemax Data Recovery to scan the SSD and recover all files from it. Then you can use Disk Management or other tools to fix the recognized SSD on your Windows 10 PC.
PAGE CONTENT:
Solid State Drives (SSDs) have revolutionized computer storage with their speed and reliability. However, encountering a situation where your SSD is not showing up on Windows 10 can be frustrating. Whether you are installing a new SSD or your existing one suddenly becomes invisible, several factors could be causing the issue. This guide will walk you through detailed solutions to fix this problem, ensuring your SSD is fully functional.
An SSD not appearing on your Windows 10 system can occur for many reasons, ranging from hardware issues to software misconfigurations. Without proper recognition, you cannot access the data stored on the SSD or use it for new installations. This article delves into potential causes and offers step-by-step instructions to resolve the issue effectively.
Common Reasons Why SSD Is Not Showing Up on Windows 10
Understanding the potential causes of this issue is the first step toward fixing it. Some of the most common reasons include:
- Improper connection or faulty hardware: The SSD might not be securely connected to your computer's motherboard or may have a faulty cable.
- Drive not initialized or formatted: A new SSD must be initialized and formatted before it can be used. If this step is skipped, Windows cannot recognize the drive.
- Outdated or missing drivers: The SSD requires specific drivers to function correctly. Missing or outdated drivers can lead to recognition issues.
- SSD not assigned a drive letter: Without a drive letter, Windows cannot display the SSD in File Explorer.
- Issues with BIOS setting: Incorrect BIOS or UEFI configurations can prevent the system from detecting the SSD.
- Corrupted file system: A damaged file system can render the SSD inaccessible to Windows.
- Compatibility issues with Windows 10: Older SSDs or those with outdated firmware may face compatibility problems.
Preliminary Checks:
Before diving into advanced troubleshooting, perform these basic checks to rule out obvious issues:
- Verify Physical Connection
- Ensure the SSD is properly connected: Check the SATA or NVMe connector to ensure a firm and secure connection.
- Inspect cables and ports: A damaged SATA cable or port could be the culprit. Use a known working cable and port for testing.
- Test the SSD on Another Computer
- Install the SSD in another computer to verify if the problem lies with the SSD or your system.
- Confirm SSD Is Recognized in BIOS/UEFI
- Enter the BIOS/UEFI setup after restarting your computer.
- Navigate to the storage or boot settings to check if the SSD is listed.
- If not, adjust the BIOS settings.
8 Solutions to Fix SSD Not Showing Up on Windows 10
If the SSD remains undetected after preliminary checks, proceed with the following troubleshooting steps:
Fix 1. Use Disk Management to Fix Unrecognized SSD on Windows 10
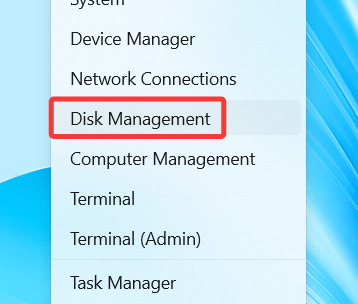
1. Open Disk Management
- Right-click on the Start menu or press Win + X.
- From the menu, select Disk Management.
![SSD not showing up on Windows 10]()
- A new window will open, displaying all the storage devices connected to your computer.
2. Check for the SSD
- In the lower section of the Disk Management window, look for a disk labeled as Unknown, Not Initialized, or Unallocated.
- If the SSD is listed but not usable, it may need initialization or formatting.
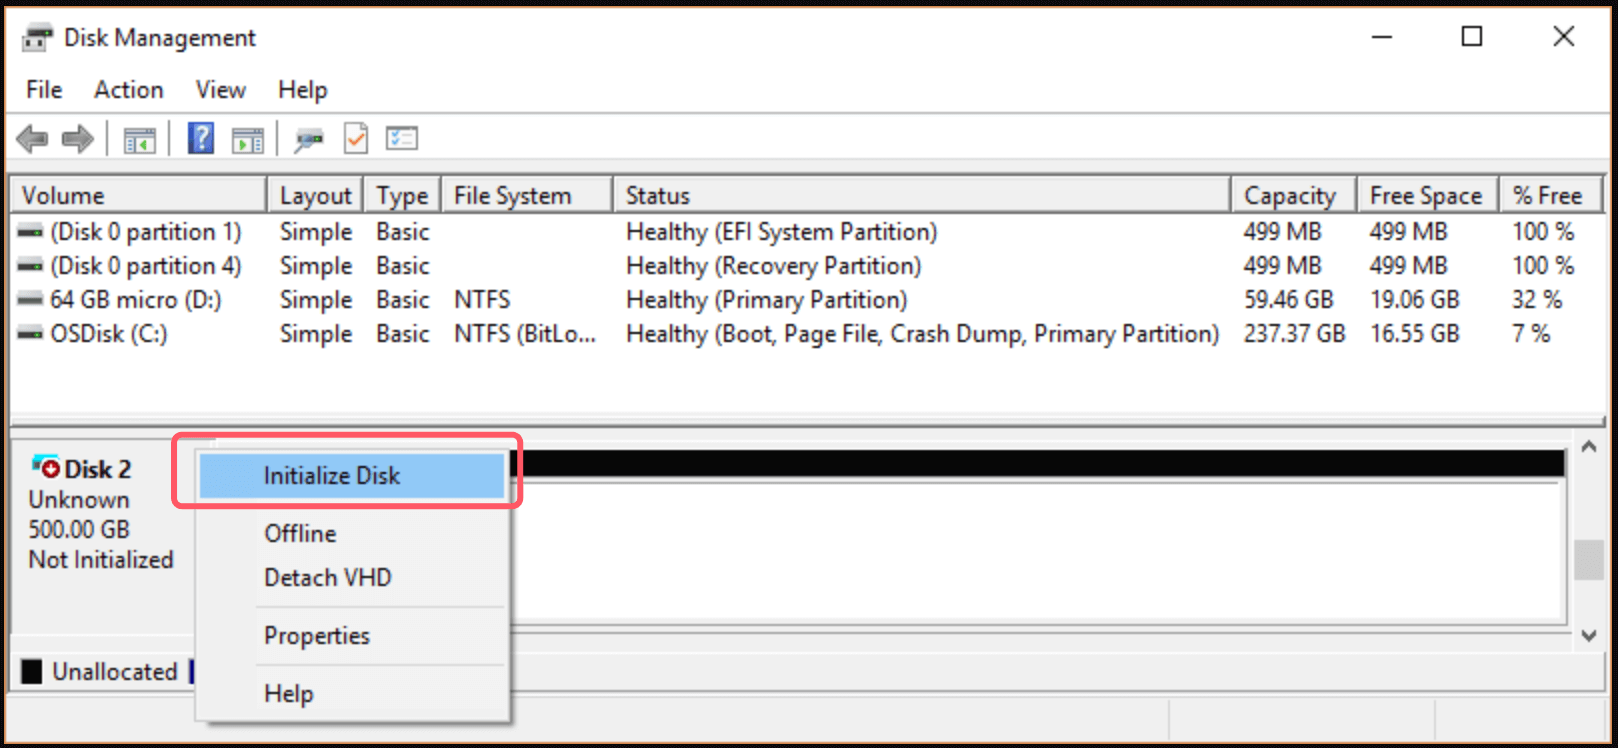
3. Initialize the SSD (If Needed)
- If the SSD is labeled as Unknown, right-click on it and select Initialize Disk.
![SSD not showing up on Windows 10]()
- A window that pops up will show up. Select the partition style from MBR (Master Boot Record) or GPT (GUID Partition Table):
- MBR: Suitable for older systems or drives smaller than 2 TB.
- GPT: Recommended for modern systems and drives larger than 2 TB.
- Click OK to complete the initialization process.
4. Create a Partition and Format the SSD
If the SSD is listed as Unallocated, you need to create a partition:
- Using the right-click menu, choose New Simple Volume from the unallocated space.
![SSD not showing up on Windows 10]()
- Follow the wizard:
- Specify the volume size (use the default to allocate the entire space).
- Assign a drive letter (e.g., D: or E:).
- Choose a file system, such as NTFS or exFAT. NTFS is standard for Windows drives.
- Select Perform a quick format to speed up the process.
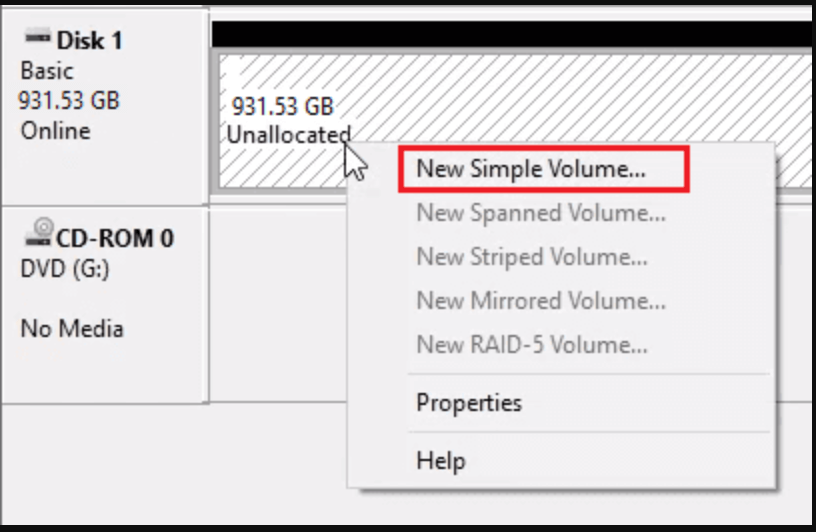
Click Finish to complete the partitioning and formatting process.
5. Verify the SSD in File Explorer
- Once the SSD has been initialized, partitioned, and formatted, it should appear in File Explorer under This PC.
- If it still does not show up, restart your computer and check again.
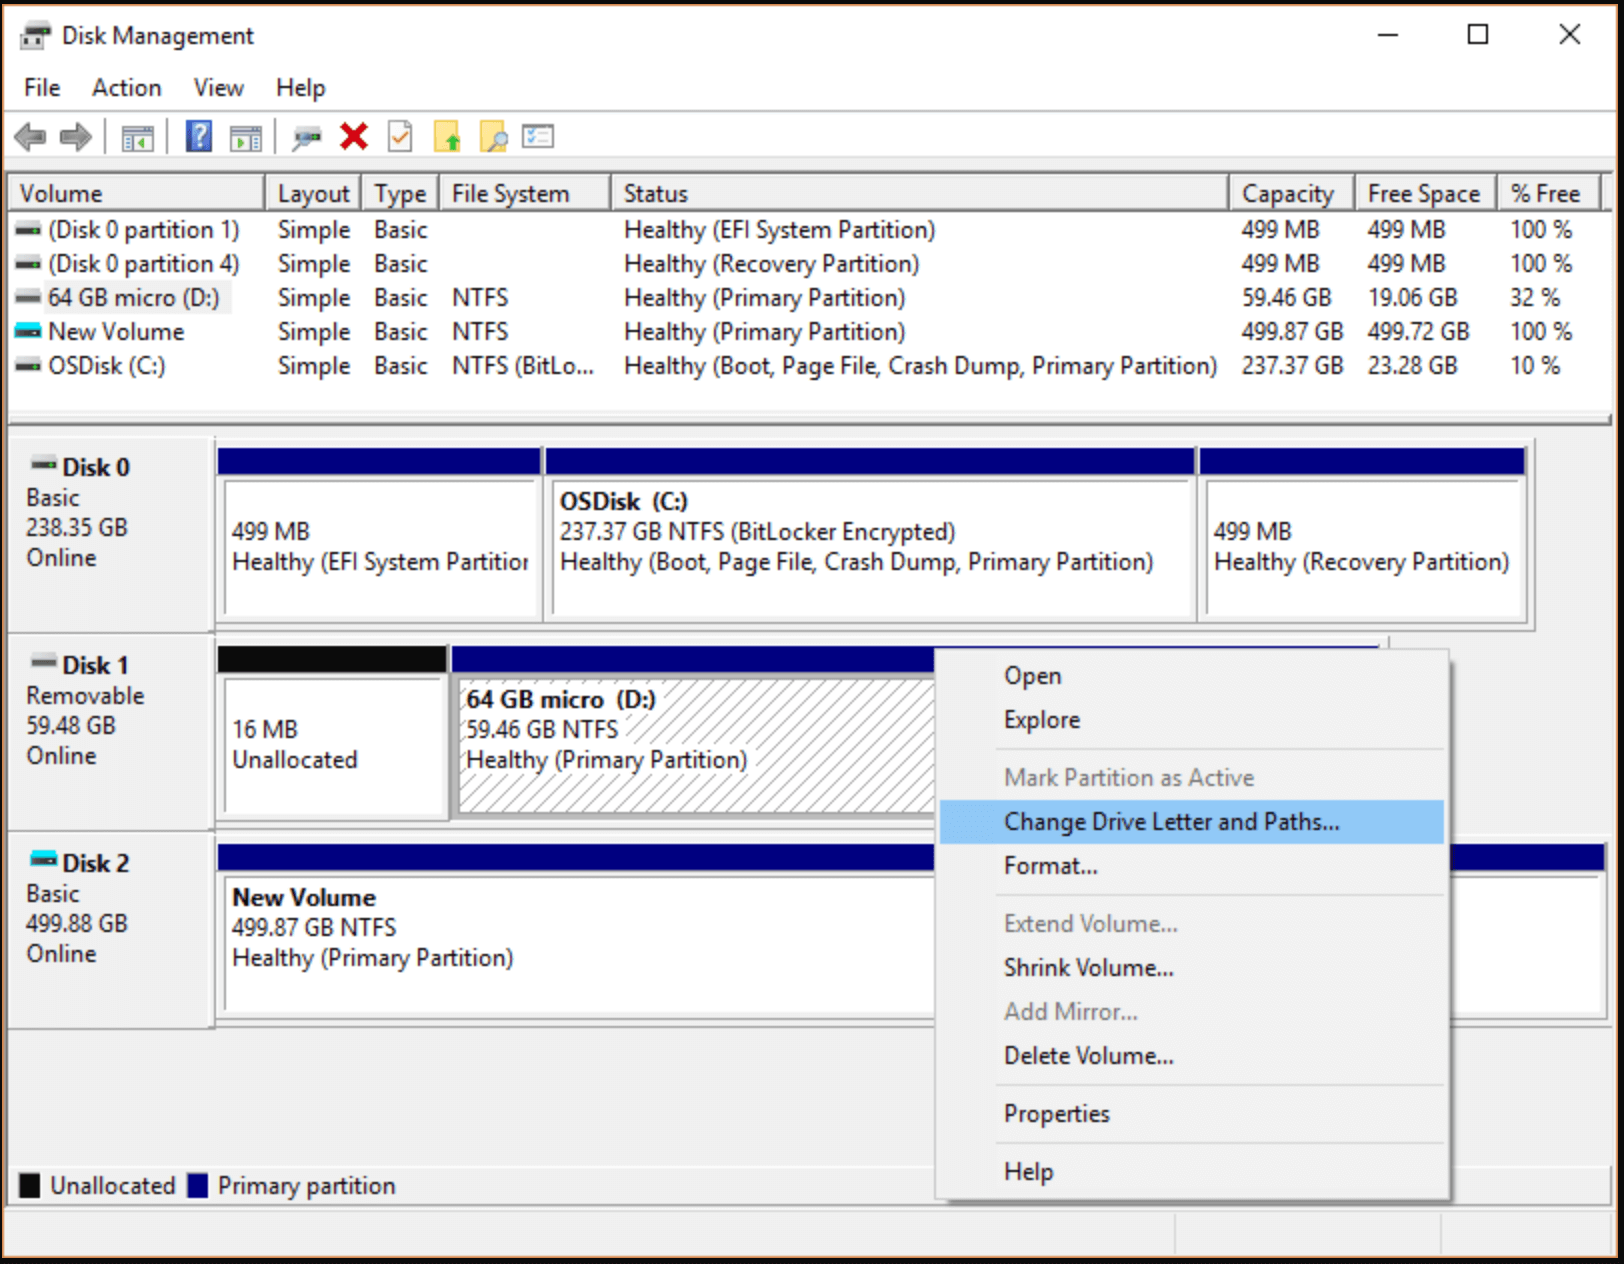
Fix 2. Assign a Drive Letter for the SSD
If the SSD lacks a drive letter, it won't appear in File Explorer.
- Open Disk Management.
- Locate the SSD and right-click on its partition.
- Select Change Drive Letter and Paths.
![SSD not showing up on Windows 10]()
- Click Add or Change, then assign a new drive letter.
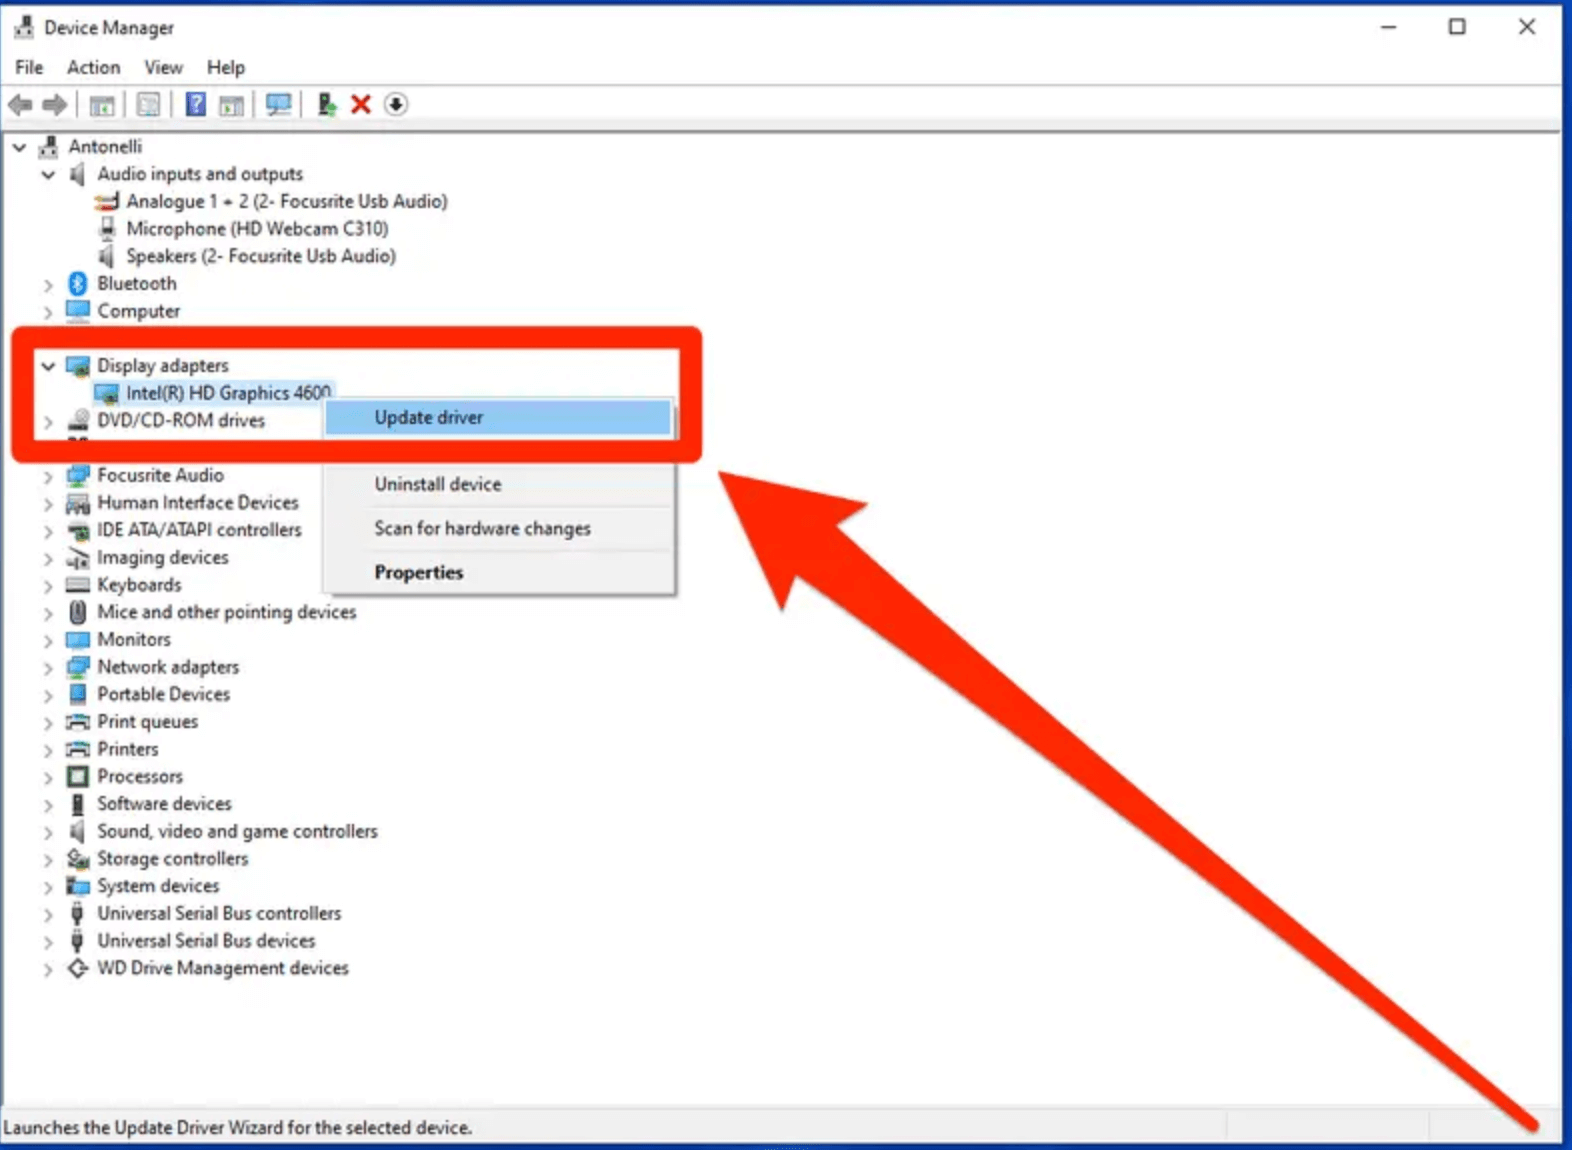
Fix 3. Update or Reinstall Disk Drivers of SSD
Outdated drivers can prevent Windows from recognizing the SSD.
- Open Device Manager: Press Win + X and select Device Manager.
- Expand Disk Drives: Locate the SSD in the list.
- Update Drivers: Right-click on the SSD and select Update Driver.
![SSD not showing up on Windows 10]()
Choose Search automatically for updated driver software.
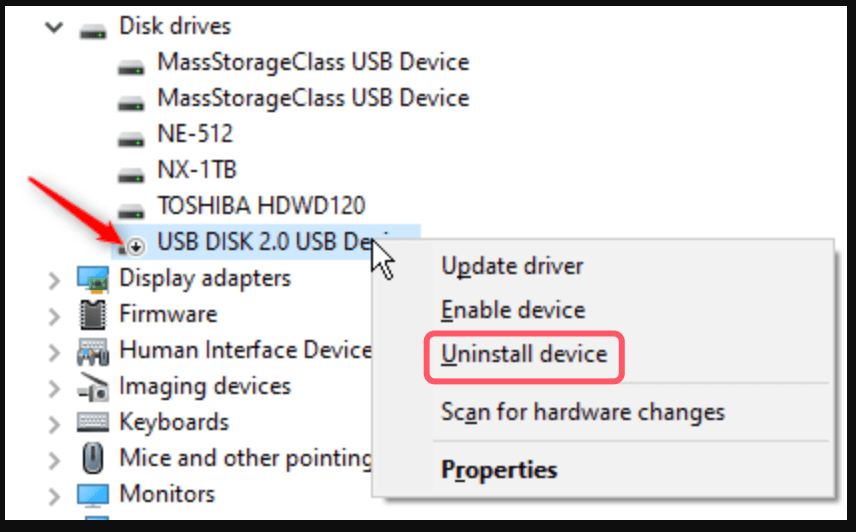
- Reinstall Drivers: If updating doesn't work, right-click the SSD, select Uninstall device, and restart your computer. Windows will reinstall the drivers automatically.
![SSD not showing up on Windows 10]()
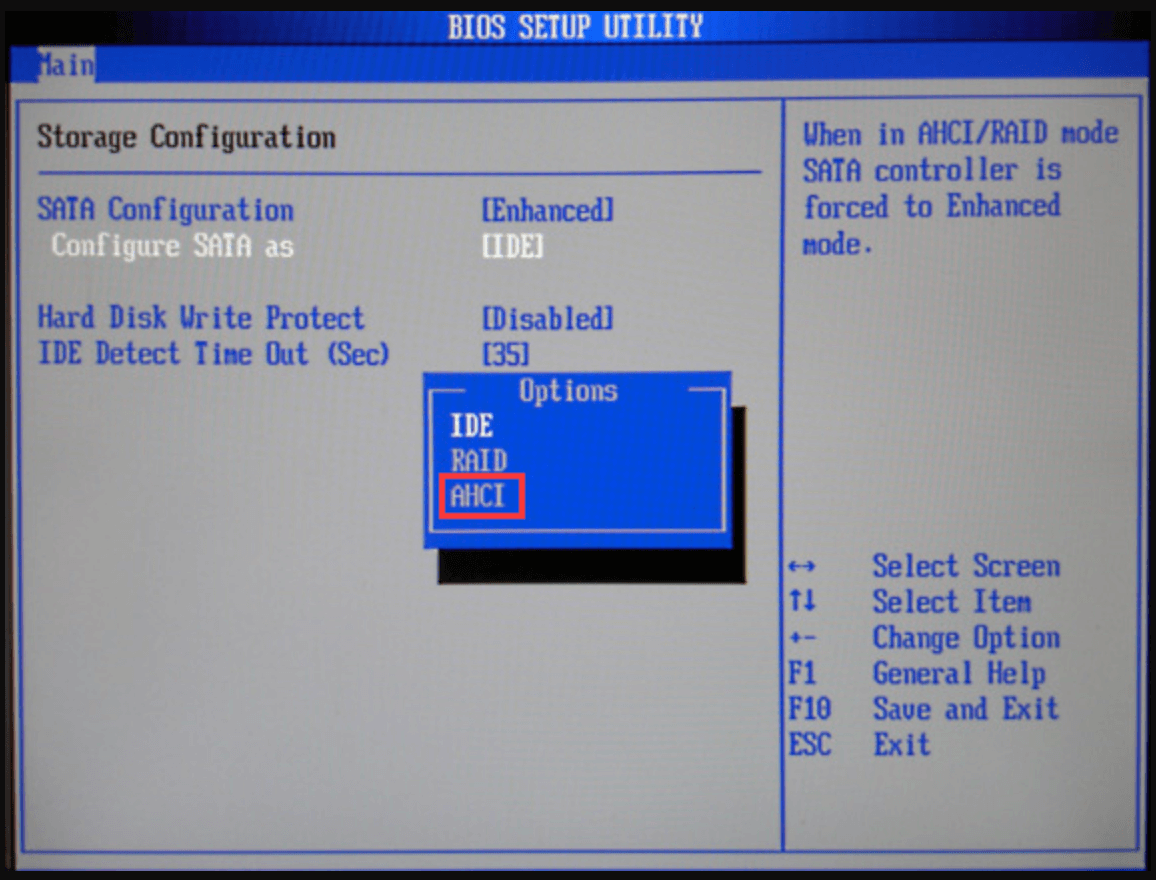
Fix 4. Change BIOS/UEFI Settings
Incorrect BIOS/UEFI settings might prevent the SSD from being detected.
- Enter BIOS/UEFI Setup: Restart your computer and press the designated key (e.g., F2, F12, DEL) during boot.
- Enable the SSD: Ensure the SSD is enabled in the storage configuration settings.
- Switch SATA Controller Mode: Navigate to SATA Configuration and change the controller mode to AHCI (preferred) or IDE.
![SSD not showing up on Windows 10]()
- Check Boot Order: Make sure the SSD is listed in the boot sequence if it contains your operating system.
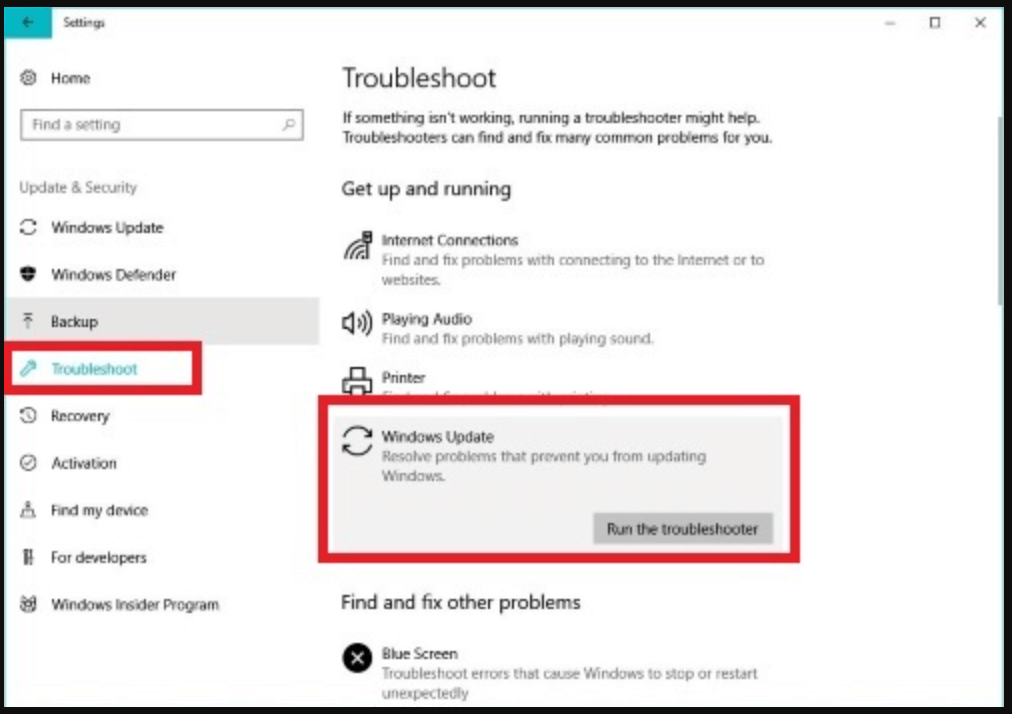
Fix 5. Run Windows Troubleshooter
Windows includes built-in tools to fix hardware issues.
- Access Troubleshooter:
- Go to Settings > Update & Security > Troubleshoot.
![SSD not showing up on Windows 10]()
- Select Hardware and Devices and follow the prompts.
- Go to Settings > Update & Security > Troubleshoot.
- Apply Fixes: Allow Windows to detect and resolve any issues automatically.
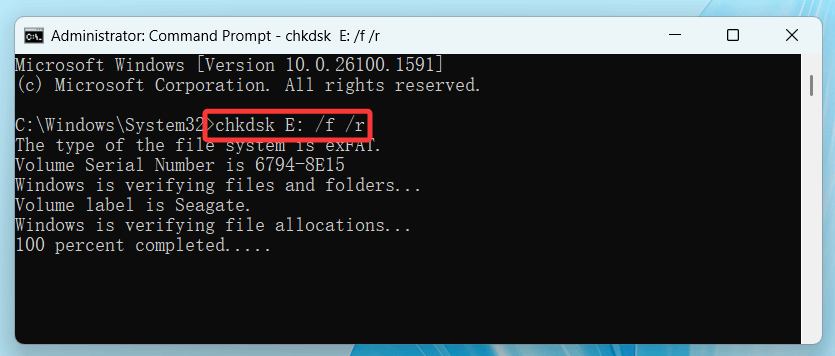
Fix 6. Repair Corrupted File System of the SSD
A corrupted file system can render the SSD unreadable. Use these steps to fix it:
- Run CHKDSK:
- Open Command Prompt as Administrator.
- Type chkdsk X: /f /r (replace X: with your SSD's drive letter).
![SSD not showing up on Windows 10]()
- Use Diskpart:
- Open Command Prompt and type diskpart.
- Use list disk, select disk X, and clean commands (replace X with your SSD's disk number).
💡 Caution: The clean command erases all data on the SSD.
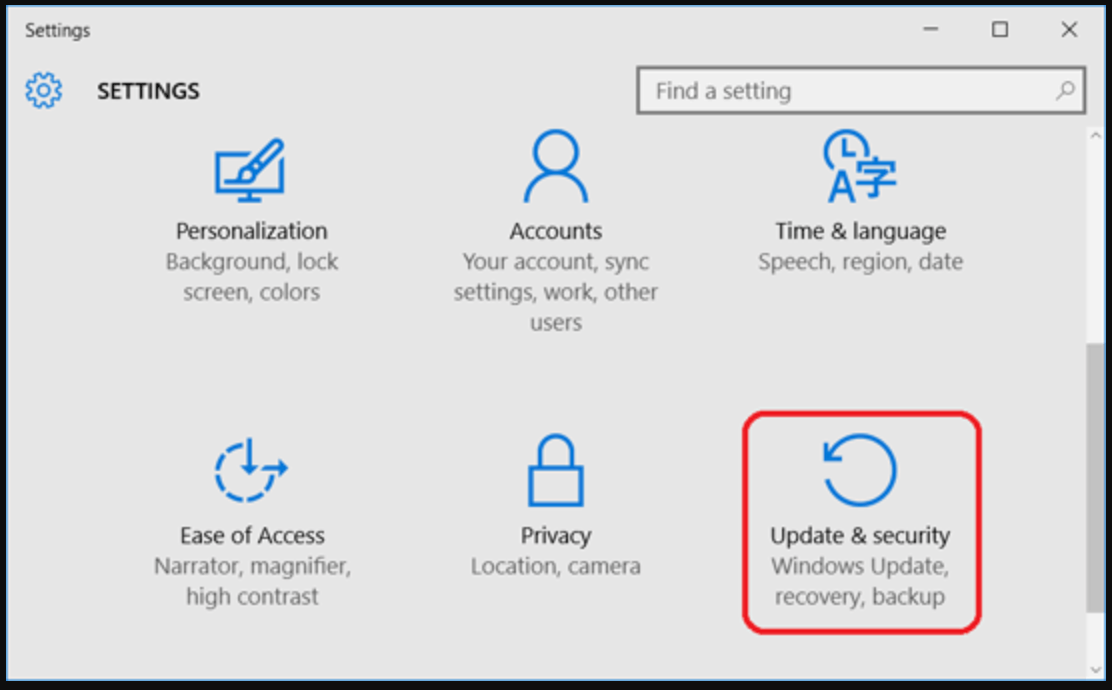
Fix 7. Perform a Windows Update
Keeping Windows up to date ensures compatibility with new hardware.
- Check for Updates:
- Go to Settings > Update & Security > Windows Update.
![SSD not showing up on Windows 10]()
- Click Check for updates.
- Go to Settings > Update & Security > Windows Update.
- Install Updates:
- Download and install any pending updates.
- Restart your system after installation.
Fix 8. Use Third-Party Tools to Fix SSD on Windows 10
Sometimes, third-party diagnostic tools are necessary to troubleshoot SSD issues.
- Manufacturer Tools: Use tools like Samsung Magician or Crucial Storage Executive to check SSD health and update firmware.
- Partition Managers: Tools like Donemax Data Recovery, MiniTool Partition Wizard or EaseUS Partition Master can help manage partitions and fix errors.
Advanced Troubleshooting (If All Else Fails)
If the problem persists, advanced steps may be required:
- Update SSD Firmware
Firmware updates can resolve compatibility and performance issues.
- Visit the SSD manufacturer's website to download the latest firmware.
- Follow the update instructions carefully.
- Diagnose Hardware Failure
- Use diagnostic tools provided by the SSD manufacturer to test for hardware defects.
- If the SSD fails the tests, it may need replacement.
- Replace Cables or Try Different Ports
- Use a new SATA or NVMe cable to rule out cable-related issues.
- Connect the SSD to a different SATA or NVMe port on the motherboard.
Recover Lost Data from Unrecognized SSD on Windows 10
Before fixing SSD not showing up on Windows 10, you can use data recovery program - such as Donemax Data Recovery to help you recover or export all files from the SSD to another drive.
Donemax Data Recovery
- Recover deleted, formatted or lost files from SSD on Windows 10.
- Recover lost data from inaccessible or unrecognized SSD on Windows 10.
- Export all data from the SSD to your Windows 10 PC.
Step 1. Download and install Donemax Data Recovery on your Windows 10 PC (Don't install it on the SSD). Then open it, select the SSD to start data recovery.

Step 2. Click on Scan button. Donemax Data Recovery will find all recoverable files including existing files, inaccessible files, deleted/formatted/lost files.
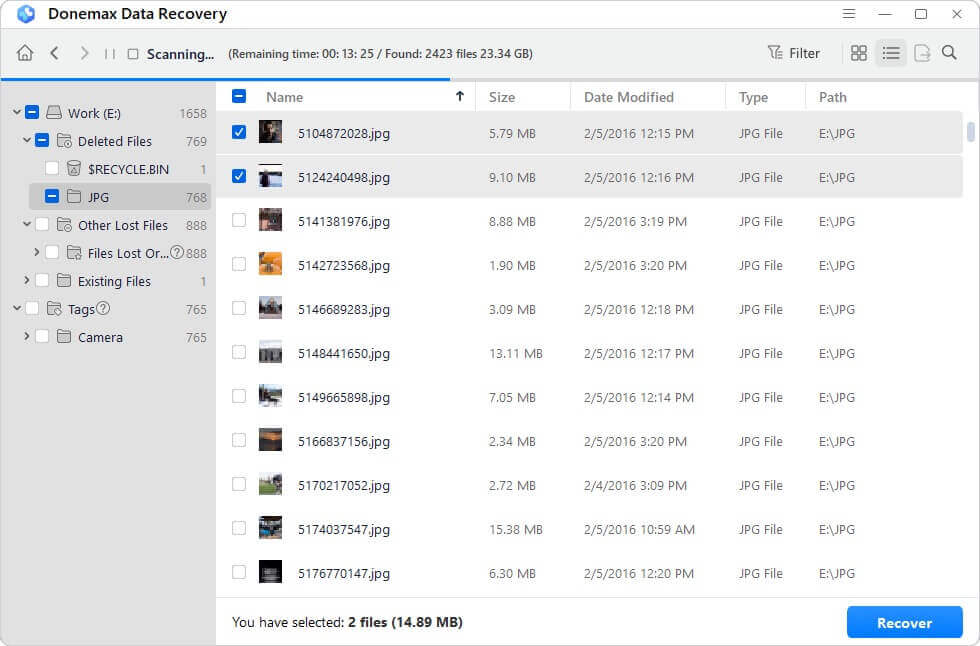
Step 3. Once the scan is completed, you can preview all recoverable files. Then select the wanted files, click on Recover button to save them.

Optimize & Protect SSD on Windows 10
Once your SSD is functioning properly, follow these tips to maintain its health and prevent future issues:
- Regularly Update Drivers and Firmware: Keep your SSD drivers and firmware up to date to ensure compatibility with Windows updates.
- Handle SSDs Properly: Avoid physical damage by handling the SSD with care during installation.
- Monitor SSD Health: Use tools like CrystalDiskInfo to monitor SSD health and performance.
- Backup Important Data: Regularly back up critical data to avoid loss in case of drive failure.
- Enable TRIM: Ensure TRIM is enabled to optimize SSD performance and lifespan.
Conclusion
An SSD not showing up on Windows 10/11 can be a minor inconvenience or a significant issue depending on the cause. By following the steps outlined in this guide, you can troubleshoot and resolve most SSD recognition problems. From checking physical connections to updating drivers and repairing corrupted file systems, these methods cover a wide range of potential fixes.
If none of the solutions work, consider seeking professional assistance or contacting the SSD manufacturer for support. With proper care and maintenance, your SSD can provide fast and reliable storage for years to come.
Donemax Data Recovery
Powerful, safe & easy-to-use data recovery software to easily and completely recover deleted, formatted, inaccessible and lost data from PC, Mac, HDD, SSD, USB drive, camera, SD card, RAID and other storage devices.
Related Articles
- Mar 30, 2026Format USB Drive Using CMD (DiskPart Guide) for Windows 11/10/8/7
- Mar 13, 2025[5 Fixes] Fix Seagate One Touch SSD Not Showing Up on My Computer
- Aug 29, 20254 Methods To Repair Hard Drive Partition on Windows 11
- Jun 24, 2025Files Become Shortcuts: How to Fix and Prevent It?
- Dec 17, 202413 Solutions to Fix WD Elements Not Showing Up on Windows 11/10/8/8.1/7/Vista
- May 28, 2025How to Fix Data Error Cyclic Redundancy Check Without Losing Data?

Contributing Writer
Christina
Christina is the senior editor of Donemax software who has worked in the company for 4+ years. She mainly writes the guides and solutions about data erasure, data transferring, data recovery and disk cloning to help users get the most out of their Windows and Mac. She likes to travel, enjoy country music and play games in her spare time.

Editor in chief
Gerhard Chou
In order to effectively solve the problems for our customers, every article and troubleshooting solution published on our website has been strictly tested and practiced. Our editors love researching and using computers and testing software, and are willing to help computer users with their problems