Tip: Donemax Data Recovery is a powerful data recovery program. It can help you recover lost data or export data from an unrecognized WD Elements external hard drive or formatted drive WD Elements external hard drive. After saving your data to a safe location, you can easily fix WD Elements not showing up on your Windows computer.
PAGE CONTENT:
People who want to increase their storage capacity frequently choose WD Elements external hard drives. However, there are occasions when these drives fail to show up on Windows 11, 10, 8.1, 8, 8 or other Windows operating systems. This issue can be frustrating, especially when important data seems inaccessible. In this comprehensive guide, we will investigate the causes of this issue and offer detailed fixes so that your computer can identify your WD Elements drive.
Also read: fix WD Elements not showing up on Mac.
Common Causes for WD Elements Not Showing Up on Windows PC
Understanding why your WD Elements drive isn't detected is crucial before diving into solutions. Here are the most common causes:
- Connection Issues: Faulty USB cables, ports, or loose connections can prevent the drive from being recognized.
- Drive Letter Conflicts: Windows may fail to assign a drive letter, making the drive invisible in File Explorer.
- Driver Problems: Outdated or corrupted drivers can hinder the system from recognizing the external drive.
- Partition Issues: The drive may have unallocated or corrupted partitions.
- File System Incompatibility: If the drive is formatted in an unsupported file system, it may not show up.
- Power Supply Issues: Insufficient power through the USB port can cause the drive to fail to spin up.
- Hardware Problems: Physical damage to the drive or internal components can also lead to detection issues.
Recover Data from Unrecognized WD Elements Drive
Before fixing WD Elements not showing up issue, you can recover data from the unrecognized WD Elements drive. Donemax Data Recovery is a powerful data recovery program, it can recover or export all data from the unrecognized WD Elements drive to another drive.
Step 1. Download and install Donemax Data Recovery on your computer and plug the WD Elements drive into your computer.
Step 2. Open Donemax Data Recovery, select the WD Elements drive to start data recovery.

Step 3. Click on Scan button to deeply scan the WD Elements drive and find all recoverable files including existing files, inaccessible files, deleted/formatted/lost files, etc.

Step 4. Once the scan process gets finished, you can click to preview the recoverable files. Select the wanted ones, click on Recover button to save them to a safe location.

Step-by-Step Solutions to Fix WD Elements Now Showing Up Issue
1. Check the Basics
Before diving into complex solutions, start with basic troubleshooting:
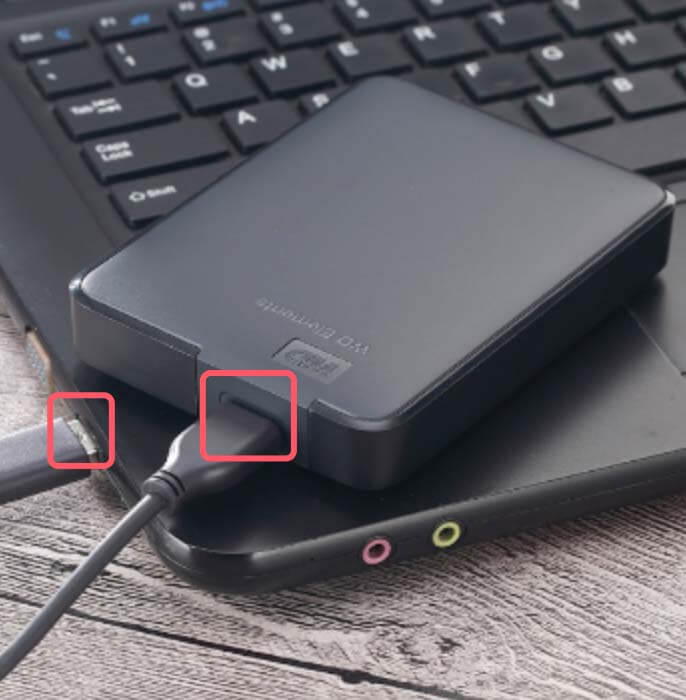
- Reconnect the Drive: Unplug the WD Elements drive and reconnect it securely.
- Test Different USB Ports: Use another USB port, preferably a USB 3.0 port if available.
![Check the Basics]()
- Try Another Cable: Replace the USB cable to rule out cable damage.
- Connect to Another Computer: Check if the drive is detected on a different computer.
These steps can rule out simple hardware or connection problems. If these don't work, proceed to the advanced methods below.
2. Ensure the Drive Has Power
Some WD Elements drives require more power than what a single USB port can provide, especially larger drives. If your drive has a separate power adapter, ensure it is plugged in. For drives relying solely on USB power, consider using a powered USB hub. A powered hub ensures stable power delivery, reducing the likelihood of detection issues due to insufficient power.
3. Check Device Manager
Device Manager is a useful tool for identifying hardware issues:
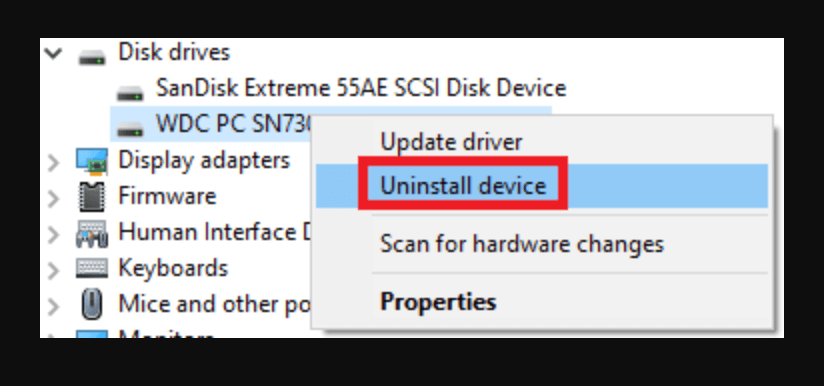
- Choose Device Manager by pressing Win + X.
- Look for the drive under Disk Drives or Universal Serial Bus Controllers.
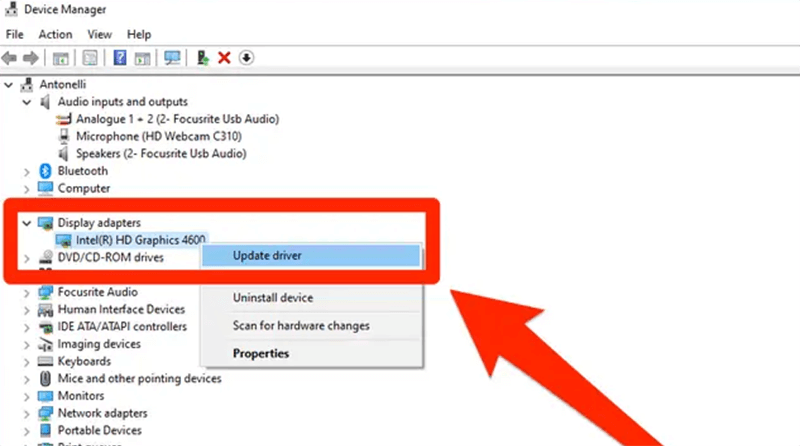
- Choose Update Driver with a right-click on the device if a yellow exclamation point appears.
- If the drive is listed as "Unknown Device," right-click it, choose Uninstall Device, then reconnect the drive.
![Check Device Manager]()
This approach can resolve driver-related problems or force the system to reinitialize the device.
4. Assign a Drive Letter
Sometimes, the drive doesn't show up in File Explorer because it lacks a drive letter:
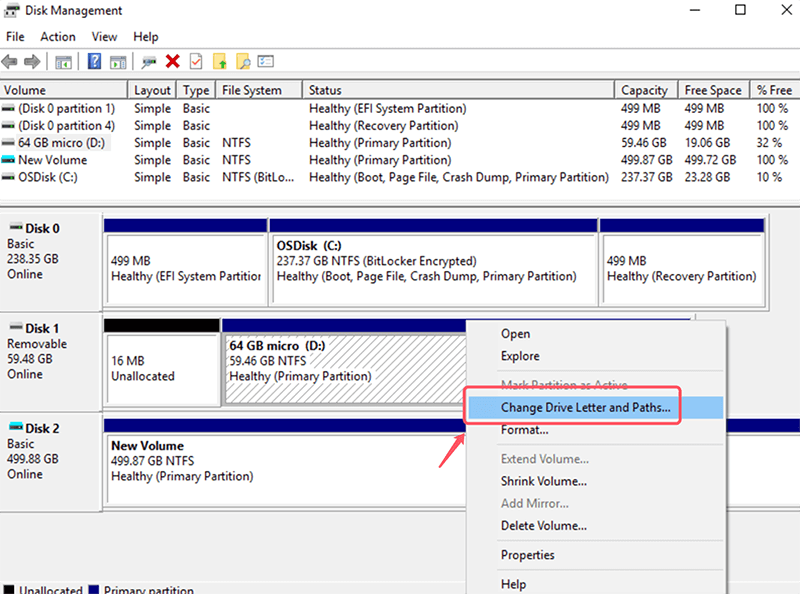
- Select Disk Management by pressing Win + X.
- Locate the WD Elements drive (it may appear as unallocated space or without a drive letter).
- Choose Change Drive Letter and Paths when you perform a right-click on the drive.
![Choose Change Drive Letter and Paths]()
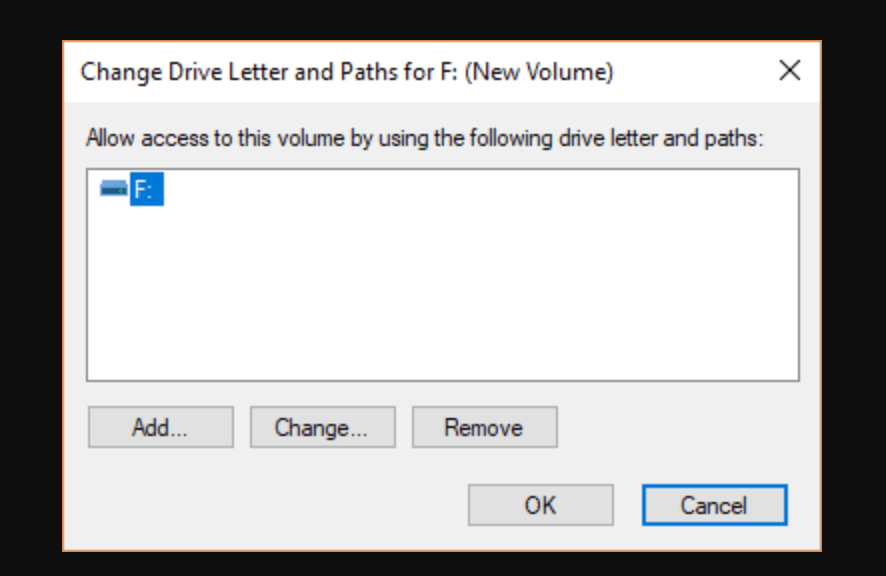
- Click Add or Change, then assign a new drive letter.
![Click Add or Change]()
Assigning a drive letter ensures Windows can access the drive through File Explorer.
5. Initialize the Drive
If the drive is new or has uninitialized partitions, Windows won't recognize it:
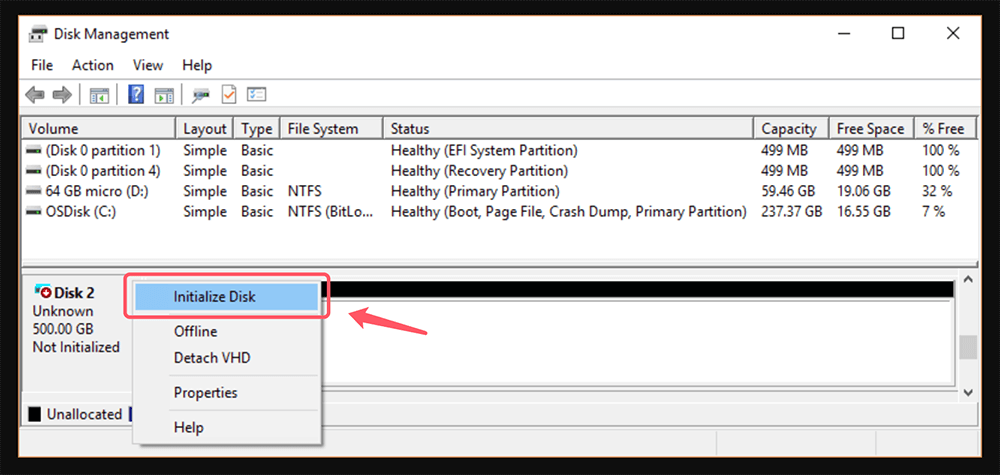
- Open Disk Management.
- If the drive is listed as "Not Initialized," right-click it and select Initialize Disk.
![Initialize the Drive]()
- Depending on your system needs, select either the GUID Partition Table (GPT) or the Master Boot Record (MBR).
- Initializing the drive prepares it for use by the operating system.
6. Format the Drive
Formatting the drive can resolve file system issues. However, this will erase all data on the drive. If the data is important, consider using data recovery software first:
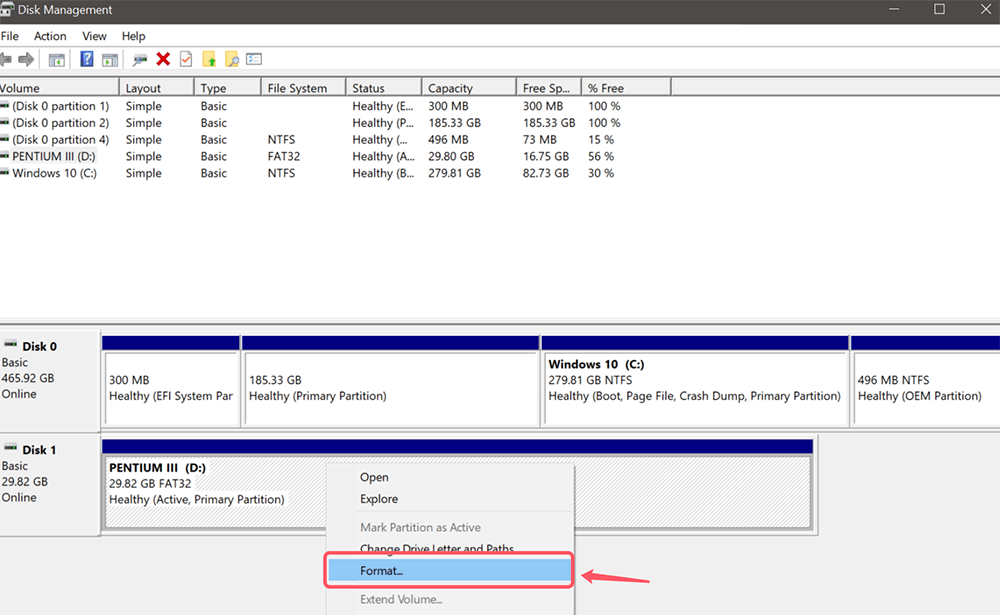
- Right-click the drive in Disk Management, then choose Format.
![Format the Drive]()
- Choose a file system such as NTFS or exFAT (compatible with Windows).
- Click OK to proceed.
After formatting, the drive should be accessible if file system corruption was the issue.
7. Update or Reinstall Drivers
Outdated or corrupted drivers can prevent your drive from being recognized:
- In Device Manager, right-click the WD Elements drive and select Update Driver.
![Update or Reinstall Drivers]()
- Select Automatic Driver Software Update Search.
- If this doesn't work, select Uninstall Device, restart your computer, and reconnect the drive to reinstall the driver automatically.
Keeping drivers up to date ensures compatibility with your operating system.
8. Run Hardware and Devices Troubleshooter
Windows offers built-in troubleshooters to fix common hardware issues:
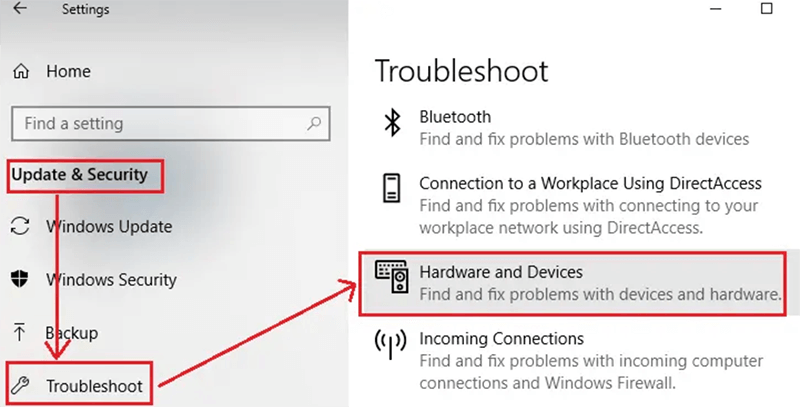
- Press Win + I to open Settings.
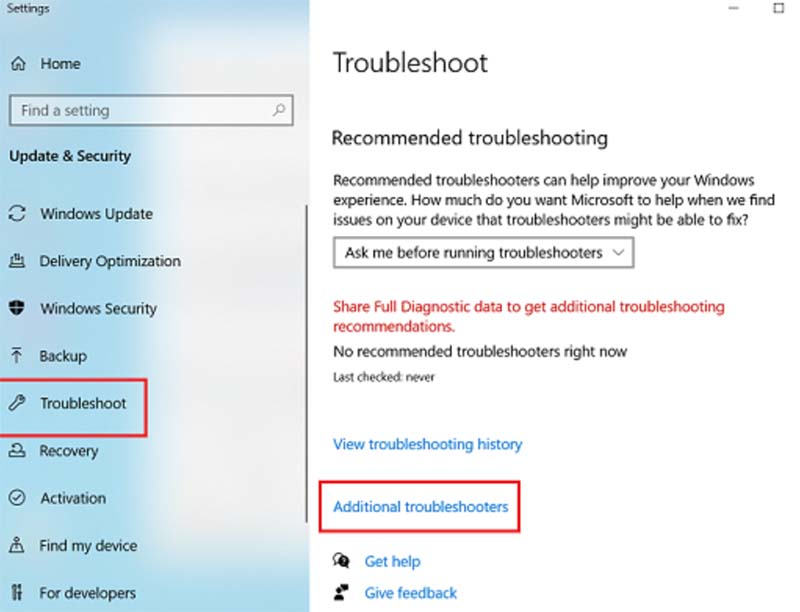
- Select Troubleshoot > Additional troubleshooters under Update & Security.
![Run Hardware and Devices Troubleshooter]()
- Select Hardware and Devices and follow the on-screen instructions.
![Run Hardware and Devices Troubleshooter]()
This tool can automatically detect and resolve minor issues with connected devices.
9. Check for Hidden Devices
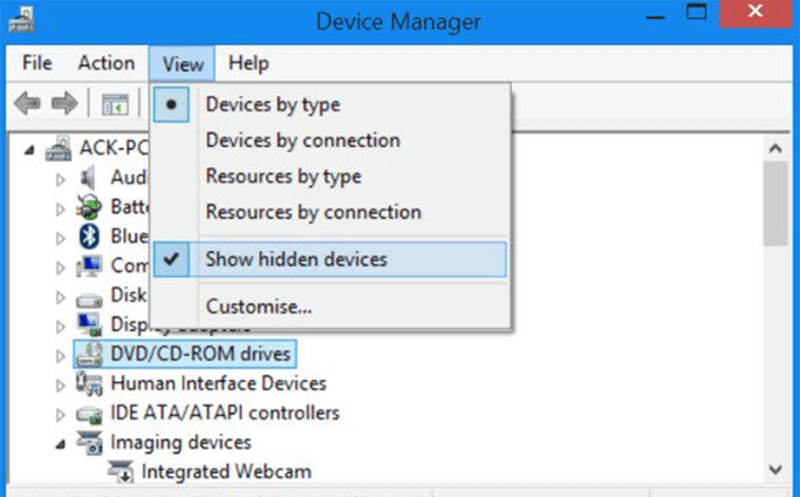
Sometimes, the drive may be hidden in Device Manager:
- In Device Manager, click View > Show Hidden Devices.
![Check for Hidden Devices]()
- Look for the WD Elements drive and follow the steps to update or reinstall its driver.
Hidden devices may not appear immediately, so this step ensures they are visible for troubleshooting.
10. Repair Corrupted Drive
A corrupted drive may not show up in File Explorer. You can use the chkdsk command to repair it:
- Launch the Command Prompt in Administrator mode.
- Type chkdsk X: /f, substituting the drive letter for "X," and hit Enter.
![Repair Corrupted Drive]()
- Wait for the process to complete and reconnect the drive.
This command repairs file system errors and ensures the drive is usable.
11. Enable Legacy USB Support in BIOS
For older systems, enabling legacy USB support in BIOS may resolve detection issues:
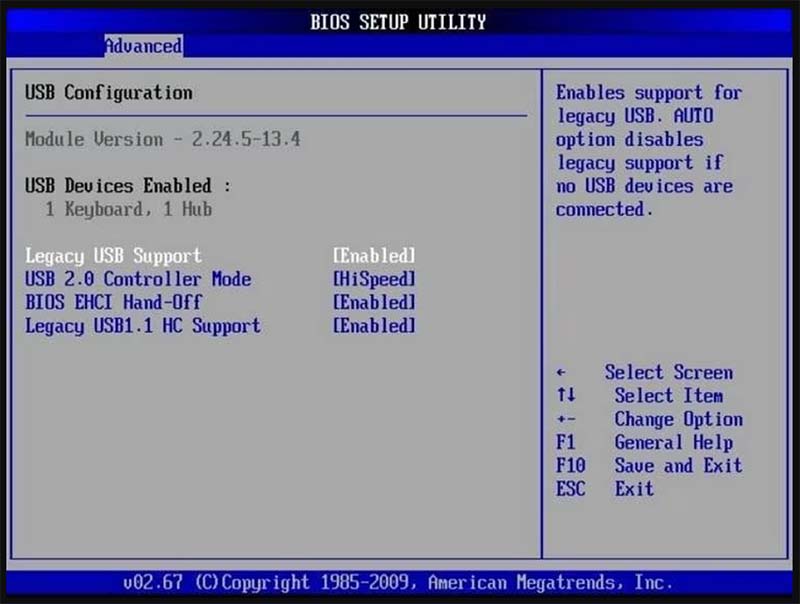
- Restart your computer, then press Del, F2, or another key during boot to access the BIOS/UEFI settings.
- Look for Legacy USB Support or similar options and enable it.
![Enable Legacy USB Support in BIOS]()
- Save changes and restart your computer.
This ensures backward compatibility with older USB devices.
12. Use Third-Party Tools
If none of the above solutions work, you can try third-party disk management or recovery tools. These tools are equipped with specialized features to handle complex drive issues efficiently. Below are some of the most effective third-party software solutions:
- EaseUS Partition Master: This tool provides a robust platform for managing disk partitions and recovering lost data. It allows users to resize, format, or convert partitions effortlessly. Its data recovery feature can retrieve files from damaged or corrupted drives, making it an excellent option for critical data recovery needs.
- AOMEI Partition Assistant: Known for its user-friendly interface, AOMEI Partition Assistant is ideal for resizing, formatting, and repairing partitions. It also includes features like migrating the operating system to SSD or HDD and creating bootable media, which can be useful if your WD Elements drive causes boot-related issues.
- MiniTool Partition Wizard: MiniTool offers advanced disk management capabilities, including partition resizing, merging, and splitting. Its diagnostic tools can detect and fix partition errors, and the data recovery option ensures you can salvage lost files from inaccessible drives.
To use these tools effectively, download and install the software of your choice. Most provide detailed on-screen instructions, guiding you through the process of analyzing and fixing issues with your WD Elements drive. Always download such tools from their official websites to avoid malware or compromised software.
13. Check for Hardware Damage
If your WD Elements drive still doesn't show up, it may have suffered physical damage. Listen for unusual clicking sounds or check for visible signs of damage. In such cases:
- Contact WD Support: They may offer warranty services or repair options.
- Seek Professional Data Recovery Services: Specialized technicians can recover data from physically damaged drives.
Advanced Solutions for Fixing Unrecognized WD Elements Drive
If none of the basic solutions resolve the issue, you may need to try more advanced fixes, especially if the problem is related to disk corruption or hardware failures.
1. Rebuild MBR (Master Boot Record)
If the drive has become corrupted or the MBR is damaged, you can try rebuilding it using built-in tools or third-party software.
- Open Command Prompt as Administrator: Press Win + X, select Command Prompt (Admin) or Windows PowerShell (Admin).
- Type the Following Commands:
- After typing diskpart, hit Enter.
- To view every disk that is attached, type list disk and hit Enter.
- Type "select disk X," substituting the number for your WD Elements drive.
- To clear the partition and get the drive ready for formatting, type clean.
- Create a new partition, type create partition main.
- To format the drive, use format fs=ntfs.
- Type assign to assign a letter to the drive.
- Reboot Your PC: Restart your computer to complete the process.
2. Use Diskpart Command
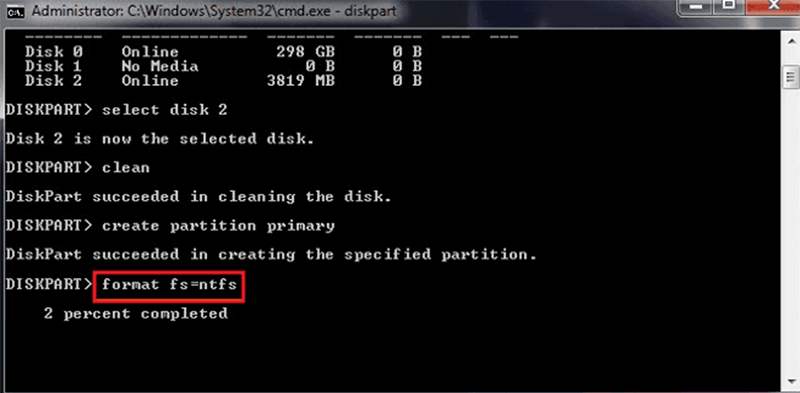
Diskpart is a powerful tool that can help fix issues with unrecognized drives, including cleaning and formatting the drive.
- Launch the Command Prompt in Administrator mode.
- Press Enter after typing diskpart.
- List all Disks: To view the connected drives, type list disk and hit Enter.
- Pick the Drive: Enter select disk X, substituting the right disk number for X.
- Clean and Format the Drive: Type clean to wipe the drive, followed by create partition primary, and then format fs=ntfs.
![Use Diskpart Command]()
Preventive Measures
To avoid similar issues in the future, follow these tips:
- Always eject the drive safely before unplugging it.
- Avoid exposing the drive to physical shocks or extreme temperatures.
- Keep your drivers and Windows updated.
- Use a surge protector to prevent power-related damage.
- Periodically back up your data to multiple locations to prevent loss in case of drive failure.
Conclusion
A WD Elements drive not showing up on Windows 11, 10, or 8/8.1/7 can be a challenging issue, but with systematic troubleshooting, it's often resolvable. By checking for basic connection problems, updating drivers, assigning drive letters, or using advanced tools, you can usually restore access to your data. For more severe cases involving physical damage, professional help may be required. Following preventive practices will ensure your external drive remains a reliable storage solution.
Donemax Data Recovery is a powerful data recovery program. It can help you export data from unrecognized WD Elements drive to your computer or recover formatted/initialized WD Elements drive, etc.


Donemax Data Recovery
Donemax Data Recovery is one of the best data recovery software. It is easy-to-use and can help in recovering deleted, formatted, inaccessible or lost data from Win/Mac HDD/SSD, external disk, USB drive, SD card, camera or other storage devices.
Related Articles
- Feb 17, 202510 Fixes for Fixing External Hard Drive Not Showing Up in File Explorer or This PC
- Jun 06, 2025[10 Fixes] Fix 100% Disk Usage on Windows 10
- Jun 25, 2025Fix 'CHKDSK Cannot Open Volume for Direct Access' Error
- Feb 06, 2025How to Prevent Your Windows 10 PC from Upgrading to Windows 11?
- Aug 20, 2025Windows Boot Repair Tool: Guide to Fix Startup Problems
- May 09, 2025Can't Find Recycle Bin on Windows Desktop? Here's How to Fix It

Steven
Steven has been a senior writer & editor of Donemax software since 2020. He's a super nerd and can't imagine the life without a computer. Over 6 years of experience of writing technical solutions and software tesing, he is passionate about providing solutions and tips for Windows and Mac users.

Gerhard Chou
In order to effectively solve the problems for our customers, every article and troubleshooting solution published on our website has been strictly tested and practiced. Our editors love researching and using computers and testing software, and are willing to help computer users with their problems
