Written byCoco LinUpdated on Jan 21, 2025
What is ATA Secure Erase? How to Use It?
Approved byGerhard Chou
Before we start: Donemax Data Eraser is a powerful data erasure program. It supports to securely and permanently erase data from PCs, Macs, HDDs, SSDs, USB drives, cameras, SD cards, RAID, Servers, etc. With certified data erasure standards, it can permanently erase any sensitive data.
PAGE CONTENT:
In the digital age, securing sensitive data is more crucial than ever. With data breaches, cybercrimes, and privacy violations on the rise, ensuring that personal or business information is securely erased when no longer needed has become a top priority. One effective and reliable method of data destruction is ATA Secure Erase. This article will explain what ATA Secure Erase is, how it works, and how you can use it to ensure your data is safely and permanently erased from hard drives and solid-state drives (SSDs).
Overview
The disposal or resale of hard drives, whether for business or personal use, requires more than just a simple deletion of files or a format. While these steps may make files disappear from view, they don't ensure that data is permanently removed. ATA Secure Erase provides a secure, standardized method to destroy data on storage devices. Whether you're planning to sell, donate, or dispose of an old drive, using ATA Secure Erase can help protect your privacy and prevent sensitive data from being recovered by unauthorized parties.
This article will cover the fundamentals of ATA Secure Erase, how it works, the steps to use it, its limitations, and other considerations to keep in mind while securely erasing data.
Understand ATA Secure Erase
What is ATA Secure Erase?
ATA Secure Erase is a data-wiping standard defined in the ATA (Advanced Technology Attachment) specification. This method is designed to securely erase all data from storage devices, including hard drives and SSDs, beyond the point of recovery. The process ensures that data cannot be retrieved, even with advanced data recovery tools.
ATA Secure Erase works directly through the drive's firmware. When initiated, it commands the drive's built-in controller to overwrite all storage sectors with data patterns that are difficult, if not impossible, to recover. The main goal is to ensure that sensitive or private information is completely erased from the storage medium.
Why is ATA Secure Erase Important?
- Data Security and Privacy: With identity theft, fraud, and cyberattacks on the rise, securely erasing data ensures that sensitive information like passwords, personal files, and business data is not recoverable.
- Compliance with Regulations: Many industries are governed by strict data protection laws like GDPR (General Data Protection Regulation), HIPAA (Health Insurance Portability and Accountability Act), and other privacy laws. Secure erasure methods like ATA Secure Erase help businesses stay compliant by ensuring that customer data is properly disposed of when no longer needed.
- Prevention of Data Recovery: Unlike simple file deletion or formatting, which only removes the references to the data but not the data itself, ATA Secure Erase ensures that the actual data is overwritten, making it unrecoverable even with sophisticated tools.
How Does ATA Secure Erase Work?
◾Process Overview
ATA Secure Erase works by sending a command to the storage device's firmware, instructing it to perform a full erasure of its contents. The process involves overwriting every sector of the drive multiple times with random data patterns, ensuring that previous data is destroyed beyond recovery.
The key to ATA Secure Erase's effectiveness lies in the way it interacts with the drive's internal controller. This built-in process allows for a thorough erasure without relying on external software tools or the operating system. It operates at a lower level, making it a more effective method for permanent data deletion than software-based solutions.
◾Hardware and Firmware Involvement
ATA Secure Erase requires that the drive's firmware support this functionality. This means that the drive must be built to recognize and execute the ATA Secure Erase command. Most modern hard drives and SSDs, especially those built after the mid-2000s, support ATA Secure Erase, but older drives or certain models may not.
Additionally, the storage device's controller is responsible for carrying out the erasure command and ensuring that data is fully overwritten. The controller manages the internal workings of the drive, including its read/write cycles, and plays a critical role in ensuring the integrity of the ATA Secure Erase process.
Steps to Use ATA Secure Erase
If you are looking to securely erase data from your drive, follow these steps to use ATA Secure Erase. There are multiple ways to carry out the process, depending on the tools and software available to you.
Before You Begin
- Check Drive Compatibility: Before initiating ATA Secure Erase, make sure your drive supports it. Modern hard drives and SSDs generally do, but some older or low-end models may not.
- Backup Data: Since ATA Secure Erase is irreversible, make sure you have a backup of any important files before proceeding.
- Prepare the System: ATA Secure Erase is typically performed from a bootable USB or from the system's BIOS, so ensure you have the necessary tools ready.
Method 1: Using Built-In BIOS/UEFI Tools
Some systems come with built-in support for ATA Secure Erase via the BIOS or UEFI. If your system's motherboard supports this feature, you can erase the data directly from the system's setup environment without needing additional software.
- Restart the Computer: Reboot your computer and enter the BIOS/UEFI settings (usually by pressing the F2, F12, or Delete key during boot).
- Find Secure Erase Option: Navigate through the BIOS/UEFI menus to locate the ATA Secure Erase option. The exact location will vary by manufacturer, but it is often found under "Advanced" or "Security" settings.
- Select the Drive: Select the drive you wish to erase. Be sure to select the correct drive, as this process will delete all data on it.
- Initiate Erasure: Follow the on-screen prompts to initiate the ATA Secure Erase process. Once started, the system will overwrite all data on the selected drive.
Method 2: Using Third-Party Software
If your system doesn't support ATA Secure Erase through the BIOS/UEFI, you can use third-party software tools that provide this functionality. Some popular tools include:
- HDDErase: A free utility designed for securely erasing hard drives using ATA Secure Erase commands.
- Parted Magic: A comprehensive disk management tool that includes ATA Secure Erase functionality.
Here's how to use HDDErase:
- Download and Create Bootable Media: Download the HDDErase tool and create a bootable USB drive using tools like Rufus or similar utilities.
- Boot from USB: Restart the computer and boot from the USB drive.
- Run HDDErase: Once booted, select the ATA Secure Erase option within the HDDErase utility.
- Select the Drive and Start Erasure: Choose the drive to erase and confirm the action. HDDErase will then overwrite all data on the drive.
Method 3: Using Manufacturer Tools
Many manufacturers offer proprietary software that supports ATA Secure Erase commands, allowing you to perform the erasure process with tools specific to your drive model. Some examples include:
- Samsung Magician (for Samsung SSDs)
- Western Digital Data Lifeguard (for WD drives)
- Seagate SeaTools (for Seagate drives)
Each of these tools typically comes with a straightforward interface, and the process will be similar to the steps described in the previous methods.
Considerations and Limitations
◾Drive Compatibility
Not all storage devices support ATA Secure Erase. SSDs, for example, require that the drive's firmware be designed to recognize and execute the ATA Secure Erase command. Some older models may not have this functionality, and the process will not work if the drive lacks the required firmware features.
Before proceeding with ATA Secure Erase, ensure that your device supports the command. Manufacturer documentation can typically confirm this.
◾Impact on SSDs and Other Flash Storage
While ATA Secure Erase is an effective method for erasing data from hard drives, it is not always ideal for SSDs. Over time, SSDs accumulate wear as they write and erase data, and the nature of flash memory can cause complications when performing a full erasure. However, ATA Secure Erase is still one of the best options for SSDs that support it, as it communicates directly with the drive’s firmware.
When dealing with SSDs, be aware of the possibility that some data might be left in areas of the drive that are not fully addressed by ATA Secure Erase due to the way data is stored in blocks.
◾Data Recovery Concerns
ATA Secure Erase is considered to be one of the most secure data-wiping methods available. However, no erasure process is 100% foolproof, especially when dealing with advanced forensic data recovery techniques. The more thorough the overwrite process (i.e., multiple overwrites), the harder it becomes to recover data.
For most practical purposes, ATA Secure Erase is sufficiently secure, but if you need to destroy highly sensitive data, consider combining it with other physical destruction methods (such as degaussing or shredding the drive).
Alternatives to ATA Secure Erase
While ATA Secure Erase is one of the best methods for securely erasing data, other alternatives may be better suited for specific needs:
- Full Disk Encryption: Encrypting the entire disk before disposal makes it nearly impossible to access data without the encryption key. However, encryption alone does not erase the data, so it’s best used alongside erasure methods.
- Physical Destruction: For highly sensitive information, physically destroying the drive ensures that no data can ever be recovered. This could involve methods like crushing, shredding, or degaussing.
Common Issues and Troubleshooting
◾Failed Secure Erase Attempts
If ATA Secure Erase fails, common issues might include:
- Drive Not Supporting the Feature: If the drive does not support ATA Secure Erase, it won't be possible to initiate the process.
- Incorrect Drive Selection: Ensure the correct drive is selected for erasure, as mistakes can result in erasing the wrong drive.
- Firmware Issues: Some drives may not execute the command properly due to firmware bugs or limitations.
◾Drive Not Detected
If your drive isn't detected during the process, ensure that all cables are properly connected, and check the BIOS settings. You may also want to try a different port or cable.
Securely and Permanently Wipe Drive with Data Eraser
Before you sell, donate or dispose of an SSD, HDD, USB Device, you can use data erasure program - such as Donemax Data Eraser to securely and permanently erase all private data.
Step 1. Download and install the reliable data erasure program - such as Donemax Data Eraser on your computer.
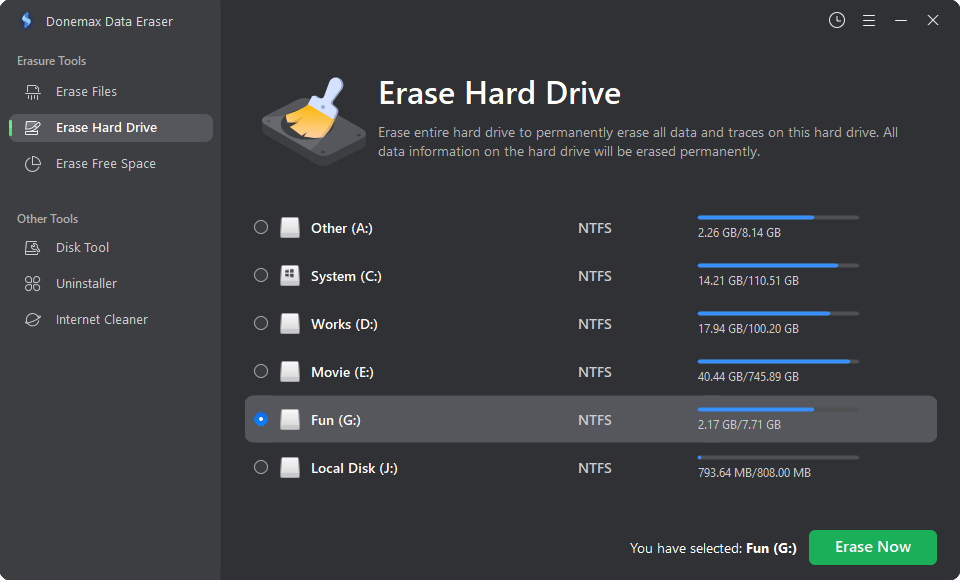
Step 2. Open Donemax Data Eraser, choose Erase Hard Drive mode, then select the target drive, click on Erase Now button.
Step 3. Select a data erasure standard, then Donemax Data Eraser will securely and permanently erase all data (existing data, deleted/formatted/lost data included) from the selected drive.
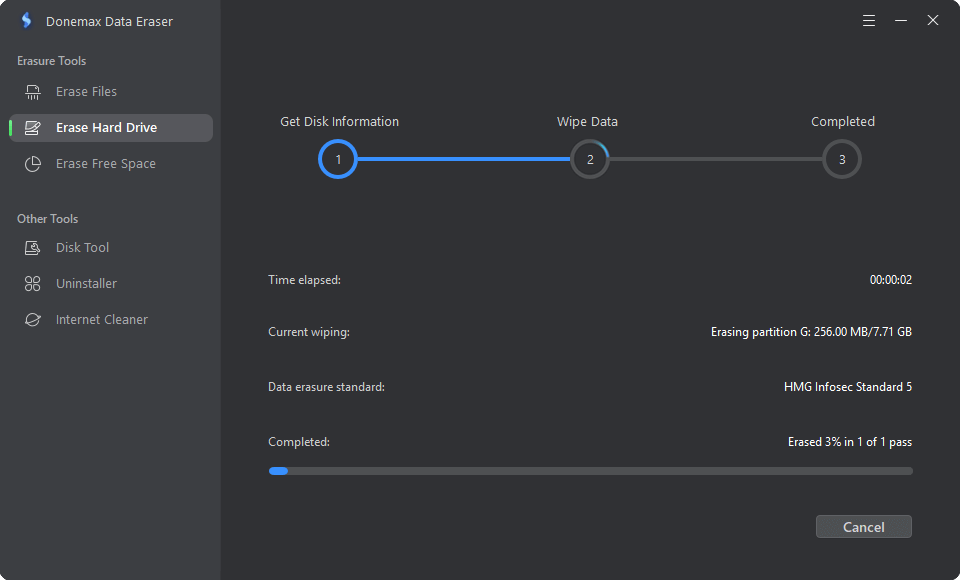
Once the process gets finished, all data stored on the drive is lost for good, cannot be recovered by any method.

Conclusion
ATA Secure Erase is a powerful tool for ensuring the complete destruction of data on hard drives and SSDs. Whether you are disposing of a drive, selling it, or donating it, using ATA Secure Erase guarantees that no sensitive information is left behind. By understanding how ATA Secure Erase works and following the appropriate steps, you can ensure that your data is safely wiped and your privacy is protected.
Donemax Data Eraser
One of the best data erasure programs for permanently erase data from PC, Mac, HDD, SSD, USB drive, digital camera and other devices. Once the data is erased, it is lost for good, cannot be recovered by any method.
Related Articles
- Jun 12, 2023Permanently Erase Data Before Selling A Windows 8/8.1 PC
- Feb 15, 2024What Is DBAN, How to Use DBAN to Erase Data?
- Mar 04, 2025Best Data Removal Tool or Data Cleaning Tool
- Jun 12, 2023How to Fix A Hard Drive That Can't Be Formatted?
- May 10, 2024How to Wipe An USB Flash Drive on Windows 11?
- Mar 12, 2024Quick Format vs Full Format, What Are the Differences?

Contributing Writer
Coco Lin
Coco has been a writer and a chief programmer at Donemax software since 2018. Over 10 years of experience of writing troubleshooting articles in the software industry, she is passionate about programming and loves to providing solutions to Windows and Mac users. Also she enjoys music and palying tennis in her free time.

Editor in chief
Gerhard Chou
In order to effectively solve the problems for our customers, every article and troubleshooting solution published on our website has been strictly tested and practiced. Our editors love researching and using computers and testing software, and are willing to help computer users with their problems