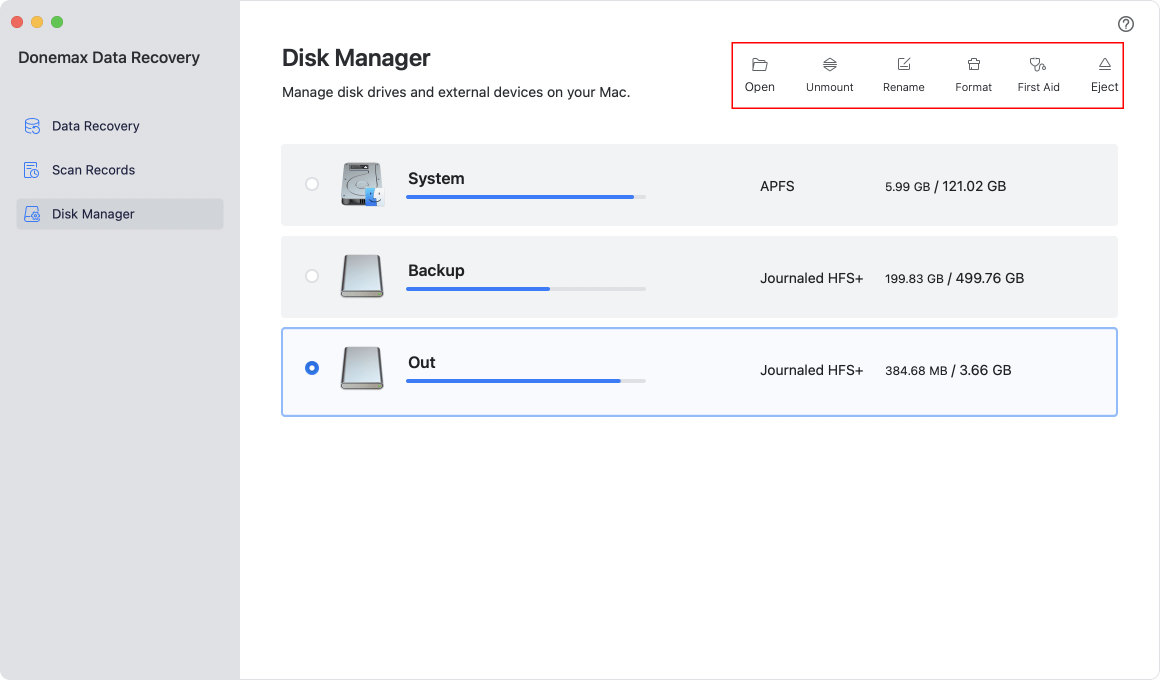
Before we start: Mac SSD data recovery software - Donemax Data Recovery for Mac is able to deeply scan the SSD and find all recoverable files. It supports to recover 2000+ file formats from any SSD and even can help in fixing damaged or crashed SSD on Mac.
PAGE CONTENT:
In our digital lives, data is everything. From family photos to important work documents, the files stored on our devices are irreplaceable. When disaster strikes and data disappears from an SSD, the experience can be nerve-wracking. However, there is hope, and with the right strategies, you can potentially recover lost data and protect yourself against future loss. This article will guide you through the key steps and considerations for recovering lost data from an SSD on your Mac, while also shedding light on preventative measures to safeguard your files.
About SSD Data Recovery
If you've ever realized that a crucial file has vanished or an entire folder is missing, you know the sinking feeling that follows. Whether due to accidental deletion, a technical glitch, or a macOS update gone wrong, losing data can feel like a hopeless situation. Data recovery from traditional hard drives (HDDs) has always been challenging, but when it comes to solid-state drives (SSDs), things become even more complicated.
Unlike traditional hard drives that rely on spinning disks to store data, SSDs use flash memory. This architectural difference affects data storage, erasure, and retrieval, making SSD recovery complex. In this article, we'll walk you through the specifics of SSD recovery on a Mac, practical steps you can take immediately after discovering data loss, and options available if your initial recovery attempts don't succeed. We'll also cover strategies to prevent data loss from happening again.

How SSDs Store and Erase Data:
To understand why recovering data from an SSD can be challenging, it helps to know how these drives work. Unlike traditional HDDs that store data magnetically on spinning disks, SSDs use NAND flash memory cells. Data in SSDs is written to and stored in blocks, which are further divided into pages. When files are deleted, SSDs don’t immediately erase data. Instead, they mark certain blocks as free. Eventually, an SSD performs a process called garbage collection, which wipes out data in marked blocks to make space for new data.
SSDs also implement a feature known as wear leveling to ensure that data is evenly distributed across cells to prolong the lifespan of the drive. However, wear leveling and garbage collection make data recovery difficult, as these processes may overwrite the very files you're trying to retrieve. Additionally, if your SSD is encrypted, data recovery becomes even more challenging due to the added layer of security.
Common Scenarios for Data Loss on SSDs
Data loss can occur in various ways on an SSD. Here are some common scenarios that Mac users might face:
- Unintentional deletion: Sometimes, files are mistakenly deleted or permanently removed from the Trash.
- File system corruption: This can occur due to software conflicts or improper shutdowns, making data inaccessible.
- Failed macOS updates or formatting: A sudden power outage, a glitch during a system update, or a mistaken reformatting of the drive can all lead to data loss.
- Physical or hardware failures: SSDs, while more durable than HDDs, are still vulnerable to wear and electrical surges, which can lead to data loss.
Identifying the cause of data loss can help you determine the best course of action for recovery. If data loss is due to accidental deletion or corruption, software recovery might be feasible. However, if the SSD has experienced physical damage, consulting a professional is recommended.
How to Recover Lost Data from SSD on Mac?
First Steps to Take After Data Loss on an SSD
When you first realize that data is missing, acting quickly is essential. SSDs continue to operate and manage data even after files are deleted, so you'll want to minimize activity on your drive to avoid overwriting lost data.
- Stop using the drive immediately: The more you use the SSD, the higher the chance of overwriting your lost data. If possible, refrain from saving new files or installing new software until you’ve attempted recovery.
- Check for recent backups: Start by checking any recent backups. Mac's Time Machine, iCloud, or other third-party cloud solutions like Google Drive may have copies of your missing files.
- Verify Trash and iCloud Drive: Sometimes, files that seem lost might simply be moved to the Trash or hidden within your iCloud storage. Double-check these locations before moving on to more advanced methods.
If you find a backup or recover files from the Trash, you’re in luck! However, if these initial checks don’t turn up anything, you may need to use recovery tools.
Using Built-in Mac Tools to Attempt Recovery
macOS comes with a few tools that can assist with data retrieval under certain circumstances. While these won't be as effective for recovering permanently deleted data, they can help repair corrupted drives or retrieve files from a recent backup.
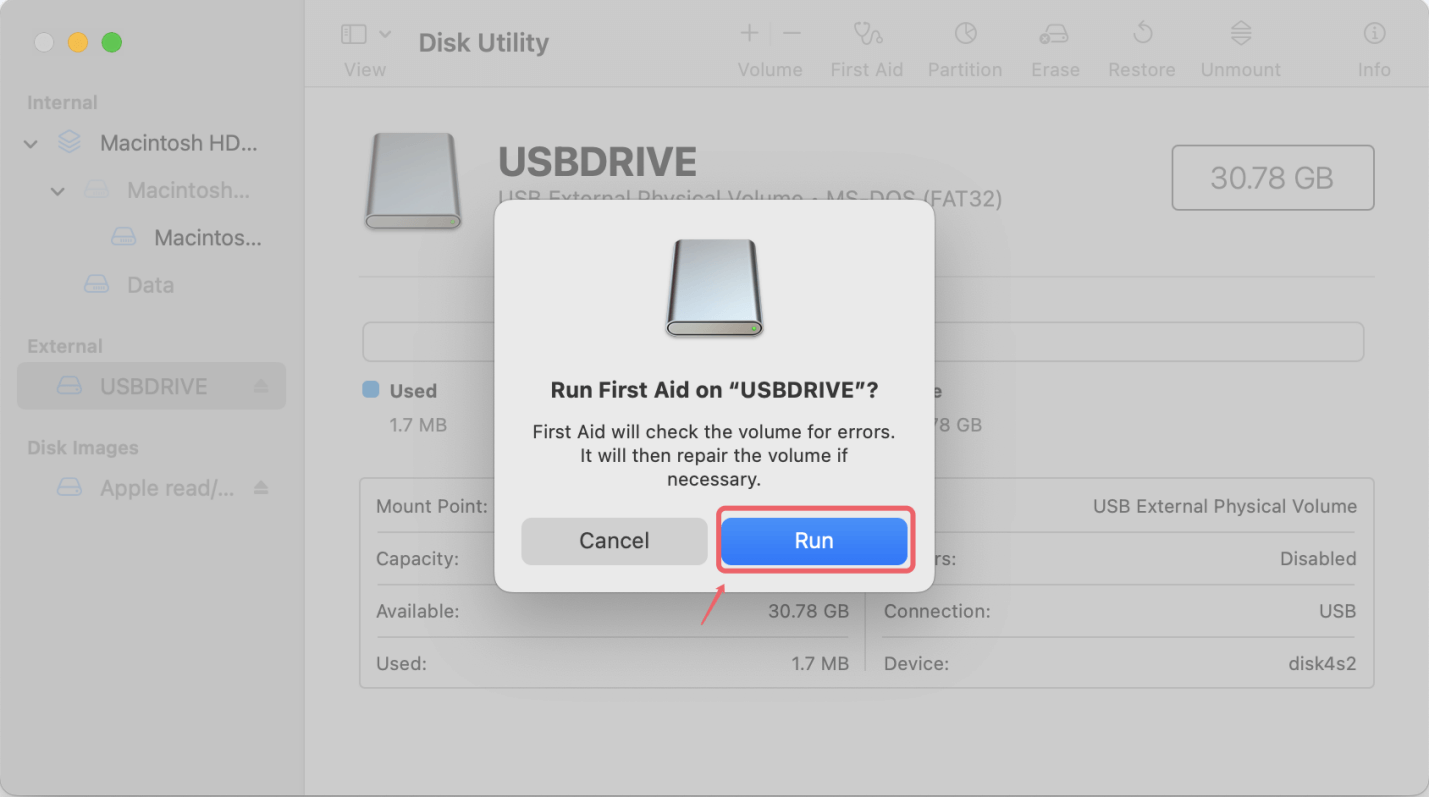
- Disk Utility: Open Disk Utility (located in Applications > Utilities) and use it to run a diagnostic and repair check on your SSD. This tool can sometimes repair minor disk errors that may cause files to become inaccessible.
- Time Machine: If you've been using Time Machine for backups, open it and navigate to a date prior to the data loss. Time Machine allows you to restore files or even your entire system to a previous state, which is invaluable for accidental deletion cases.
- Terminal Commands: For advanced users, there are terminal commands that might help reveal hidden files or repair the file system. Be careful with this approach, as misuse of Terminal commands can worsen the problem.
These methods are worth exploring, especially if you've recently experienced data loss. However, if you can't find your files using built-in tools, you'll likely need to turn to professional data recovery software.
Using Professional Data Recovery Software for SSDs on Mac
Professional data recovery software offers advanced solutions for more complex cases of data loss on SSDs. These tools scan the SSD's storage sectors for recoverable data fragments and often succeed where Mac's native tools fall short.
Donemax Data Recovery for Mac is a reliable Mac data recovery application. It can help Mac users to securely and completely recover deleted, formatted and lost data from any SSD including SATA, NVMe, etc.
Donemax Data Recovery for Mac
- Recover deleted files from SSD on Mac.
- Recover formatted and erased data from SSD on Mac.
- Recover lost data from damaged or crashed SSD on Mac.
- Recover all data from Mac's internal SSD.
Follow these steps to recover lost data from an SSD on Mac:
Step 1. Download and install Donemax Data Recovery for Mac on your Mac. If the SSD is an external device, connect it to your Mac. Then select the SSD to start data recovery.

Step 2. Click on Scan button to deeply scan the SSD and find all recoverable files including deleted files, inaccessible files, formatted/erased files, etc.

Step 3. Once the scan is completed, you can use preview feature to preview all recoverable files. Then select the wanted files, click on Recover button to save them.

Donemax Data Recovery for Mac also can help you:
- Export data from an inaccessible SSD to another drive.
- Mount SSD including NTFS SSD on Mac.
- Fix damaged or crashed SSD on Mac.

When to Seek Expert Data Recovery Services
If software recovery doesn't yield results, or if your SSD has physical damage, it may be time to consult a professional data recovery service. These services use advanced equipment and techniques to retrieve data that's inaccessible by consumer-grade software.
Signs you may need expert assistance include:
- Drive not recognized by your Mac.
- No results from software scans or software indicating a hardware issue.
- Visible physical damage on the SSD, such as burnt components or unusual sounds from the drive.
Professional services can be costly, typically ranging from $300 to $1,500, depending on the extent of the damage and the amount of data you need to recover. When choosing a data recovery provider, look for one with positive reviews and data confidentiality guarantees. Many services offer "no data, no charge" policies, where you pay only if data recovery is successful.
Preventing Future Data Loss on SSDs
The best way to avoid future data loss is to develop a proactive approach to data protection. Here are some effective strategies:
- Regular Backups: Time Machine is an excellent tool for Mac users, offering automatic hourly backups that can save you from data loss disasters. Consider also using cloud storage, such as iCloud, Dropbox, or Google Drive, to create additional copies of your files.
- Avoid Overheating and Power Surges: SSDs are sensitive to temperature extremes and electrical fluctuations, both of which can lead to data loss. Use a surge protector, especially if your area is prone to power issues.
- Be Mindful of Drive Health: SSDs have a finite lifespan due to limited write cycles. Tools like DriveDx or SMART Monitoring can help you keep tabs on your SSD’s health and replace it if signs of degradation appear.
- Practice Safe Software Updates and Shutdowns: Sudden shutdowns or improper updates are frequent culprits of data corruption. Make sure your Mac is always safely shut down and that you install updates in a stable environment, like when plugged into a power source.
By regularly backing up and monitoring your SSD's health, you can prevent many data loss issues from arising in the first place.
Conclusion
While losing data from an SSD can be a stressful experience, knowing how to handle the situation can help you recover with confidence. Start by checking backups, and don't hesitate to use built-in Mac tools to repair your drive or retrieve recent files. Professional recovery software can be a lifeline for files lost to accidental deletion or drive errors, and if all else fails, a professional data recovery service may be your last resort.
Remember, prevention is the best remedy. With regular backups and mindful practices, you can safeguard your data against potential mishaps. As SSD technology continues to advance, more recovery options may emerge, making it easier for users to retrieve their precious files. In the meantime, acting quickly and responsibly in response to data loss can make all the difference.
FAQs About SSD Data Recovery on Mac
1. How to recover permanently deleted files from SSD on Mac?
You can use Mac data recovery software to deeply scan the SSD and recover the permanently deleted files:
- Download and install Donemax Data Recovery for Mac.
- Open Donemax Data Recovery for Mac, select the SSD.
- Click on Scan button to deeply scan the SSD.
- Preview and recover lost files after scanning.
2. Is it possible to recover deleted/erased data from Mac's internal SSD (including Apple silicon Mac)?
Yes, first of all, check if you could recover lost data from Time Machine backup. If not, just try Mac data recovery software. It deeply scans the SSD and recover all deleted/formatted/erased data.
3. What is the best Mac SSD data recovery software?
Here is the list of top 5 Mac SSD data recovery software:
- Donemax Data Recovery for Mac
- PhotoRec
- Do Your Data Recovery for Mac
- Recoverit for Mac
- Magoshare Data Recovery for mac
4. How to permanently wipe data from SSD on Mac before selling or donating?
To make data recovery be impossible, you can use Mac disk wipe software - such as Donemax Data Eraser for Mac to wipe the SSD. Once the data is wiped by this software, the data is lost for good, cannot be recovered by any method.
5. How to repair damaged SSD on Mac?
You can use Disk Utility to repair a damaged SSD on Mac:
- Make sure the SSD is connected to the Mac.
- Go to Launchpad > Other > Disk Utility, open Disk Utility.
- Select the SSD, click First Aid.
- Click Run to run First Aid on the SSD.


Donemax Data Recovery for Mac
Donemax Data Recovery for Mac is one of the best Mac data recovery software. It is easy-to-use and can help in recovering deleted, formatted, inaccessible or lost data from Mac HDD/SSD, external disk, USB drive, SD card, camera or other storage devices.
Related Articles
- Sep 15, 2025Upgrade Alienware Gaming Laptop SSD: A Complete Guide
- Nov 19, 2024What is SSD, About SSD Types, Compare SSD to HDD
- Sep 23, 2024How to Format NVMe SSD on Windows or macOS?
- Jun 06, 2025Sabrent Rocket SSD Not Showing Up on My Computer, Fix It Now
- Jan 14, 2025How to Fix Corrupted or Dead SSD Without Losing Data?
- Jul 24, 2024How to Fix SanDisk Portable SSD Not Working on Mac?

Christina
Christina is the senior editor of Donemax software who has worked in the company for 4+ years. She mainly writes the guides and solutions about data erasure, data transferring, data recovery and disk cloning to help users get the most out of their Windows and Mac. She likes to travel, enjoy country music and play games in her spare time.

Gerhard Chou
In order to effectively solve the problems for our customers, every article and troubleshooting solution published on our website has been strictly tested and practiced. Our editors love researching and using computers and testing software, and are willing to help computer users with their problems
