PAGE CONTENT:
- Overview: SSD Won't Mount on MacBook Pro
- Common Causes of SSD Not Mounting on MacBook Pro
- Basic Troubleshooting Steps to Fix Unmounted SSD on MacBook Pro
- Advanced Troubleshooting Methods to Fix Unmounted SSD on Mac
- Recover Lost Data from Unmounted or Erased SSD on MacBook Pro
- Preventive Measures to Avoid Mounting Issues
- Conclusion
Having an SSD (Solid State Drive) not mounting on a MacBook Pro can be frustrating and potentially disruptive to your workflow. Whether it's an external SSD or an internal one, the inability to access your files or use the SSD for storage is an issue that many users face. In this article, we'll explore the common causes behind an SSD not mounting on your MacBook Pro, the troubleshooting steps you can take to fix the problem, and preventive measures to ensure that it doesn’t happen again.
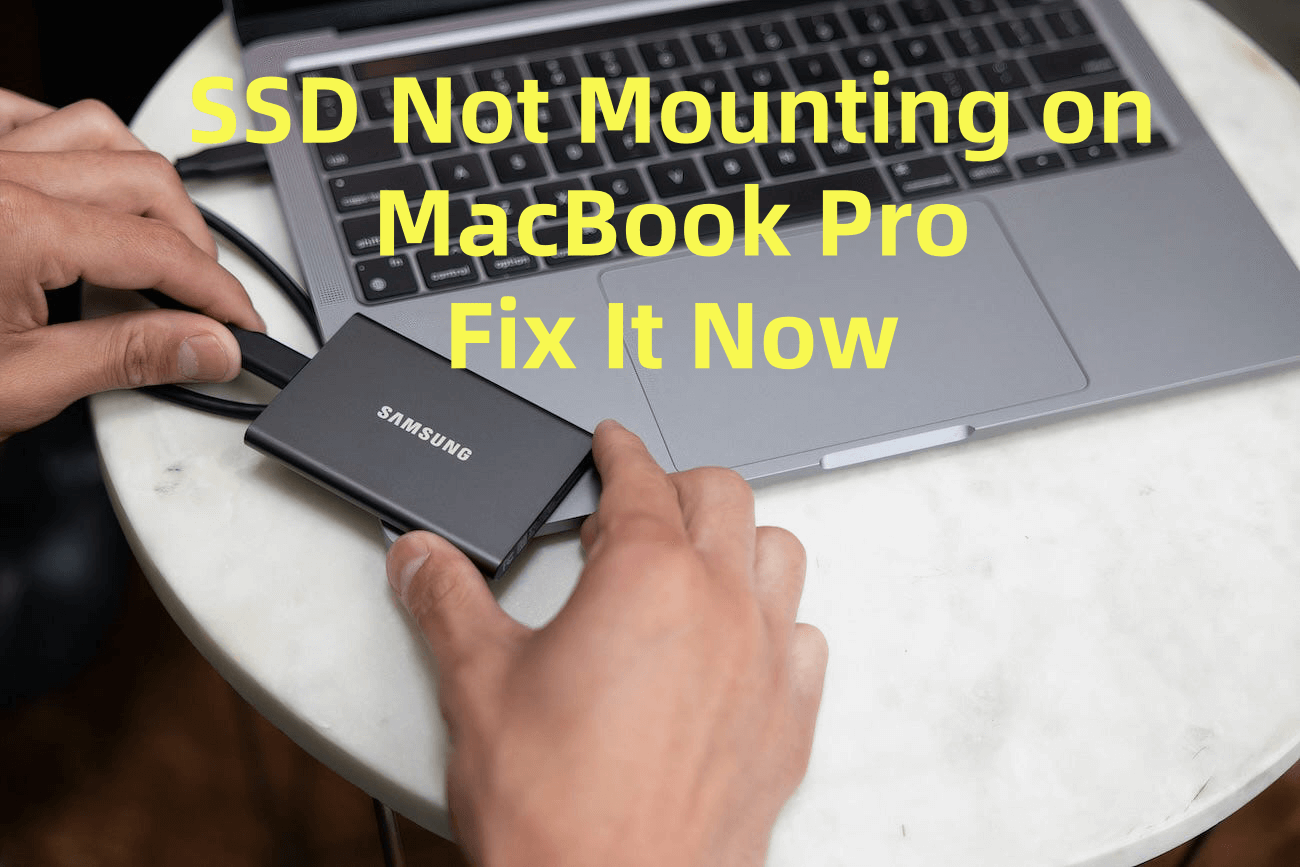
Overview: SSD Won't Mount on MacBook Pro
A MacBook Pro is renowned for its performance and reliability, but even the best devices can run into issues. One such issue that some users may encounter is an SSD not mounting. When an SSD fails to mount, the data it contains may be inaccessible, and it might appear as though the drive has failed. Fortunately, there are several reasons this could happen, and many of them are fixable. Whether it's an external SSD or one installed internally, understanding how to troubleshoot the problem can save you time, and in some cases, your data.
In this article, we'll walk you through the potential causes, the steps you can take to troubleshoot the problem, and tips to prevent future occurrences.
Common Causes of SSD Not Mounting on MacBook Pro
Before diving into the troubleshooting steps, it's important to understand what might be causing the issue. SSD mounting failures are generally caused by either hardware or software issues. Here are some common causes:
● Hardware Connection Issues
The most common cause of an external SSD not mounting is a hardware connection problem. This could be something as simple as a loose cable or an issue with the port. If you're using a USB or Thunderbolt external SSD, check to see if:
- The cable is securely connected to both the SSD and the MacBook Pro.
- The cable or port is damaged (e.g., frayed cable, bent pins in the port).
- The SSD has power if it requires an external power supply.
If any of these are the issue, replacing the cable or trying a different port might resolve the problem.
● File System Corruption
An SSD may not mount if the file system is corrupted. MacBook Pro uses HFS+ (Mac OS Extended) or APFS (Apple File System), depending on the macOS version. If the SSD's file system is damaged - whether due to improper ejection, malware, or physical damage - it can prevent the drive from mounting. File system corruption can sometimes result from sudden power failures, improper disconnections, or the SSD becoming too full.
● Software Conflicts
In some cases, a software conflict might prevent an SSD from mounting. This could be related to third-party applications that interfere with disk management or bugs in macOS. Some users report SSD mounting issues after macOS updates, where certain drivers or compatibility problems prevent the drive from mounting properly.
● SSD Compatibility Issues
If you are using an external SSD, it's essential to ensure that the SSD is compatible with macOS. SSDs that are formatted with Windows-centric file systems, such as NTFS, exFAT, or FAT32, may not mount easily on a MacBook Pro without specific drivers or third-party software. In addition, certain SSD brands or models may have firmware compatibility issues with macOS.
● Outdated Firmware
Firmware issues can cause mounting problems. SSDs and macOS are continuously updated to improve compatibility and fix bugs. If your SSD firmware is outdated, it could cause issues when trying to mount the SSD on macOS. Similarly, if your macOS is outdated, it may not properly recognize new hardware, including SSDs.
Basic Troubleshooting Steps to Fix Unmounted SSD on MacBook Pro
Once you understand the possible causes, the next step is to troubleshoot the problem. Below are some basic troubleshooting methods you can try.
Check Physical Connections:
The first step in troubleshooting is to check all physical connections. Whether you're using an external SSD or the SSD is installed inside the MacBook Pro, make sure the drive is properly connected.
- External SSD: If you're using an external SSD, ensure that the cable is firmly connected to both the SSD and the MacBook Pro. You should also test the cable by using it with another device to ensure it's not faulty.
- Internal SSD: If the SSD is internal, check for any hardware malfunctions, such as a loose drive cable or malfunctioning connector.
If everything looks fine, move on to the next step.
Restart the MacBook Pro:
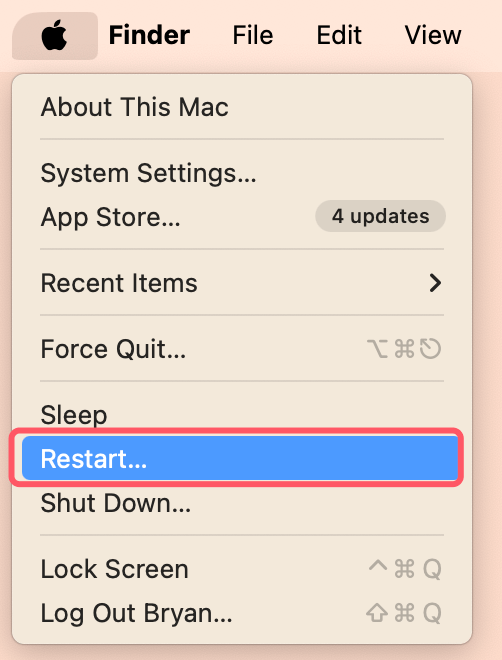
Sometimes, a simple restart can fix SSD mounting issues. Restarting your MacBook Pro helps refresh system processes, clear minor software conflicts, and ensure that the system is in a stable state.
To restart:
- Close all applications.
- Click the Apple logo in the top left corner.
- Select "Restart."
![SSD not mounting on a MacBook Pro]()
After the restart, check if the SSD mounts automatically.
Check Disk Utility:
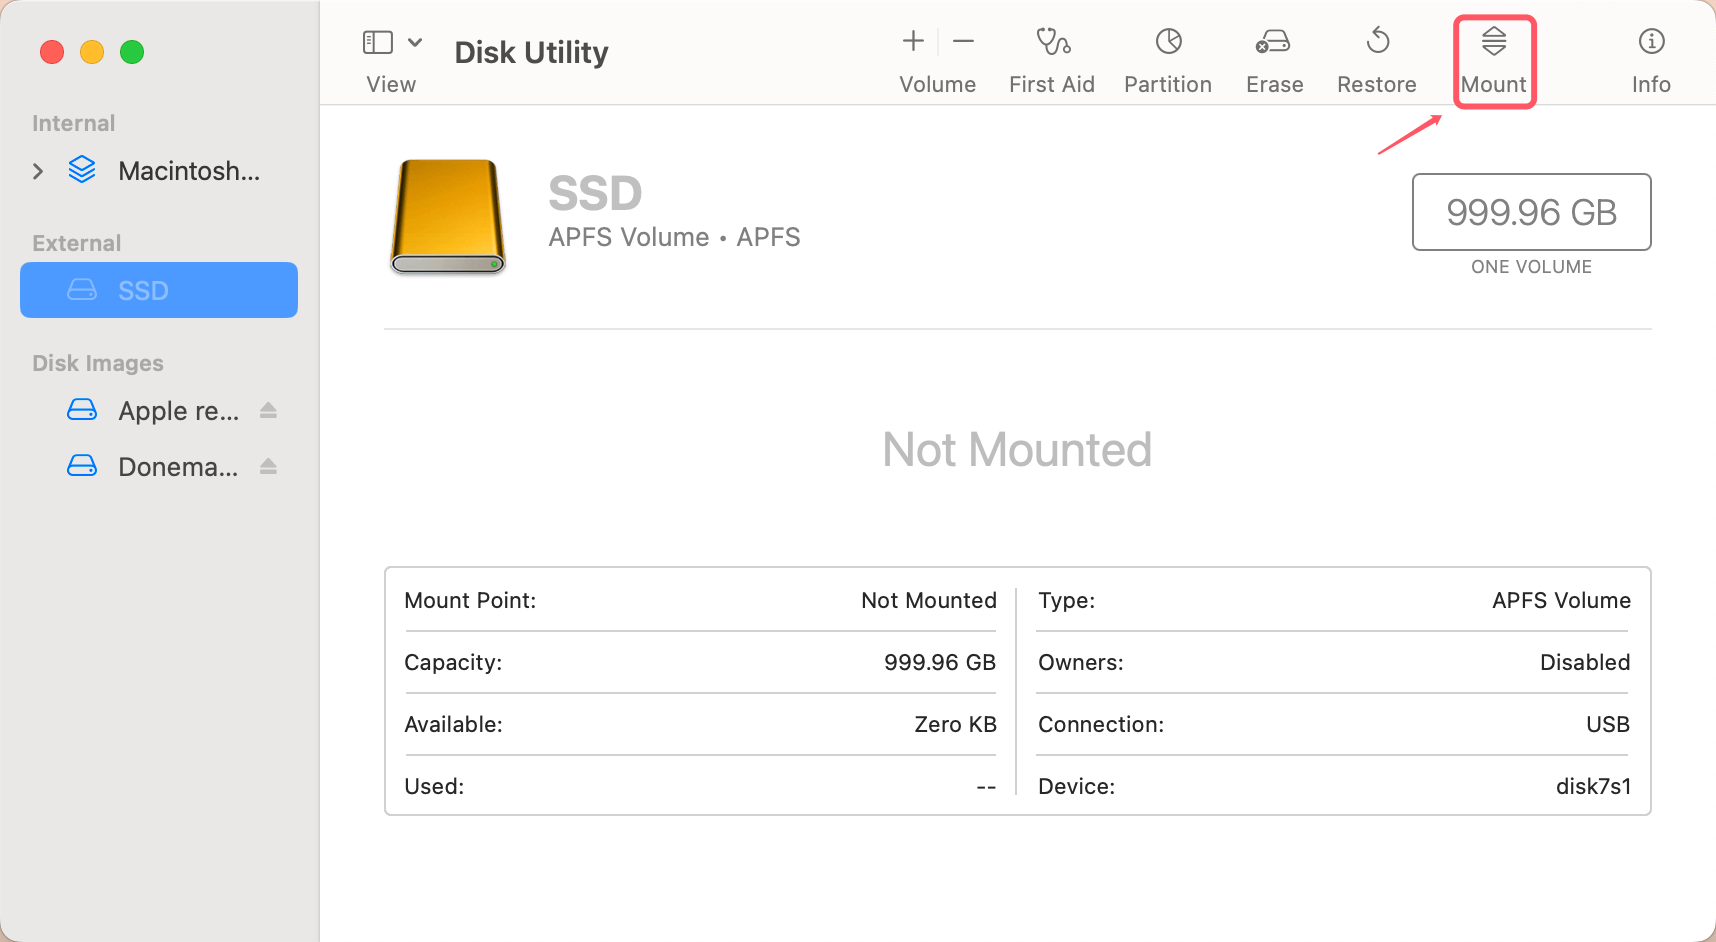
macOS provides a built-in utility called Disk Utility that helps you manage your disks and storage devices. It's a useful tool to check if the SSD is being detected but failing to mount.
To check your SSD with Disk Utility:
- Open Disk Utility Utilities via Applications.
- Look for the SSD in the left-hand sidebar. If it's visible but not mounted, it may need to be manually mounted.
- If the SSD is listed but not mounted, select it and click Mount.
![SSD not mounting on a MacBook Pro]()
If the SSD is still not mounting, you may need to proceed to more advanced troubleshooting methods.
Advanced Troubleshooting Methods to Fix Unmounted SSD on Mac
If the SSD doesn't appear in Disk Utility or continues to fail to mount, more advanced methods might be required.
Run First Aid in Disk Utility:
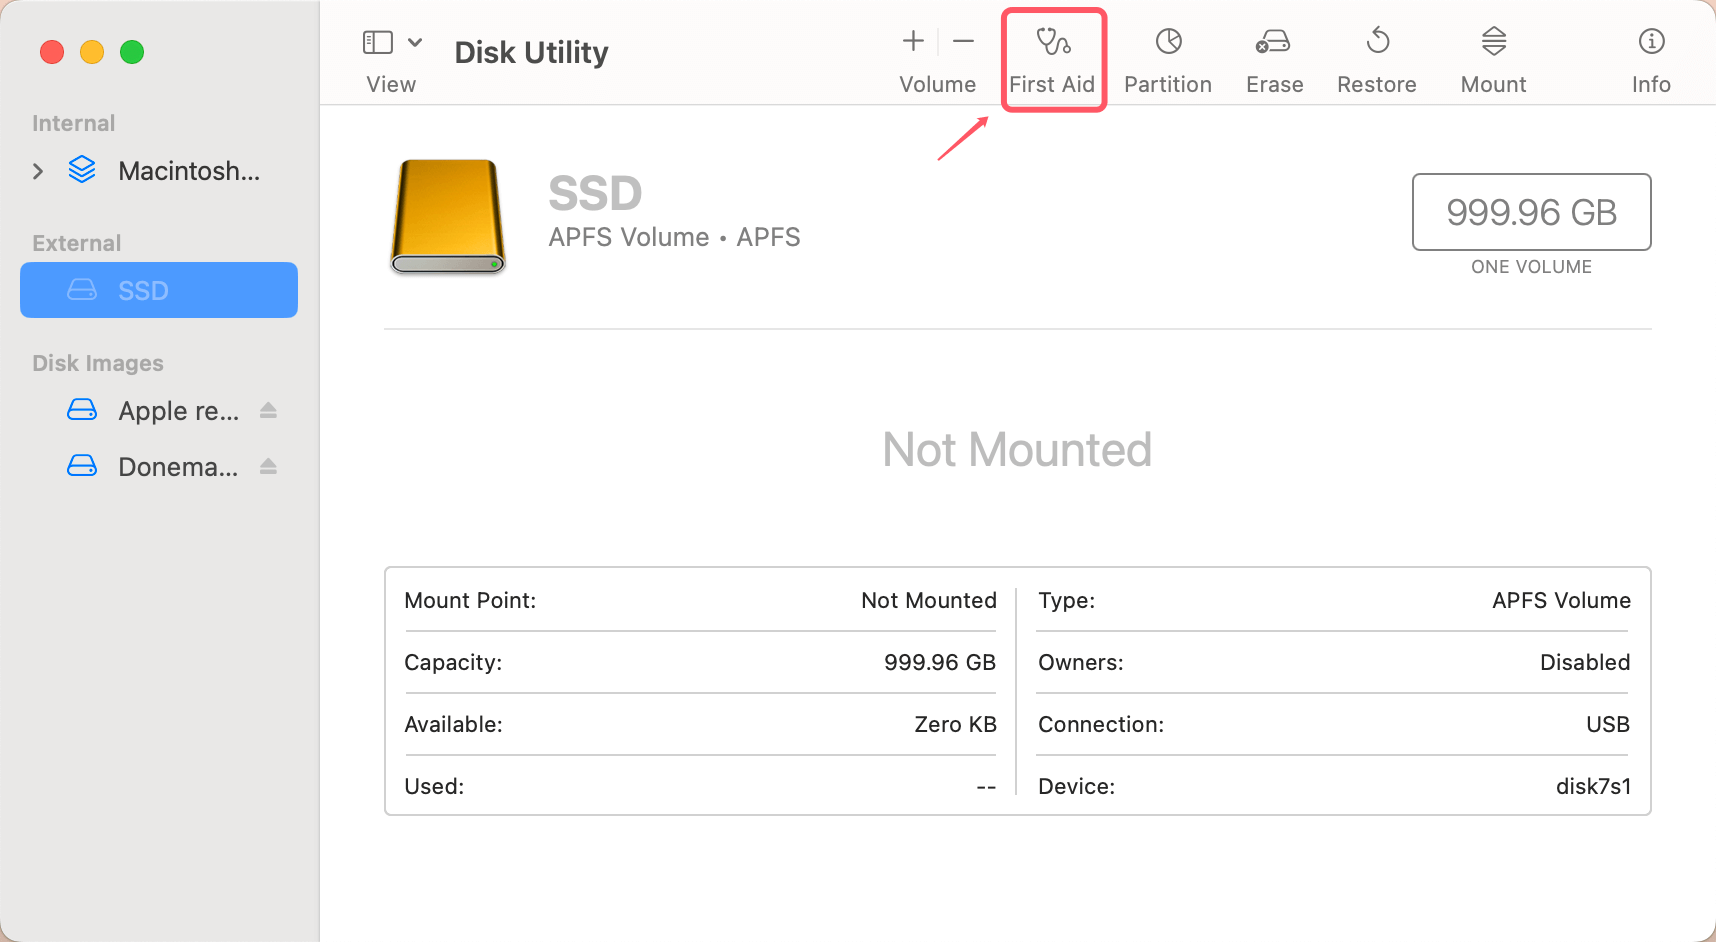
Disk Utility comes with a built-in tool called First Aid that can help fix minor file system problems.
To run First Aid:
- Open Disk Utility.
- Select the SSD that is not mounting.
- Click the First Aid button in the toolbar.
![SSD not mounting on a MacBook Pro]()
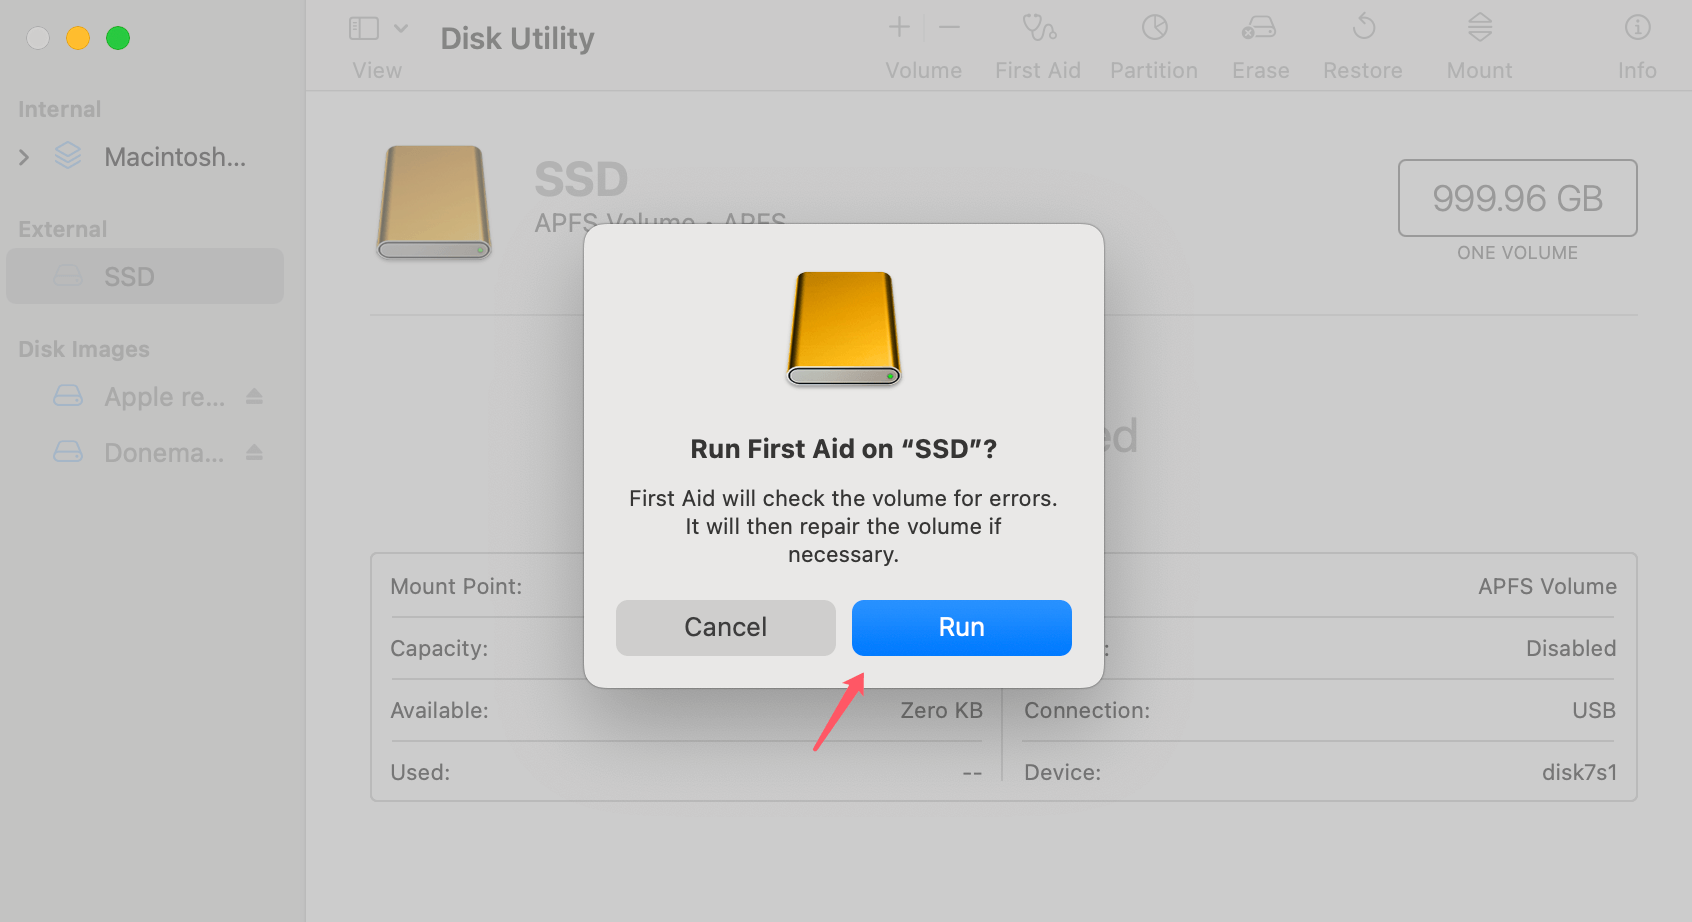
- Confirm by clicking Run.
![SSD not mounting on a MacBook Pro]()
Disk Utility will check the drive for errors and try to repair any issues. If First Aid is unable to repair the drive, you might see a message indicating the failure, or it may ask you to back up and reformat the drive.
Check the System Information Tool:
If the SSD does not show up in Disk Utility, you can check the System Information tool to see if your MacBook Pro recognizes the drive at a hardware level.
To access System Information:
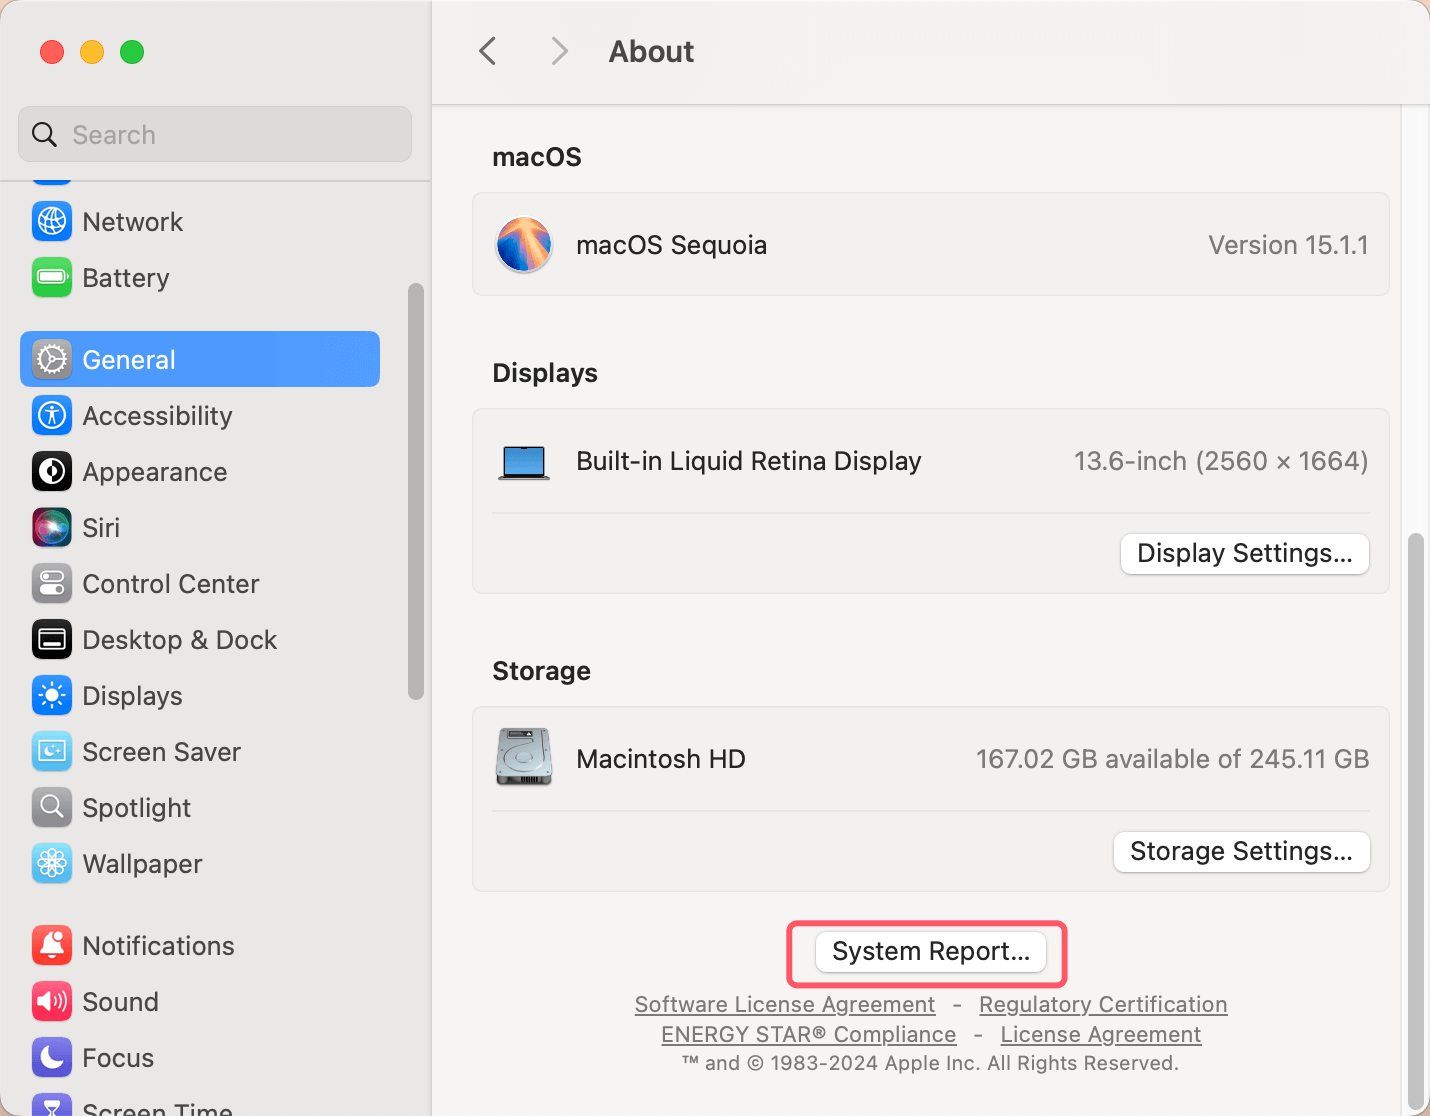
- Click the Apple logo in the top-left corner and select Systems.
- Go to General > About > System Report.
![SSD not mounting on a MacBook Pro]()
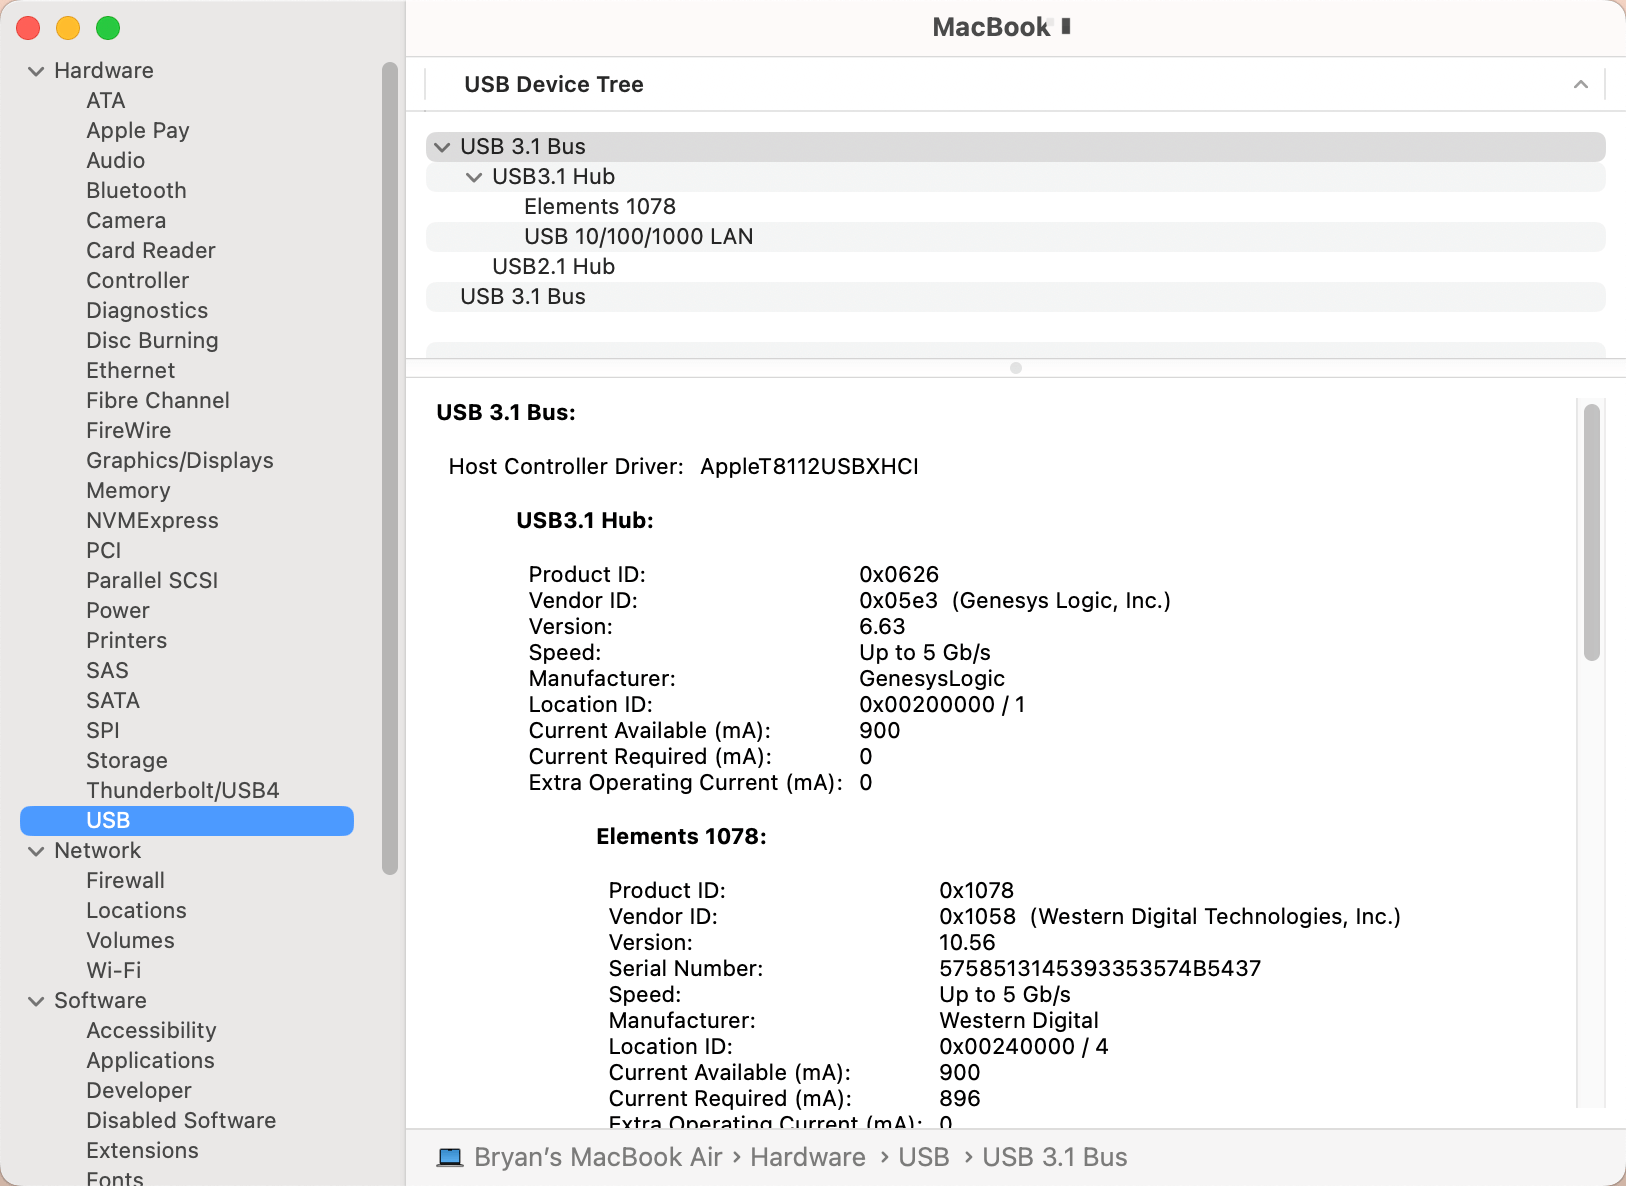
- Under Hardware, select Storage or USB (depending on whether the SSD is external or internal).
![SSD not mounting on a MacBook Pro]()
If the SSD is recognized here but not in Disk Utility, it suggests that the issue might be software-related.
Reset NVRAM/PRAM and SMC:
Sometimes, resetting the NVRAM and SMC can resolve hardware recognition issues, including SSD mounting problems.
To reset the NVRAM:
- Turn off your MacBook Pro.
- Press and hold Option + Command + P + R keys immediately after turning the Mac on.
- Hold these keys for about 20 seconds and release.
- Let your Mac restart.
To reset the SMC:
- Shut down the MacBook Pro.
- For Macs with a T2 chip: After seven seconds of holding down the Control + Option + Shift keys, push the power button. Hold for a further seven seconds, then let go of the power button and all keys.
- For other MacBooks: Turn off the Mac, after ten seconds of holding down the Shift + Control + Option keys, let go and restart the computer.
Safe Mode Boot:
To determine whether the problem is software-related, try booting into Safe Mode. In Safe Mode, only essential macOS components load, which helps you narrow down if a third-party app or process is causing the issue.
To boot in Safe Mode on Intel-based Mac:
- Turn off the MacBook Pro.
- Press and hold the Shift key as soon as you turn it on.
- When the login window appears, release the key.
- Once in Safe Mode, check if the SSD mounts.
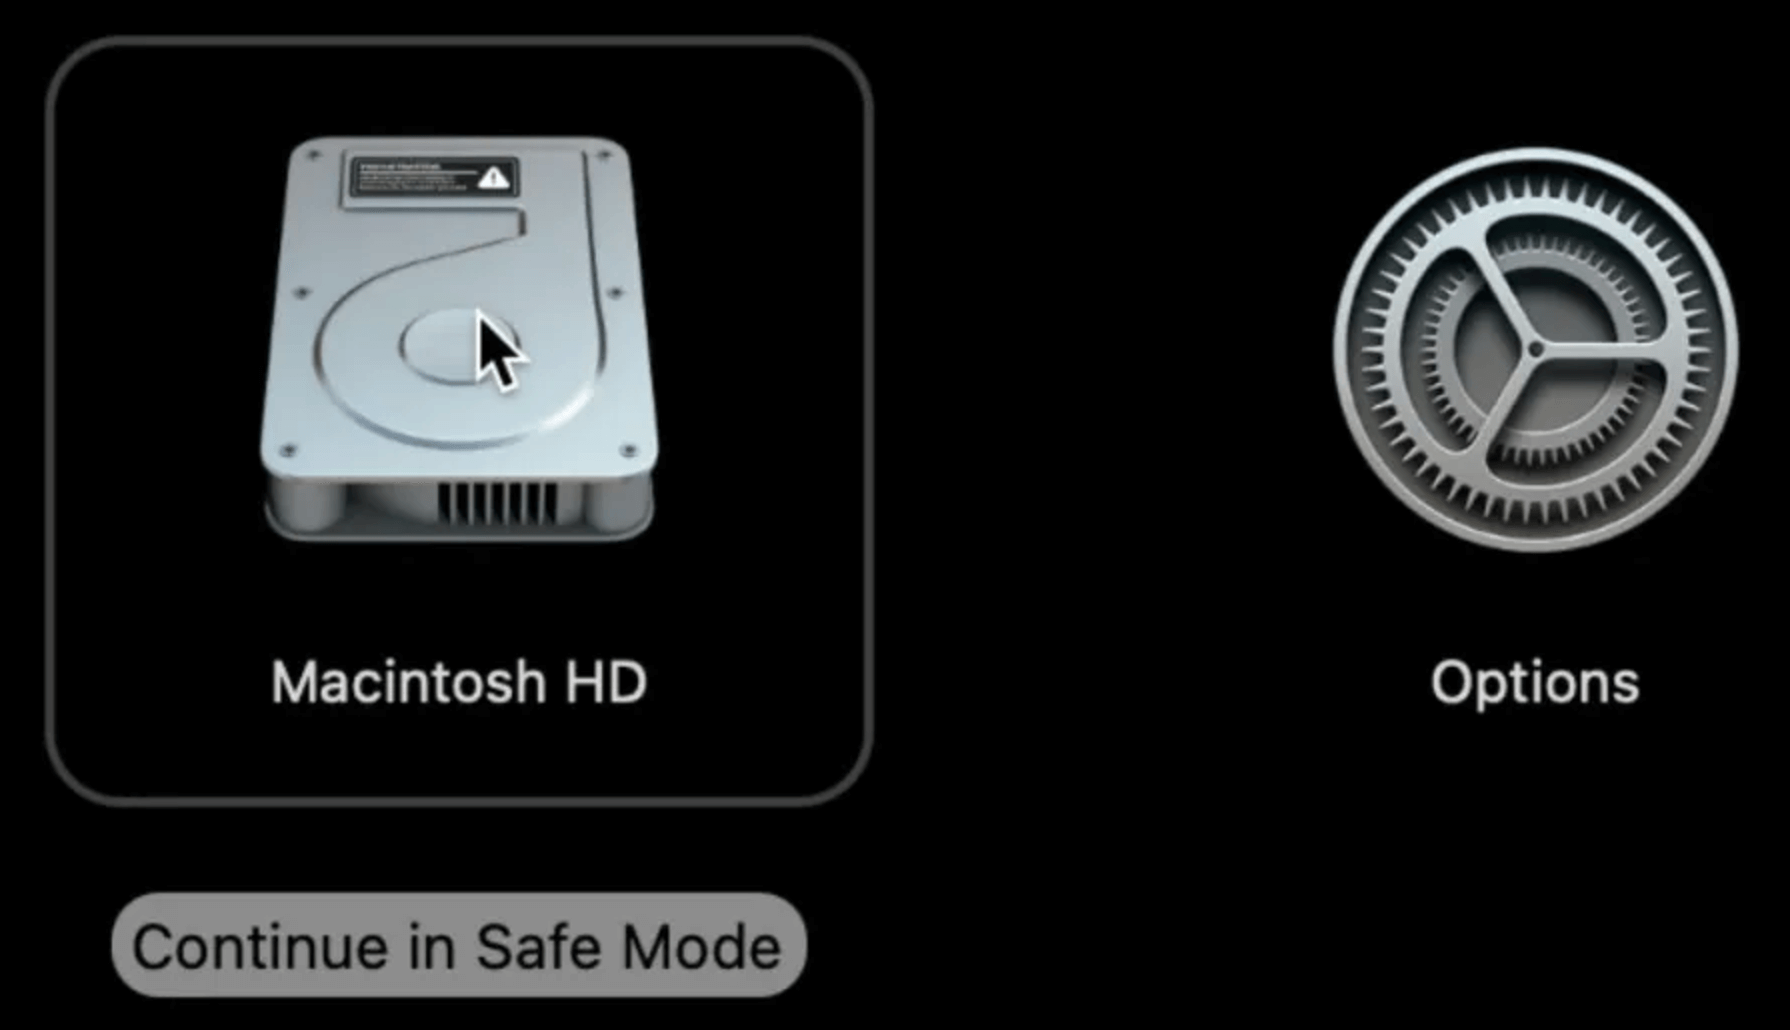
For Apple silicon Mac, shut down the mac, then press and hold Power button until you see Loading Startup Options, then select the Macintosh HD, press Option key, choose Continue in Safe Mode.
Use Terminal Commands to Mount SSD:
If the above steps didn't work, you can use macOS's Terminal to try mounting the SSD manually.
diskutil Command:
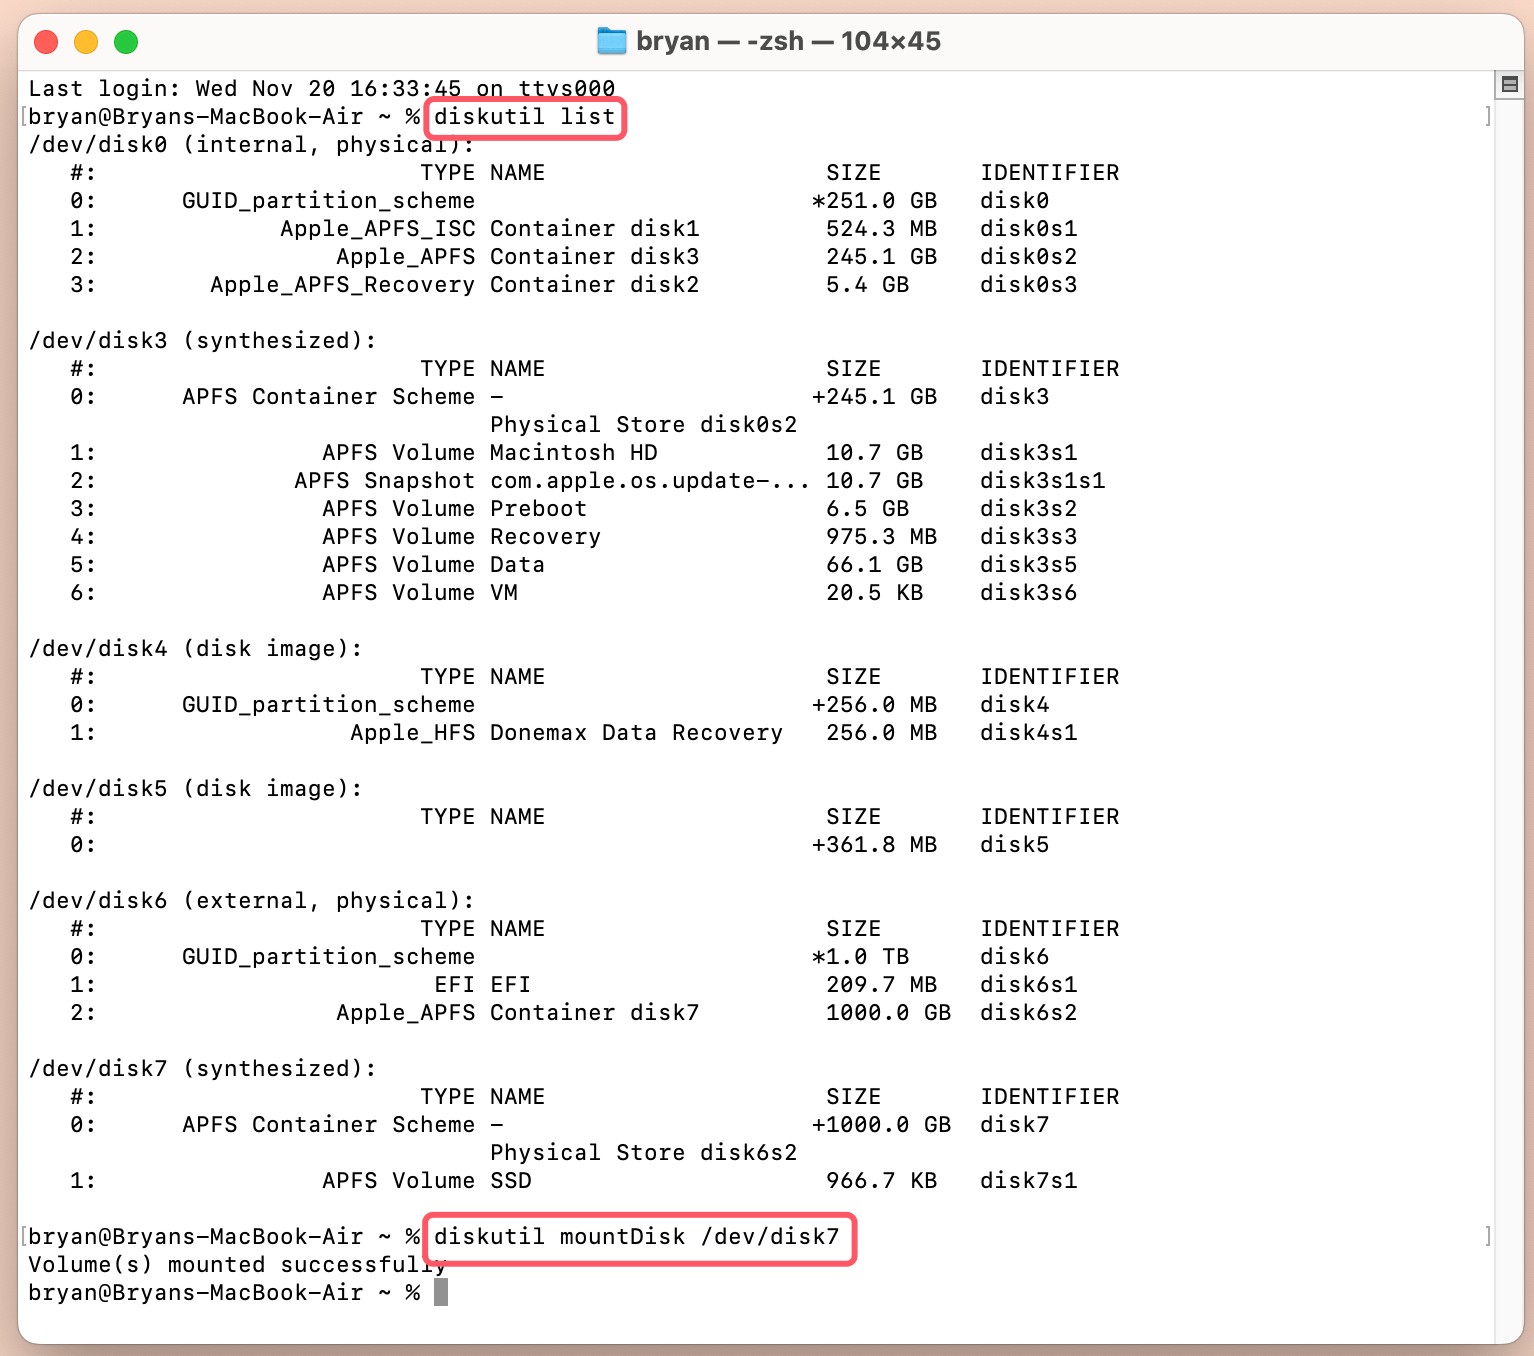
You can use the diskutil command to list and mount the SSD.
- Open Terminal from Applications > Utilities.
- Type diskutil list to view all disks connected to your MacBook.
- Find the identifier for the SSD (e.g., disk2, disk3).
- To mount the SSD manually, type diskutil mountDisk /dev/disk2 (replace disk2 with the correct identifier).
![SSD not mounting on a MacBook Pro]()
FSCK Command:
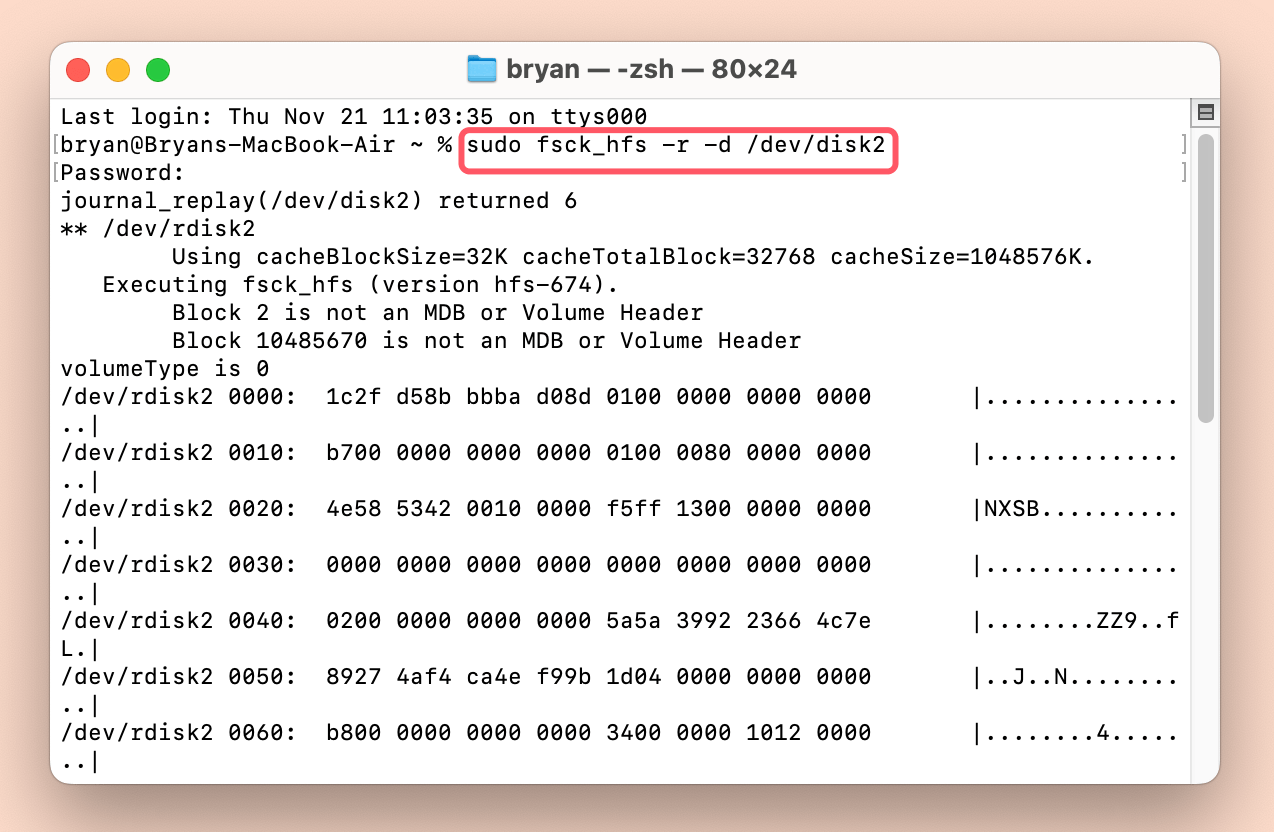
In some cases, you may need to run the fsck (file system consistency check) command to fix disk corruption.
- In Terminal, type sudo fsck_hfs -r -d /dev/disk2 (replace disk2 with your SSD identifier).
![SSD not mounting on a MacBook Pro]()
- If errors are found, fsck will attempt to repair them.
Reformat the SSD:
If none of the above methods work, you may need to reformat the SSD as a last resort. This will erase all data on the drive, so it's crucial to ensure that you've backed up your data first.
Backup Data Before Reformatting:
If your SSD isn't mounting, using data recovery software or connecting it to a different system might be necessary to recover files before reformatting.
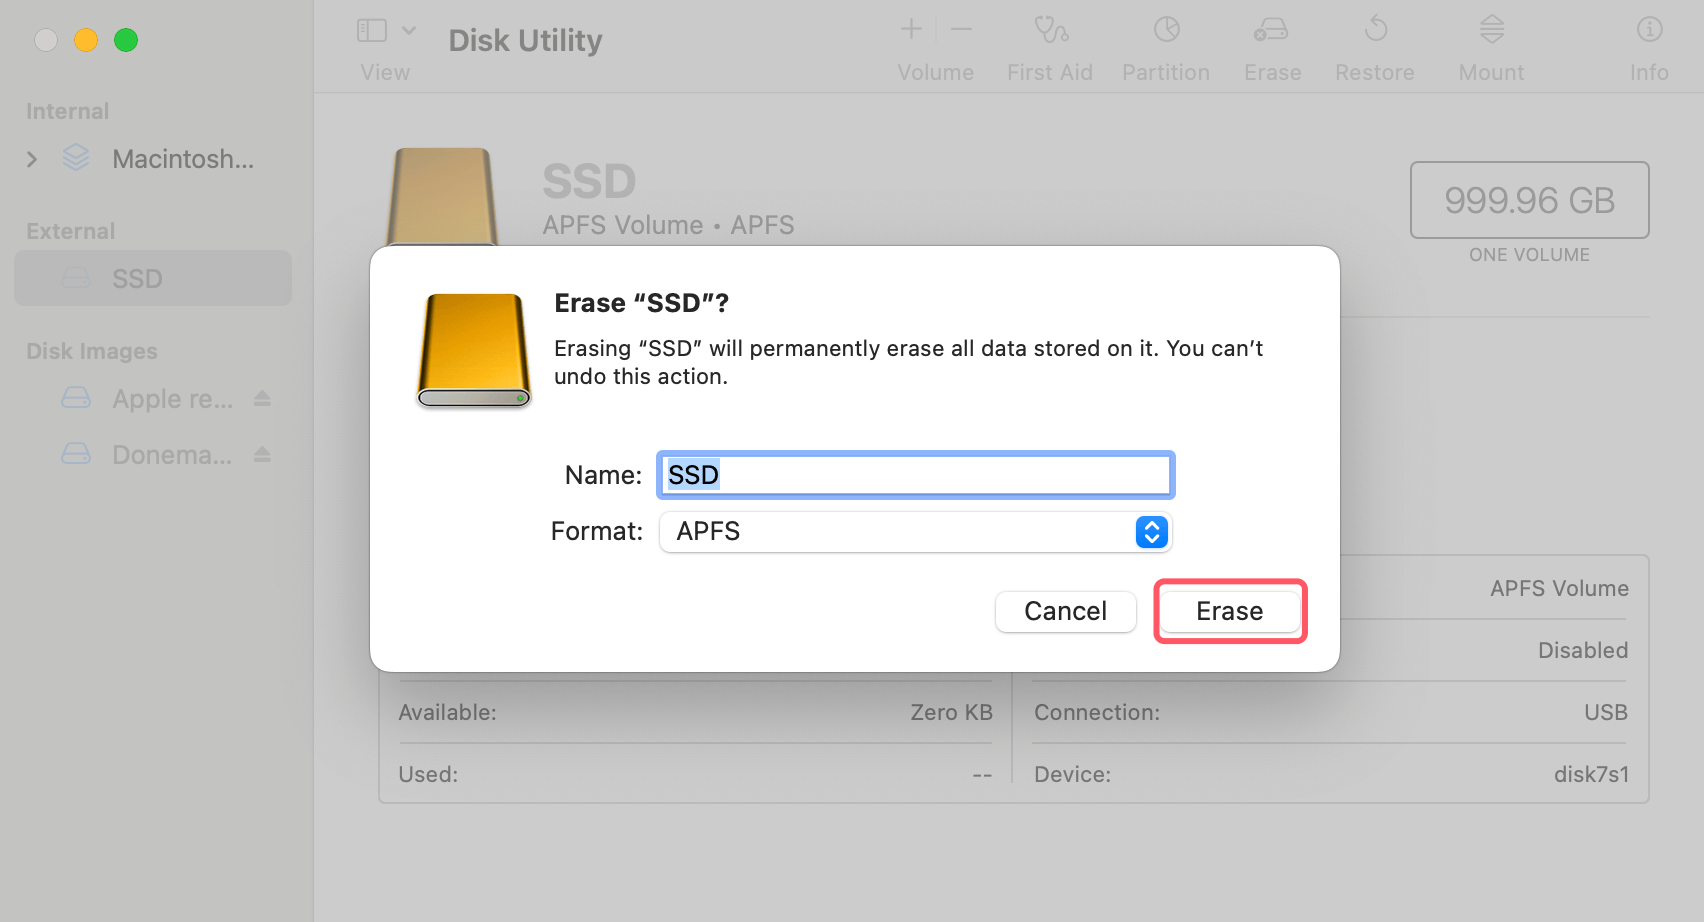
Reformat the SSD:
Once data is backed up, use Disk Utility to reformat the SSD to a Mac-compatible file system (APFS or HFS+).
- Open Disk Utility.
- Select the SSD and click Erase.
- Choose APFS or Mac OS Extended (Journaled) as the format.
- Click Erase to complete the process.
![SSD not mounting on a MacBook Pro]()
Recover Lost Data from Unmounted or Erased SSD on MacBook Pro
Mac data recovery software can help you securely and quickly and completely recover data from unmounted or erased SSD on Mac:
Step 1. Download and install the best Mac data recovery software - Donemax Data Recovery for Mac.
Step 2. Open Donemax Data Recovery for Mac and select the SSD to start data recovery.

Step 3. Click on Scan button to deeply scan the SSD and find all recoverable files.

Step 4. Once the scan is completed, you can preview all recoverable files. Then select the wanted files and click on Recover button to save them.

Preventive Measures to Avoid Mounting Issues
To avoid future SSD mounting issues, it's important to follow a few preventive measures.
- Regular Disk Maintenance: Running Disk Utility's First Aid periodically can help maintain the health of your SSD.
- Keep macOS and Firmware Updated: Ensure both your macOS and SSD firmware are updated to the latest versions. Firmware updates often address compatibility issues that may prevent mounting.
- Proper SSD Removal: Always safely eject external SSDs to prevent file system corruption. Right-click on the SSD icon in Finder and select Eject, or drag it to the trash before disconnecting.
Conclusion
An SSD not mounting on a MacBook Pro can be frustrating, but with the right troubleshooting steps, you can identify and fix the issue. Start with basic checks like ensuring proper connections and using Disk Utility. If the problem persists, delve into more advanced methods like resetting system controllers, using Terminal, or even reformatting the drive. By following these steps, you can troubleshoot effectively, recover lost data, and ensure your SSD remains functional in the future.
Donemax Data Recovery for Mac is a powerful recovery app. It not only can help you recover lost data from unmounted or erased SSD, but it also can help in mounting SSD on MacBook Pro, fixing damaged drives, etc.


Donemax Data Recovery for Mac
Donemax Data Recovery for Mac is one of the best Mac data recovery software. It is easy-to-use and can help in recovering deleted, formatted, inaccessible or lost data from Mac HDD/SSD, external disk, USB drive, SD card, camera or other storage devices.
Related Articles
- Jan 15, 2025How to Estimate the Remaining Lifespan of Your SSD? [3 Methods]
- Oct 30, 2025KIOXIA SSD Not Showing Up? Fix Detection Issues Fast
- Nov 05, 2024Why SSD Not Working and How to Fix Common SSD Issues
- Jan 14, 2025How to Fix Corrupted or Dead SSD Without Losing Data?
- Jan 17, 2025How to Format an SSD to ExFAT or FAT32 on Mac: A Detailed Guide
- Sep 15, 2025Upgrade Alienware Gaming Laptop SSD: A Complete Guide

Christina
Christina is the senior editor of Donemax software who has worked in the company for 4+ years. She mainly writes the guides and solutions about data erasure, data transferring, data recovery and disk cloning to help users get the most out of their Windows and Mac. She likes to travel, enjoy country music and play games in her spare time.

Gerhard Chou
In order to effectively solve the problems for our customers, every article and troubleshooting solution published on our website has been strictly tested and practiced. Our editors love researching and using computers and testing software, and are willing to help computer users with their problems

