Written byMariaUpdated on Apr 10, 2025
How to Restore Lost Files with Time Machine on macOS Sequoia: Step-by-Step Guide
Approved byGerhard Chou
Summary: In this guide, we will show you how to recover lost files from Time Machine backup on macOS Sequoia. If you have not backed up your Mac using Time Machine, you can use Mac data recovery software - such as Donemax Data Recovery for Mac to help recover permanently deleted files, erased files from internal disk or external storage device.
PAGE CONTENT:
- Understanding Time Machine Backups
- When Would You Use Time Machine Restore on macOS Sequoia?
- Steps to Restore Files from Time Machine Backups on macOS Sequoia
- Mode Guide and Tips About Time Machine Backup on macOS Sequoia
- How to Recover Lost Files on macOS Sequoia Without Backup?
- FAQs About Restoring Files via Time Machine on macOS Sequoia
- Final Thoughts
Have you ever accidentally deleted a term paper or lost a project folder right before a deadline? I've been there too! If you're using macOS Sequoia, Apple's Time Machine makes it super easy to restore lost files - no tech wizardry required. With a few clicks, you can rescue deleted photos, essays, or even your entire system from a Time Machine backup.
Let's discuss how to use Time Machine's new features in macOS Sequoia, like faster searches and encrypted backups, to recover what's missing.

Understanding Time Machine Backups
Time Machine is Apple's built-in backup software for Macs. It works by automatically saving versions of your files over time, like snapshots, so you can restore to an earlier state if something ever goes wrong.
Think of it as a safety net for your data. Time Machine lets you "travel back in time" to rescue a file you deleted by accident, find a paper you thought was gone forever, or even recover your entire system after a crash. Pretty neat!
What's New in macOS Sequoia?
The latest Mac operating system, macOS Sequoia, makes some nice improvements to Time Machine:
- Faster searching - Finding files is quicker than before.
- Cloud backup option - You can back up small files to iCloud.
- Enhanced security - Your backups are now encrypted by default to keep data safer.
When Would You Use Time Machine Restore on macOS Sequoia?
Restoring from a Time Machine backup helps recover files in situations like:
- Accidentally deleting a file that needs to be recovered.
- Needing an older version of a document after saving changes.
- Your Mac crashed and won't turn on properly.
- Getting a new Mac and needing to transfer your data.
As long as you've been regularly backing up with Time Machine, you're covered!
Steps to Restore Files from Time Machine Backups on macOS Sequoia
Step 1: Prepare for Restore
Before using Time Machine to restore lost files, make sure:
- You have a backup drive connected - This could be an external USB/Thunderbolt drive or a wireless Time Capsule.
- Time Machine backups exist - Check by opening System Settings > General > Time Machine. You should see the backup history.
- Your Mac runs macOS Sequoia - Older versions of macOS may not have full compatibility.
If you don't see backups, you'll need to set up Time Machine properly first.
Step 2: Restore Individual Files or Folders
If you just need to recover a specific file or folder (like an important homework document), here's what to do:
- Open the Finder window where that lost file used to be stored. For example, if it was a Pages report in your Documents folder.
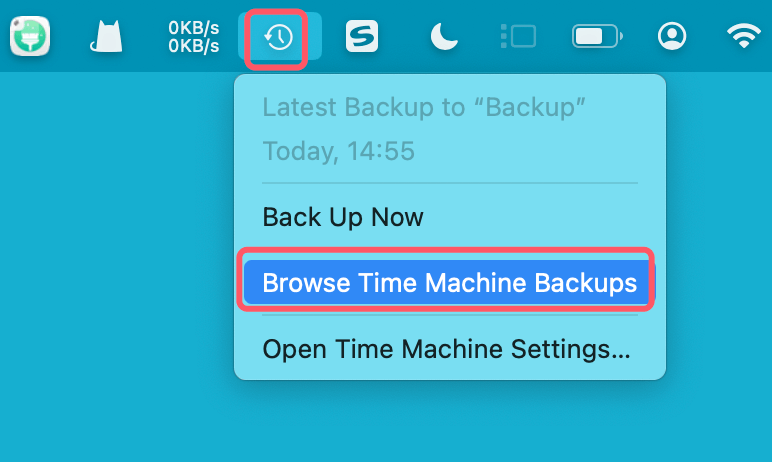
- Click the Time Machine icon in your menu bar at the top.
- Choose "Browse Time Machine Backups" from the dropdown menu.
![Restore Lost Files with Time Machine on macOS Sequoia]()
- You'll see a spacey-looking interface with a timeline on the right side showing all your backups by date. Use the timeline to scroll through backups to when the file still existed.
- When you find the date the lost file was there, browse through the folders and restore it! Click the Restore button to get the file back instantly.
![Restore Lost Files with Time Machine on macOS Sequoia]()

That's all there is to it! With just those steps, you can recover important documents or school projects in no time.
Step 3: Restore Your Entire System
If your whole Mac is having major problems and you can't access your files, more drastic measures are needed. Doing a full Time Machine restore will completely reset your Mac to an earlier state:
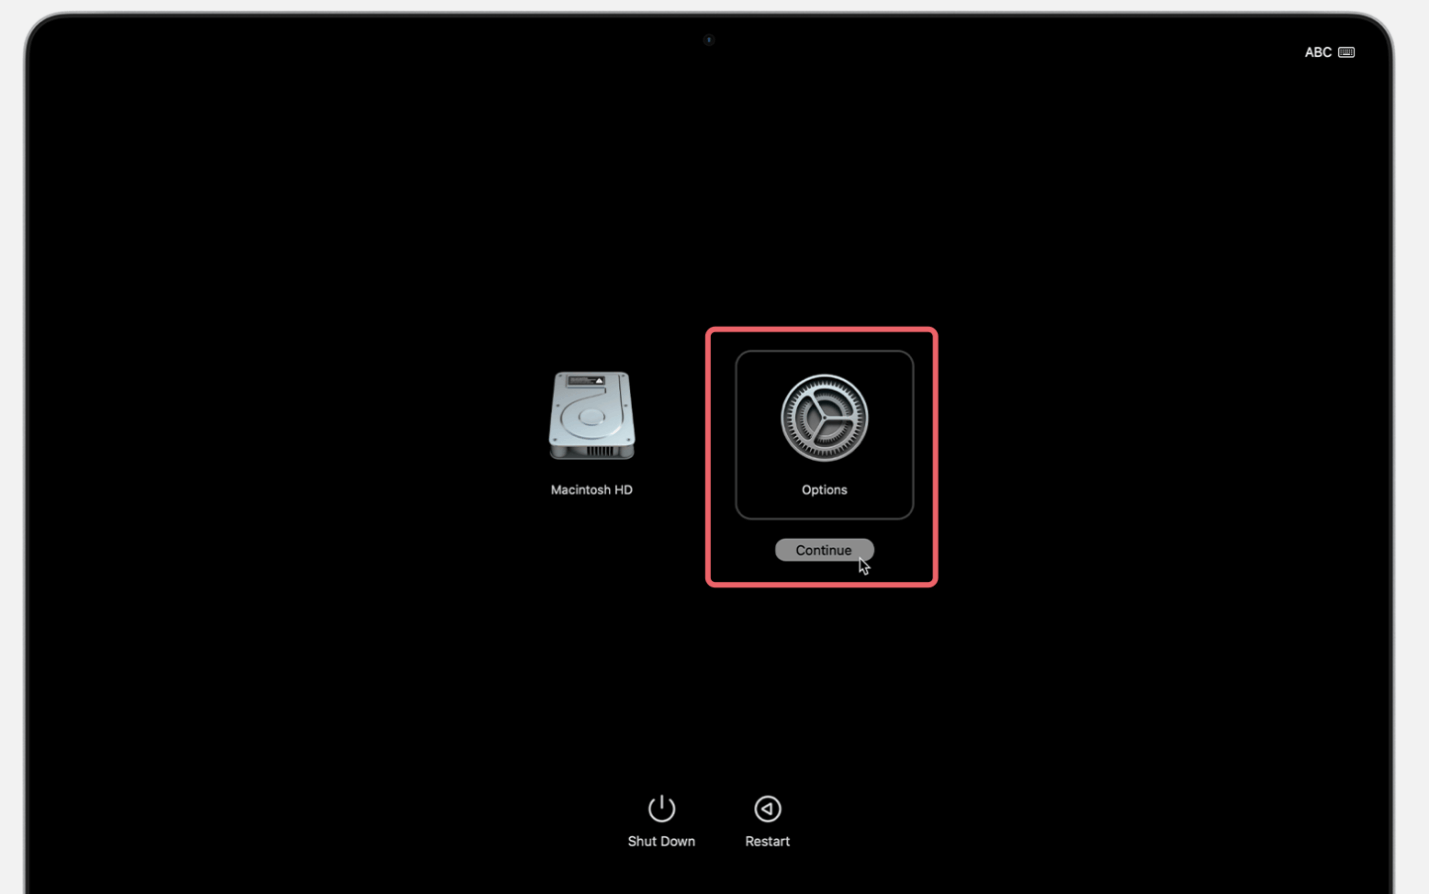
- First, reboot your computer and hold POWER button until it enters Recovery Mode. Choose Options, click Continue.
![Restore Lost Files with Time Machine on macOS Sequoia]()
- Choose "Restore from Time Machine" then pick your backup drive.
![Restore Lost Files with Time Machine on macOS Sequoia]()
- Select the most relevant pre-crash snapshot from the timeline.
- Confirm to wipe your internal drive and restore the full system from that point-in-time.

This process takes hours depending on your backup size but is extremely useful as a last resort when your Mac won't start up properly anymore!
Step 4: Migrate Data to a New Mac
Did you get a shiny new Mac computer? Setting it up is way easier if you have a Time Machine backup.
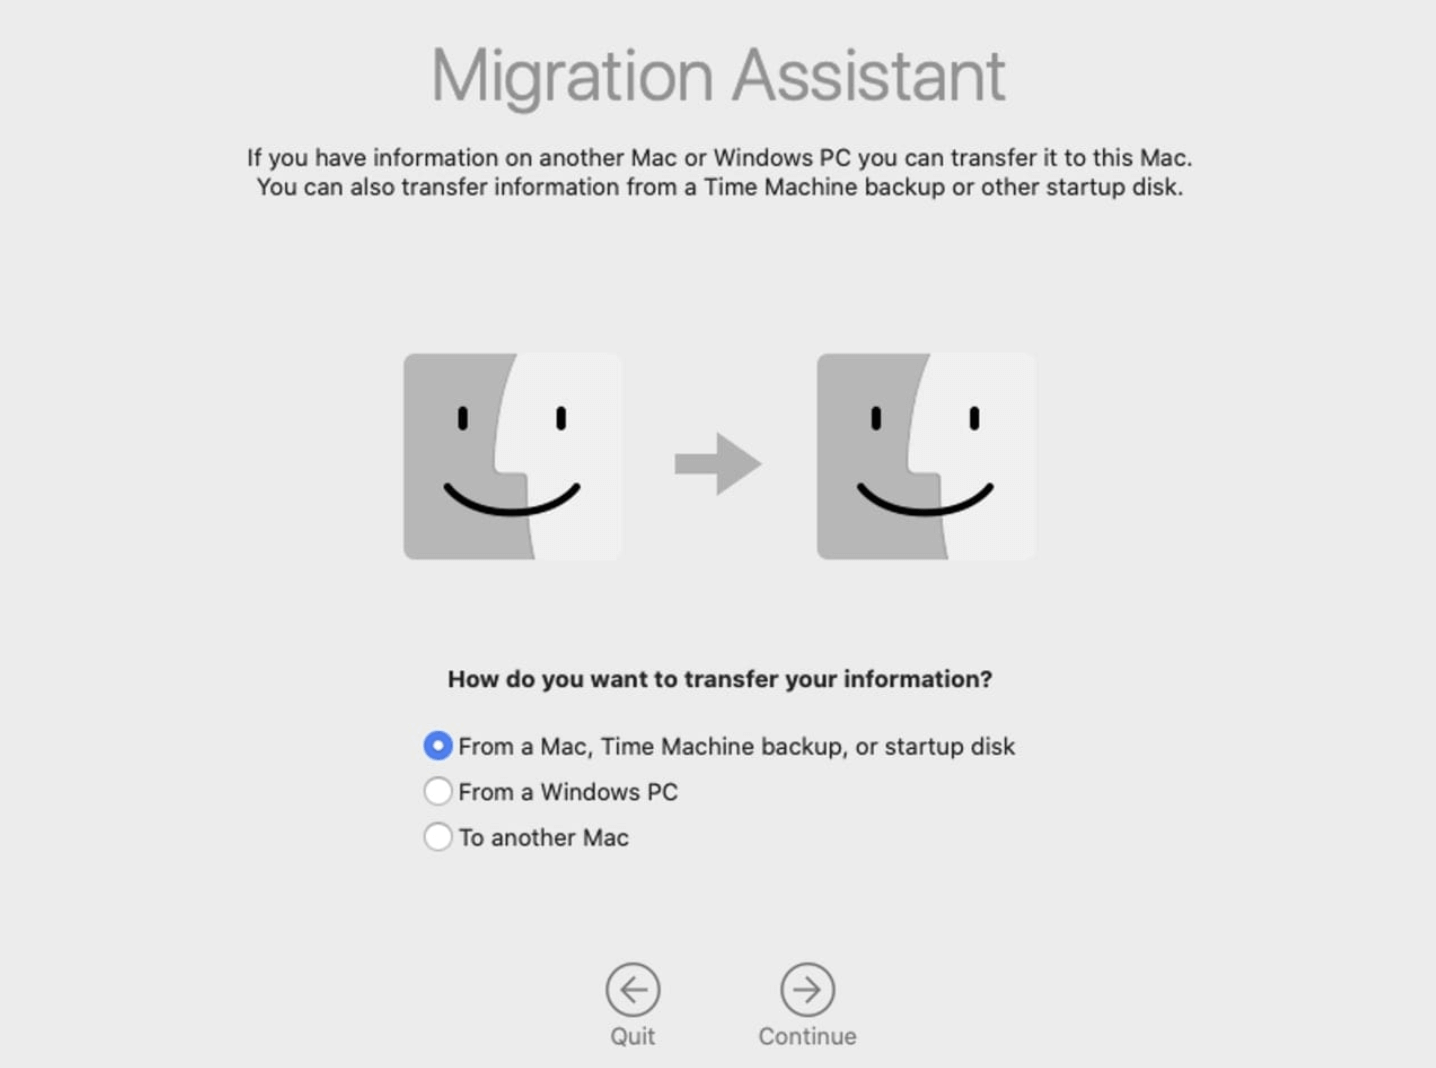
While going through the macOS Sequoia setup assistant questions on your new machine, you'll have the option to transfer data from an existing backup. Simply connect your Time Machine drive, pick a snapshot to transfer from, and you'll have your files migrated over seamlessly.
Mode Guide and Tips About Time Machine Backup on macOS Sequoia
1️⃣ Fix issues if you can't restore files from Time Machine backups
Having issues restoring backups? Here are some quick fixes:
- Can't find backups? Reconnect your backup drive and double-check it's listed under Time Machine settings. For network drives, ensure file sharing is enabled in System Preferences.
- Restores seem slow? Try using Ethernet instead of Wi-Fi for faster network transfer speeds. You can also exclude folders like virtual machines to make future backups lighter.
- Partial file restores? Sometimes restarting and trying again does the trick. You can also use Disk Utility’s First Aid feature to check the backup drive for errors.
Best Practices:
To keep your backups in tip-top shape:
- Enable encryption to password protect backups
- Rotate between two backup drives for extra redundancy
- Monitor storage space carefully as backups take up disk space rapidly
2️⃣ Alternatives to Time Machine Recovery
While Time Machine is the simplest built-in option, there are third party Mac backup tools available too:
- Data recovery software like Donemax Data Recovery for Mac can rescue files from corrupted drives
- Online cloud backup services like Backblaze offer offsite protection
So don't wait - set up Time Machine today and rest easy knowing your files are protected! With these simple steps, you'll be prepared to easily restore lost homework, photos, documents and more.
3️⃣ Restoring Files from an Old Computer or Drive
What if you need to restore files from a Time Machine backup on an old computer or external drive that you no longer have? No worries, you can still access the backups by connecting that drive to your current Mac.
Here's how:
- Physically connect the old Time Machine backup drive to your new Mac using a USB, Thunderbolt, or network connection.
- Open Time Machine on your current Mac and navigate to the backup you want to restore from.
- Browse and restore files as needed.
Keep in mind that very old backups may not always be 100% compatible if the applications have changed a lot since then. But restoring your documents and other critical files should still be achievable.
4️⃣ Does Time Machine Backup System Files?
Yep, Time Machine backs up almost everything on your Mac automatically, including apps, settings, and system files.
The only exceptions are temporary cache files and folders Time Machine ignores to save space. But all your important data, documents, media, downloads, desktop items, etc. are included in backups by default.
One nice touch is that Time Machine won't repeatedly back up unchanged files after the first time. It only stores changed data to keep storage efficiency high.
5️⃣ How Long Are Time Machine Backups Kept?
Time Machine manages backup history intelligently. It will keep hourly backups for the past 24 hours, daily backups for the past month, and weekly backups for everything older than a month.
So you always have a snapshot close to the current time, while still being able to go back months or years to recover lost files if needed.
And you don't have to worry about running out of space! Time Machine automatically deletes the oldest backups first when your backup drive starts getting full.
6️⃣ Alternative Backup Solutions
While Time Machine is convenient, what other options exist for protecting your data?
Online Cloud Backup Services
Backblaze and iDrive are two affordable and user-friendly cloud backup services. They automatically sync your files to the cloud for offsite protection in case something happens to your computer and backups. Price is only $5-10 monthly.
External Drive/NAS for Mirroring
Having an additional external drive to mirror your Mac's data is wise for redundancy. Or network-attached storage (NAS) devices like Synology offer expansive mirrored backup capabilities.
Third Party Backup Software
Programs like Donemax Disk Clone clones your entire drive or selective files to external storage as bootable backups. Helpful for advanced backup management.
Archive Tools
Applications like Arq backup or Duplicati let you securely backup to cloud storage providers like Google Drive, OneDrive, Dropbox, etc. More tech savvy but great for long term archives.
How to Recover Lost Files on macOS Sequoia Without Backup?
If you don't back up your Mac with Time Machine, you can use data recovery software - such as Donemax Data Recovery for Mac to help you recover lost files on macOS Sequoia.
Step 1. Download and install Donemax Data Recovery for Mac on your Mac.
Step 2. Open Donemax Data Recovery for Mac, select the drive where you lose your files to start data recovery.

Step 3. Click on Scan button to deeply scan the selected drive and find all deleted/erased and lost files.

Step 4. Once the scan is completed, you can preview all recoverable files. Then select the wanted files, click on Recover button to save them.

FAQs About Restoring Files via Time Machine on macOS Sequoia
Q1: Can I restore files from Time Machine on a different Mac?
Yes, you can restore files from a Time Machine backup associated with one Mac onto a different Mac. However, some apps may need to be reinstalled after restoration because of system-specific permissions that cannot transfer.
Q2: Does Time Machine back up macOS system files?
Yes, Time Machine backs up the macOS system files along with your files. But it does exclude temporary cache files and folders in order to save backup storage space - only the critical system files are included.
Q3: How long do backups persist?
Time Machine backups will persist for as long as there is available storage space on the backup drive. When the drive becomes full, Time Machine will automatically delete the oldest backups first in order to make room for the newest backup versions.
Q4: How often does Time Machine backup my files?
Time Machine makes backup copies hourly for the past 24 hours, daily for the past month, and then weekly beyond a month. This allows you to efficiently restore recently changed files while also being able to go back months or years if needed.
Q5: Can I access old file versions after restoring from a backup?
Yes, even after you restore an individual file from a Time Machine backup, all the old historical versions of that file remain available in your backup timeline. You can enter Time Machine again later to restore an even older version if needed.
Final Thoughts
And there you have it! With macOS Sequoia's excellent Time Machine capabilities, you're fully equipped to restore lost files and get back to work quickly.
Be sure to maintain regular backups rather than waiting until an emergency. Setting up scheduled weekly backups takes just minutes and provides essential peace of mind.
Let us know if you have any other questions! We're always happy to help explain anything related to Mac backups, restorations, or migrations.
Donemax Data Recovery for Mac
Donemax Data Recovery for Mac is one of the best Mac data recovery software. It is easy-to-use and can help in recovering deleted, formatted, inaccessible or lost data from Mac HDD/SSD, external disk, USB drive, SD card, camera or other storage devices.
Related Articles
- Jan 05, 2025How to Recover Lost Files After macOS Update? [macOS Sequoia Supported]
- Nov 11, 2024How to Recover Deleted Photos on Mac? 5 Solutions to Try
- Jul 12, 2024How to Recover Lost Data from Unmounted Drive on Mac?
- Dec 31, 2024Can't Find a File on Mac? Get It Back By Searching or Recovering
- Nov 19, 2024Full Guide: Recover Lost Data on macOS Catalina
- Jun 16, 2023How to Recover Lost Data from An Formatted APFS Hard Drive?

Contributing Writer
Maria
Maria is one of the senior writers & editors of Donemax who lives and works in Sydney, Australia. She loves PC, Mac and Internet Technology. She has 6 years of writing articles about data recovery on PC/Mac, disk cloning solution, data eraser and computer OS optimization, etc. She is also interested in testing various software and digital products.

Editor in chief
Gerhard Chou
In order to effectively solve the problems for our customers, every article and troubleshooting solution published on our website has been strictly tested and practiced. Our editors love researching and using computers and testing software, and are willing to help computer users with their problems