PAGE CONTENT:
As technology advances, our devices grow more powerful, and macOS Sequoia is no exception. With its intuitive design and enhanced features, it's a solid choice for many Mac users. However, there are times when a factory reset is necessary. Whether you're experiencing performance issues, preparing to sell your device, or encountering a persistent software problem, a factory reset can restore your Mac to its original state. This process, while straightforward, requires careful attention to detail, especially to avoid losing important data. In this comprehensive guide, we will explore the steps to safely factory reset your macOS Sequoia while covering critical precautions and providing solutions for common problems that may arise.
Backup Your Data Before macOS Sequoia Factory Reset
Prior moving into the factory reset process, it is important to understand the importance of backing up your data. A factory reset will erase all the information on your Mac, including files, applications, settings, and any personal data. Therefore, a backup ensures that you can recover all your essential files after the reset.
Time Machine Backup
One of the easiest and most effective ways to back up your Mac is through Time Machine, Apple’s built-in backup tool. Time Machine automatically saves a copy of your system, allowing you to restore everything from your operating system to individual files.
Here’s how to back up using Time Machine:
- Attach External disk: Attach an external SSD or hard disk to your Mac.
- In order to launch Time Machine, navigate to the Apple menu, choose System Settings > General > Time Machine, and then click Time Machine.
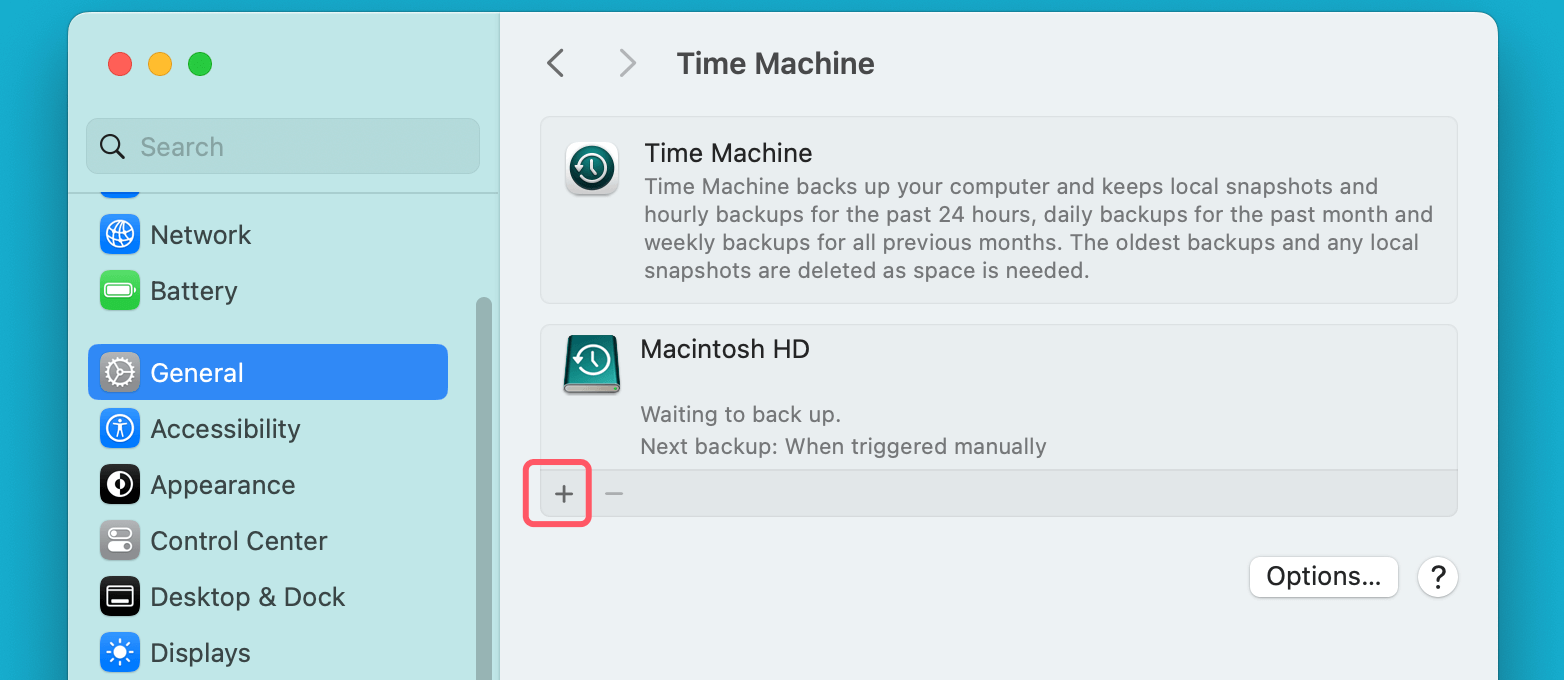
- Select Backup Disk: Click + to add backup disk and choose your connected external drive.
![Select Backup Disk]()
- Enable Automatic Backups: Toggle the switch to enable automatic backups.
- Start Backup: Click "Back Up Now" to create your first backup.
Once the backup is complete, all your data will be stored on the external drive, ready for restoration after the reset.
How to Use Time Machine on macOS Sequoia?
Connect an external hard drive to your Mac, and back up all data from your Mac to the external hard drive by using Time Machine.
Other Backup Methods
In addition to Time Machine, you may store crucial information using online storage services. This method is particularly useful if you only need to back up specific files and documents.
iCloud backups:
- Go to System Settings > Apple ID > iCloud.
- Toggle the options to back up documents, photos, and other data to iCloud.
Cloud backups provide the advantage of easy access across multiple devices, so you can retrieve files even without the external drive handy.
Disk clone:
You can use Mac disk cloning software to clone all data from the internal SSD to the external hard drive, creating full bootable clone backup.
Step 1. Download and install the reliable disk cloning software - Donemax Disk Clone for Mac and install it on your Mac.
Donemax Disk Clone for Mac
- Clone HDD/SSD/external device on Mac.
- Create bootable clone for macOS Sequoia, Sonoma, Ventura, etc.
- Create disk image backup on Mac.
Step 2. Connect an external hard drive to your Mac. Then open Donemax Disk Clone for Mac, choose OS Clone mode. Select the external hard drive as the destination drive.

Step 3. Click on Clone Now button to clone all data including macOS Sequoia, settings, apps and user data from the internal SSD to the external SSD, making a full bootable clone.

Understanding Factory Reset on macOS Sequoia
A factory reset reverts your Mac to its original, factory settings by erasing the entire operating system and reinstalling a fresh version of macOS Sequoia. Essentially, your Mac will be in the same state it was when you first took it out of the box.
Why Factory Reset macOS Sequoia?
Several situations may warrant a factory reset:
- Performance issues: Over time, your Mac may slow down due to software glitches or accumulated files. A factory reset clears out all unnecessary data and restores performance.
- System errors: Persistent software errors that can't be fixed through traditional troubleshooting often require a factory reset.
- Preparing to sell or give away your Mac: If you're selling or giving away your Mac, a factory reset ensures all your personal data is erased, protecting your privacy.
- Upgrading to a new macOS version: Sometimes, major macOS upgrades might not install correctly, or errors may occur. A fresh reset helps resolve installation issues.
Soft Reset vs. Factory Reset
It's essential to distinguish between a soft reset and a factory reset. A soft reset, or restart, is a simple process where your Mac restarts to fix temporary glitches. A factory reset, on the other hand, is a complete wipe of your hard drive, removing all data and resetting the system to its default settings. The latter is a more drastic measure, meant for serious issues or significant transitions.
How to Factory Reset macOS Sequoia?
Step 1. Prepare Your Mac
Before initiating the reset, you need to prepare your Mac by following these steps:
- Disconnect external devices: Unplug any peripherals such as external hard drives, USBs, or additional displays.
- Connect to power: Ensure your Mac is plugged into a power source. A factory reset can take some time, and you don't want the process to be interrupted by a drained battery.
- Check for software updates: Install any pending macOS Sequoia updates before the reset to ensure the process runs smoothly.
Step 2. Sign Out of Apple Services
Before erasing your Mac, you should sign out of any Apple services linked to your device. This includes iCloud and Messages, which are all tied to your Apple ID.
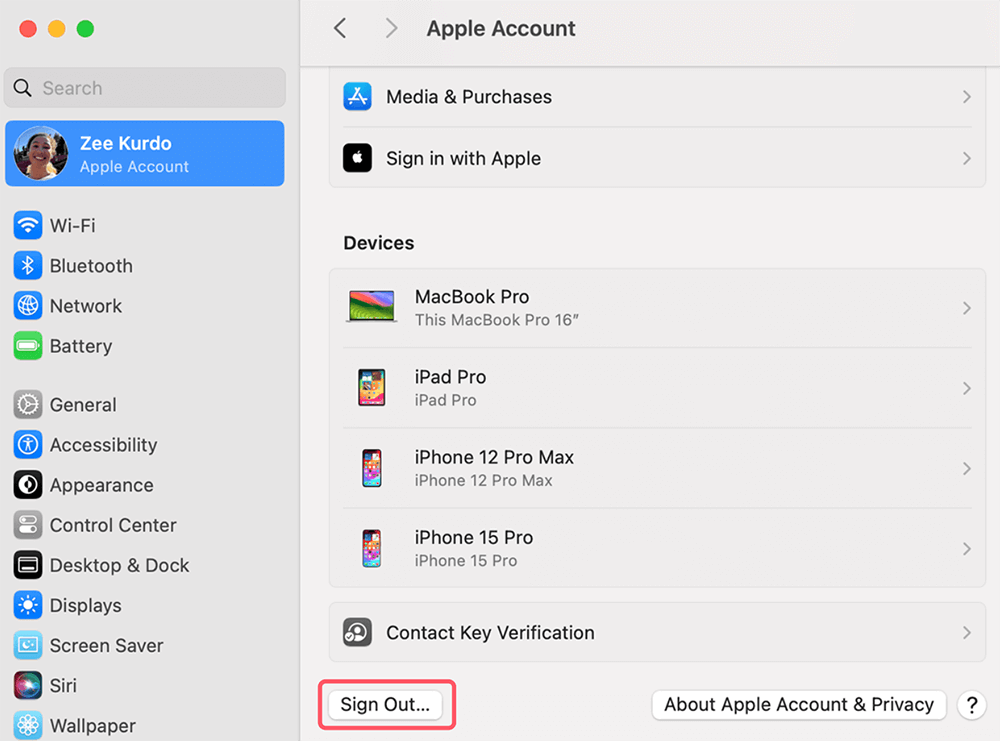
- Sign out of iCloud: Go to Apple Menu > System Settings, click the name of the user account. On the right side, scroll down and click on Sign Out button.
![Sign out of iCloud]()
You'll be prompted to choose whether to keep a copy of iCloud data on your Mac; since you're resetting the device, select Remove from Mac.
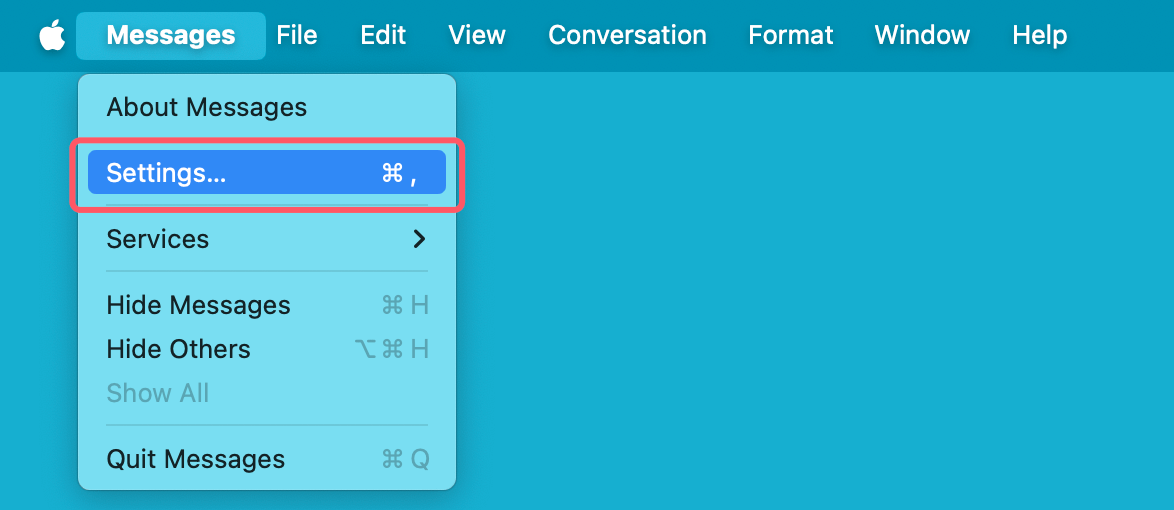
- Sign out of Messages: Open Messages app, then click Messages on Apple menu, choose Settings.
![Sign out of Messages]()
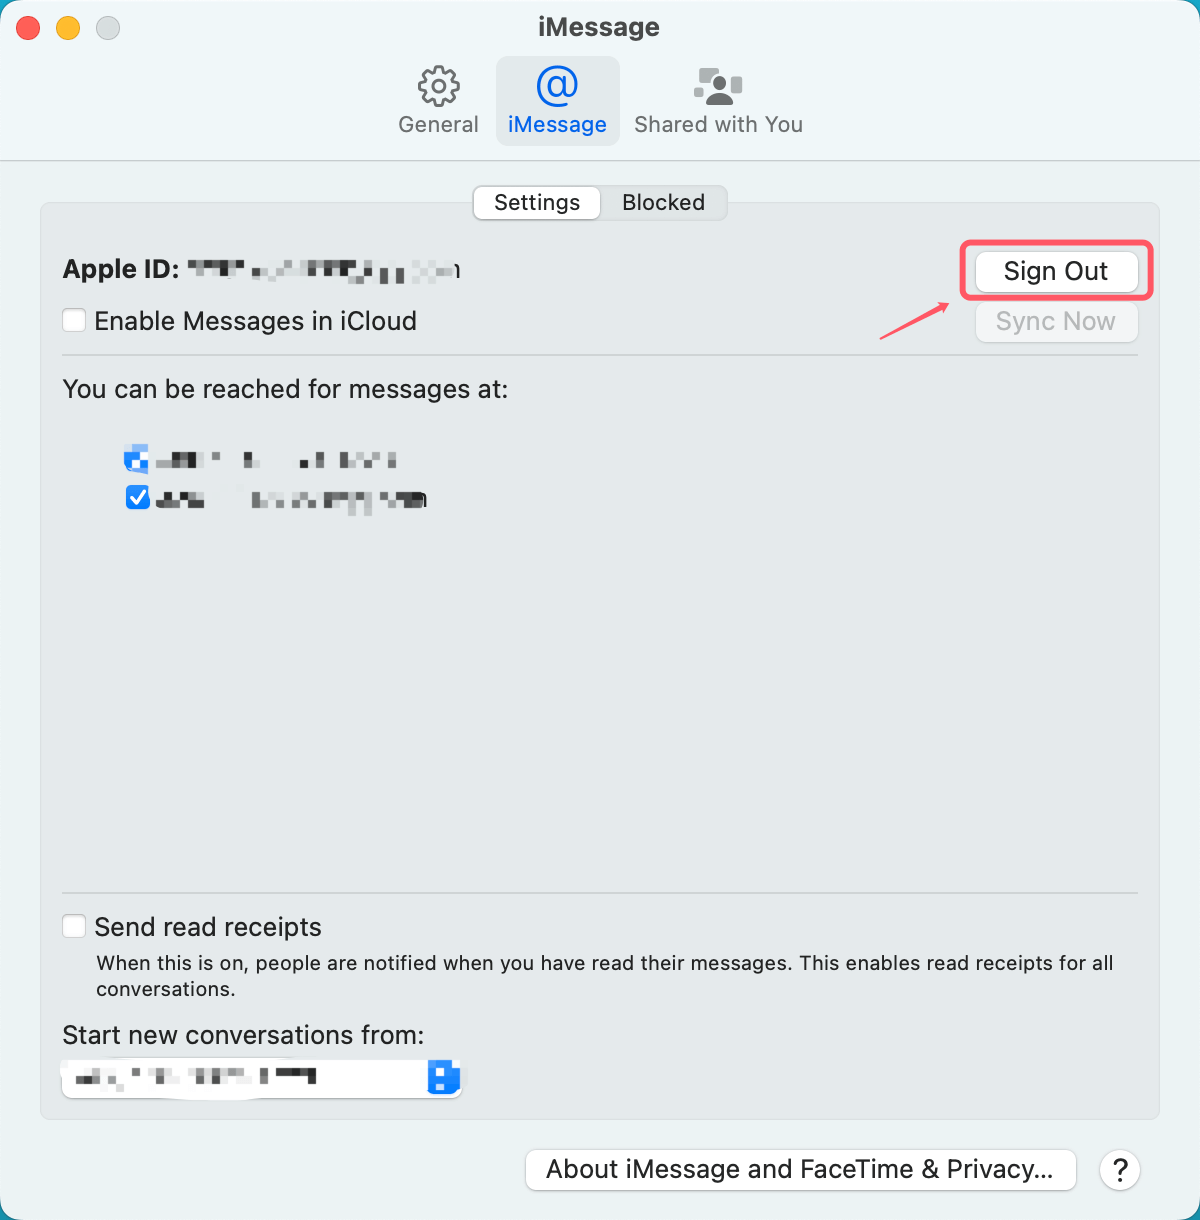
Click iMessage and click Sign Out.
![Click iMessage and click Sign Out]()
This ensures that your Mac is no longer connected to your Apple ID, making it easier to set up after the reset or hand over to someone else.
Step 3. Boot into Recovery Mode
The next step is to enter macOS Recovery Mode, a special mode that allows you to access tools for troubleshooting, reinstalling macOS, and erasing your hard drive.
- Restart your Mac by selecting Restart from the Apple menu.
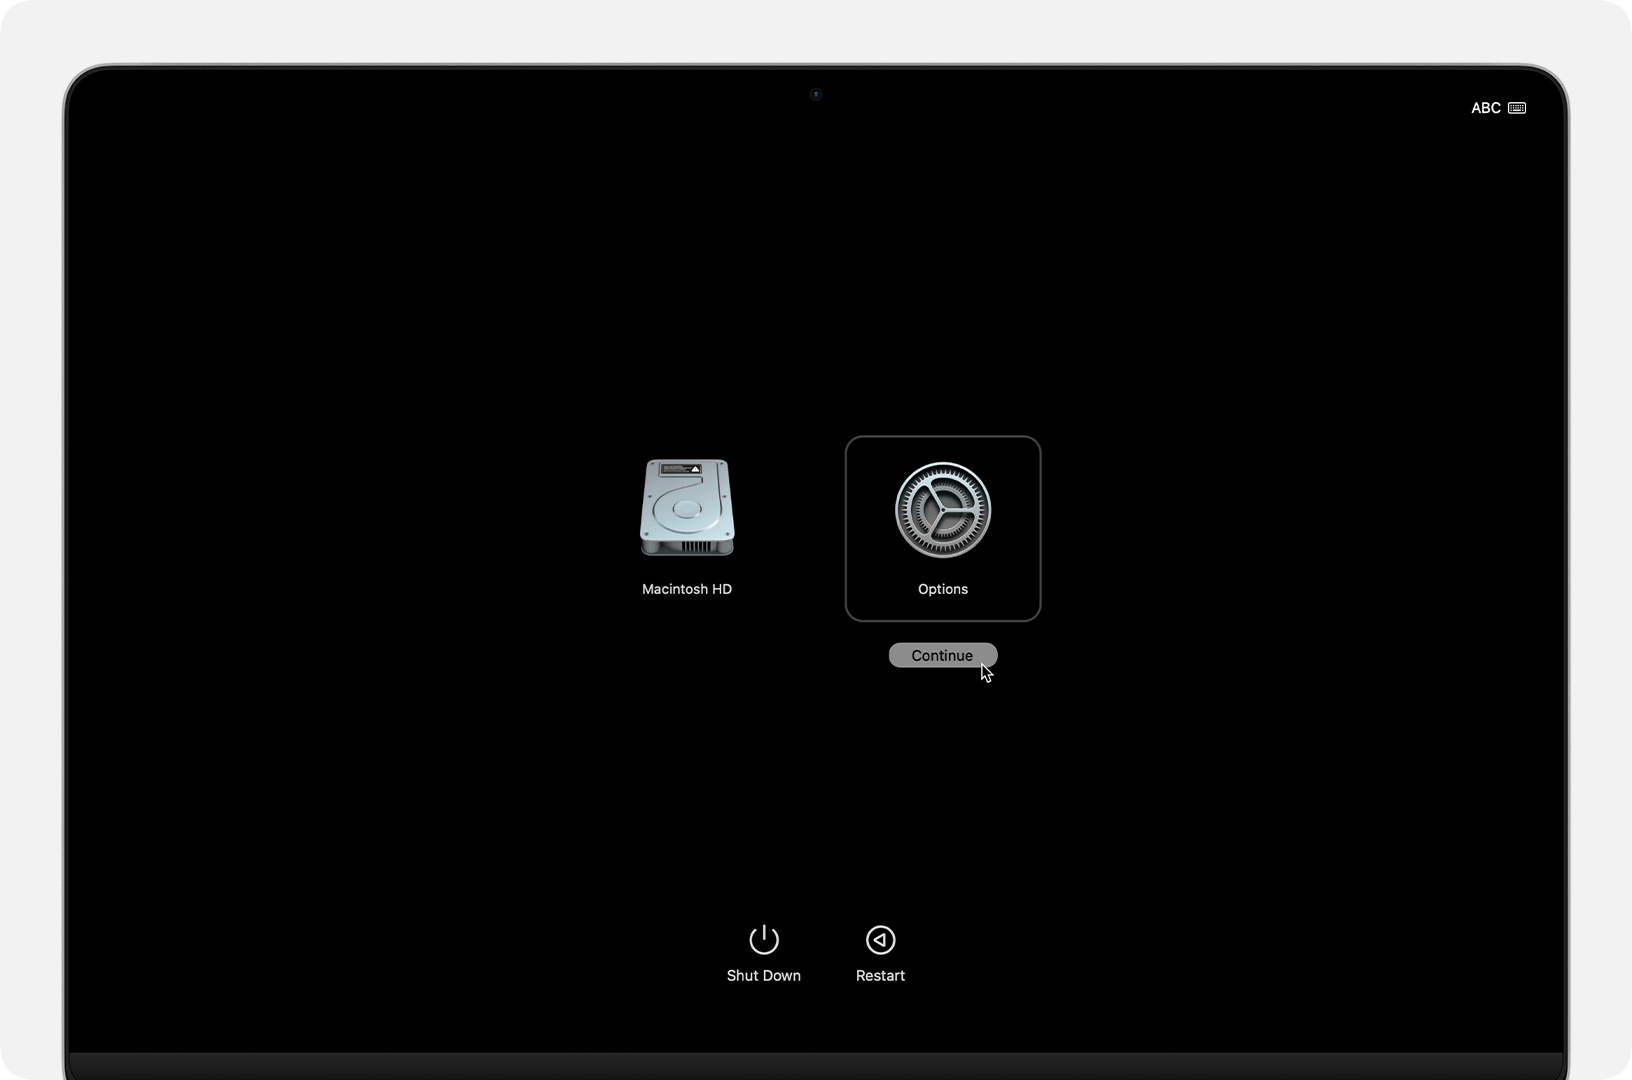
- Press and hold Power button until you see Loading Startup Options, then choose Options, click on Continue button. Choose a user account, enter login password if required.
![Boot into Recovery Mode]()
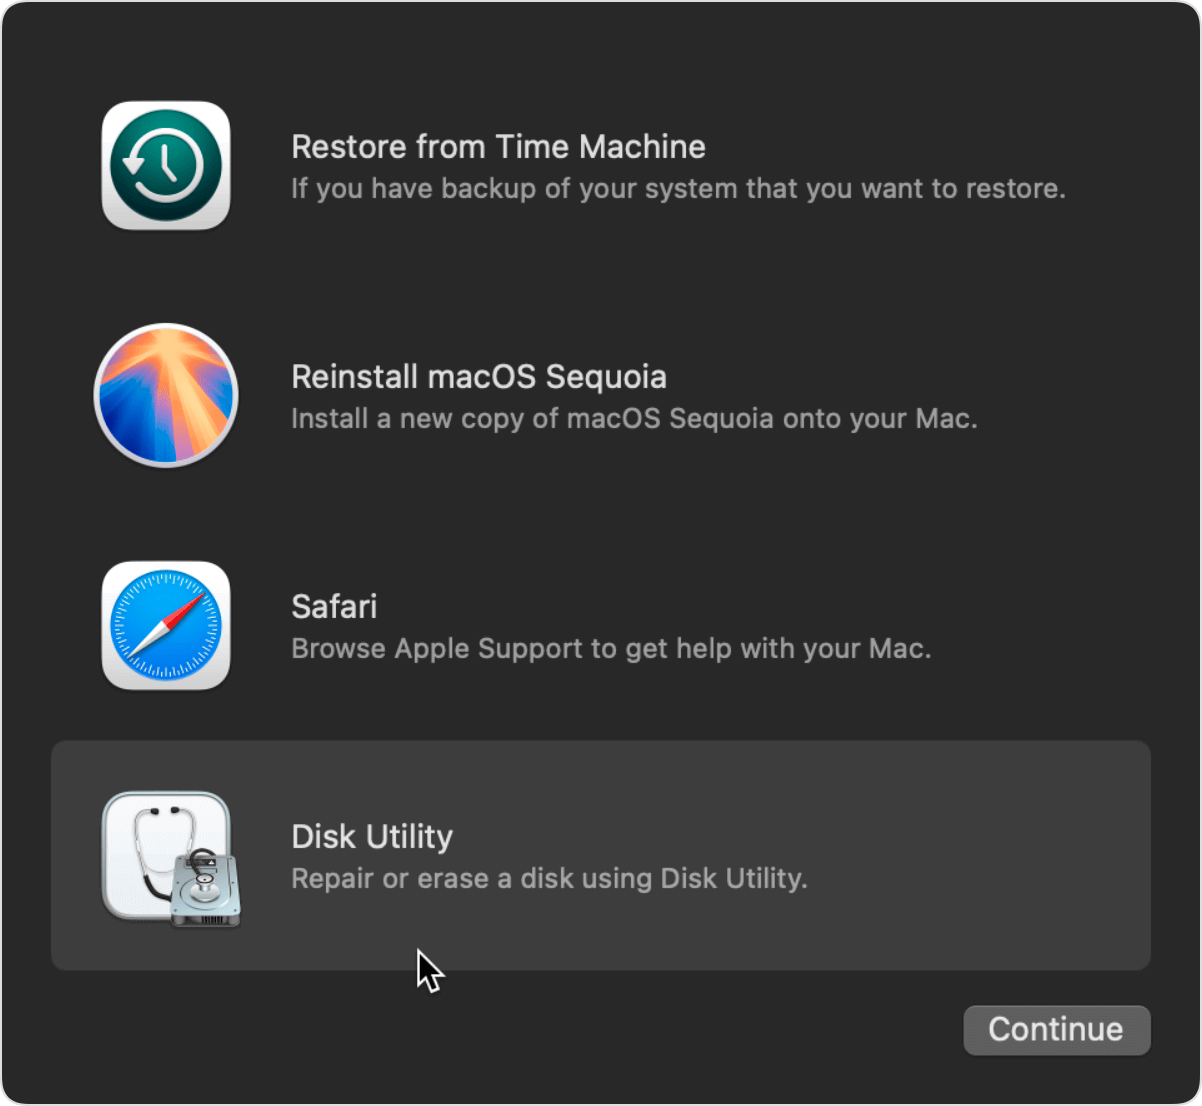
- Safari, Restore from Time Machine, Reinstall macOS Sequoia, and Disk Utility are among the options available in the macOS Recovery window that appears when you enter Recovery Mode.
![Boot into Recovery Mode]()
Step 4. Erase Startup Disk from Disk Utility
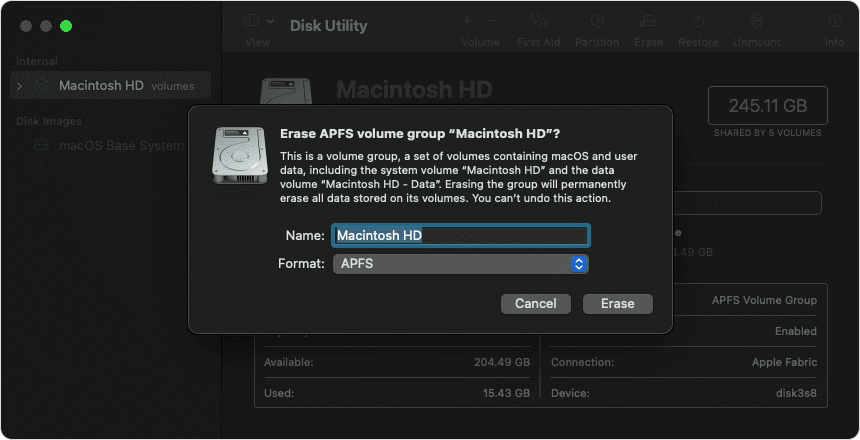
To perform the factory reset, you need to erase your Mac’s startup disk using Disk Utility.
- Launch Disk Utility: Choose Disk Utility from the Recovery app window, then click Continue.
- Choose startup disk: Locate your Mac's primary starting drive, usually referred to as Macintosh HD, in Disk Utility.
- Erase Disk: From the toolbar, select Erase. Select the format that is suitable for your drive:
- For newer Macs with SSDs, choose APFS (Apple File System).
- For older Macs with spinning hard drives, choose Mac OS Extended (Journaled).
- Confirm and Erase: After choosing the format, click Erase again to confirm. This will completely wipe the drive, removing all data, including macOS Sequoia.
![Erase Startup Disk from Disk Utility]()
Step 5. Reinstall macOS Sequoia
Once your startup disk is erased, it’s time to reinstall a fresh copy of macOS Sequoia.
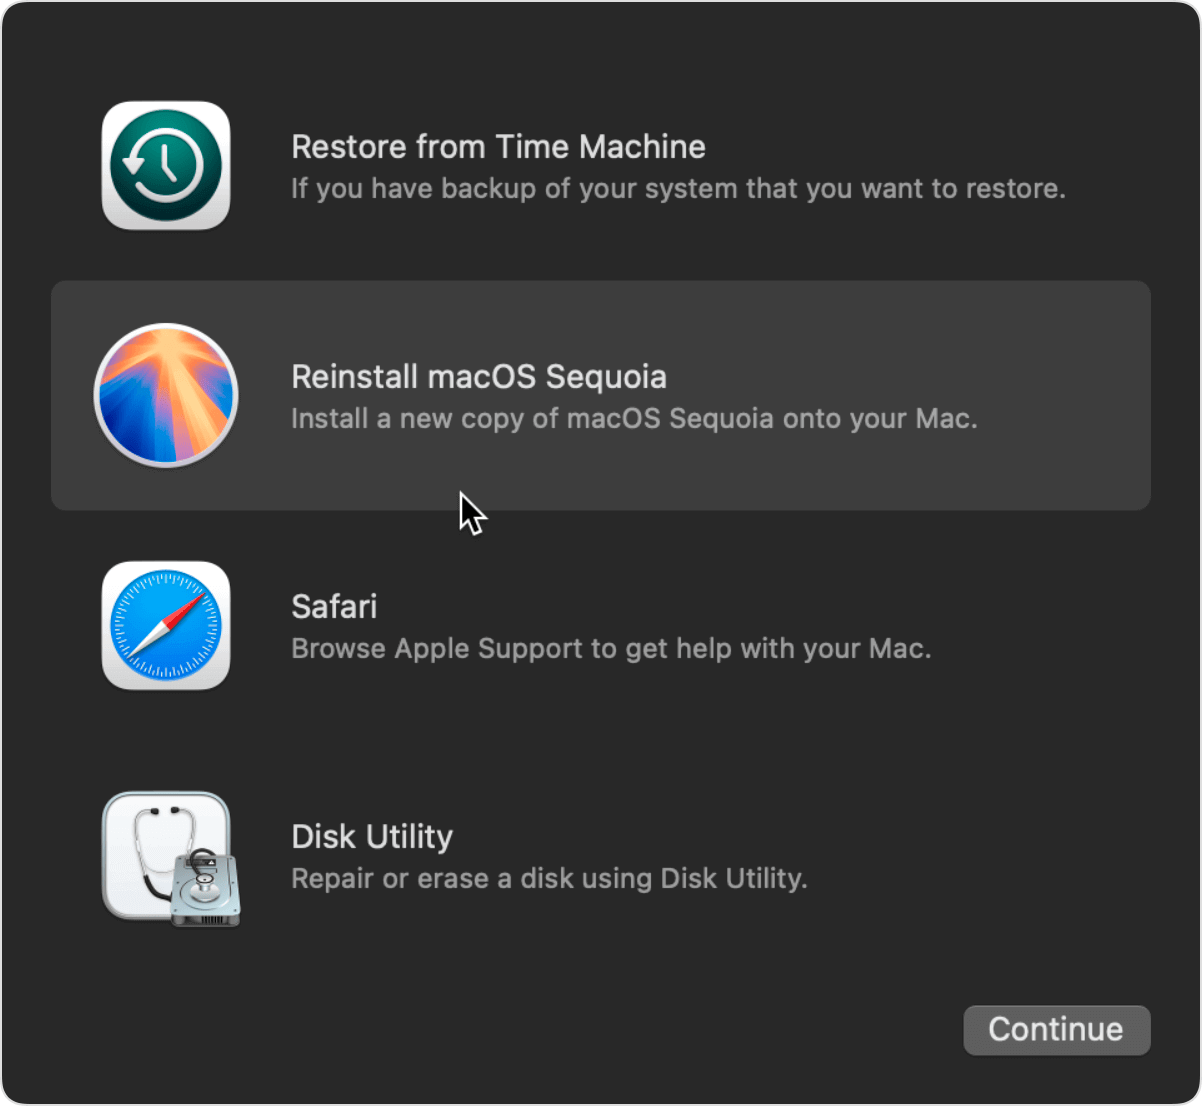
- Return to Recovery App: To get back to the Recovery app window, close Disk Utility.
- Reinstall macOS Sequoia: After selecting Reinstall macOS Sequoia, adhere to the on-screen directions. The most recent version of macOS Sequoia will be downloaded to your Mac from the internet.
![Reinstall macOS Sequoia]()
- Install macOS: Once the download is complete, the installer will guide you through setting up macOS Sequoia on your freshly erased Mac.
Depending on how fast your connection is, the installation procedure can take a while. Once it's done, your Mac will restart and take you through the initial setup process.
Restoring from Backup (Optional):
After reinstalling macOS Sequoia, you have the option to restore your files from a backup. If you used Time Machine, this process is straightforward.
- Connect your Time Machine Backup Drive: Plug in the external drive where you saved your backup.
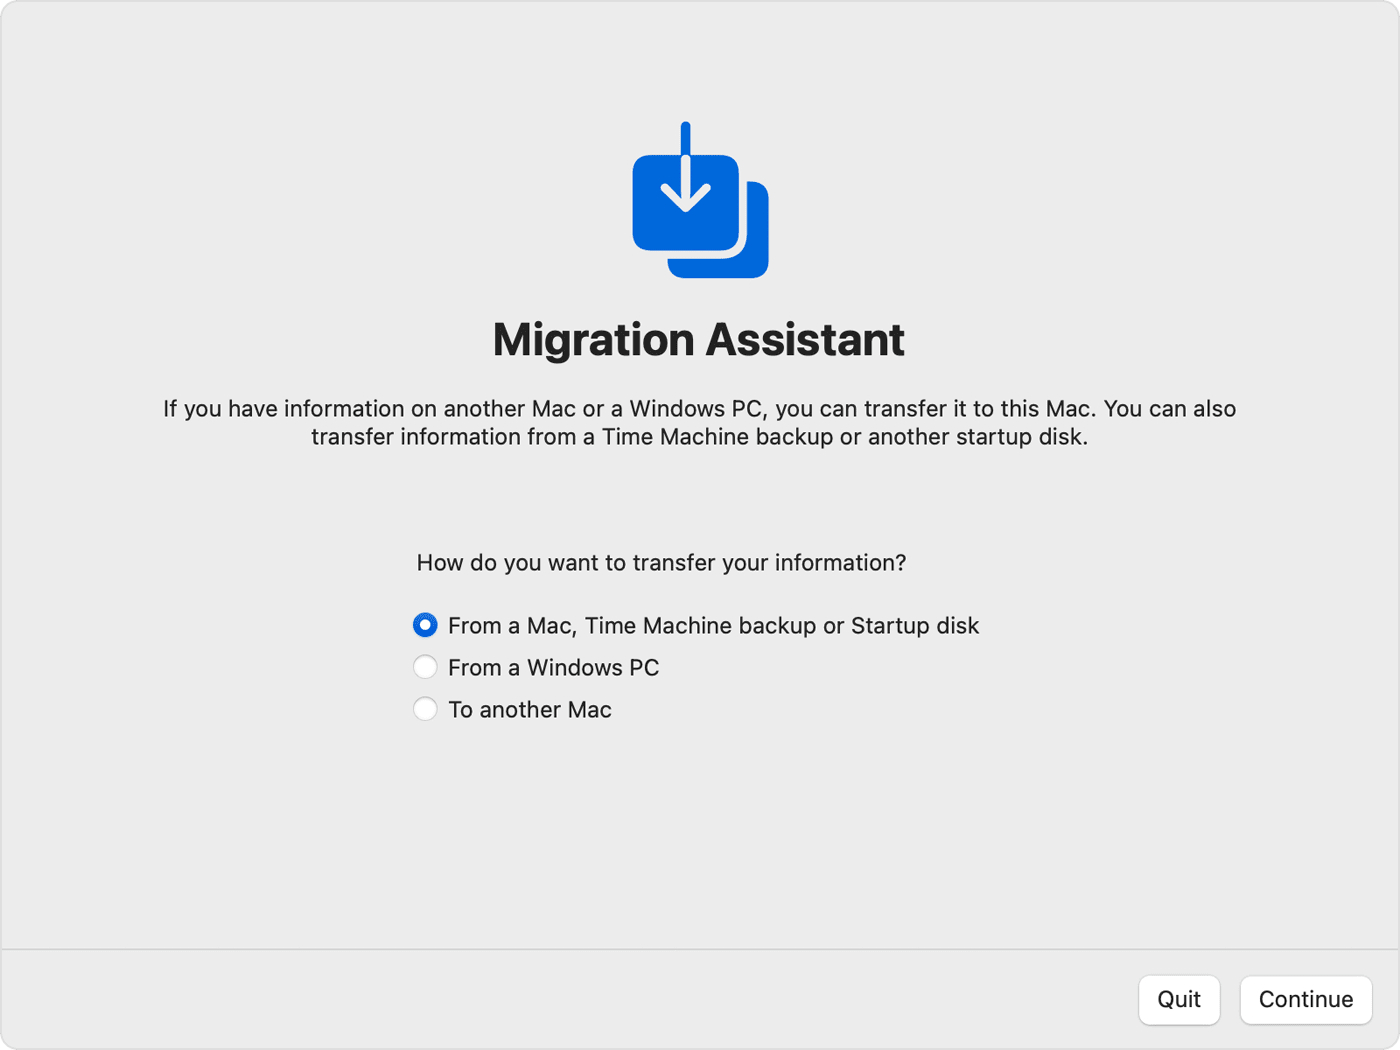
- Open Migration Assistant: Go to Applications > Utilities > Migration Assistant.
- Restore from Backup: Select From a Mac, Time Machine backup, or startup disk, then choose the appropriate backup. Follow the on-screen instructions to restore your files, applications, and settings.
![Restoring from Backup]()
You can also selectively restore files from iCloud or other cloud services if you didn't use Time Machine.
What to Do After the Factory Reset of macOS Sequoia?
After the factory reset, your Mac will feel brand new, but there are a few additional steps to take to ensure everything is running smoothly.
Setting Up macOS Sequoia:
When your Mac restarts, you’ll be prompted to set it up as if it were a new device:
- Choose Language and Region: Select your preferred language and region settings.
- Connect to Wi-Fi: Choose a Wi-Fi network to connect to the internet.
- Sign In with Apple ID: If you're keeping the Mac, sign in with your Apple ID to re-enable iCloud, iMessage, and other services.
- Set up Touch ID and Apple Pay: If your Mac has these features, follow the prompts to set them up.
- Run macOS Updates: Go to System Settings > General > Software Update to ensure your Mac is fully up-to-date.
Installing Essential Apps:
After the reset, you'll need to reinstall any third-party applications you previously used. Visit the Mac App Store to download the apps, or restore them from a backup.
Note: The lost data which is erased due to reinstalling macOS Sequoia is not lost for good and can be recovered by data recovery software.
Recover Lost Data after Reinstalling macOS Sequoia
Check how to reinstall macOS Sequoia and recover lost data from erased drive after macOS Sequoia reinstalling.
Permanently Wipe Data on macOS Sequoia
Before you sell, donate or dispose of your Mac computer, you'd better permanently erase all private data from your Mac to prevent potential data recovery.
After factory reset macOS Sequoia, you can wipe free disk space of the startup disk to permanently wipe all deleted/erased/lost data.
Step 1. Download and install Donemax Data Eraser for Mac and open it on Mac.
Step 2. Open Donemax Data Eraser for Mac, choose Erase Hard Drive mode, then select the startup disk, click on Erase Now button.

It will wipe free disk space of the internal SSD and permanently erase all deleted/formatted/lost data.
Conclusion
Factory resetting macOS Sequoia can be an effective solution for solving persistent software issues, boosting performance, or preparing your Mac for a new user. By following this guide, you can safely reset your Mac while ensuring your data is backed up and recoverable. Whether you're troubleshooting a problem or simply starting fresh, a factory reset restores your Mac to its peak condition. Just remember to back up, sign out of Apple services, and follow the step-by-step process to make the transition as smooth as possible.
Before you sell or donate your Mac, you'd better use special disk wipe software - such as Donemax Data Eraser for Mac to wipe the Mac's disk.
Related Articles
- Feb 22, 2024Use Erase All Content and Settings on macOS [macOS Sequoia Supported]
- Nov 20, 2024How to Factory Reset macOS Big Sur? [Intel-based/Apple silicon supported]
- Nov 07, 2024How to Factory Reset macOS Mojave?
- Aug 21, 2023How to Permanently Erase Data on MacBook Air?
- Dec 28, 2024Free WD or Seagate Disk Formatting Tool for Mac
- Feb 29, 2024How to Format Mac Startup Disk?

Steven
Steven has been a senior writer & editor of Donemax software since 2020. He's a super nerd and can't imagine the life without a computer. Over 6 years of experience of writing technical solutions and software tesing, he is passionate about providing solutions and tips for Windows and Mac users.

Gerhard Chou
In order to effectively solve the problems for our customers, every article and troubleshooting solution published on our website has been strictly tested and practiced. Our editors love researching and using computers and testing software, and are willing to help computer users with their problems
