PAGE CONTENT:
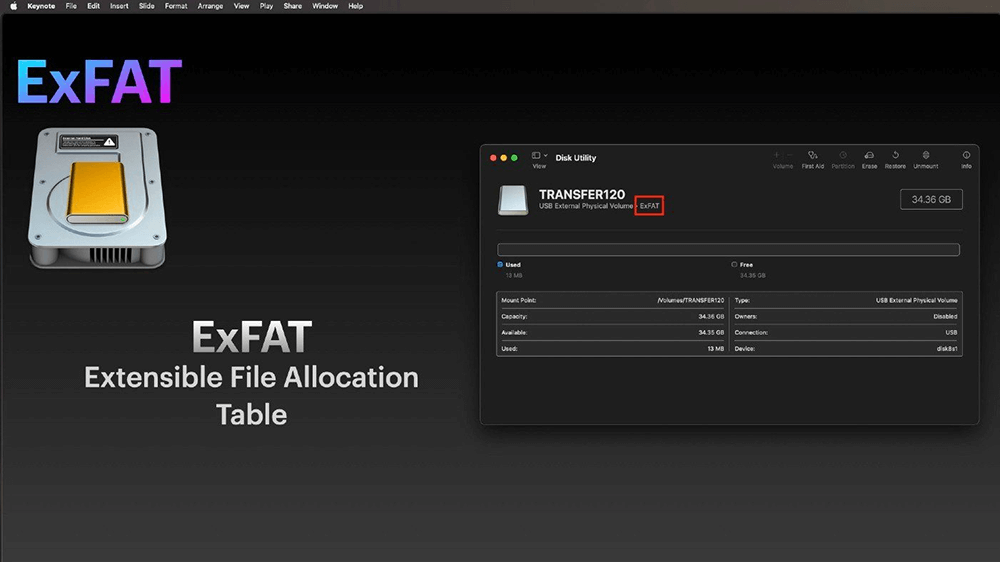
As our digital lives become increasingly complex, managing external storage solutions has become a critical task. One of the most versatile and widely used file systems is ExFAT (Extended File Allocation Table), which is a cross-platform file system developed by Microsoft. Unlike NTFS, which is primarily suited for Windows, or HFS+ and APFS, which are favored by macOS, ExFAT works seamlessly across both Windows and macOS. This makes it an ideal choice for users who need to move large files between operating systems.
In this article, we will explore the complete process of formatting and unformatting an ExFAT drive on your Mac. We'll explore why ExFAT is a popular choice for external storage, the steps involved in formatting and unformatting, and how to recover data if necessary.
What is ExFAT and Why Use It?
Before we format or unformat the ExFAT drive on Mac, it's important to understand what ExFAT is and why you might want to use it. ExFAT was introduced in 2006 as a solution to the limitations of FAT32, particularly its file size cap of 4GB. While FAT32 could be used on a wide range of devices, it couldn't handle modern file sizes, making it obsolete for tasks like video editing or transferring large files.
Key Features of ExFAT:
- Cross-platform compatibility: ExFAT works on both Windows and macOS without requiring third-party software.
- Larger file support: Unlike FAT32, ExFAT allows you to store files larger than 4GB, making it more suited for handling large multimedia files.
- Efficient file management: ExFAT uses a more efficient file structure compared to FAT32, reducing system overhead and improving performance on larger drives.
When to Format a Drive to ExFAT:
There are several scenarios where you may need to format a drive to ExFAT on your Mac. Some of these include:
- You've bought a new external hard drive or USB drive, and it's in NTFS or HFS+ format.
- You want to share data between a Windows and a Mac system.
- You need to handle large files that exceed the FAT32 size limitations.
How to Format an ExFAT Drive on Mac?
Formatting a drive to ExFAT on a Mac is relatively straightforward. macOS has built-in tools, like Disk Utility, that make this process easy and efficient. But before you start, remember that formatting will remove all of the data from the disk, so be careful to backup any crucial files.
Steps to Format an ExFAT Drive:
1. Connect the drive to your Mac: Ensure that your external drive or USB flash drive is properly connected to your Mac.
2. Open Disk Utility:
- Go to Disk Utilities from utilities via Applications.
- Alternatively, use Spotlight by pressing Command + Space and typing "Disk Utility."
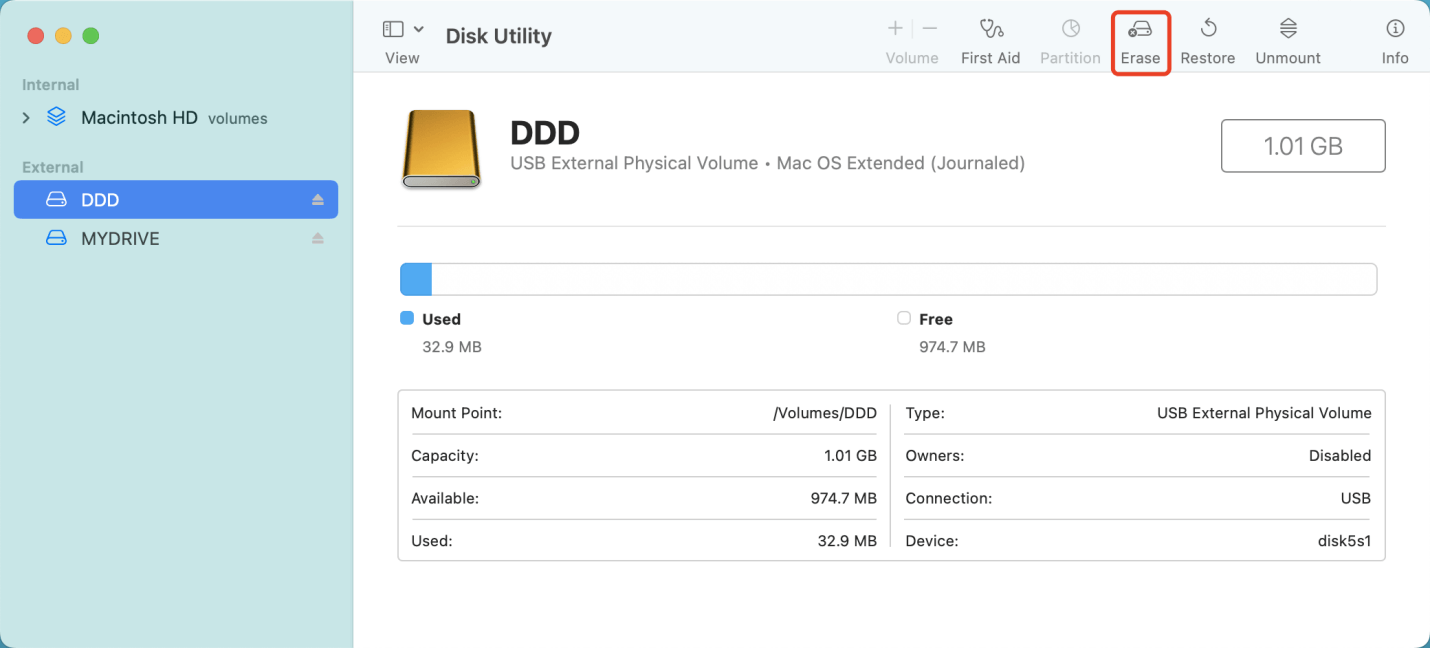
3. Select the Drive: Once Disk Utility is open, you will see a list of available storage devices on the left-hand sidebar. These include internal drives, external drives, and any other mounted storage, like USB flash drives or SD cards. Be sure to select the correct drive you want to format, as formatting the wrong drive will result in data loss.
In this step, it's important to distinguish between the physical drive and its partitions. The top-level drive represents the entire physical storage device, while the partitions beneath it represent sections of the drive. You'll want to select the physical drive to ensure that the entire drive is formatted, not just a single partition.
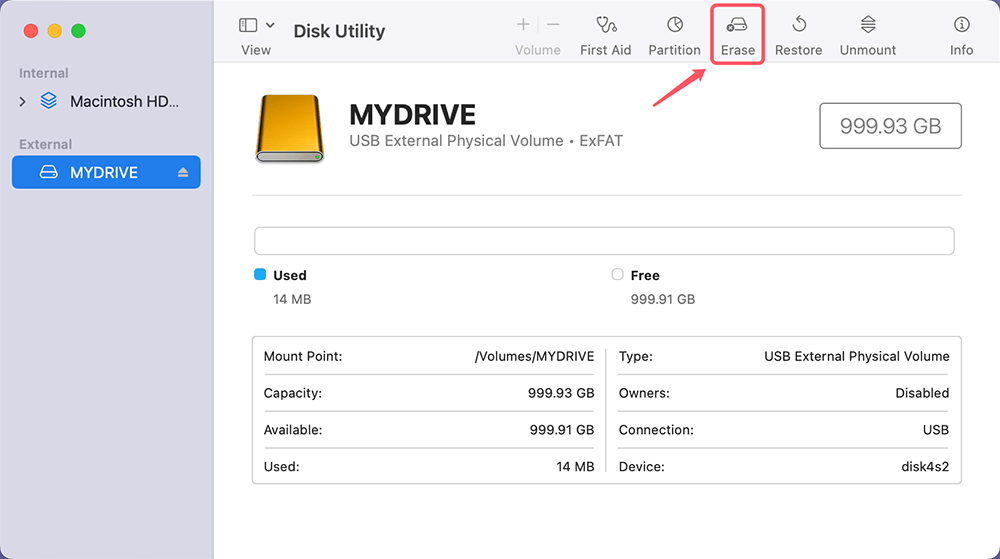
4. Click the "Erase" Button: With the correct drive selected, you'll notice an "Erase" button located at the top of the Disk Utility window. Clicking this button begins the formatting process. When you click it, a new window will appear, prompting you to specify details for the formatting process.
5. Choose Format as ExFAT:
In the "Erase" window, you'll have several options:
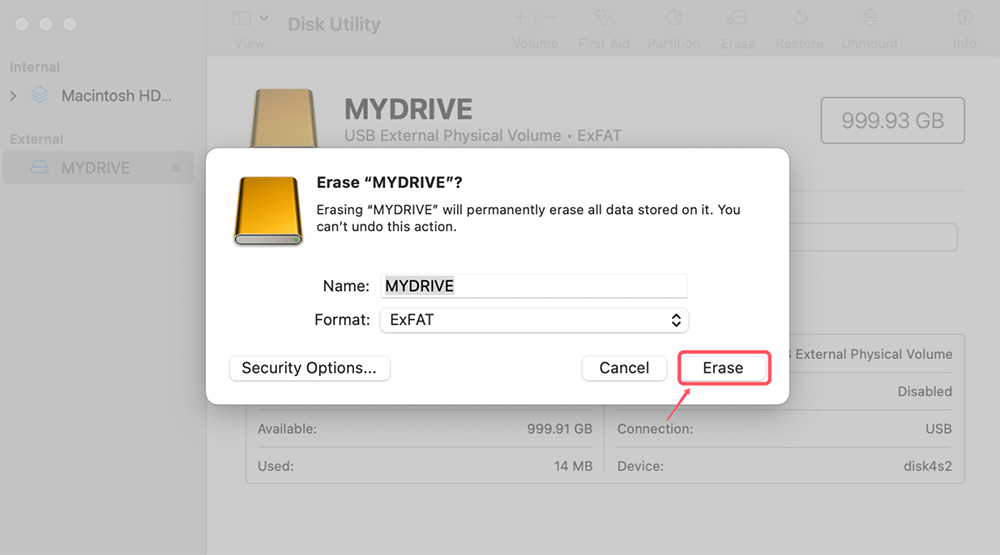
- Name: This is where you can give your drive a name. This is optional, but it helps you identify the drive more easily when connected to your Mac or another device.
- Format: This dropdown menu will present you with several file system options, such as APFS, Mac OS Extended (HFS+), and ExFAT. Select ExFAT from the list, as this is the format that works on both macOS and Windows.
- Scheme: The scheme refers to the partition map used by the drive. For most users, the default option - GUID Partition Map - is the best choice. However, if you're planning to use the drive on older Windows systems or specific devices, you might need to choose the Master Boot Record (MBR) scheme.
It's worth taking a moment to explain the partition scheme options:
- GUID Partition Map: This scheme is the most modern and supports large drives and multiple partitions. It is the standard scheme for macOS and most newer Windows systems.
- Master Boot Record (MBR): MBR is an older scheme, mostly used by older Windows systems and some external devices. If you’re planning to use your drive on an older computer or game console, MBR might be necessary.
- Apple Partition Map (APM): This scheme is mostly obsolete, having been used on older Macs. It's unlikely you'll need to use APM unless you're working with legacy hardware.
For most modern users, GUID Partition Map is the best option.
6. Confirm and Erase: Click "Erase" to start the formatting process. The duration of this process could vary according on the drive's size.
7. Completion: Once the process is complete, your drive will be formatted in ExFAT and is ready to use on both Mac and Windows systems.
Note:
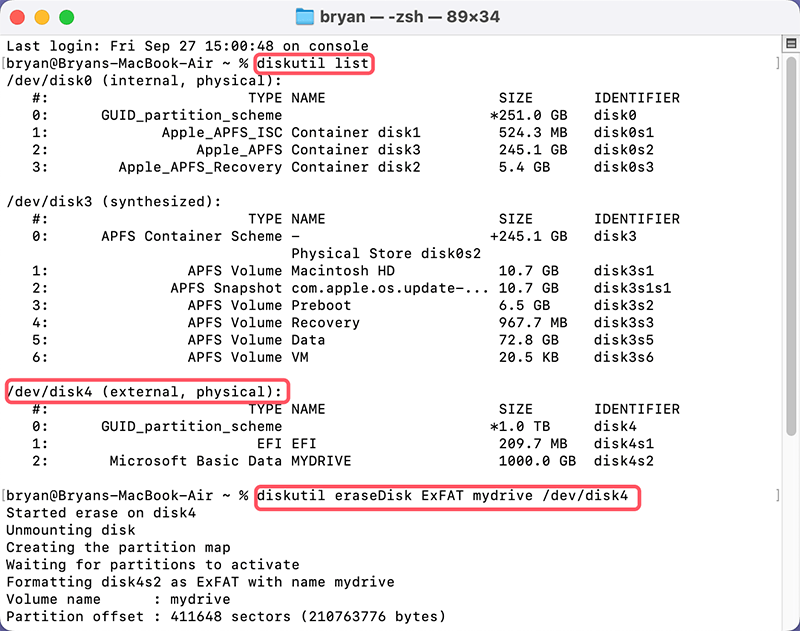
- You also can use Terminal commands "diskutil eraseDisk ExFAT disk_name disk_identifier" to erase a hard drive to ExFAT on Mac.
- You can use Disk Utility or Terminal to erase an ExFAT drive to ExFAT/FAT32/APFS/Mac OS Extended, etc.
- If you want to erase an ExFAT drive to NTFS, you can use NTFS for Mac tool to format an ExFAT drive to NTFS.
How to Format Hard Drive to NTFS on Mac?
You can use NTFS for Mac tool to format ExFAT/FAT32/APFS/HFS+ to NTFS on Mac, 100% effective.
How to Unformat an ExFAT Drive on Mac?
Unformatting a drive refers to the process of recovering data from a formatted drive. Unfortunately, macOS doesn't have a built-in "unformat" feature, and once a drive is formatted, the file system is overwritten. However, it is pertinent to mention that formatting doesn't necessarily erase the data itself - it just marks the storage space as available for new data. Therefore, with the right software, you can recover most, if not all, of your data after formatting.
Using Data Recovery Software
When you realize that you've accidentally formatted your drive, stop using it immediately. Writing new data to the drive can overwrite the recoverable files, making data retrieval much harder, if not impossible.
Here's a step-by-step guide to unformatting a drive on a Mac using data recovery software:
1. Download Data Recovery Software: There are several reputable data recovery programs available for macOS, such as Donemax Data Recovery for Mac, Disk Drill and Stellar Data Recovery.
Click Download button to download the best Mac data recovery software - Donemax Data Recovery for Mac.
2. Install and Launch the Software: Follow the installation instructions for your chosen software. Launch the application once it's installed.

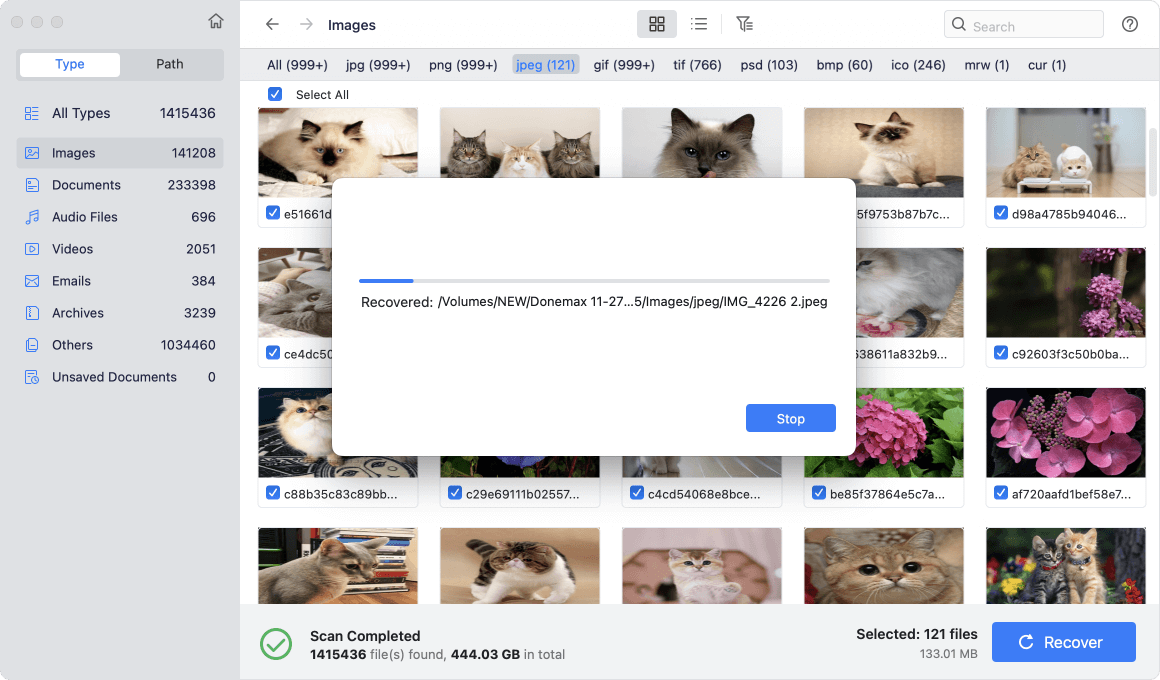
3. Scan the Formatted Drive: Most recovery tools will list available drives on your system. Select the formatted ExFAT drive and initiate a scan. This might take a few minutes to many hours, depending on the size of the drive.

4. Preview the Recovered Files: After the scan is complete, you'll be presented with a list of recoverable files. Many programs offer a preview function so you can check the integrity of the files before recovering them.

5. Recover the Files: Select the files you wish to be recovered and provide them a place to be saved on your computer or an external disk. To prevent overwriting any surviving data, it's imperative to save the recovered files somewhere other than the formatted disk.
6. Check for File Integrity: Once recovery is complete, verify that the files are usable and undamaged. While most files should be intact, some may be corrupted, especially if new data had been written to the drive after formatting.
Conclusion
ExFAT is an excellent choice for users who need a file system that works across both Mac and Windows platforms, especially when handling large files. Formatting a drive to ExFAT on a Mac is a simple process using built-in tools like Disk Utility or Terminal. However, if you accidentally format a drive and need to recover data, you'll need to use specialized data recovery software, as macOS doesn't offer a built-in solution for unformatting drives. By following the steps outlined in this guide, you can confidently format, unformat, and recover data from your ExFAT drive on a Mac.
In summary, whether you're setting up an external drive for cross-platform use or attempting to recover lost data, understanding the ins and outs of ExFAT and Mac's file management tools will save you time and effort in the long run.
FAQs About Formatting and Unformatting ExFAT Drive on Mac
1. How to format an ExFAT drive on Mac?
You can use Disk Utility to format an ExFAT drive on Mac:
- Open Disk Utility.
- Select the ExFAT drive and click Erase.
- Select a file system, click Erase again.
- Format the ExFAT drive.
2. How to format a drive to ExFAT using Terminal?
In addition to Disk Utility, you can also format a drive using the Mac Terminal, which is particularly useful for more advanced users who prefer a command-line interface.
Steps to Format a Drive to ExFAT Using Terminal:
- Connect the Drive: As with Disk Utility, connect the drive you wish to format.
- Open Terminal: Launch the Terminal application (found in Applications > Utilities or by using Spotlight).
- Identify the Drive:
- In Terminal, type diskutil list and press Enter. This will display a list of all connected drives.
- Look for the drive you wish to format, noting the identifier (such as /dev/disk4).
- Format the Drive: Now, type the following command to format the drive to ExFAT: diskutil eraseDisk ExFAT NAME /dev/diskX, for example "diskutil eraseDisk ExFAT mydrive /dev/disk4" and press Enter.
![Format the Drive]()
- Confirm the Format: Once the format process is complete, Terminal will display a success message. Your drive is now formatted to ExFAT.
3. How to unformat an ExFAT drive on Mac?
You can use data recovery software to unformat an ExFAT drive on Mac:
- Download and install Donemax Data Recovery for Mac.
- Open Donemax Data Recovery for Mac, choose the formatted ExFAT drive.
- Click on Scan button to deeply scan the formatted drive.
- Preview and recover lost data after scanning.
Recovering Data Without Software:
If you've accidentally formatted your ExFAT drive and don't want to use third-party data recovery software, data recovery may be much more challenging. While some advanced users may attempt manual recovery using Unix-based tools like TestDisk, this method requires deep technical knowledge and is not recommended for casual users.
If your data is highly valuable, getting in touch with a reputable data recovery provider can be your best bet. Although these services might be expensive and time-consuming, they can frequently recover data from badly damaged or formatted devices.
Related Articles
- Jul 08, 2025Hard Drive Crash: Causes, Recovery, and Prevention Guide
- Jun 29, 2023How to Format A Hard Drive to NTFS on Mac?
- Feb 17, 2024How to Format SK Hynix Beetle X31 SSD for Mac?
- Jul 17, 2023Format A SD Card for Both Windows and Mac OS
- Mar 13, 2025How to Fix Seagate Backup Plus Not Showing Up on Windows? [9 Fixes]
- Jun 21, 2024How to Format LaCie Rugged Portable Hard Drive (HDD or SSD) for Mac?

Christina
Christina is the senior editor of Donemax software who has worked in the company for 4+ years. She mainly writes the guides and solutions about data erasure, data transferring, data recovery and disk cloning to help users get the most out of their Windows and Mac. She likes to travel, enjoy country music and play games in her spare time.

Gerhard Chou
In order to effectively solve the problems for our customers, every article and troubleshooting solution published on our website has been strictly tested and practiced. Our editors love researching and using computers and testing software, and are willing to help computer users with their problems

