Written byMariaUpdated on Mar 13, 2025
How to Fix Seagate Backup Plus Not Showing Up on Windows? [9 Fixes]
Approved byGerhard Chou
Before we start: Before fixing Seagate Backup Plus drive not showing up on your computer, you can use Donemax Data Recovery to completely recover lost/inaccessible files from the drive. It also can help you repair a damaged Seagate Backup Plus drive on Windows PC or Mac.
PAGE CONTENT:
Seagate Backup Plus is a popular external hard drive used for data backup and storage. However, many Windows users experience an issue where the drive is not recognized or does not show up in File Explorer or Disk Management. This can be frustrating, especially if the drive contains important data.
Several factors can cause this issue, including faulty USB connections, missing drivers, unassigned drive letters, file system corruption, or hardware failure. Fortunately, there are numerous troubleshooting techniques you can use to fix this issue and recover access to your Seagate Backup Plus drive.
This article provides a detailed guide to help you fix the Seagate Backup Plus drive not showing up issue and ensure that your external hard drive functions properly again.

Recover Lost/Inaccessible Files from Unrecognized Seagate Backup Plus Drive
Before fixing Seagate Backup Plus not showing on Windows 11/10/8/7, you can use data recovery software - such as Donemax Data Recovery to recover inaccessible/lost files from the drive.
Step 1. Download and install Donemax Data Recovery on your computer, then connect the Seagate Backup Plus to your computer.
Step 2. Open Donemax Data Recovery, then select the Seagate Backup Plus drive to start data recovery.

Step 3. Click on Scan button to deeply scan the Seagate Backup Plus drive and find all recoverable files including existing files, inaccessible files, deleted/formatted/lost files.
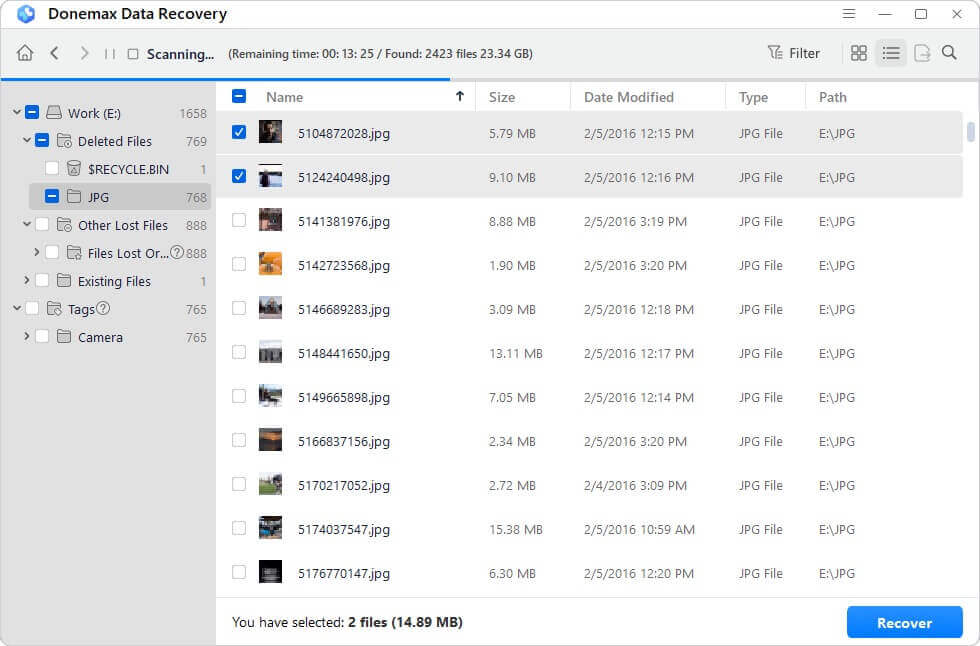
Step 4. Once the scan is completed, you can preview all recoverable files. Then select the wanted files, click on Recover button to save them.

If you want to repair a corrupted Seagate Backup Plus drive, just choose Disk Manager, select the Seagate Backup Plus drive, click on Repair button.

Basic Causes of Seagate Backup Plus Not Showing Up
Understanding the cause of the issue is helpful before moving on to solutions. Some of the major causes are listed below:
- Faulty or loose USB connection – The USB cable or port might be damaged.
- Outdated or missing drivers – Windows may fail to detect the drive due to driver issues.
- Drive letter conflicts – If the drive doesn't have an assigned letter, Windows may not display it.
- Power supply issues – Insufficient power from the USB port may cause detection problems.
- Drive not initialized – If the drive is new or was used on another system, it may need initialization.
Now, let's go through different troubleshooting methods to resolve this issue.
9 Fixes to Fix Seagate Backup Plus Not Showing Up
Fix 1. Inspect the Physical Connection
- Try switching USB ports, preferably using a USB 3.0 or USB 2.0 port.
- Test the Seagate Backup Plus drive on another computer to check if the issue persists.
- If using a USB hub, connect the Seagate Backup Plus drive directly to the computer.
Fix 2. Check for Drive Activity
- The drive is getting power if its LED light is on and you can hear it spinning.
- If the drive is making clicking or beeping noises, it may be failing.
If the drive is physically fine but still not showing up, proceed with the solutions below.
Fix 3. Check and Assign a Drive Letter in Disk Management
Sometimes, the drive appears in Disk Management but doesn't have a letter assigned. Comply these steps to assign a letter:
- Choose Disk Management by pressing Win + X.
![Seagate Backup Plus not showing up on Windows]()
- Look for your Seagate Backup Plus drive in the list.
- Right-click on it and choose Change Drive Letter and Paths if it has been identified but does not have a drive letter.
![Seagate Backup Plus not showing up on Windows]()
- Select a letter (such as "H"), click Add, and then click OK.
![Seagate Backup Plus not showing up on Windows]()
- Verify that File Explorer shows the drive.


Fix 4. Update or Reinstall Device Drivers
If the drive isn't detected, the problem could be due to outdated or corrupted drivers.
Update the Drivers:
- Choose Device Manager by pressing Win + X.
- Expand Disk drives and look for the Seagate Backup Plus.
- Right-click the drive and select Update driver.
![Seagate Backup Plus not showing up on Windows]()
- Select Install any available updates and run an automated driver search.
- Check to see if the drive shows after restarting your computer.

Reinstall the Drivers:
If updating doesn't work, try reinstalling the drivers:
- Follow steps 1-2 above.
- Choose Uninstall device with a right-click on the drive.
![Seagate Backup Plus not showing up on Windows]()
- Turn off the computer and disconnect the drive.
- To enable Windows to restore the drivers automatically, reconnect the drive.

Fix 5. Initialize the Seagate Backup Plus Drive (If Not Initialized)
If the drive appears as Not Initialized in Disk Management, you must initialize it before use.
Steps to Initialize the Drive:
- Choose Disk Management by pressing Win + X.
- Find the Seagate drive (it should say Not Initialized).
- Choose Initialize Disk with a right-click on the drive.
![Seagate Backup Plus not showing up on Windows]()
- Click OK after selecting MBR or GPT.
- The drive should now be available in File Explorer after formatting (see Fix 5).

⚠️ Warning: Initializing the drive erases all data, so use recovery tools if needed before proceeding.
Fix 6. Format the Seagate Backup Plus Drive (If Necessary)
If the drive is detected but unusable, formatting may be required.
Steps to Format the Drive
- Choose Disk Management by pressing Win + X.
- Right-click the Seagate Backup Plus drive and select Format.
![Seagate Backup Plus not showing up on Windows]()
- Choose NTFS or exFAT (for cross-platform compatibility).
- Name the drive and check Perform a quick format.
![Seagate Backup Plus not showing up on Windows]()
- Click OK to format the drive.


⚠️ Warning: Formatting deletes all data, so back up files first.
Fix 7. Run CHKDSK to Repair Seagate Backup Plus's Drive Errors
If your Seagate Backup Plus is recognized but still not accessible, the drive may have file system corruption or bad sectors. Windows provides a built-in tool called CHKDSK (Check Disk Utility) that can detect and repair such errors.
What is CHKDSK, and Why Use It?
CHKDSK is a Windows command-line tool that scans and repairs logical and physical errors on a drive. Here's what it does:
- Fixes file system corruption that may prevent the drive from being read.
- Detects and repairs bad sectors, preventing data loss.
- Recovers readable information from corrupted sections.
- Marks unusable sectors to prevent data from being written to them.
When Should You Use CHKDSK?
You should run CHKDSK if:
- The drive is visible but inaccessible.
- You see error messages like "The file or directory is corrupted and unreadable."
- The drive keeps disconnecting or slowing down during file transfers.
- Windows prompts you to "Scan and fix" the drive when you connect it.
How to Run CHKDSK in Command Prompt
- To launch the Command Prompt, press Win + R, type cmd, then hit Enter.
- In the command window, type the below command and press Enter:
chkdsk X: /f /r /x
![Seagate Backup Plus not showing up on Windows]()
(Replace "X" with the actual drive letter assigned to your Seagate Backup Plus.)

Alternative CHKDSK Methods:
1. Run CHKDSK from File Explorer
If you prefer a graphical method, follow these steps:
- Open File Explorer (Win + E).
- Choose Properties with a right-click on your Seagate Backup Plus HDD.
![Seagate Backup Plus not showing up on Windows]()
- Select the tab for Tools.
- Under "Error checking," click "Check."
![Seagate Backup Plus not showing up on Windows]()
- Click Scan drive and follow the prompts.
![Seagate Backup Plus not showing up on Windows]()


2. Run CHKDSK from Advanced Startup (For Unbootable PCs)
If your PC doesn’t boot properly or your external drive prevents startup, use Windows Recovery Mode:
- Restart your PC and hold Shift while clicking Restart from the Start menu.
- Move to Command Prompt from Advanced Options via Troubleshoot.
- Type the same CHKDSK command:
chkdsk X: /f /r /x
- Press Enter and wait for the scan to complete.
CHKDSK Stuck or Taking Too Long? Try These Fixes
If CHKDSK gets stuck or takes hours to complete:
- Run CHKDSK without the /r switch (this skips bad sector recovery):
chkdsk X: /f /x
- Use an alternative disk repair tool like Seagate SeaTools (covered in Fix 9).
- Check the drive's health using the wmic command:
wmic diskdrive get status
If the result shows "Pred Fail", the drive may be physically failing.
What to Do If CHKDSK Cannot Fix the Issue?
If CHKDSK fails or displays messages like "Windows found errors but was unable to fix them", try these options:
- Use System File Checker (SFC) to repair system files:
sfc /scannow
![Seagate Backup Plus not showing up on Windows]()
- Use DISM for deeper repairs:
DISM /Online /Cleanup-Image /RestoreHealth
- Recover data using third-party recovery tools before formatting the drive.
- Consider replacing the drive if bad sectors continue to grow.

Fix 8. Disable USB Selective Suspend in Power Settings
Windows may disable USB ports to save power, which can prevent external drives from being detected.
Steps to Disable USB Selective Suspend
- Go to Power Options after opening the Control Panel.
- Next to the active plan, click Change plan settings.
- Click on Modify Advanced Power Configurations.
- Select the USB selective suspend setting by expanding the USB settings.
- Disable both the battery and the plug.
- Click Apply > OK, then restart your PC.
Fix 9. Use Seagate SeaTools for Drive Diagnosis
Seagate provides SeaTools, a diagnostic tool to detect and repair issues.
Steps to Use SeaTools:
- Download and install SeaTools for Windows from Seagate's website.
- Open the program and select your Seagate Backup Plus drive.
- Run the Short Drive Self Test and Fix All Fast options.
![Seagate Backup Plus not showing up on Windows]()
- If errors are found, follow on-screen instructions to fix them.

When to Seek Professional Help
If none of the solutions work, consider the following:
- The drive is making clicking or grinding noises → Possible hardware failure.
- The drive is not detected on any computer → Circuit board or USB interface failure.
- You need to recover important data → Contact a data recovery service.
Seagate offers warranty support, so check their website for repair or replacement options.
Conclusion
The Seagate Backup Plus not showing up on Windows issue can often be fixed with simple troubleshooting steps. Start by checking connections, updating drivers, assigning a drive letter, and repairing errors. If necessary, format or initialize the drive. For persistent issues, use Seagate's tools or seek professional help.
To prevent future problems, regularly back up your data and safely eject your drive before disconnecting it.
Donemax Data Recovery
One of the best data recovery programs to recover deleted, formatted or lost data from PC, Mac, HDD, SSD, USB drive, SD card, camera, RAID, Sever or other storage devices.
Related Articles
- Jun 21, 2024How to Format LaCie Rugged Portable Hard Drive (HDD or SSD) for Mac?
- Mar 12, 2024External Hard Drive Not Mounting on Mac mini, What to Do?
- Jul 08, 2024Seagate External SSD Not Mounting on Mac, Fix It With These Methods
- Jun 29, 2023How to Format A Hard Drive to NTFS on Mac?
- Feb 17, 2025How to Fix Corrupted USB Flash Drive Without Formatting? [5 Methods]
- Feb 06, 2024How to Format Lexar Portable SSD for Mac?

Contributing Writer
Maria
Maria is one of the senior writers & editors of Donemax who lives and works in Sydney, Australia. She loves PC, Mac and Internet Technology. She has 6 years of writing articles about data recovery on PC/Mac, disk cloning solution, data eraser and computer OS optimization, etc. She is also interested in testing various software and digital products.

Editor in chief
Gerhard Chou
In order to effectively solve the problems for our customers, every article and troubleshooting solution published on our website has been strictly tested and practiced. Our editors love researching and using computers and testing software, and are willing to help computer users with their problems