Before we start: Donemax NTFS for Mac can quickly fix WD external hard drive read-only on Mac. It offers quick solution to add NTFS read-write on Mac, change the WD external hard drive from read-only to read-write by only 1click.
PAGE CONTENT:
If you've ever encountered the frustrating situation where your WD external hard drive has become read-only on your Mac, you are not alone. Many Mac users experience this issue, often leading to confusion and difficulty accessing or modifying the files on the drive. Fortunately, this is a common problem with multiple possible solutions. In this article, we will walk you through several methods to change the WD external hard drive from read-only to read-write on a Mac. We will also cover some preventative measures to ensure this issue doesn't arise again in the future.
Understand Read-Only and Read-Write Permissions
Before we dive into the troubleshooting steps, it's important to understand what read-only and read-write permissions mean.
- Read-Only: When an external hard drive is set to read-only, you can view and copy files from the drive, but you cannot modify, delete, or add any new files. This is a protection mechanism that prevents accidental modification or corruption of files. However, it can be frustrating when you need to make changes to the data on your drive.
- Read-Write: With read-write access, you have full control over the files on your external hard drive. You can modify existing files, delete them, and add new ones without any restrictions.
The reason an external hard drive may default to read-only on Mac typically has to do with file system compatibility, incorrect permissions settings, or issues with the drive itself.
Why Your WD External Hard Drive May Be Read-Only on Mac?
Several factors can cause your WD external hard drive to be set to read-only on your Mac. These include:
- File System Compatibility: Different operating systems use different file systems to organize data on storage devices. Mac OS primarily uses HFS+ (Mac OS Extended) and APFS, while Windows uses NTFS, ExFAT, and FAT32. Mac OS has limited write support for NTFS-formatted drives, often resulting in a read-only state when such drives are connected.
- Corruption or Disk Errors: If the drive is corrupted or has disk errors, it may automatically switch to a read-only mode to prevent further data loss. Disk errors can occur due to improper ejection, power loss, or other physical problems with the drive.
- Drive Lock or Permissions Issues: Some external hard drives have built-in locks that prevent writing to the disk. Additionally, Mac OS may restrict access to certain drives based on permissions or security settings, rendering the drive read-only.
- Incorrect Disk Permissions: A common cause of read-only issues on Mac is incorrect disk permissions. If the disk is improperly configured or if the user account lacks write permissions, the drive will be accessible only in read-only mode.
Now that we know what might cause this issue, let's move on to how we can resolve it.
Change the WD Drive from Read-only to Read-write on Mac
#1 Check the Disk Format
The first step is to verify the format of the external hard drive. If the drive is formatted with a file system that Mac OS cannot write to, such as NTFS, then it will default to read-only mode.
Checking the Disk Format:
- Open Disk Utility: Go to Disk Utility from Utilities via Applications.
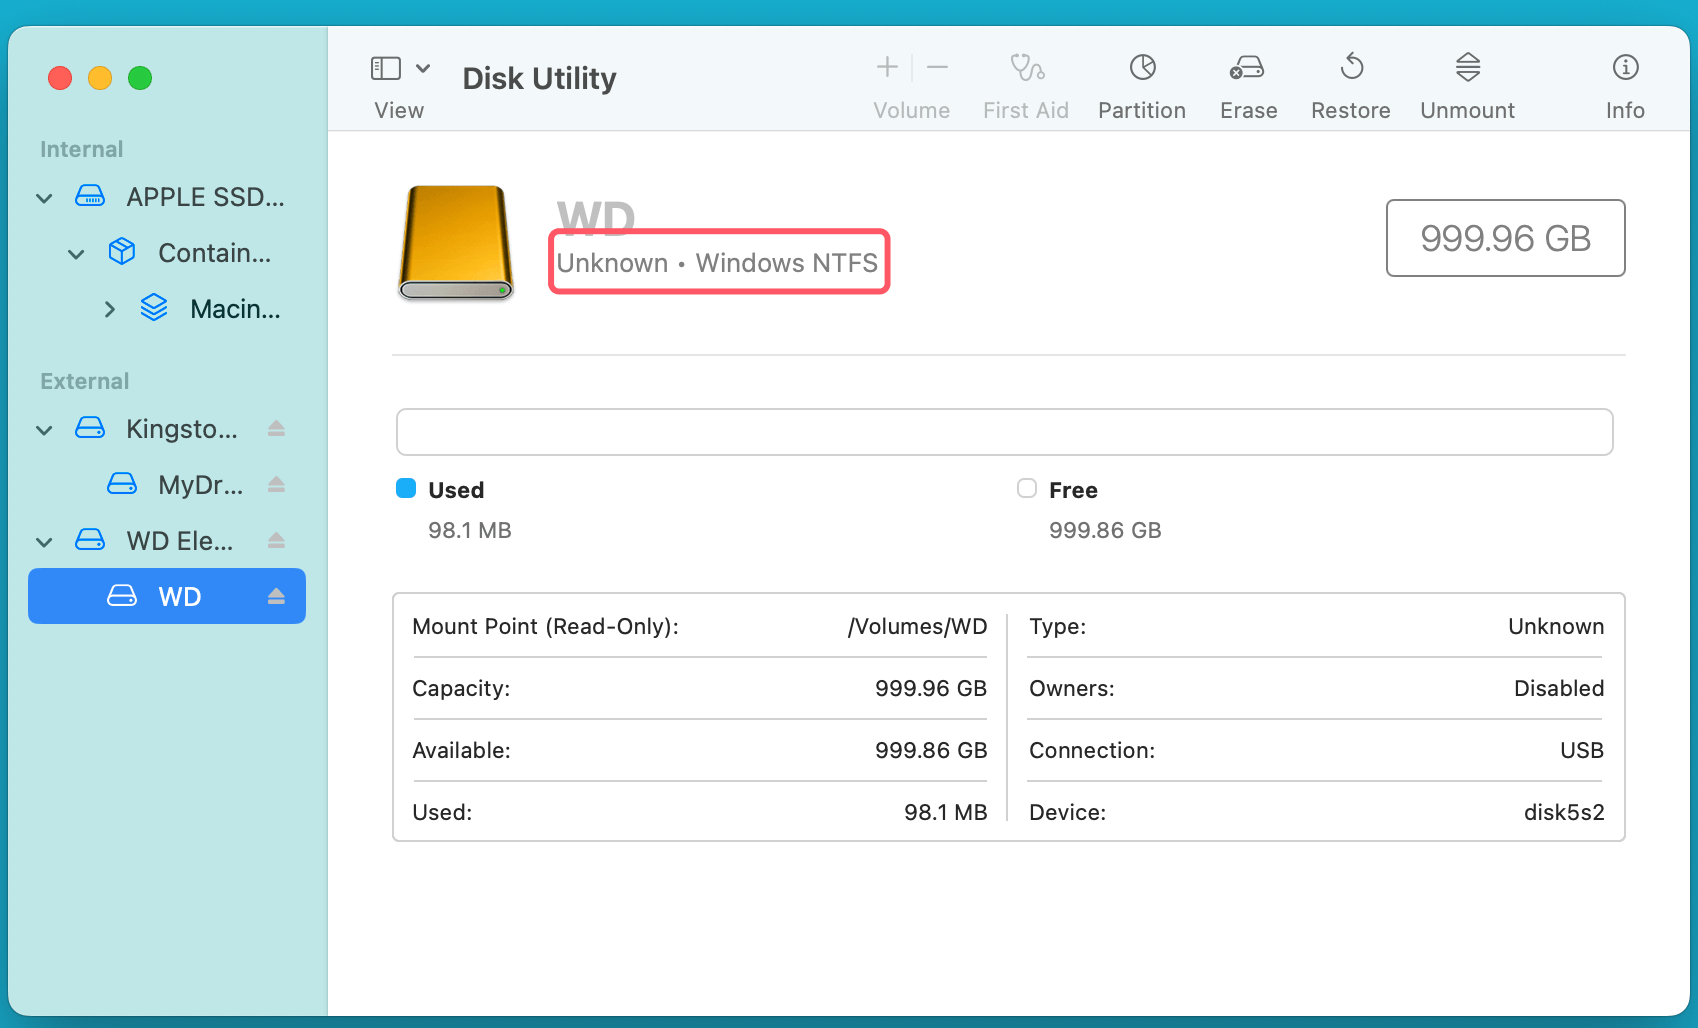
- Locate the External Drive: In the Disk Utility window, find your WD external hard drive in the left sidebar.
- Check the Format: Under the disk's name, you'll see the format. If it says NTFS, ExFAT, or FAT32, these formats may cause issues with read-write access on Mac OS.
![Change WD External Hard Drive from Read-Only to Read-Write on Mac]()
If your drive is NTFS formatted, you can't write to it unless you install third-party software. However, if the drive is formatted with a Mac-compatible format like HFS+ or APFS, the issue likely lies elsewhere.
#2 Modify Disk Permissions Using Disk Utility
If the disk format is compatible but you're still facing a read-only issue, it‘s possible that disk permissions are preventing write access. macOS uses a system called FileVault and Access Control Lists (ACLs) to manage disk permissions, and you can fix permission-related issues using Disk Utility.
Repairing Disk Permissions:
- Open Disk Utility: Go to Disk Utility from Utilities via Applications..
- Select Your External Drive: In the sidebar, select your WD external hard drive.
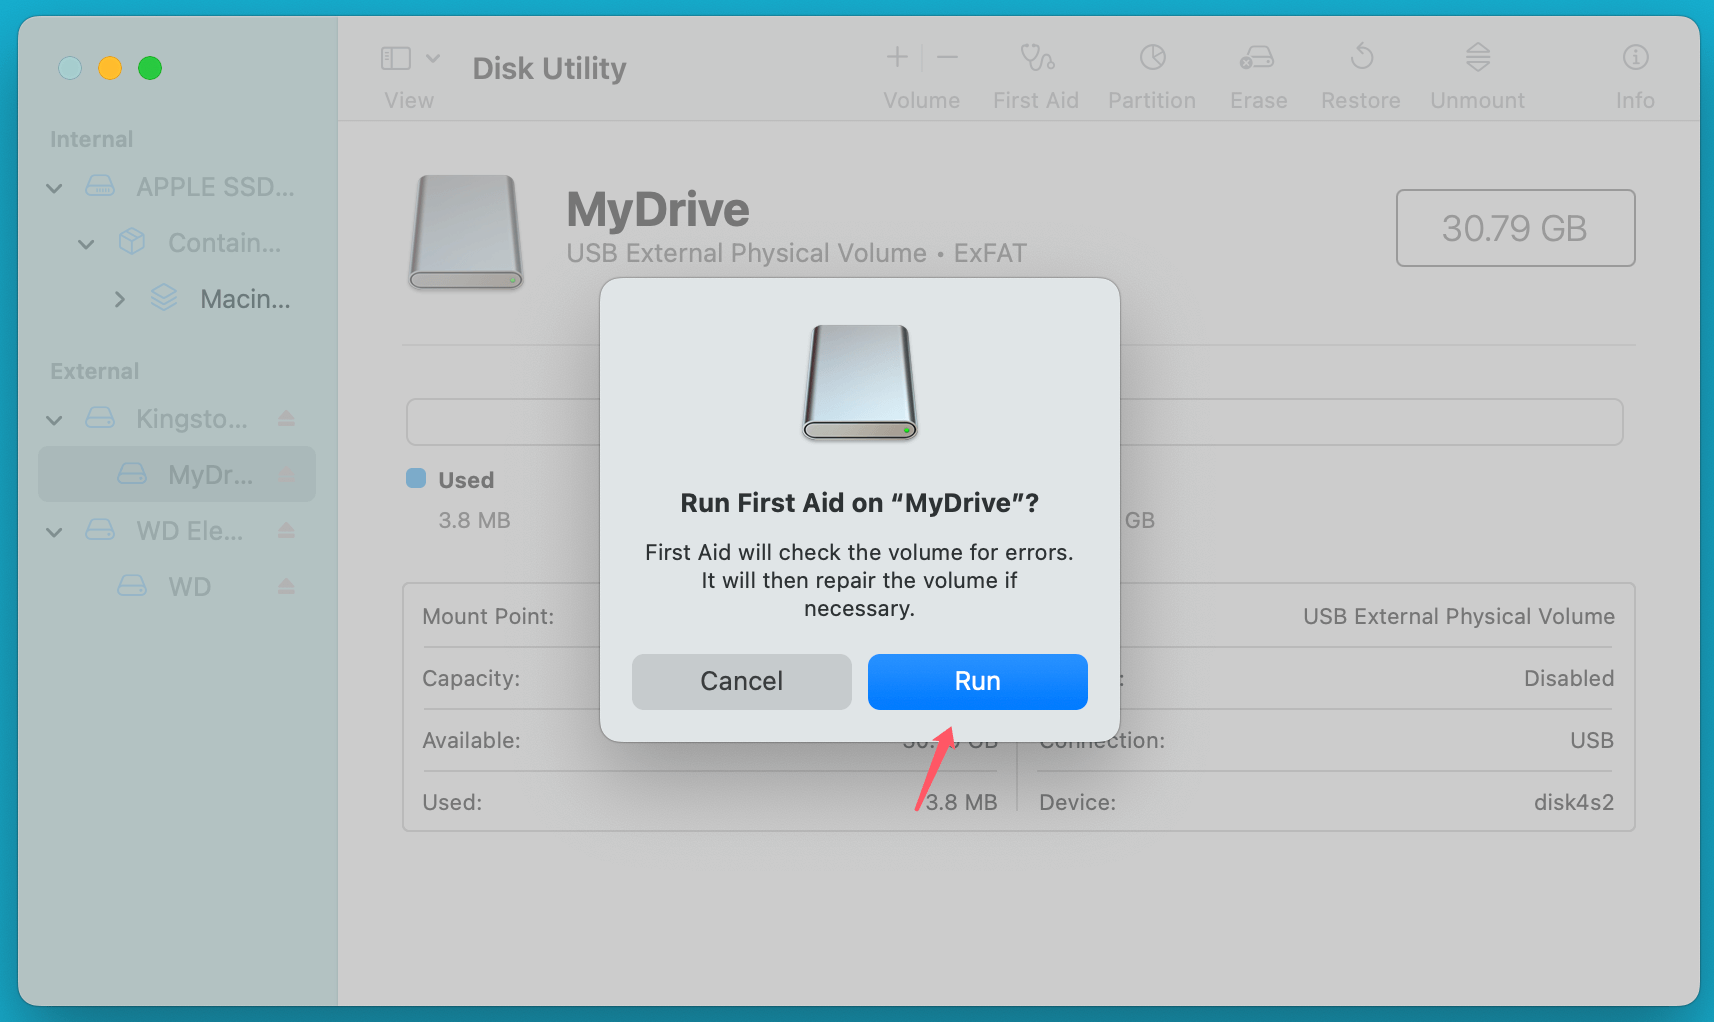
- Run First Aid: Click on the First Aid button in the toolbar, then click Run. This will check the disk for errors and attempt to repair any problems.
![Change WD External Hard Drive from Read-Only to Read-Write on Mac]()
- Check Permissions: If errors are found and fixed, check if the drive is now accessible for writing.
In many cases, running First Aid will resolve minor disk permission errors that are preventing write access. However, if the issue persists, you may need to manually adjust the permissions.
#3 Modify Permissions Using Terminal (for older Mac systems)
If Disk Utility didn't fix the problem, you can use the Terminal app to manually change the permissions of the external hard drive. This method is more advanced, so make sure to follow the steps carefully.
Using Terminal to Modify Permissions:
1. Open Terminal: Go to Terminal from Utilities via Applications.
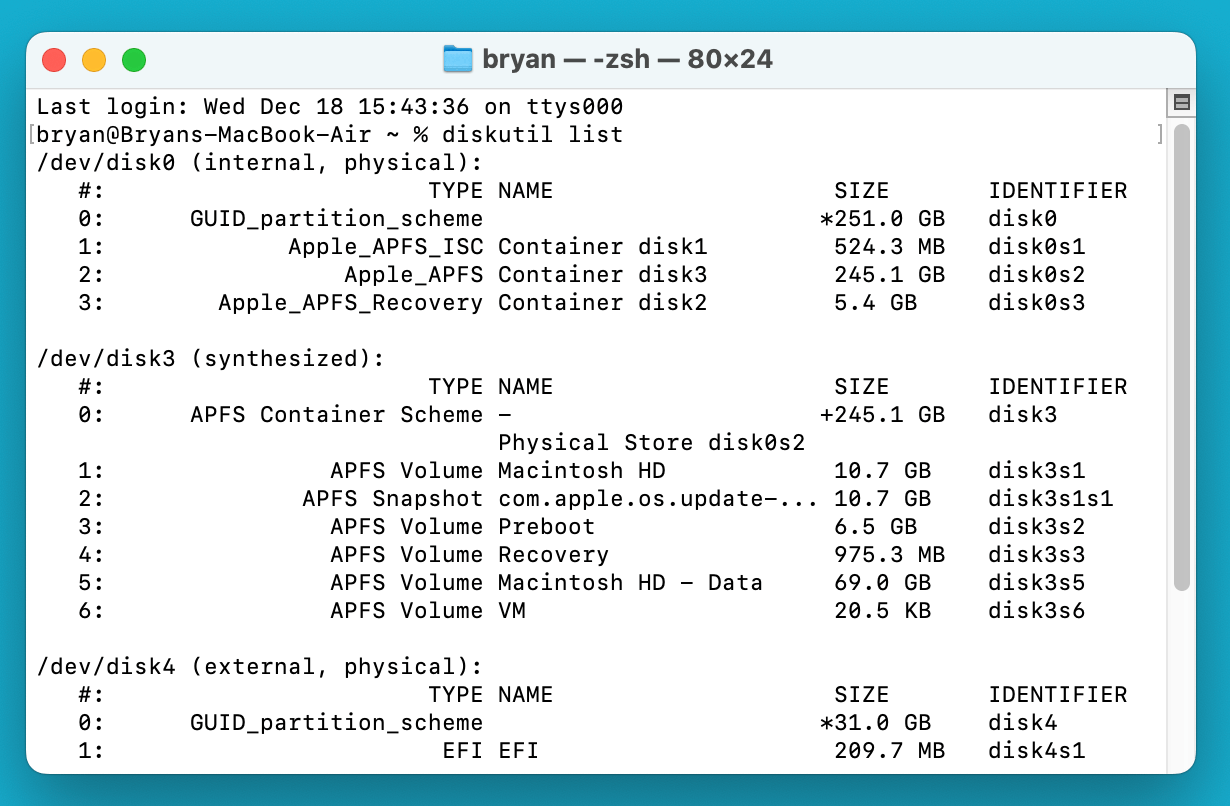
2. Find the External Drive's Name: Type the following command and press Enter:
diskutil list
This will list all the connected drives. Look for your external drive in the list and note the disk identifier (e.g., /dev/disk4).
3. Change Permissions:
Now that you've identified your external drive, you can proceed to modify its permissions. You'll use the chmod command to adjust the file permissions on the drive.
- In Terminal, type the following command:
sudo chmod -R 777 /Volumes/YourDriveName
Replace YourDriveName with the actual name of your external hard drive as shown in Finder. In our example, if your drive is called "WD My Passport," you would type:
sudo chmod -R 777 /Volumes/WD\ My\ Passport
- The sudo command ensures that you have administrative privileges to make changes. It will ask you for your Mac's admin password. Type your password and press Enter (note that Terminal won't display the password as you type, which is normal).
- The chmod command changes the permissions of files and directories. The -R flag makes the changes recursive, meaning it will apply the new permissions to all files and subdirectories within the external hard drive.
This means you're giving full read-write-execute access to everyone on the system, which is typically safe for external drives that you use only for personal or non-sensitive data.
4. Change Ownership (Optional)
Sometimes, the issue may be related to the ownership of the drive. If the drive was previously used with another computer, your Mac might not recognize your user account as the owner. In that case, you can change the ownership to your account using the chown command.
- Type the following command to change the owner:
sudo chown -R $(whoami) /Volumes/YourDriveName
- This command sets your current user account as the owner of the drive. The $(whoami) part retrieves your username, ensuring that you're the one with permission to modify the files on the drive.
5. Verify Changes
After running the chmod and chown commands, the external hard drive should now have proper read-write access. You can verify the changes by:
- Opening Finder and attempting to create a new file or folder on the external hard drive.
- Copying files: Try copying files from your Mac to the external hard drive.
- Editing files: Open a file on the external drive and attempt to edit it.
If the drive is now writable, you should be able to make modifications without encountering the read-only error.
#4 Install Third-Party Software for NTFS Drives
If your WD external hard drive is NTFS-formatted, Mac OS won't allow you to write to it by default. To resolve this, you can install third-party software that enables full read-write access to NTFS-formatted drives.
Donemax NTFS for Mac is one of the best NTFS drivers. It quickly add NTFS read-write support on Mac.
Step 1. Download and install Donemax NTFS for Mac on your Mac and connect the NTFS WD external hard drive to the Mac.
Step 2. Open Donemax NTFS for Mac, select the WD external hard drive, click on Enable Writable button.

#5 Verifying the Changes
After following the above steps, you should now have read-write access to your external hard drive. To confirm:
- Open Finder and try to create a new file or folder on the external hard drive.
- Copy Files: Try copying files from your Mac to the external drive.
- Modify Files: Open an existing file on the drive and attempt to edit it.
If you are able to do all of the above without any issues, then your drive is now set to read-write mode.
Troubleshooting Common Issues
Below are some troubleshooting tips:
- Drive Format: Ensure that the drive is formatted to a compatible file system for your Mac (preferably ExFAT, HFS+, or APFS).
- External Drive Lock: Some WD external drives have a physical switch that locks the drive into read-only mode. Check for such a switch and ensure it's in the unlocked position.
- Reformatting: If the above steps don't work, you may need to reformat the external hard drive. This will erase all data, so make sure to back up your files first.
Conclusion
Changing your WD external hard drive from read-only to read-write on a Mac can seem challenging, but with the right steps, it's a manageable task. By understanding the root causes of the issue - whether it's file system compatibility, disk permissions, or the need for third-party software - you can quickly resolve the problem and regain full access to your external drive. If the issue persists, reformatting the drive or seeking professional support may be necessary. With these solutions, you can ensure that your external hard drive functions properly and serves your needs for data storage and transfer.

Donemax NTFS for Mac
An easy-to-use NTFS for Mac tool to help you enable writable for NTFS drives on Mac so that you can read-write NTFS drives on Mac without any limitation. It also can help you mount, format, repair, rename, open drive on your Mac.
Related Articles
- Dec 19, 2024Why Is My SD Card Showing as RAW Drive? How to Fix RAW SD Card?
- Jan 02, 2025Disk is OFF or Offline on Mac, Fix It Now
- May 23, 2025Step-by-step Guide: Fix a Corrupted USB Flash Drive Using CMD
- Nov 29, 2024How to Format ExFAT or FAT32 Drive to NTFS on Mac?
- Mar 21, 2025How to Use Seagate Game Drive for Xbox: A Complete Guide
- Dec 05, 2024How to Use Samsung Portable SSD T5 EVO on Mac

Christina
Christina is the senior editor of Donemax software who has worked in the company for 4+ years. She mainly writes the guides and solutions about data erasure, data transferring, data recovery and disk cloning to help users get the most out of their Windows and Mac. She likes to travel, enjoy country music and play games in her spare time.

Gerhard Chou
In order to effectively solve the problems for our customers, every article and troubleshooting solution published on our website has been strictly tested and practiced. Our editors love researching and using computers and testing software, and are willing to help computer users with their problems

