Written byMariaUpdated on Apr 10, 2025
How to Repair an External Hard Drive on macOS Sequoia: An In-Depth Troubleshooting Guide
Approved byGerhard Chou
Before we start: Donemax Data Recovery can help you mount a disk on Mac, repair an external hard drive on Mac, recover lost data on Mac, etc. If you want to repair an external hard drive on macOS Sequoia, you can use this tool to help recover lost data and repair the drive.
PAGE CONTENT:
Ever plugged in your external hard drive to your Mac and had it disappear like a ghost? Annoying, right? Maybe it's acting super slow, making weird clicking noises, or just not showing up at all. I've been there too - staring at that "Disk Not Readable" error like it's a riddle.
You don't need to panic or buy a new drive! I'll show you how to repair an external hard drive on macOS Sequoia using simple tricks anyone can do. We'll start with easy fixes like Apple's built-in Disk Utility (it's easier than you think), move to handy Terminal commands for stubborn errors, and even explore third-party tools if things get messy.
Understand External Hard Drive Issues on macOS Sequoia
Why do external hard drives fail in the first place? There are a few main culprits:
Logical Errors
Corrupted files, improper ejection, unsupported file systems, and other software issues can prevent macOS from interacting properly with the drive. Symptoms include:
- Drive not appearing in Finder
- Strange noises
- Slow performance
- Specific error messages
Physical Damage
If you've dropped the drive, encountered connectivity problems, or experienced overheating, physical components like the read/write heads may be damaged.
Compatibility Problems
Drives formatted specifically for Windows (NTFS format) may not work perfectly with macOS. Reformatting the drive can help eliminate software conflicts.
Pre-Repair Checklist:
Before you start tinkering around with your busted drive, run through this checklist:
1. Back Up Any Recoverable Data
If the drive mounts even partially, use Time Machine or cloud storage to back up important files. This protects you if things go south later.
2. Check Connections and Ports
Try using a different cable, connecting to another USB port, or plugging the drive into another Mac. This helps determine if the issue is software or hardware-related.
3. Open Disk Utility to See if the Drive Appears
Even if your drive shows up here but not on the desktop, that's progress! It means macOS detects the hardware.
Recover Lost/Inaccessible Data from Corrupted External Hard Drive Before Repairing It
Before repairing the external hard drive on macOS Sequoia, you can use data recovery software - such as Donemax Data Recovery for Mac to recover all deleted/formatted/lost files and inaccessible files from the external hard drive.
Step 1. Download and install Donemax Data Recovery for Mac and connect the external hard drive to your Mac.
Step 2. Open Donemax Data Recovery for Mac, select the external hard drive to start data recovery.

Step 3. Click on Scan button to deeply scan the external hard drive and find all recoverable files including existing files, deleted/erased/lost files, inaccessible files, etc.

Step 4. Once the scan gets finished, you can preview all recoverable files. Then select the wanted files, click on Recover button to save them.

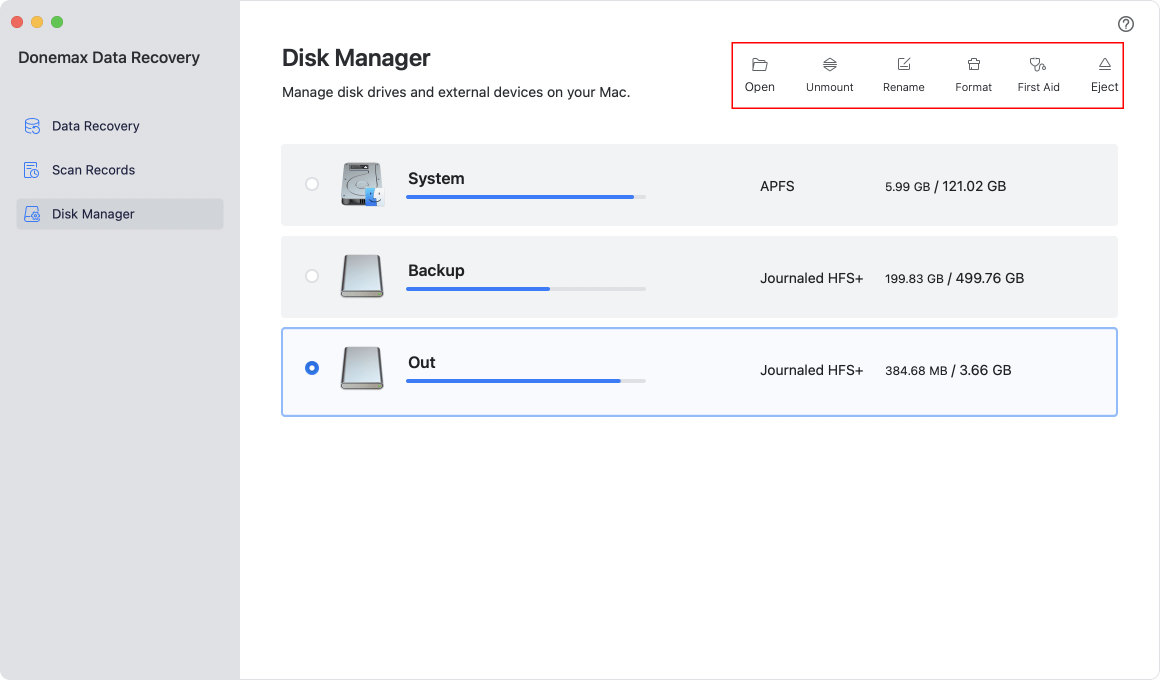
Donemax Data Recovery for Mac's Disk Manager tool can help you mount external hard drive on Mac, repair damaged external hard drive on Mac and reformat corrupted external hard drive on Mac.
Methods to Repair an External Hard Drive on macOS Sequoia
Method 1: Run First Aid in Disk Utility
Your first step to revive an external drive should always be Disk Utility, built right into macOS. The "First Aid" feature checks and repairs errors related to:
- Corrupt directories
- Issues with permissions
- Problematic disk formatting
- Bad sectors
It can automatically fix many logical errors.
1. Open Disk Utility (Applications > Utilities > Disk Utility)

2. Select Your External Drive
Choose the name of the drive device, not just the volume.
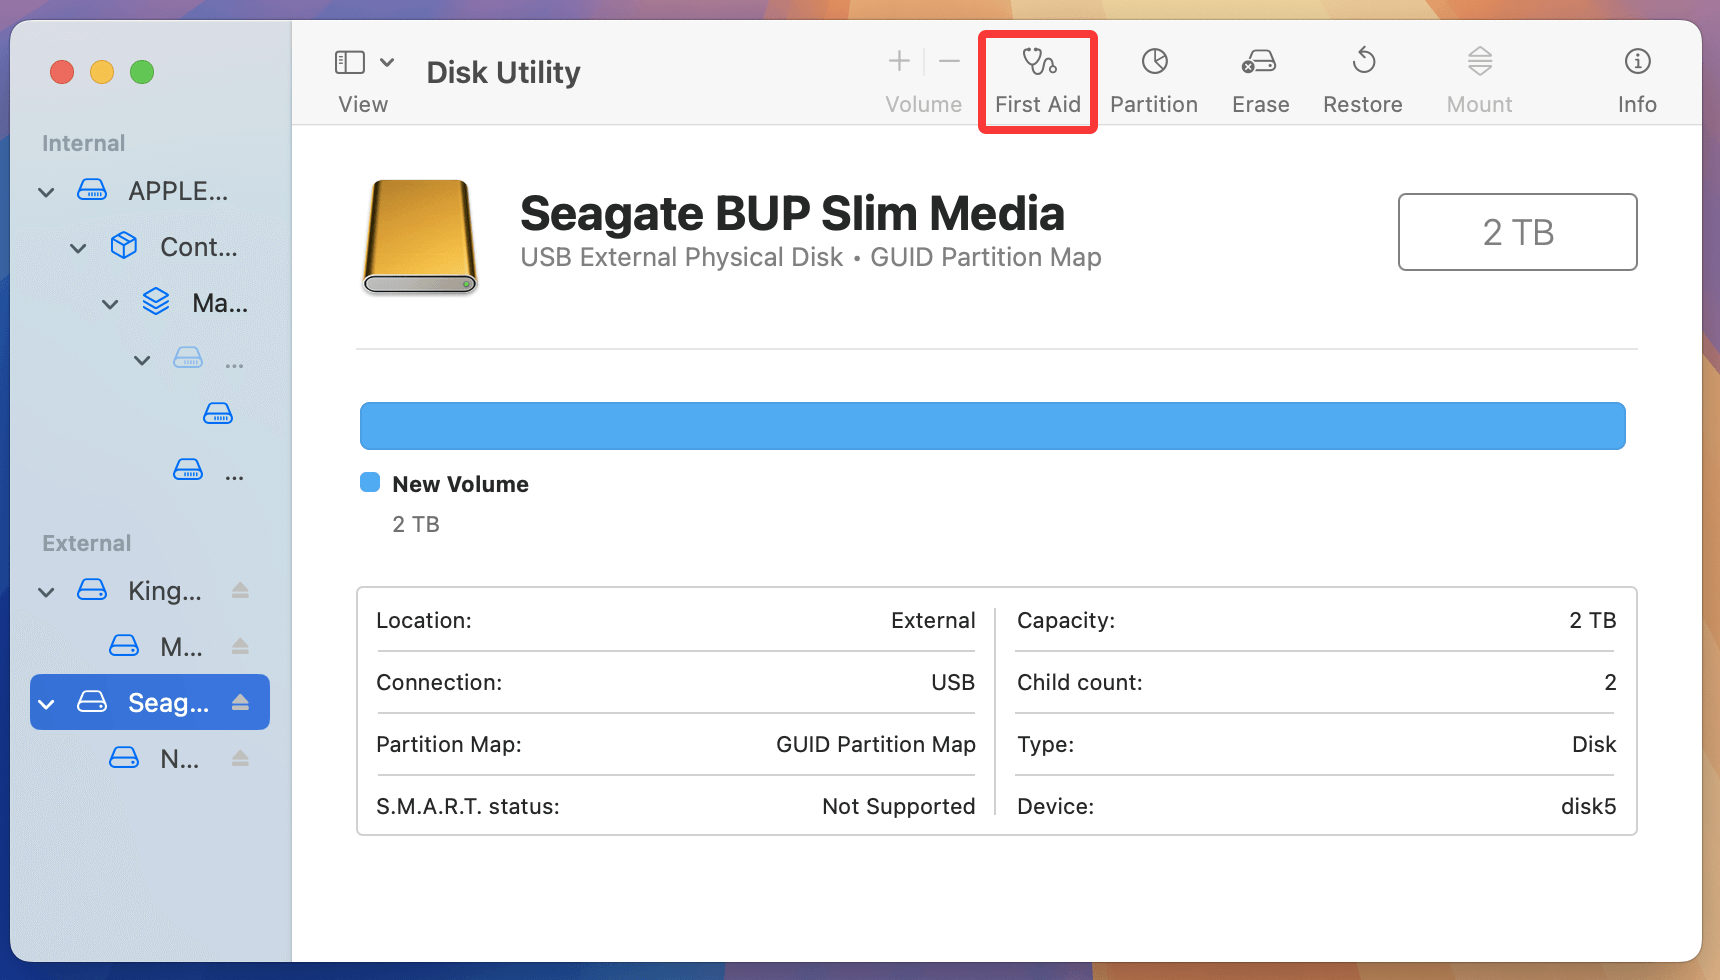
3. Click "First Aid" (the band-aid icon) and Confirm
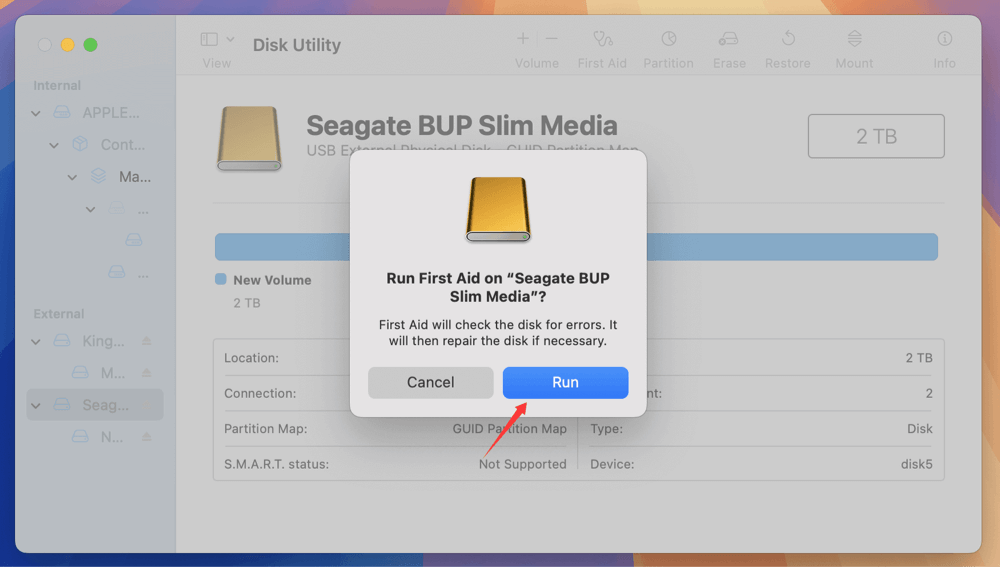
This initiates the repair process.
4. Wait for Completion and Review the Results
- Green checkmark = no issues detected. The drive is healthy!
- Red exclamation point = problems found. Move on to advanced steps.
If First Aid resolved your issue congrats! You can stop here. But for continuing problems it’s time to break out the big guns.
Method 2: Use Terminal Commands for Advanced Repairs
While Disk Utility handles basic issues, Terminal gives you more advanced options via command-line tools. Common fixes include:
- Rerunning more exhaustive diagnostics with fsck
- Unmounting and remounting stalled drives
- Low-level repartitioning
This involves more specialized knowledge but may resurrect a drive that First Aid alone can't.
Step-by-Step Terminal Instructions
1. Open Terminal via Applications > Utilities.
2. Type diskutil list and Find Your Drive
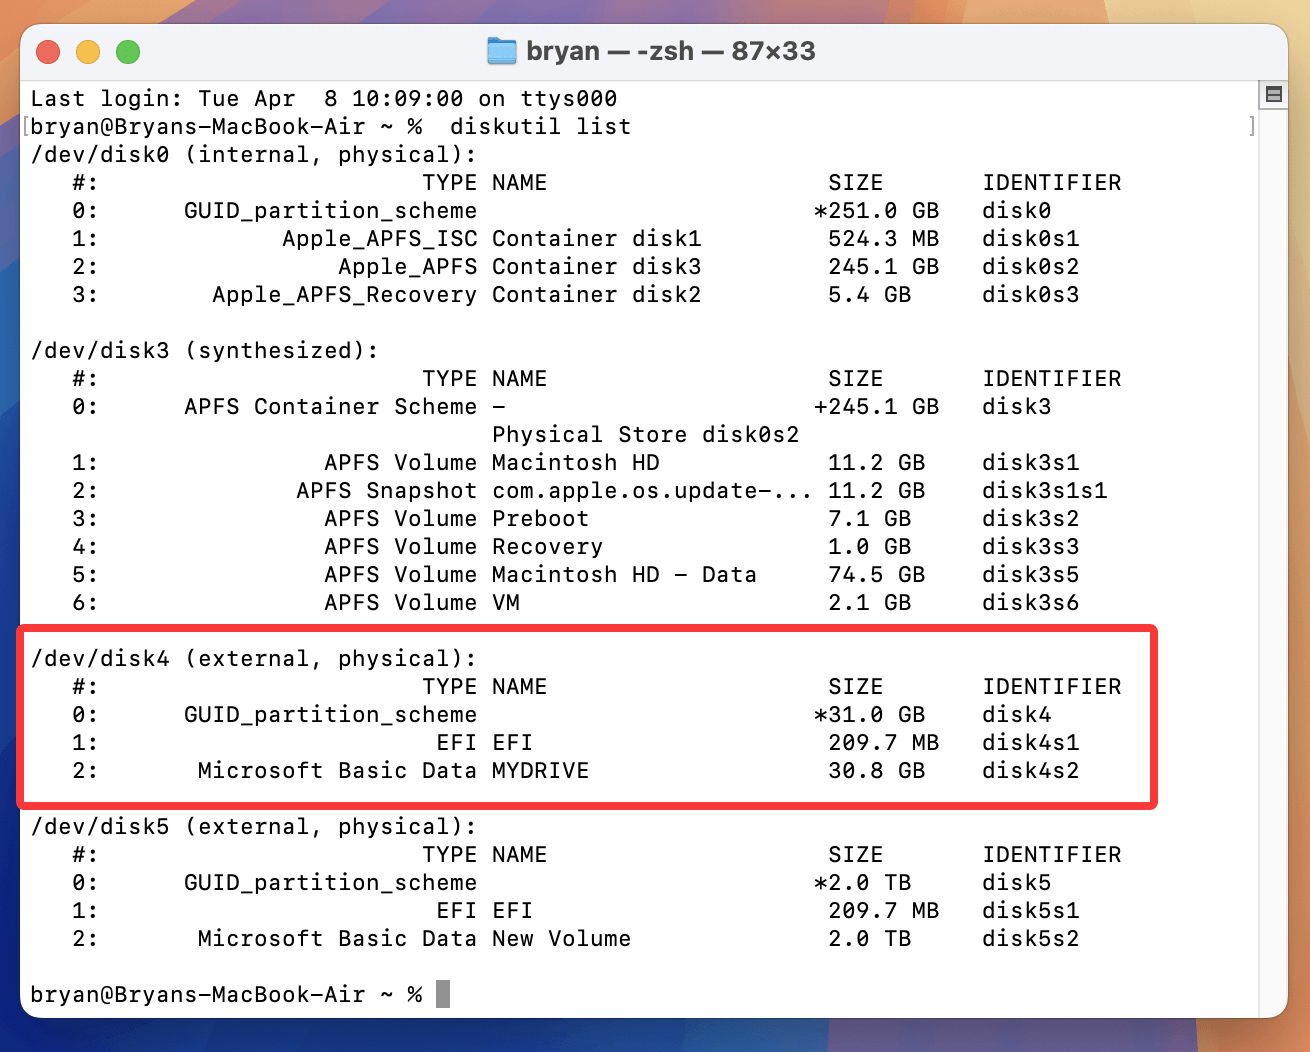
Match the name (e.g. "External Disk") to what shows in Disk Utility.
3. Unmount the Drive with diskutil unmountDisk /dev/diskX (replace X with your disk)
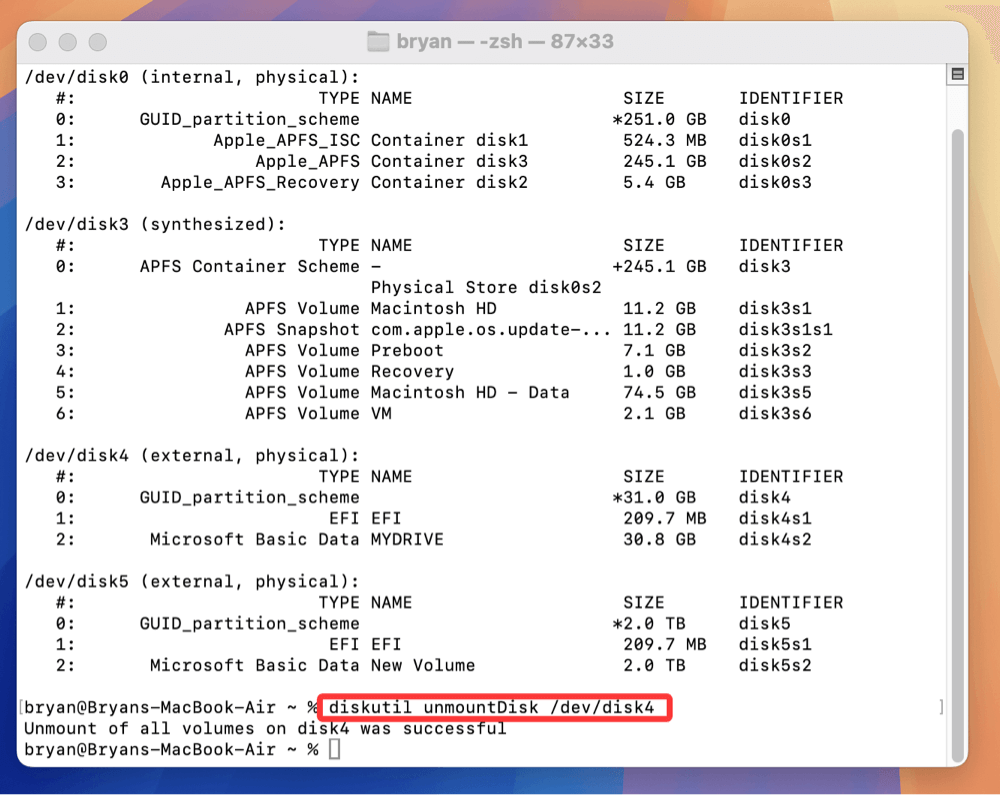
This detaches the drive from the file system.
4. Run fsck_apfs -fy /dev/diskX to Check for and Repair Issues
Replace apfs in the command with exfat or hfs if needed.
5. Remount the Drive Afterwards with diskutil mountDisk /dev/diskX
Now you can access the drive again!
Repeat this sequence multiple times if problems persist. Terminal gives you the options, but actually fixing things is still a game of patience.
Method 3: Turn to Third-Party Repair Tools
When all else fails, powerful disk repair utilities like Donemax Data Recovery for Mac, Drive Genius, and Tech Tool Pro may save the day. They offer advanced features like:
- Scanning for recoverable data
- Directory optimization
- Disk benchmarking
- Firmware updates
- Component-level drive testing
Basically if Terminal can't fix it, these tools represent your last bastion of hope before having to format or replace the drive entirely. Let’s explore Donemax Data Recovery as an example.
How to Use Donemax Data Recovery:
1. Download and Install Donemax Data Recovery
2. Open Donemax Data Recovery, Choose Disk Manager. Select Your External Drive
3. Run "First Aid" to Fix Errors
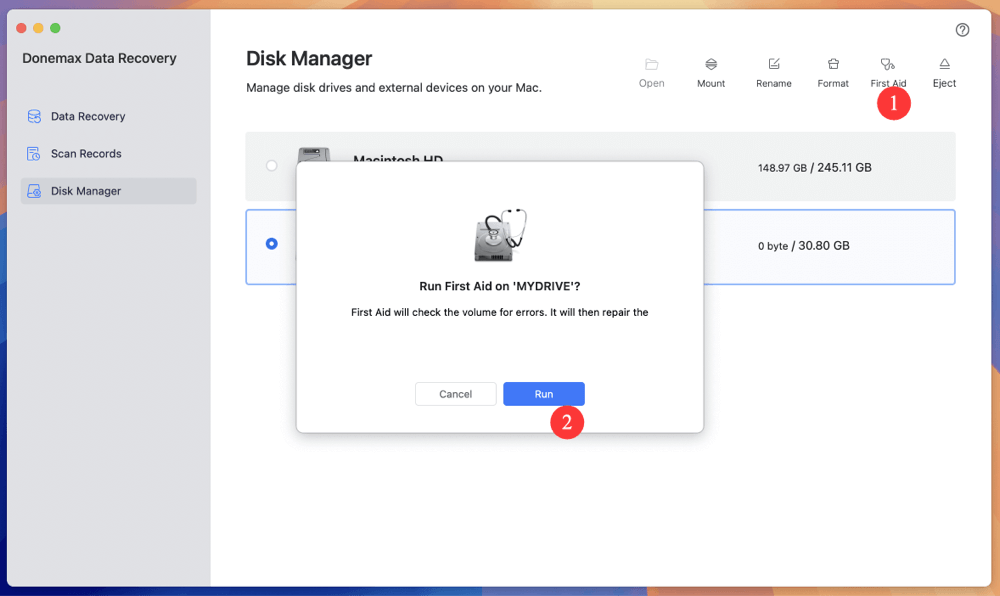
This cleans up problems like faulty directories, crashes during reformatting, lost partitions, and more.
4. Alternatively, Attempt Data Recovery
If you can't repair the errors, Donemax Data Recovery's "Data Recovery" features grab as much data as possible before formatting the disk.
Remember that these apps aren't 100% effective. But when standard methods fail, break out the credit card and cross those fingers!
Techniques for Recovering Data from a Damaged Drive
- What if all repair efforts fail and you still need important files from the drive? Don't panic yet! Here are a few last ditch data recovery options before you throw that brick-like device into the ocean.
If You Have a Recent Backup…
- Connect your external drive to another Mac
- Use Migration Assistant to transfer data between devices
- Check your Time Machine backup if enabled
Turn to Data Recovery Software
- Tools like Donemax Data Recovery can work magic if there are still readable sectors on the drive. It scans for recoverable data and attempts to copy it to safety.
Call in the Professionals
(Expensive But Effective)
- For valuable or sentimental data, disk recovery specialists like DriveSavers may be able to help using specialized equipment in a sterile clean room environment. This costs hundreds or thousands of dollars but offers the highest chance of retrieving precious files.
So those are your last options to avoid a complete data apocalypse. With some MacGyver-level tricks, you can likely recover at least some data from a failing drive.
When Should You Format the Drive?
If all else fails and your drive is unresponsive, reformatting it may be your only option. Note that formatting erases all data so only do this if you've exhausted repair methods!
Before we get into the steps, here are scenarios where formatting makes sense:
- You have a full backup or rescued important files
- First Aid attempts fail repeatedly
- The drive has physical damage
- You just want a clean slate
How to Format in Disk Utility?
This will completely wipe and reconfigure the drive.
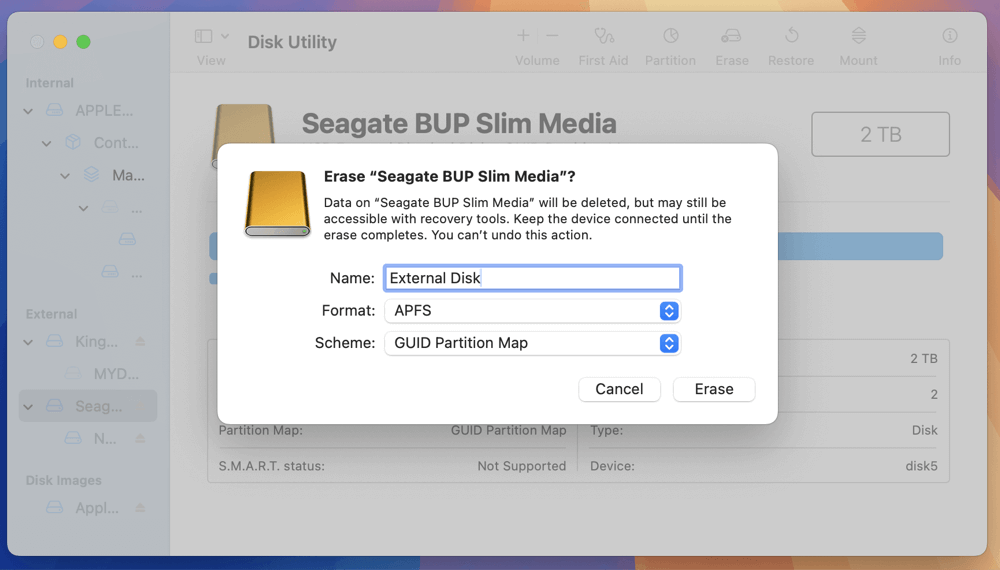
1. Open Disk Utility and Select Your External Drive
Make sure you choose the correct one!
2. Click "Erase" in the Toolbar
3. Assign a Name and Select a Format
- APFS: Optimized for macOS (especially SSDs)
- exFAT: Cross-compatible between macOS and Windows
4. Confirm the Erase Process
Click "Erase" once more if you're ready. This cannot be undone! But it should leave you with a sparkly clean drive partition afterward.
Physical Damage and When to Call It Quits
Let's shift gears and talk about hardware for a moment. What if your drive failure stems from physical problems vs. strictly logical errors? Here are the warning signs:
- Strange clicking or beeping sounds
- Burnt smell coming from the device
- Components rattling inside the case
- Visible dents, cracks, water damage etc.
- Drive not spinning up at all
In these cases your options are limited:
1. Stop Using the Device Immediately
Continuing to power on a physically damaged drive will likely accelerate component degradation.
2. Consider Professional Data Recovery
Opening the enclosure yourself risks further harm and usually voids any warranty. But specialists have equipment to safely extract data despite physical issues.
3. If Warranted, Inquire with the Manufacturer About Potential Replacements
Nothing lasts forever, so damaged drives may need retirement. If it’s within the warranty window, check if the vendor honors replacements. Some may offer reduced-cost refurb units too.
4. Properly Dispose of the Device Afterwards
Diligently remove any personal info and find a certified electronics recycling center near you. Some accept old drives for free! This keeps hazardous materials safely out of landfills.
5. Invest in a Ruggedized Drive For the Future
For users prone to dropping things, consider a tougher casing like silicone-shelled drives. They withstand shock, vibration, dust and water exposure better (though not fully immune).
So in summary - physical damage introduces costly, complex headaches. Prevention is easier via common sense handling and high quality enclosures.
Tips to Prevent External Drive Failure in the Future
Speaking of prevention, let's wrap up with some quick pro tips:
- Eject Properly: Always use the eject icon before disconnecting external drives. This avoids file system corruption.
- Handle Carefully: Don't drop, crush, or rattle hard drives around. Their mechanical guts don't like that.
- Keep Cool: Ensure enough ventilation and airflow around the enclosure. Excess heat wears out components quickly.
- Use Quality Cabling: Cheap connectors can intermittently lose connection and cause issues. Spring for thicker, shorter cables.
- Turn Off When Transporting: Files getting jostled around while powered on is asking for problems.
There you have it - follow that advice and your external drives will thank you. Now let's answer some common questions for extra clarity.
FAQs and Troubleshooting Tips
Q: Will formatting fully erase my drive and all its data?
A: Yes! So make absolutely sure you’ve backed up anything important before you reformat a disk. After formatting no original files can be recovered.
Q: Why does my drive appear on a Windows PC but not on my Mac?
A: It’s likely formatted with the NTFS file system for Windows. To use it on macOS, reformat to APFS or exFAT through Disk Utility. Just remember this erases everything.
Q: First Aid in Disk Utility says "Overlapped extent allocation" - what should I do?
A: This error means Disk Utility found file system corruption. Run 'Repair Disk' 2-3 times to fix it. If problems persist, use the Terminal fsck command or third-party tools for a better chance at repair.
Final Thoughts
And that covers the basics for breathing new life into external drives on your Mac! With this handy guide, you now have the knowledge to troubleshoot basic issues, attempt more advanced repairs, and recover important data from failing drives.
The next time your external hard drive misbehaves, follow along step-by-step to get it working again. And don’t forget those preventative maintenance habits so you can keep your disks in top shape for years to come.
Donemax Data Recovery for Mac
Donemax Data Recovery for Mac is one of the best Mac data recovery software. It is easy-to-use and can help in recovering deleted, formatted, inaccessible or lost data from Mac HDD/SSD, external disk, USB drive, SD card, camera or other storage devices.
Related Articles
- Feb 19, 2025[9 Methods] Fix Corrupted, Damaged or Inaccessible SD Card Without Formatting
- Jun 17, 2024How to Fix Install Windows on Wrong Hard Drive?
- Apr 07, 2025Fix Hard Drive Spinning but Not Detected
- Feb 24, 2025How to Repair a Corrupted Android SD Card: A Complete Guide
- Jan 12, 20255 Solutions to Fix Disk is Unreadable on Mac
- Sep 23, 2024Fix Bad Sectors on HDD/SSD/USB Drive: A Comprehensive Guide

Contributing Writer
Maria
Maria is one of the senior writers & editors of Donemax who lives and works in Sydney, Australia. She loves PC, Mac and Internet Technology. She has 6 years of writing articles about data recovery on PC/Mac, disk cloning solution, data eraser and computer OS optimization, etc. She is also interested in testing various software and digital products.

Editor in chief
Gerhard Chou
In order to effectively solve the problems for our customers, every article and troubleshooting solution published on our website has been strictly tested and practiced. Our editors love researching and using computers and testing software, and are willing to help computer users with their problems
Hot Donemax Products
Clone hard drive with advanced clone technology or create bootable clone for Windows/Mac OS.

Completely and easily recover deleted, formatted, hidden or lost files from hard drive and external storage device.
Certified data erasure software - permanently erase data before selling or donating your disk or any digital device.