Written byStevenUpdated on Apr 15, 2025
9 Methods to Fix Apple Support 2002F on Mac
Approved byGerhard Chou
PAGE CONTENT:
If you've encountered the Apple Support 2002F error while trying to reinstall macOS through Internet Recovery, you're not alone. This error has become a common stumbling block for Mac users attempting to access Apple's recovery servers. Fortunately, it can usually be fixed with the right approach and a bit of patience.
In this guide, we'll dive deep into the Apple Support 2002F error - what it is, why it happens, and how to fix it step by step.
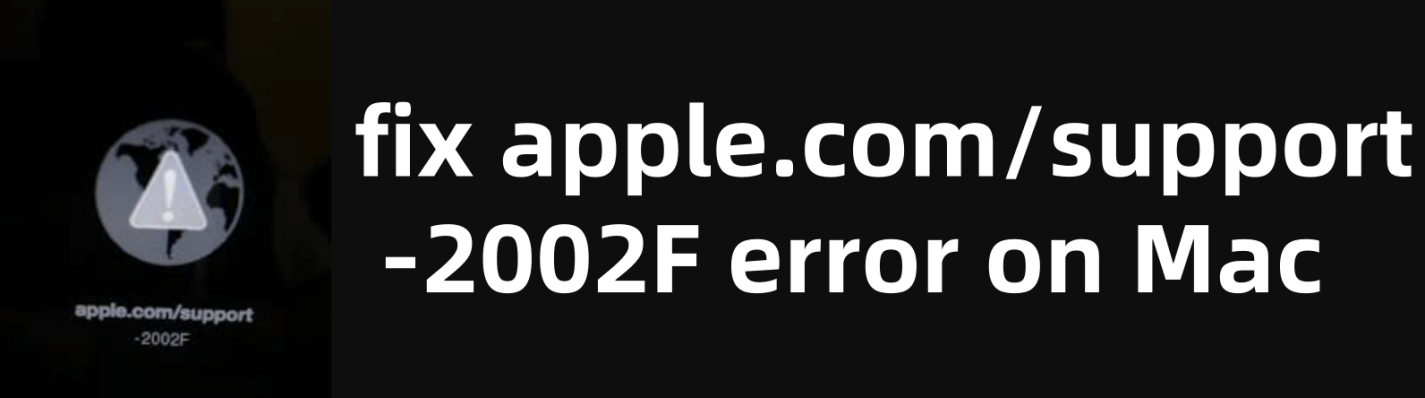
What Is the Apple Support 2002F Error?
The 2002F error code appears when a Mac fails to connect properly to Apple's servers during Internet Recovery mode. Typically, it looks something like this:
apple.com/support -2002F
This means that your Mac couldn't complete the recovery process and is stuck. The root cause is generally related to network connectivity or hardware incompatibility, but there could be multiple reasons, including:
- Weak or unstable Wi-Fi connection
- Incompatible or faulty hardware (e.g., non-Apple SSD or RAM)
- Network security settings blocking communication
- Problems with DNS configuration
- Corrupt NVRAM/PRAM settings
Understanding these root causes helps us take a systematic approach to resolving the issue.
Preliminary Checks Before Troubleshooting Apple Support 2002F Error
Before diving into advanced solutions, start with these basic checks:
▪️ Ensure a Strong Internet Connection
Internet Recovery heavily relies on stable internet. A weak Wi-Fi signal is one of the main culprits behind the 2002F error. Move closer to the router, restart it, or use a faster network.
▪️ Use a Wired Ethernet Connection
If available, use a Thunderbolt-to-Ethernet or USB-C-to-Ethernet adapter and connect directly to your router. This often bypasses Wi-Fi issues.
▪️ Check Hardware Compatibility
Have you recently upgraded your RAM or installed a third-party SSD? Some non-Apple hardware can cause recovery to fail. Try reverting to the original hardware if possible.
▪️ Disconnect Peripherals
Remove all unnecessary external devices (e.g., USB drives, hubs, external keyboards). Sometimes peripherals interfere with recovery processes.
9 Methods to Fix Apple Support 2002F Error on Mac
Method 1: Reset NVRAM/PRAM
Resetting NVRAM and PRAM can clear out corrupt system settings that might interfere with recovery.
Steps:
- Turn Off your Mac.
- Switch it back on and press and hold right away: Command + Option + P + R
- Continue to hold the keys for roughly 20 seconds.
- Release and let your Mac reboot.
Once the system restarts, try launching Internet Recovery again by pressing Command + Option + R during startup.
Method 2: Use a Wired Ethernet Connection
Wi-Fi can be unstable during macOS Internet Recovery, especially on older Mac models or when using enterprise-level routers with strict settings.
Why This Works:
- Ethernet provides a more stable, direct connection to the internet.
- It reduces packet loss and latency that could interfere with recovery.
💡 Tip:
If your Mac doesn't have an Ethernet port, use an adapter like Apple's Thunderbolt to Ethernet Adapter or a USB-C to Ethernet dongle.
Once connected, press and hold Command + Option + R to restart the Mac and boot into Internet Recovery.
Method 3: Check and Update Network Settings
In many cases, the 2002F error is due to network-level issues, especially when the router has security filters or firewall settings that block Apple's servers.
What to Check:
- DHCP should be enabled in router settings.
- DNS servers can be switched to Google DNS:
- 8.8.8.8 and 8.8.4.4
- Disable firewalls or MAC address filtering temporarily.
- Ensure ports 80 (HTTP) and 443 (HTTPS) are open.
💡 Bonus Tip:
Try using a mobile hotspot. This allows you to bypass complex home or corporate network setups.
Method 4: Boot Using a macOS Bootable USB Installer
If Internet Recovery keeps failing and you're stuck with the 2002F error, using a bootable USB installer can be a reliable and powerful alternative. This method allows you to bypass the need for Apple's recovery servers entirely and perform a clean macOS installation using local files stored on a USB drive.
What You'll Need:
- A working Mac (to create the installer)
- A USB flash drive with a minimum capacity of 16GB
- A compatible macOS installer (Big Sur, Monterey, Ventura, etc.)
💡 Note: Make sure the version of macOS you're downloading is compatible with your target Mac. For example, macOS Ventura cannot be installed on a 2015 MacBook Air.
Step 1: Download the macOS Installer
On a working Mac:
- Open the App Store or go to Apple's official download links.
- 2Search for the version of macOS you need (e.g., macOS Monterey).
- Click Download. It will appear in your Applications folder as:
- Install macOS Monterey.app or Install macOS Ventura.app, etc.
Do not launch the installer after download.
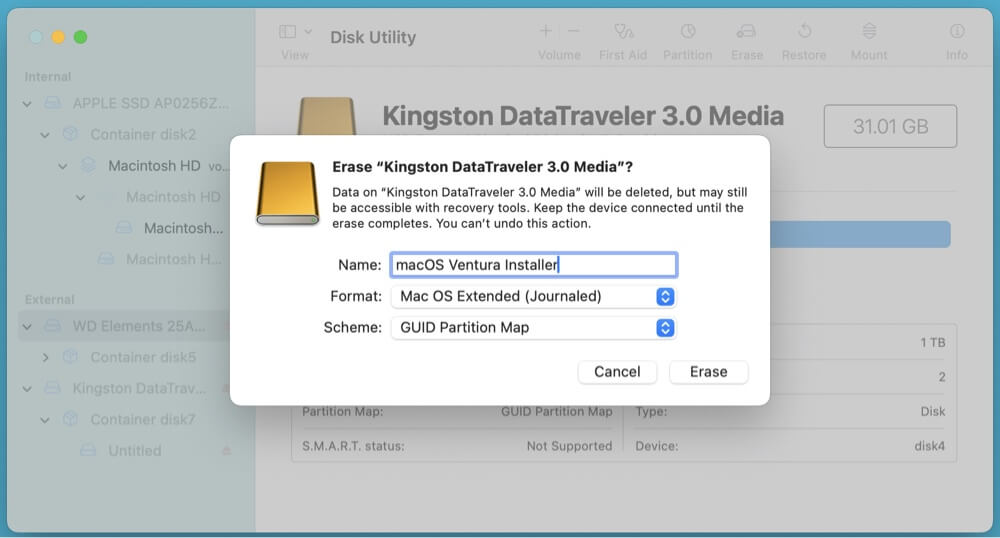
Step 2: Format the USB Drive
Before making the USB bootable, it must be properly formatted.
- Attach the Mac to the USB flash drive.
- Open Disk Utility from Utilities via Applications.
- From the sidebar, choose your USB drive.
- Click Erase and use the following settings:
- Name: MyVolume (or any name you'll recognize)
- Format: Mac OS Extended (Journaled)
- Scheme: GUID Partition Map
- Click Erase and wait for the process to complete.
![Apple Support 2002F error]()
Step 3: Create the Bootable Installer Using Terminal
Now, open Terminal from Utilities via Applications and use the following command:
For macOS Ventura:
sudo /Applications/Install\ macOS\ Ventura.app/Contents/Resources/createinstallmedia --volume /Volumes/MyVolume
For macOS Monterey:
sudo /Applications/Install\ macOS\ Monterey.app/Contents/Resources/createinstallmedia --volume /Volumes/MyVolume
Replace MyVolume with the actual name of your USB drive if different.
Press Enter, type your Mac password (you won't see it), and confirm by typing Y when prompted.
This process takes 10–20 minutes. When it's done, you'll have a bootable macOS installer ready to use.
Step 4: Boot the Problem Mac Using the USB Installer
Now that your installer is ready:
- Insert the bootable USB drive into the Mac that’s showing the 2002F error.
- Shut down the Mac completely.
- Press and hold the Option (⌥) key as soon as you turn it back on.
- After a few seconds, the Startup Manager will appear.
- Select the USB drive (usually labeled Install macOS Ventura or similar) using arrow keys.
- Press Return to start the installation process.
From here, you can:
- Use Disk Utility to erase or reformat your internal drive.
- Choose Install macOS to start a fresh installation.
Important Notes:
- Make sure to back up your data before erasing your internal drive.
- If you're installing on a new or replaced SSD, ensure the disk is formatted as APFS (for modern macOS versions) using Disk Utility.
- Some T2 chip-enabled Macs may require you to enable external boot in Startup Security Utility. To access this, you need to boot into macOS Recovery from a bootable installer and choose Utilities > Startup Security Utility.
Why This Method Works:
- It removes reliance on your current Wi-Fi or Apple's recovery servers.
- It works even when Internet Recovery is corrupted or blocked.
- It gives you complete control over which macOS version is installed.
This method is highly recommended not only for fixing the 2002F error, but also when:
- You want to clean install macOS.
- You're upgrading or downgrading to a different version.
- You're replacing a drive and need to install macOS on a blank disk.
You also can use third-party software - such as Donemax Data Recovery for Mac to create an USB installer for macOS.
Method 5: Run Apple Diagnostics
If you suspect hardware is the issue (e.g., failing SSD, RAM, or logic board), use Apple Diagnostics to check for problems.
How to Run Apple Diagnostics:
- Disconnect all external devices.
- Turn Off the Mac.
- Press and hold the D key as soon as you turn it on.
![Apple Support 2002F error]()
- Apple Diagnostics will start and scan your hardware.
- Review the error codes or results.
If hardware issues are detected, schedule a repair appointment at an Apple Store or Authorized Service Provider.
Method 6: Reinstall Original Hardware (If Applicable)
Aftermarket components such as non-Apple SSDs or memory modules can prevent macOS from booting or accessing Internet Recovery.
What to Do:
- Reinstall the original hard drive or SSD that came with your Mac.
- Revert to Apple-certified RAM if you’ve recently upgraded.
- Once the system is restored, you can try reinstalling the newer components after OS installation.
In many cases, Apple's firmware updates are incompatible with some third-party hardware, particularly when using T2-secured Macs.
Method 7: Use Target Disk Mode With Another Mac
If you have access to another Mac, Target Disk Mode can help you reinstall macOS or access files directly.
Steps to Use Target Disk Mode:
- Connect the two Macs via Thunderbolt or USB-C.
- On the non-working Mac, turn it on and hold T key.
![Apple Support 2002F error]()
- It should appear as an external drive on the working Mac.
- Use the working Mac to install macOS on the target Mac's drive.
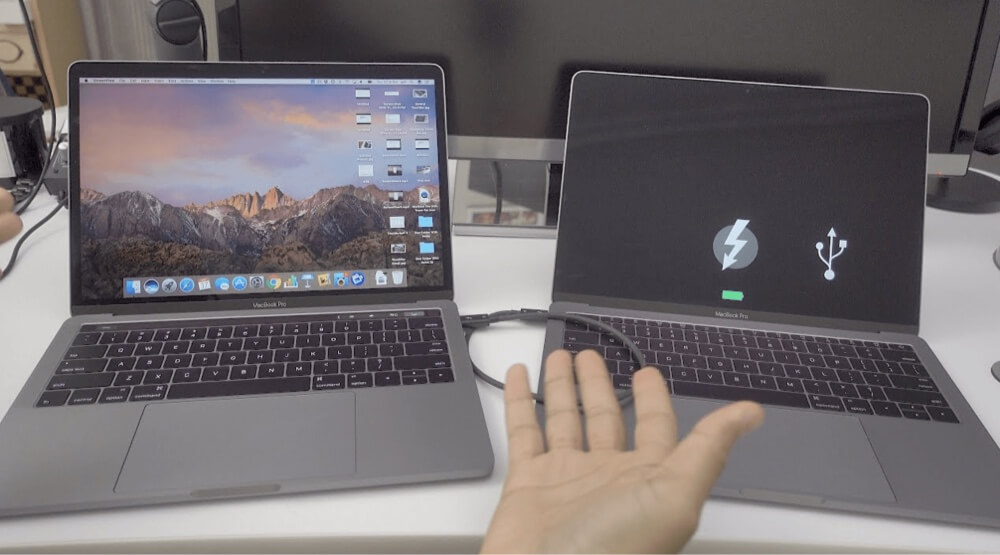
You can also copy files before performing a clean install.
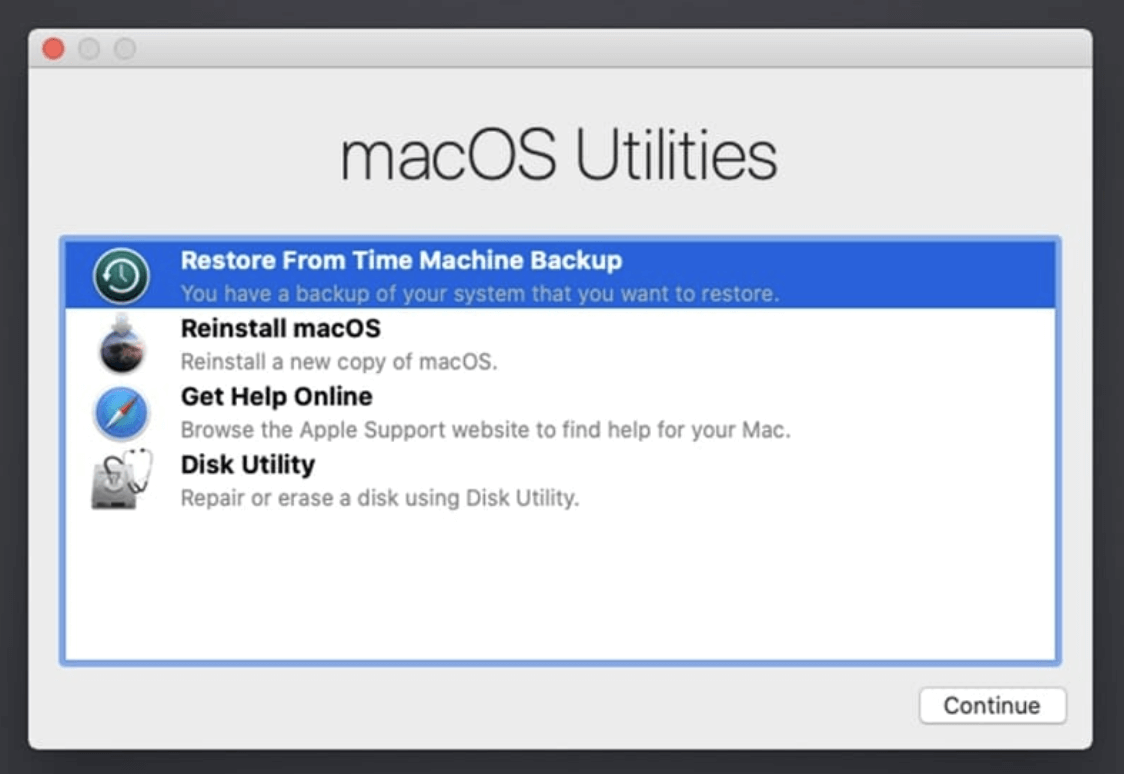
Method 8: Use Time Machine Backup (If Available)
If you’ve previously created a Time Machine backup, you can restore your Mac to a previous state without relying on Internet Recovery.
How to Restore From Time Machine:
- Boot into macOS Recovery using Command + R.
- Choose Restore From Time Machine Backup.
![Apple Support 2002F error]()
- Connect your Time Machine drive and follow the prompts.
Make sure the backup is recent and free from issues to prevent restoring corrupted system files.
Method 9: Visit Apple Support or Authorized Repair Center
If all else fails and you continue seeing the 2002F error, it’s time to seek professional assistance. There could be a deeper hardware failure or firmware corruption.
What Apple Might Do:
- Replace faulty components.
- Reflash system firmware.
- Help you reinstall macOS using Apple's internal tools.
Be sure to back up your data beforehand if the Mac is still accessible, as repairs may require drive formatting.
💡 Bonus Tips:
- Avoid using VPNs when attempting Internet Recovery - they may block access to Apple servers.
- Try holding Command + R (local recovery) instead of Command + Option + R if you've previously installed macOS.
- Update your router firmware if you consistently face recovery or connection issues across multiple devices.
Recover Lost Data After Fixing Apple Support 2002F Error on Mac
If you have lost data due to fixing Apple Support 2002F error on Mac, you can use Mac data recovery software - such as Donemax Data Recovery for Mac to get the lost data back.
Step 1. Download and install Donemax Data Recovery for Mac on your Mac.
Step 2. Open Donemax Data Recovery for Mac, then select the Macintosh HD to start data recovery.

Step 3. Click on Scan button to deeply scan the Macintosh HD to find all recoverable files.

Step 4. Once the scan is completed, you can preview all recoverable files. Then select the wanted files, click on Recover button to save them.

Conclusion
The Apple Support 2002F error may be frustrating, but it's often fixable using a combination of internet-related tweaks and recovery workarounds. Start with the basics - checking your Wi-Fi or switching to Ethernet - then move on to more involved solutions like creating a USB installer or resetting NVRAM.
If your Mac continues to throw the 2002F error despite these steps, it could be pointing to a hardware issue that needs professional attention.
By following the detailed troubleshooting methods in this guide, you'll be well-equipped to fix the 2002F error and get your Mac back up and running smoothly.
Donemax Data Recovery for Mac
Donemax Data Recovery for Mac is one of the best Mac data recovery software. It is easy-to-use and can help in recovering deleted, formatted, inaccessible or lost data from Mac HDD/SSD, external disk, USB drive, SD card, camera or other storage devices.
Related Articles
- Dec 18, 2024Unable to Write Data to USB Drive or SD Card on Mac? Here's How to Fix It
- Jul 15, 2025Fix Corrupted exFAT File System: Full Guide for Windows and macOS
- Jan 15, 2025Mac Won't Boot After Restoring from Time Machine Backup: Troubleshooting Guide
- Apr 15, 20257 Methods to Fix HDD/SSD Shows Up AS Unknown Device in Device Manager
- Mar 31, 2025Can't Find Time Machine Icon on Apple Menu Bar? 7 Methods to Fix It
- Nov 19, 2024Fix 'You cannot upgrade this version of macOS because a new version is installed' Error on Mac

Contributing Writer
Steven
Steven has been a senior writer & editor of Donemax software since 2020. He's a super nerd and can't imagine the life without a computer. Over 6 years of experience of writing technical solutions and software tesing, he is passionate about providing solutions and tips for Windows and Mac users.

Editor in chief
Gerhard Chou
In order to effectively solve the problems for our customers, every article and troubleshooting solution published on our website has been strictly tested and practiced. Our editors love researching and using computers and testing software, and are willing to help computer users with their problems
Hot Donemax Products

Clone hard drive with advanced clone technology or create bootable clone for Windows/Mac OS.

Completely and easily recover deleted, formatted, hidden or lost files from hard drive and external storage device.

Certified data erasure software - permanently erase data before selling or donating your disk or any digital device.