Written byChristinaUpdated on Jun 24, 2025
How to Use Time Machine on macOS Sequoia?
Approved byGerhard Chou
Before we start: Time Machine is a macOS built-in tool for data backup on Mac. It's useful to back up data and system with multiple versions. Donemax Disk Clone for Mac offers another directly backup method. It clone the macOS drive and generate a full and bootable clone.
Backups are one of the most critical tasks for anyone using a computer, whether for work or personal use. Data loss can occur, from accidental deletion to software malfunctions and hardware failures. macOS users are in luck because Apple has built a robust and reliable backup tool - Time Machine.
On macOS Sequoia, Time Machine is still a trusted backup solution that allows you to preserve your data seamlessly. We'll explain how to use Time Machine on macOS Sequoia in this article.
What is Time Machine?
Time Machine is macOS's native backup utility. The tool provides a straightforward and user-friendly method for backing up your data. It automatically creates incremental backups of your files on Mac. Also, you can restore specific files, folders, or even your entire system when needed.
The core benefits of Time Machine include:
- Automation: Time Machine runs automatically in the background. If you configured sheduled backups, it will back up your system hourly, daily, and weekly without requiring user intervention.
- Ease of Use: The interface is simple and intuitive, even for non-technical users.
- Full System Restoration: In case of hardware failure, you can restore your entire system, including macOS, apps, and files.
- Compatibility: Time Machine works seamlessly with external drives, network-attached storage (NAS), and Time Capsule for wireless backups.
Now that you understand what Time Machine is, let's dive into how to set it up on macOS Sequoia.
Preparing for Time Machine Backup on macOS Sequoia
Before you begin setting up Time Machine, you'll need an external storage device. Time Machine backups will require a significant amount of space. Make sure your external drive has at least twice the capacity of your Mac's internal storage. This ensures that you have enough room for multiple versions of your files.
1. Choose an External Drive
Time Machine requires an external storage device to store your backups. This can be an external hard drive, SSD, or a network drive that supports macOS backups. Ideally, your external drive should be large enough to accommodate multiple backups of your system. It means selecting a drive with ample storage capacity - at least 1TB or more depending on the size of your internal drive.
2. Format the Drive
For Time Machine to work properly, the external drive must be formatted as APFS (Apple File System) or HFS+ (Mac OS Extended). macOS Sequoia defaults to APFS and it might need to format the old drive.
Here's how to format your drive:
Step 1. Launch Disk Utility by selecting it from Applications' Utilities folder.
Step 2. From the sidebar, choose the external drive.
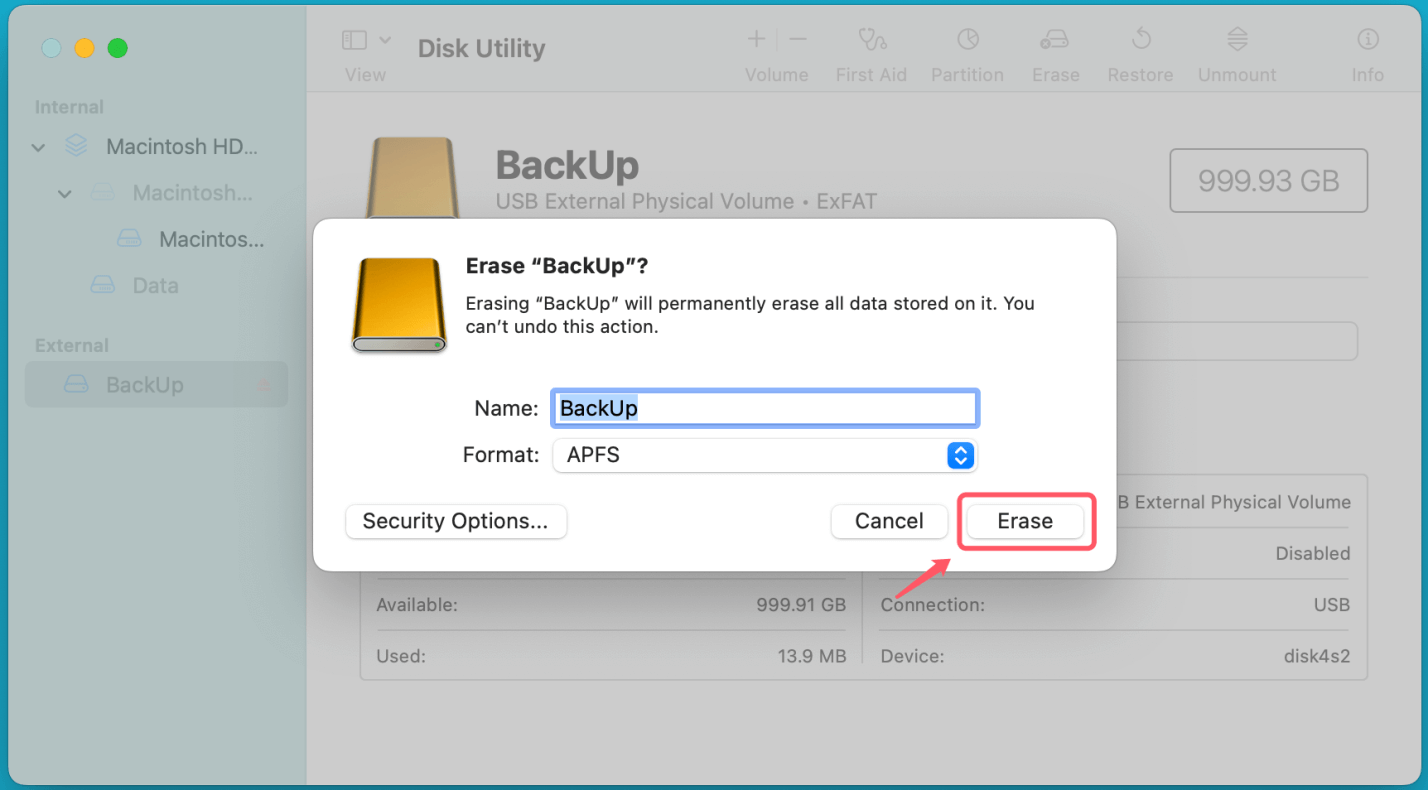
Step 3. Select APFS from the format options by clicking Erase.
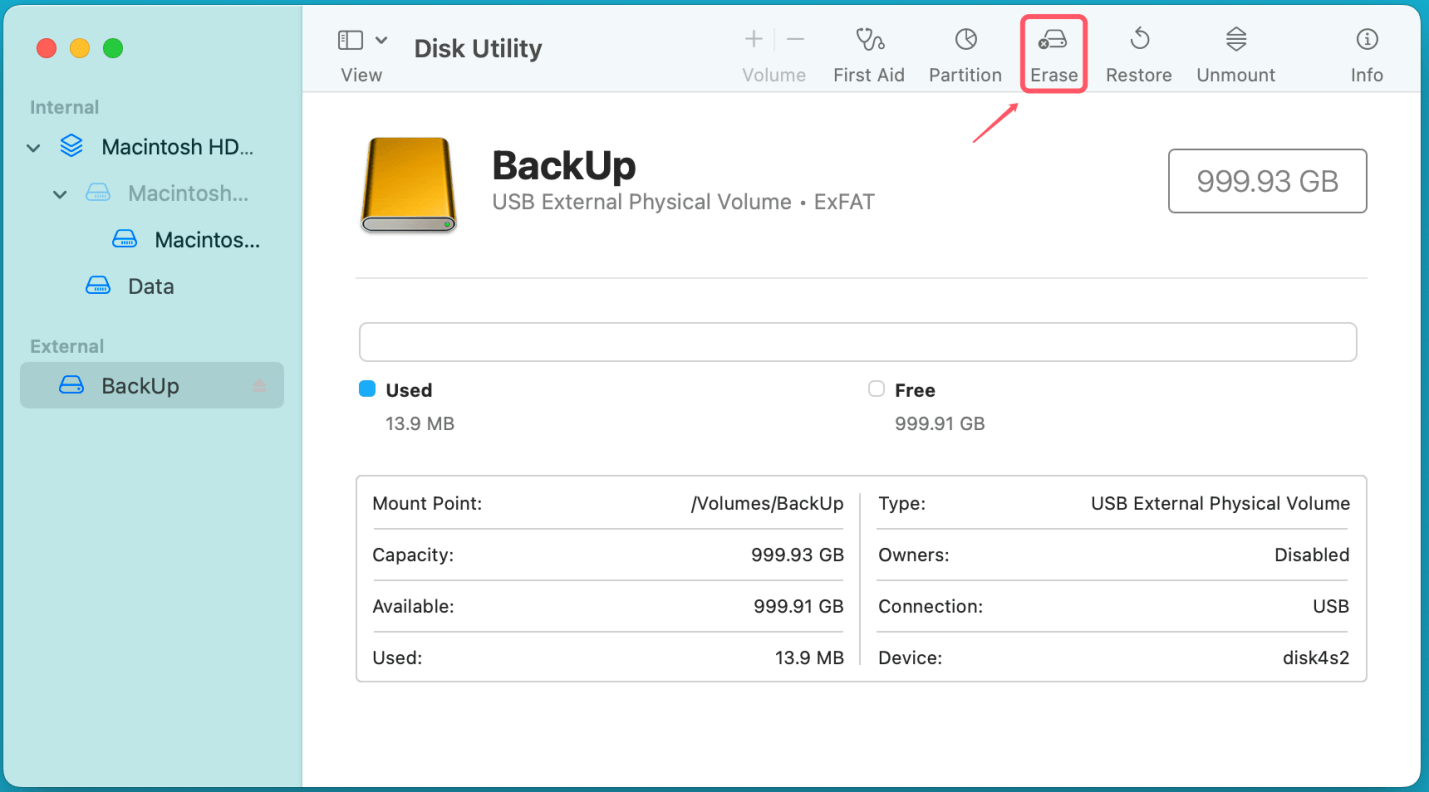
Step 4. Name the drive and click Erase to confirm.
Once your external drive is ready, you can proceed to configure Time Machine.
Setting Up Time Machine on macOS Sequoia
Setting up Time Machine is a breeze on macOS Sequoia. Follow these steps to get started:
1. Connect Your External Drive
Connect your external disk to your Mac after formatting it. macOS Sequoia ought to recognize the drive immediately, asking if you wish to utilize it for Time Machine backups. You can manually set up Time Machine from System Settings if this popup doesn't show up.
2. Enable Time Machine
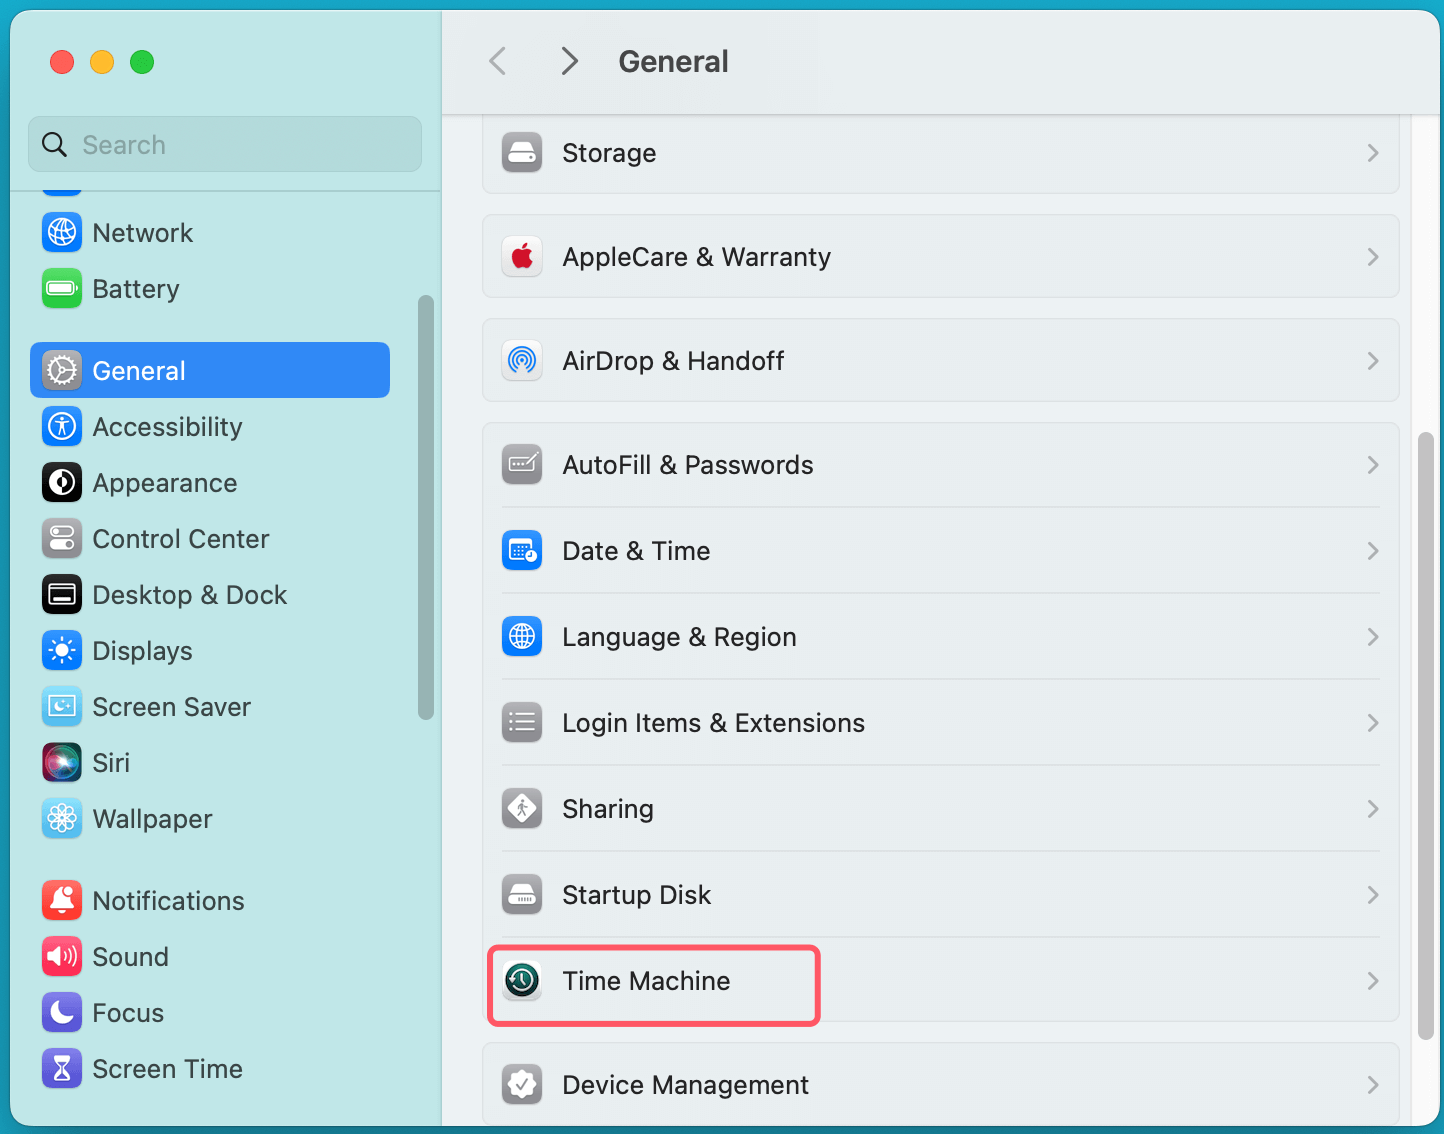
Step 1. Select System Settings from the menu by clicking the Apple logo in the upper-left corner of the screen.
Step 2. In the sidebar, choose General, scroll down and select Time Machine.
Step 3. Select the backup disk in step three. (Click + to add a backup disk.)
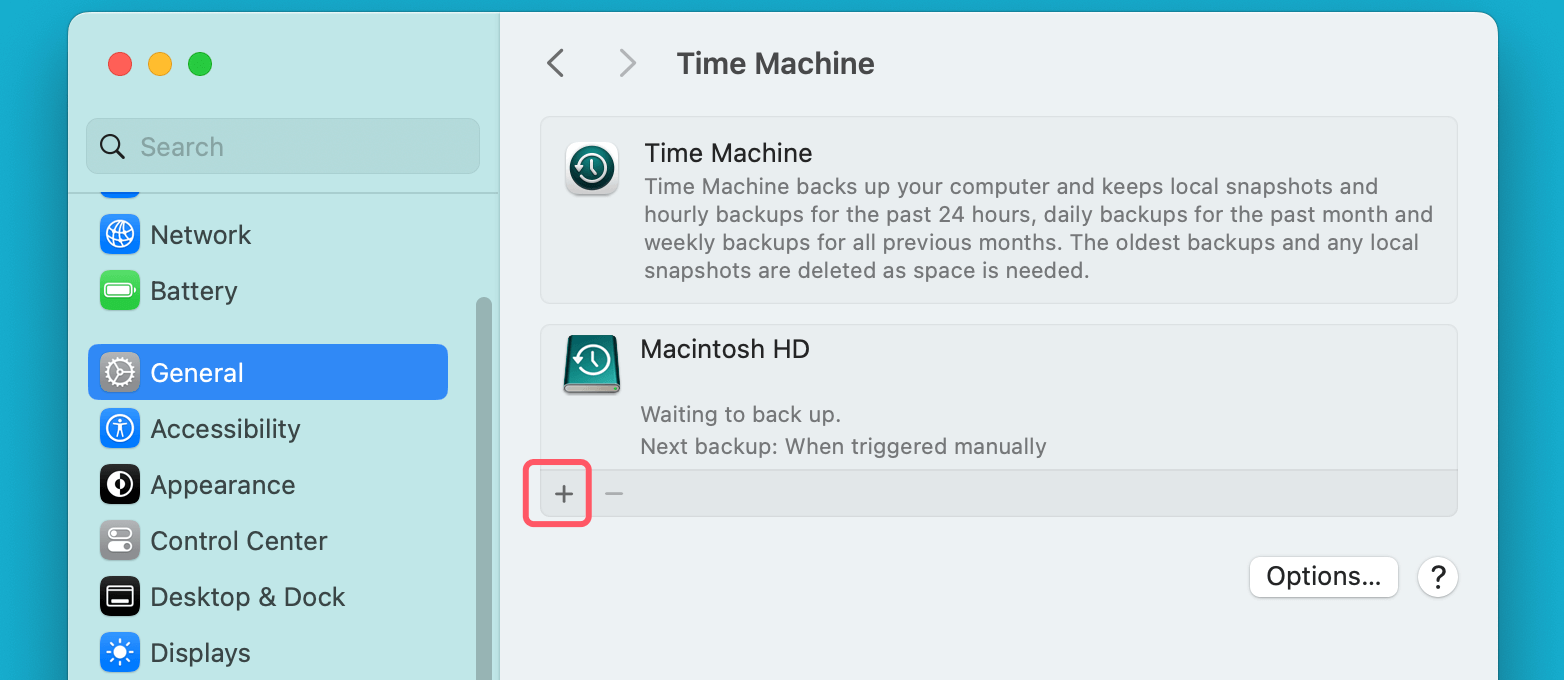
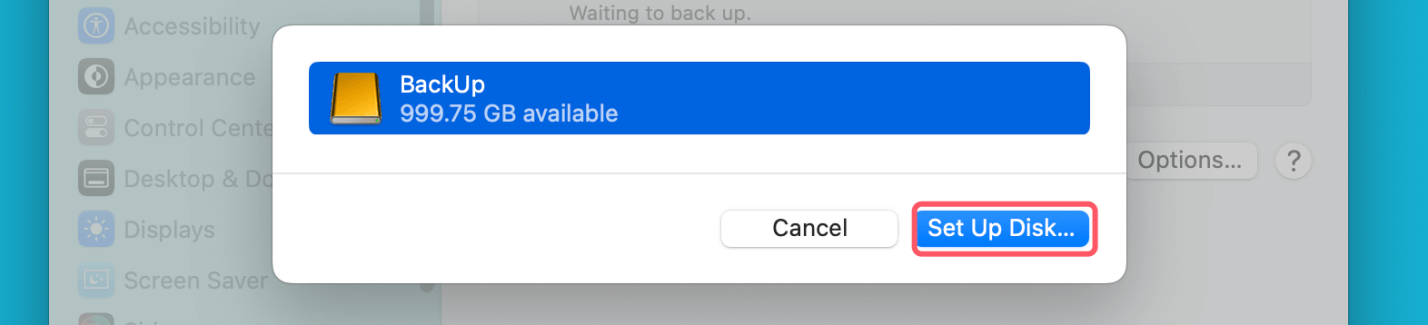
Step 4. Click Set Up Disk after selecting your attached external drive from the list.
3. Configure Backup Options
Time Machine offers several configuration options that can help you manage how backups are created:
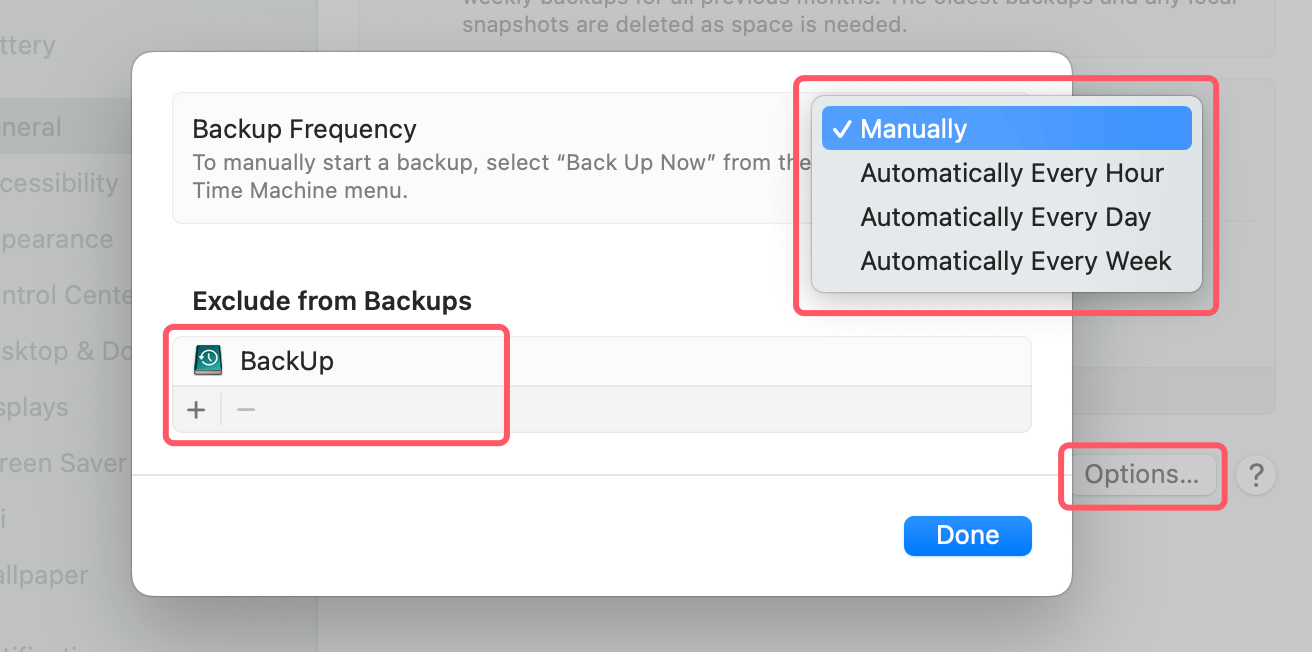
- Automatic Backups: By default, Time Machine creates automatic backups every hour. You can toggle this feature on or off.
- Encryption: If you want to protect your backups with a password, you can choose to encrypt the backup disk.
- Exclusions: Time Machine backs up almost everything on your Mac by default. However, you can exclude specific files, folders, or applications to save space. Click on Options and use the + button to add items you don't want to back up.
![Configure Backup Options]()
It may take some time for Time Machine to create your first backup, depending on the size of your data. Future backups will be incremental, meaning they will only back up changes since the last backup, making them much quicker.
Managing Time Machine Backups
Time Machine is designed to be a "set it and forget it" type of tool. However, you might occasionally need to manage or monitor the backups to ensure everything is working smoothly.
1. Manual Backups
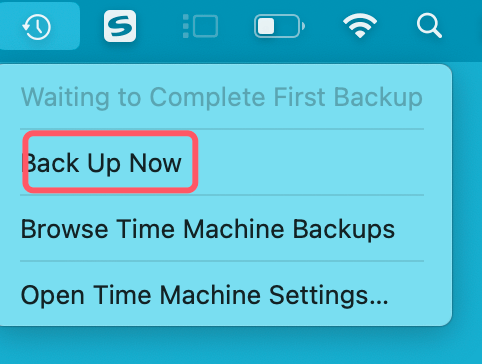
If you've made significant changes to your system or files, you may need to back up it immediately. You can manually initiate a backup outside of the automatic schedule:
- Click on the Time Machine icon in the menu bar and select Back Up Now.
![Manual Backups]()
2. Backup Retention
Time Machine automatically manages the storage on your backup disk. It maintains daily backups for the last month, weekly backups for the last twelve months, and hourly backups for the last twenty-four hours. Time Machine will automatically remove the oldest backups to create place for fresh ones if your backup disk fills up too quickly.
3. Excluding Files from Backup
If you don’t want to back up certain large files or folders, you can exclude them from Time Machine:
- Open System Settings and go to Time Machine.
- Select Options, then add the files or directories you wish to exclude by clicking the Add button.
Restoring Files Using Time Machine
One of the most valuable features of Time Machine is to restore individual files or entire system configurations. Here's how you can restore files or your system using Time Machine on macOS Sequoia.
1. Restoring Individual Files
If you've deleted or modified a file by mistake, you can easily restore it from a Time Machine backup.
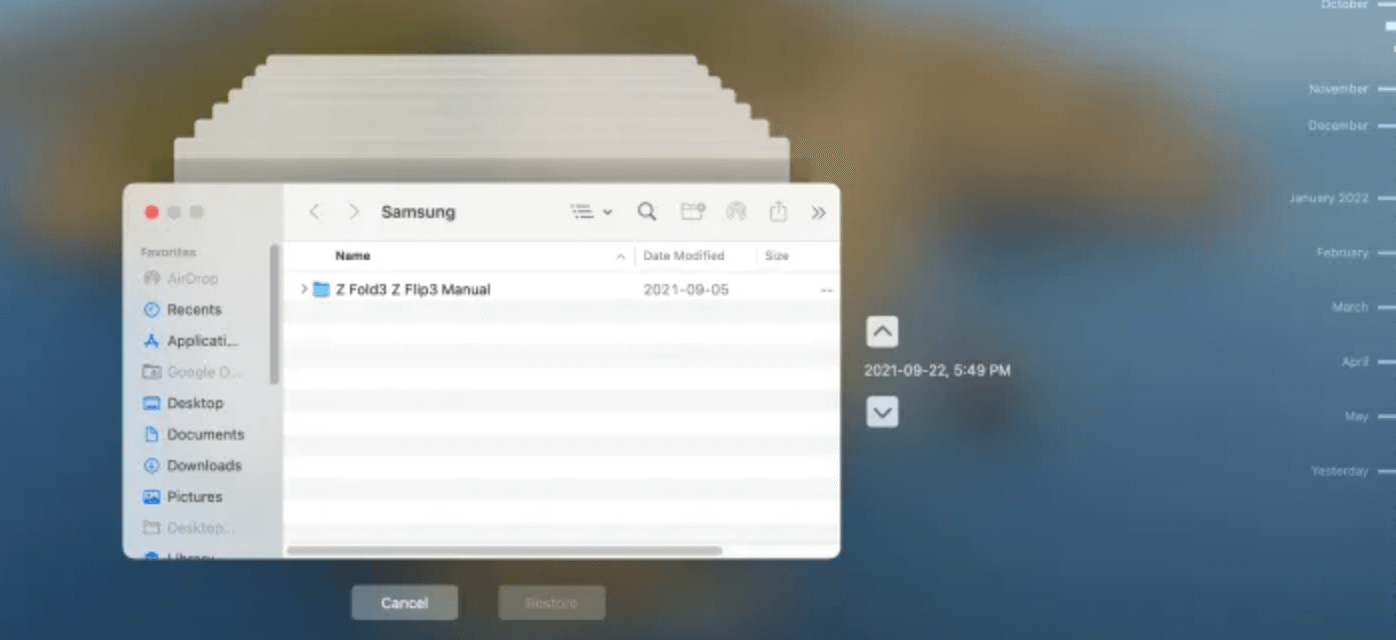
Step 1. Choose Enter Time Machine by clicking the Time Machine symbol in the navigation bar.
Step 2. Locate the file's existence point using the timeline on the right side of the screen.
Step 3. Once you locate the file, select it and click Restore.
2. Restoring the Entire System
You may need to restore your entire macOS some times. For example, after replacing a failed hard drive or migrating to a new Mac. Time Machine has you covered:
Step 1. Restart your Mac, press and hold Power button until it boots into macOS Recovery mode. Choose Options and click on Continue button.

Step 2. In the macOS Recovery window, choose Restore from Time Machine Backup.
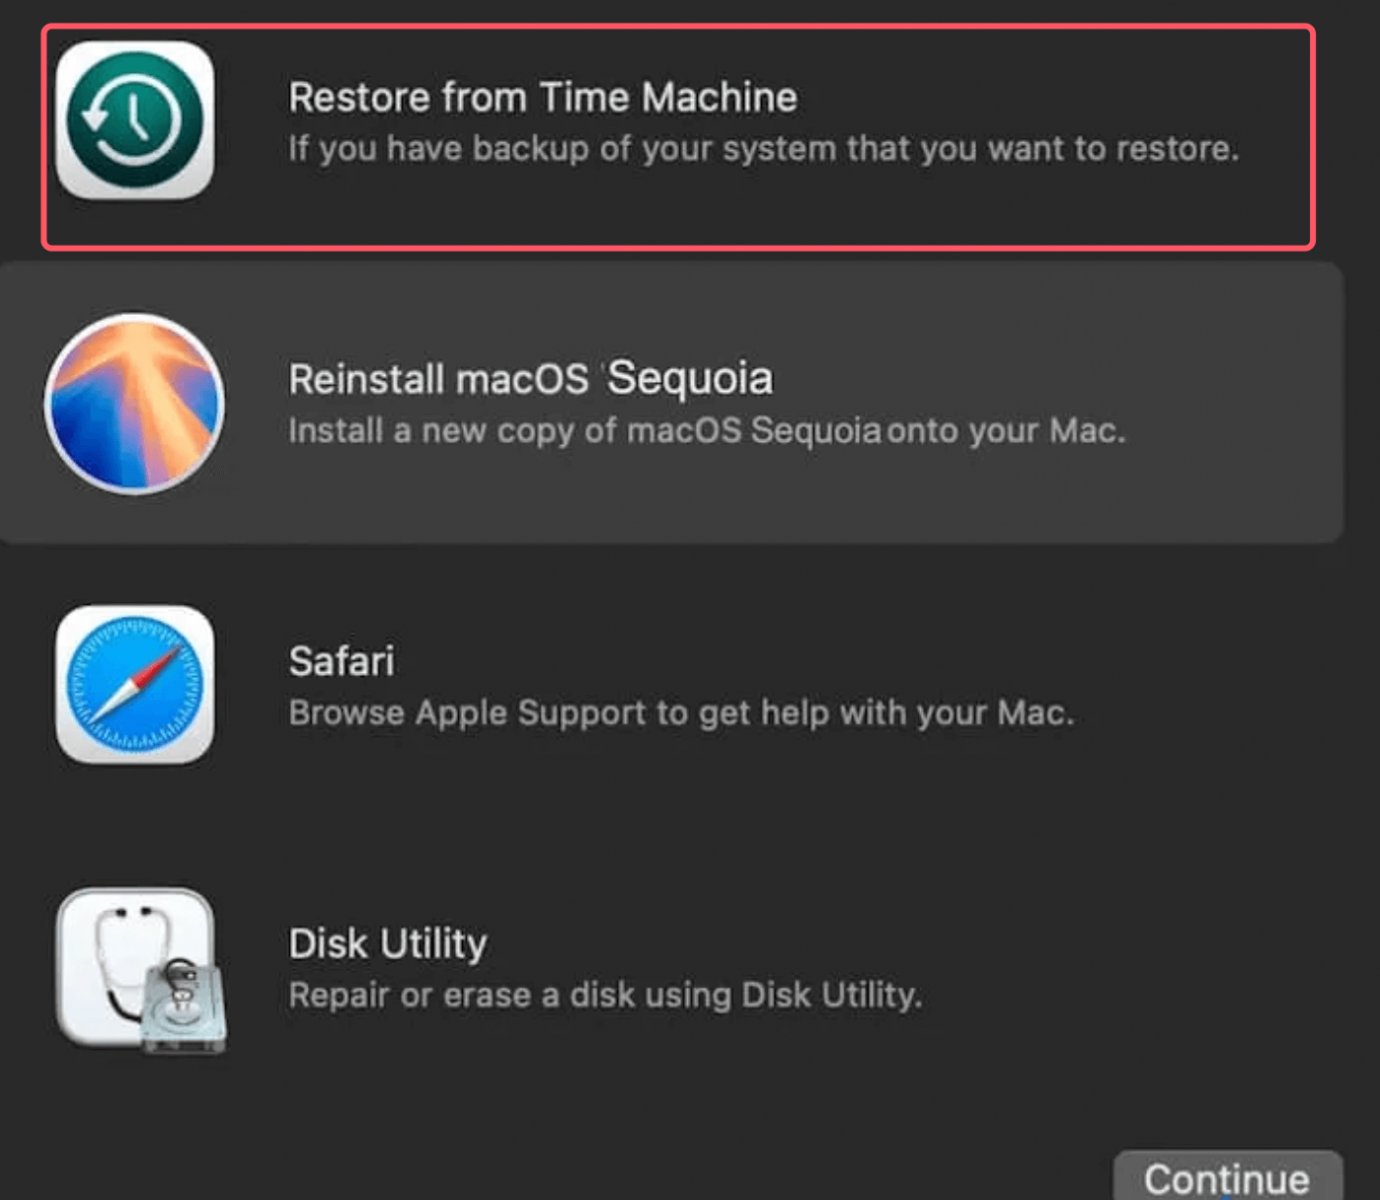
Step 3. Follow the on-screen instructions to choose the backup and restore your system.
After restoring from Time Machine, you’ll be able to bring your Mac back to its previous state. It includes all applications, system settings, and personal files.
Tips for Optimizing Time Machine on macOS Sequoia
While Time Machine is largely automatic, a few tips you can follow to ensure it's running smoothly and efficiently.
1. Regularly Check Your Backup Disk
Even though Time Machine runs automatically, it's a good idea to occasionally check the status of your backups. You can do this by:
- Selecting Open Time Machine Settings by clicking on the Time Machine icon in the menu bar.
- Ensure the Latest Backup and Next Backup fields are updating as expected.
2. Monitor Disk Health
Since Time Machine relies on an external disk, it's crucial to monitor the health of that drive. Over time, disks can fail, especially traditional hard drives. Consider using Disk Utility to check the status of your backup disk regularly.
3. Consider Multiple Backups
For even greater security, consider keeping multiple Time Machine backups. You can rotate between two or more external drives for backups. Also, you can use a network-attached storage (NAS) device to store backups wirelessly.
Troubleshooting Common Time Machine Issues on macOS Sequoia
Even though Time Machine is reliable, users may occasionally encounter problems. Here are some common issues and how to resolve them:
1. Time Machine Doesn't Recognize the Backup Disk
- Ensure the drive is properly formatted (APFS or HFS+).
- Disconnect and reconnect the drive.
- Restart your Mac and try again.
2. Backup Fails to Complete
- Check your external drive for errors using Disk Utility.
- Ensure there is enough space on the drive.
- Exclude large files temporarily and try again.
3. Slow Backups
- The initial backup can take several hours depending on the amount of data.
- Subsequent backups should be faster. If they remain slow, try connecting your external drive directly to a high-speed USB-C or Thunderbolt port.
Best Alternative to Time Machine on macOS Sequoia
Disk cloning software is another tool can help you back up data on macOS Sequoia. It even can help in creating bootable clone backup for macOS Sequoia.
Step 1. Download and install the best Mac cloning software - Donemax Disk Clone for Mac. It is fully compatible with macOS Sequoia.
Donemax Disk Clone for Mac
- Copy data, create disk image, or clone system drive on Mac
- Make bootable clone backup for macOS.
- Compatible with macOS Sequoia, Tahoe, and old versions.
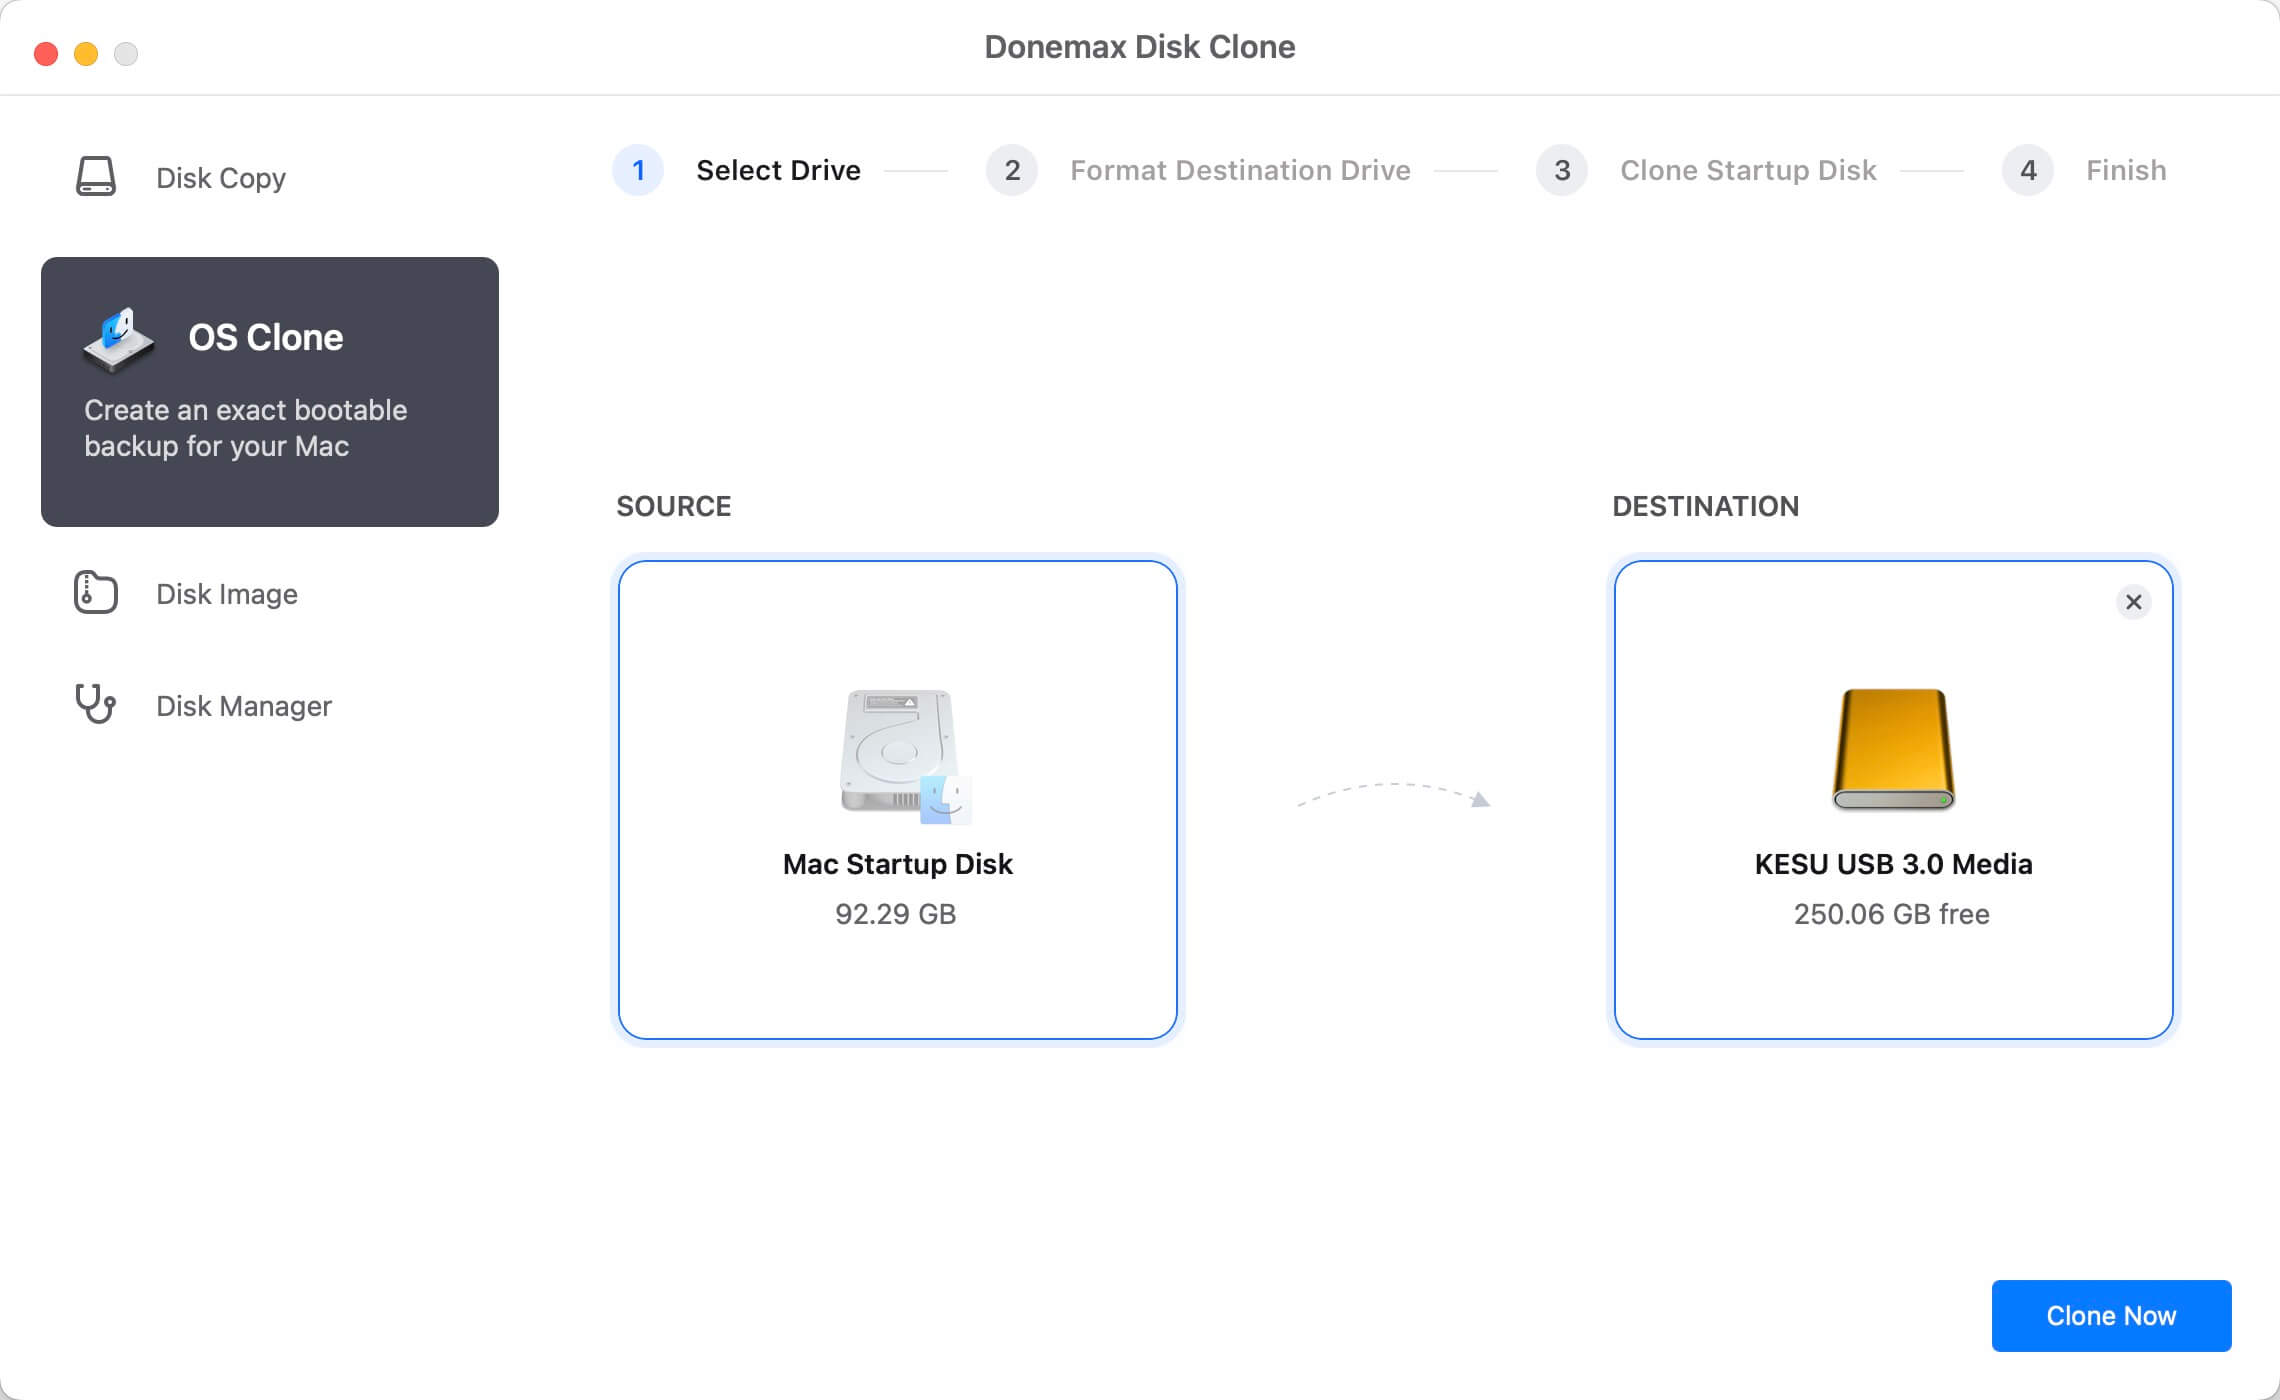
Step 2. Open Donemax Disk Clone for Mac, choose OS Clone mode. This mode can clone everything from Mac's internal disk to the external hard drive.

Step 3. Select the external hard drive as the destination drive, click on Clone Now button. It will clone macOS Sequoia, settings, apps and user data and other data to the external hard drive. It can ensure to create a full bootable clone backup.
💡 Note: After cloning the macOS Sequoia to the external drive, you can connect the external hard drive to your Mac. Set the external drive as the startup disk so that your Mac can boot from the external hard drive.
Conclusion
Backing up your data is essential, and Time Machine on macOS Sequoia makes it easy, automatic, and reliable. With the right setup, you can ensure that your files/applications and entire system are safe. Whether you're restoring a single file or your entire Mac, Time Machine has you covered.
Set up Time Machine today and enjoy peace of mind knowing your important data is secure.
Donemax Disk Clone for Mac
An award-winning disk cloning program to help Mac users clone HDD/SSD/external device. It also can create full bootable clone backup for Macs.
Related Articles
- May 13, 2025How to Clone a M1 Chip Mac to an External Hard Drive?
- Nov 11, 2024How to Copy a Macintosh Disk for Data Backup and Transfer?
- Jul 14, 2023How to Transfer Data Between Mac and Windows PC?
- Feb 02, 2026How to Restore MacBook to Previous Date Without Time Machine?
- Feb 22, 2024Step-by-step Guide: Clone macOS Sonoma to An External Hard Drive
- Jan 01, 2024How to Create Disk Image Backup on macOS Sonoma?

Contributing Writer
Christina
Christina is the senior editor of Donemax software who has worked in the company for 4+ years. She mainly writes the guides and solutions about data erasure, data transferring, data recovery and disk cloning to help users get the most out of their Windows and Mac. She likes to travel, enjoy country music and play games in her spare time.

Editor in chief
Gerhard Chou
In order to effectively solve the problems for our customers, every article and troubleshooting solution published on our website has been strictly tested and practiced. Our editors love researching and using computers and testing software, and are willing to help computer users with their problems