Written byStevenUpdated on Apr 08, 2025
How to Clone Time Machine Drive to A New Drive?
Approved byGerhard Chou
Before we start: With the macOS built-in tools, like Disk Utility, Terminal, you can try to clone Time Machine drive or the backup data to another drive. Also, you can manually copy the data or use Donemax Disk Clone for Mac to copy and transfer the data to a new drive easily.
PAGE CONTENT:
Time Machine is an essential backup solution built into macOS, designed to automatically back up your files, system settings, and applications. It allows users to restore individual files or an entire system in case of data loss or hardware failure. However, there are situations where you may need to clone your Time Machine drive to a new one or manually copy your backups:
- Upgrading to a larger drive – If your current backup drive is running out of space, you may want to transfer your backups to a larger drive.
- Replacing a failing drive – If your backup disk is showing signs of failure, cloning it to a new drive can prevent data loss.
- Migrating backups to a new drive – If you want to use a different external drive for your Time Machine backups while keeping existing backups intact.
In this guide, we will cover two primary methods:
- Cloning a Time Machine drive to a new drive using Disk Utility and Terminal.
- Copying Time Machine backups to a new drive manually, using rsync command, or copy with software.
By following these methods, you can ensure a smooth transition without losing your valuable backups.
Method 1: Cloning a Time Machine Drive to a New Drive
Cloning a Time Machine drive creates an exact replica of your backup disk, ensuring that all your previous backups are transferred without any modifications. This is the preferred method if you want to seamlessly continue using Time Machine without any reconfiguration.
Step 1: Preparing the New Drive
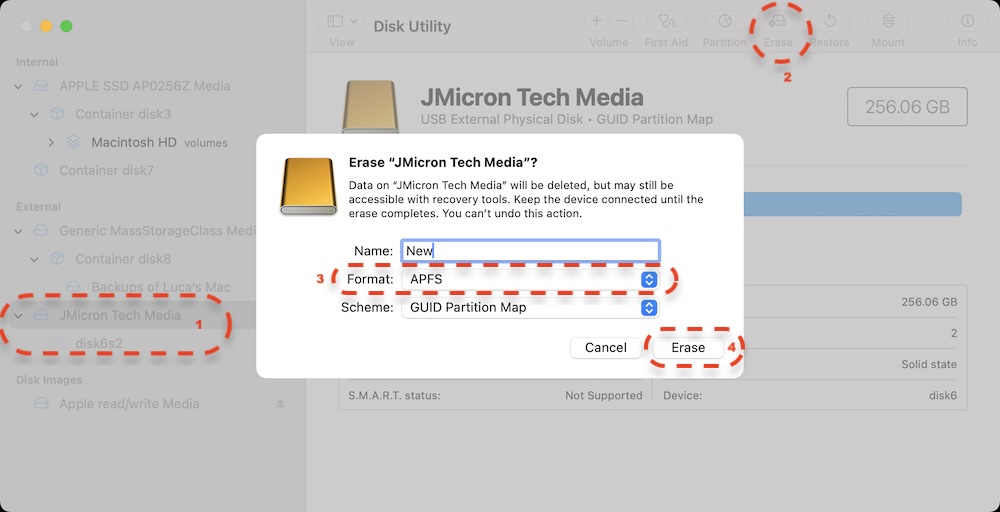
Before cloning, you must format the new drive properly:
- Connect the new drive to your Mac using a USB, Thunderbolt, or FireWire connection.
- Open Disk Utility from Utilities via Applications.
- In the left panel, select the new drive.
- Click Erase at the top.
- Choose the correct format:
• APFS
• Mac OS Extended (Journaled) - Click Erase to format the drive.
- Once completed, the drive is ready for cloning.
Step 2: Cloning Using Disk Utility
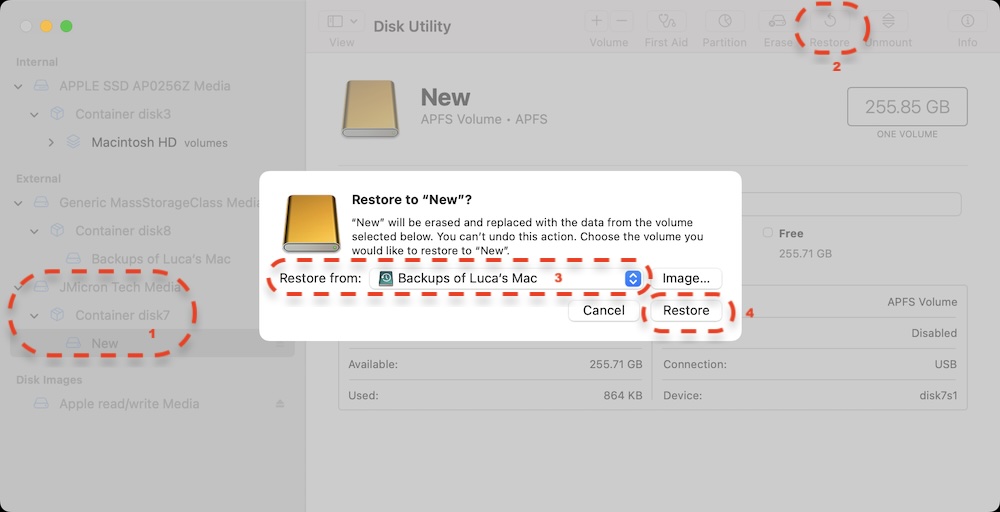
Disk Utility provides a built-in cloning feature through the Restore function. Follow the steps below:
- Open Disk Utility from Utilities via Applications.
- Select your new drive from the left sidebar.
- Click the Restore button.
- In the "Restore From" field, choose your old Time Machine drive.
- Click Restore and wait for the process to complete.
![Clone Time Machine Drive to a New Drive]()
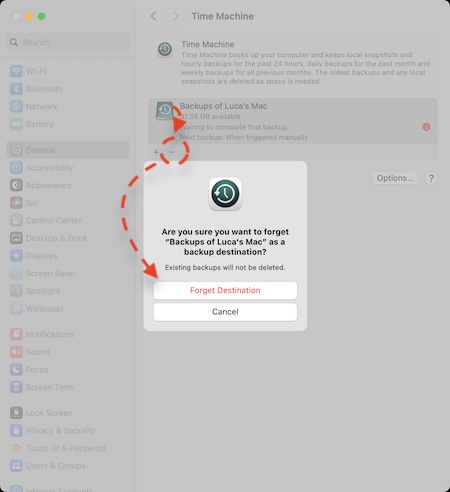
- Once finished, eject the old drive and test the new one by selecting it in Time Machine Settings (System Settings > General > Time Machine).
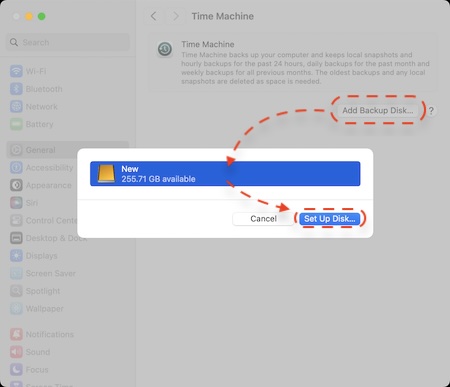
- Select the old drive and click "-" to remove it from Time Machine. Click Forget Destination button to confirm it.
![Clone Time Machine Drive to a New Drive]()
- Then click Add Backup Disk and select the new disk and click "Set Up Disk" to set it as backup drive for Time Machine.
![Clone Time Machine Drive to a New Drive]()
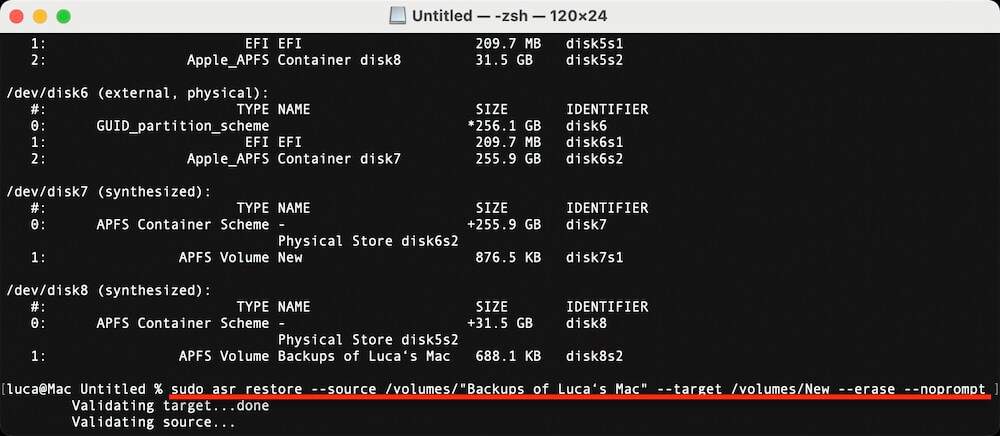
Step 3: Cloning Using Terminal (Advanced Users)
If you prefer using Terminal, you can use the asr (Apple Software Restore) command:
- Go to Utilities from Applications and open the Terminal
- Type the following command:
sudo asr restore --source /Volumes/OldTimeMachineDrive --target /Volumes/NewTimeMachineDrive --erase --noprompt
Replace OldTimeMachineDrive and NewTimeMachineDrive with the actual names of your drives.
- Wait for the process to complete.
![Clone Time Machine Drive to a New Drive]()
- Once done, verify that the new drive appears in Time Machine Settings and performs backups correctly.
Method 2: Copying Time Machine Backups to a New Drive
Instead of cloning, you can manually copy the Time Machine backups to a new drive. This method is useful if you want to move backups without cloning the entire disk.
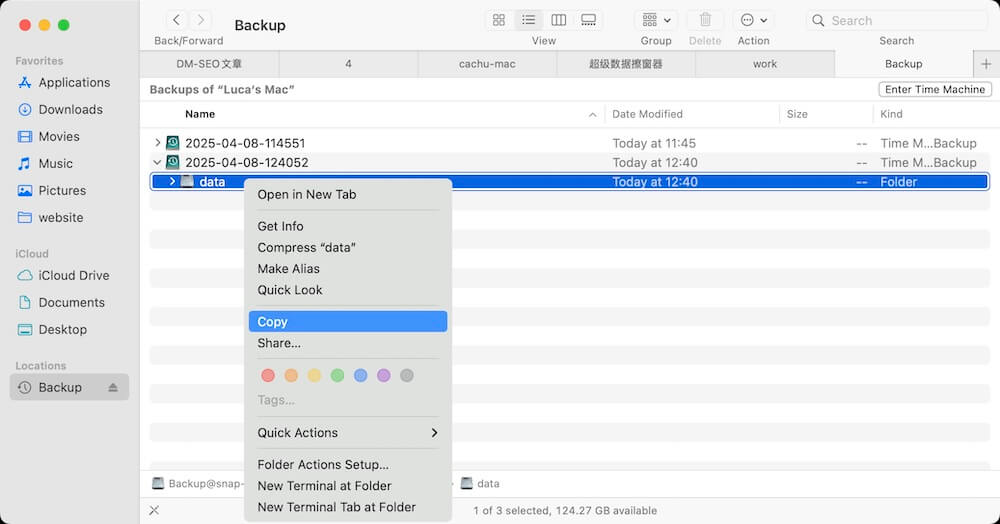
Step 1: Manually Copying Backups
- Connect both drives (old and new) to your Mac.
- Open Finder and navigate to your old Time Machine drive.
- Locate the drive in the backup folder.
- Right-click it and select Copy and then paste to the new drive. Or you can just drag and drop the folder onto the new drive.
![Copy Time Machine Backups to a New Drive]()
- Wait for the transfer to complete (this may take hours for large backups).
- Once copied, set the new drive as the Time Machine backup destination in System Settings > General > Time Machine.
✍ Note: Copying this way may fail due to permission issues. If that happens, use the rsync method below.
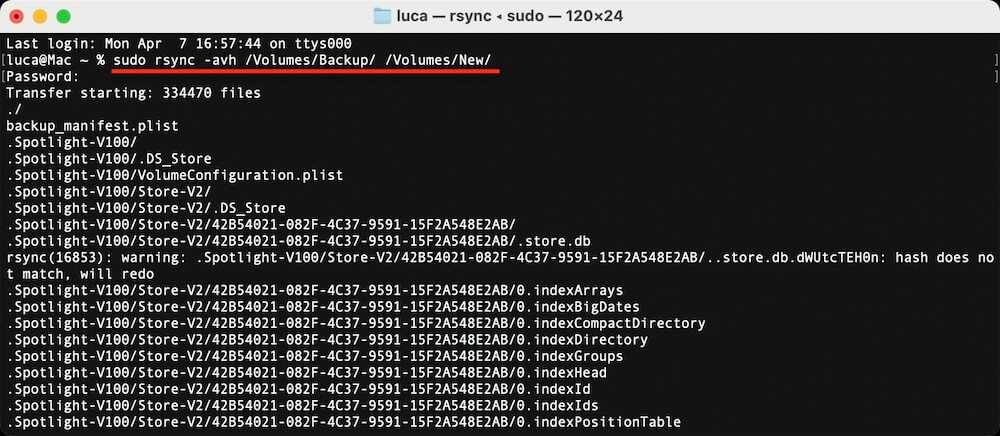
Step 2: Using rsync for a Reliable Copy
rsync is a command-line tool that ensures files are copied accurately.
- Go to Utilities from Applications and open the Terminal
- Run the command below:
sudo rsync -avh /Volumes/OldTimeMachineDrive/ /Volumes/NewTimeMachineDrive/
- Wait for the process to complete.
![Copy Time Machine Backups to a New Drive]()
- Verify that all backup data has been transferred successfully.
- Open Time Machine Settings and select the new drive as your backup destination.
Verifying the Copied Backups
After cloning or copying the backups, ensure that Time Machine recognizes the new drive:
- Open Time Machine from System Settings > General.
- Click and choose the new drive as the backup drive for Time Machine.
- Ensure that previous backups are accessible.
- Run a test backup to confirm the drive is working properly.
Method 3. Copy Time Machine Backups with Donemax Disk Clone
If you want to make sure there is another copy of Time Machine backups for data security, you can also use the third-party tool to copy the data. With the software Donemax Disk Clone for Mac, it's easy and fast to copy the data from Time Machine backup drive.
Donemax Disk Clone for Mac
- Copy Time Machine backup data or other files easily and fast.
- Make bootable clone backup for the macOS system drive.
- Create disk image for hard drive data on Mac.
The software is simple and easy to handle with intuitive interface. If you want to clone the data from Time Machine backup drive, please ensure to connect the drive to the Mac, also connect another new drive to the machine as destination. Do as follows to clone the data from Time Machine backup drive to the new drive with the software:
Step 1. Download and install the software on Mac. Then run the software from launchpad. Choose the Disk Copy mode.

Step 2. Select the old Time Machine backup drive as source, choose the new drive as destination.
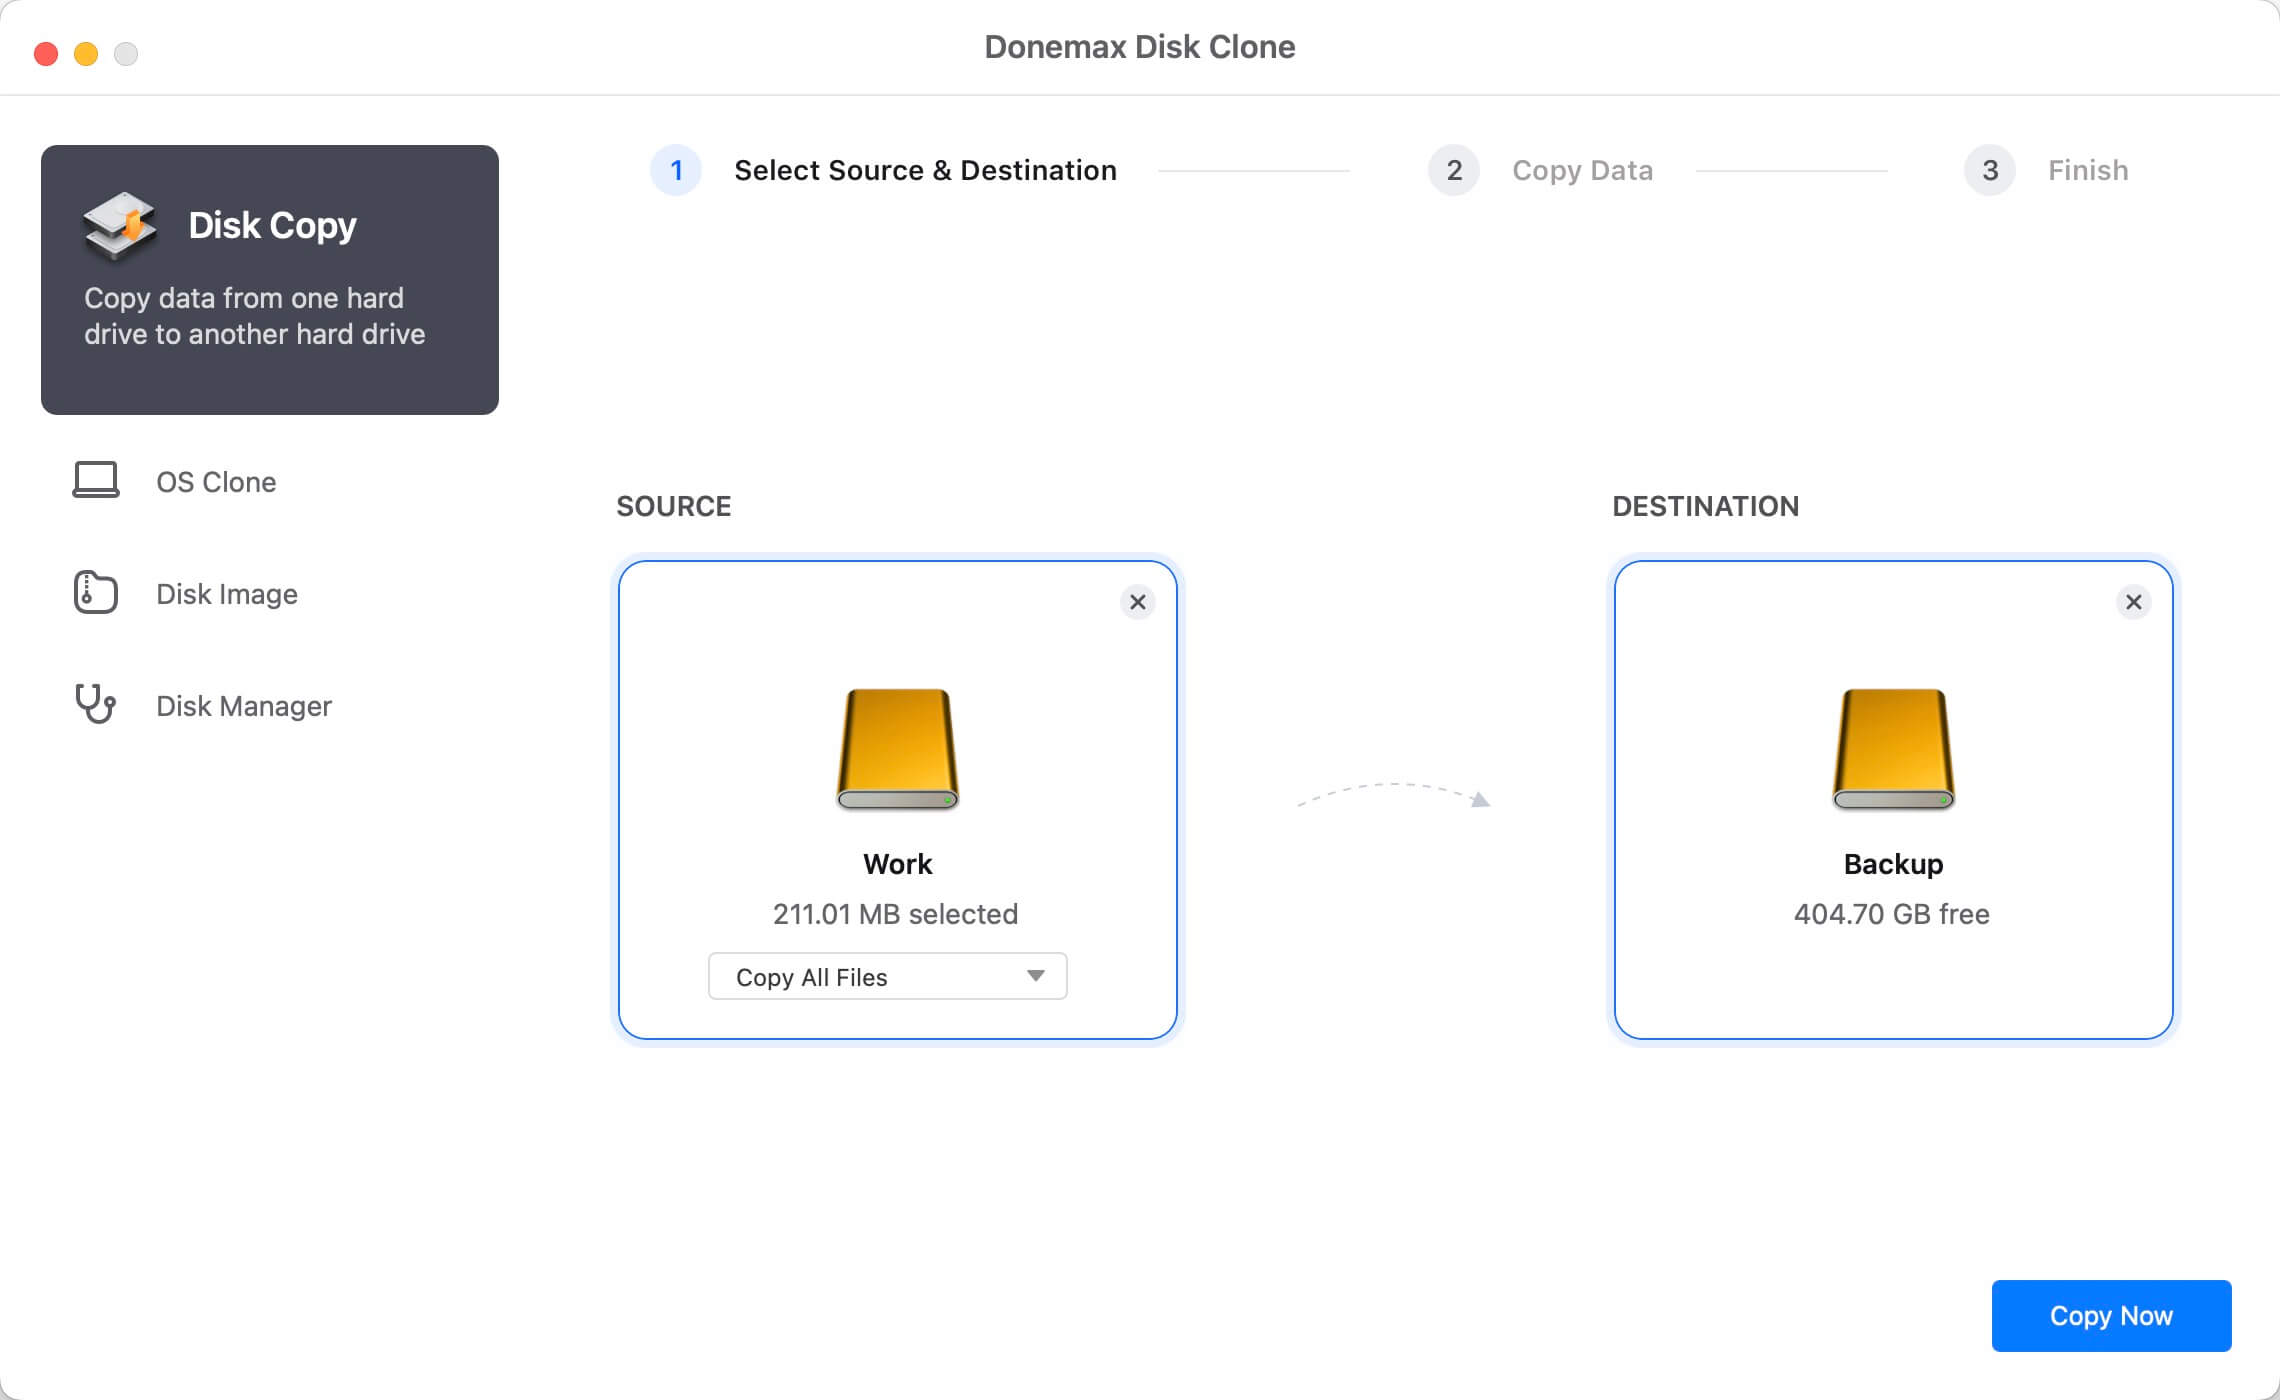
Step 3. Click Copy Now button, the software will start to copy the data from the Time Machine drive to the new drive.

✍ Tips: Ensure to choose a new drive with enough space to hold the copied data from the Time Machine backup drive.
Troubleshooting Common Issues
After transferring your Time Machine backups to a new drive, you may encounter some issues that prevent Time Machine from recognizing or properly using the new drive. Below, we expand on common problems and their solutions.
1. Time Machine Doesn't Recognize the New Drive
Once you complete the cloning or copying process, Time Machine should automatically detect the new drive when you go to System Settings > General > Time Machine and select it. However, sometimes the new drive may not appear as a valid backup destination.
Possible Causes:
- The new drive is not formatted correctly.
- The backup database is not copied properly.
- macOS does not recognize the drive due to system errors.
Solutions:
a) Check Drive Formatting
- Go to Utilities from Applications and open the Disk Utility
- Select the new drive and check its format.
- Ensure it is formatted as APFS (for macOS 10.13 High Sierra and later) or Mac OS Extended (Journaled) (for macOS 10.12 Sierra and earlier).
- If it's not formatted correctly, erase the drive and reformat it before copying the backups again.
b) Re-select the Drive in Time Machine Preferences
- Go to System Settings > General > Time Machine.
- Click Add Backup Disk.
- Choose the new drive and confirm your selection.
- If Time Machine still doesn't recognize it, restart your Mac and try again.
c) Reset Time Machine Settings
Sometimes, Time Machine's settings may not update properly after transferring backups. Resetting its preferences can resolve this issue:
- Open Terminal (Applications > Utilities).
- Type the following command to reset Time Machine:
sudo tmutil inheritbackup /Volumes/NewTimeMachineDrive/
Replace NewTimeMachineDrive with the actual name of your new backup disk.
![Copy Time Machine Backups to a New Drive]()
- Try selecting the new drive in Time Machine Settings again.

2. Permission Errors During Copying
When manually copying the Backups.backupdb folder from the old Time Machine drive to the new one, you may see permission-related errors preventing the transfer.
Common Error Messages:
- "You don't have permission to access some of the items."
- "The operation can't be completed because you don't have permission to access some of the items."
- "Files cannot be copied due to system restrictions."
Solutions:
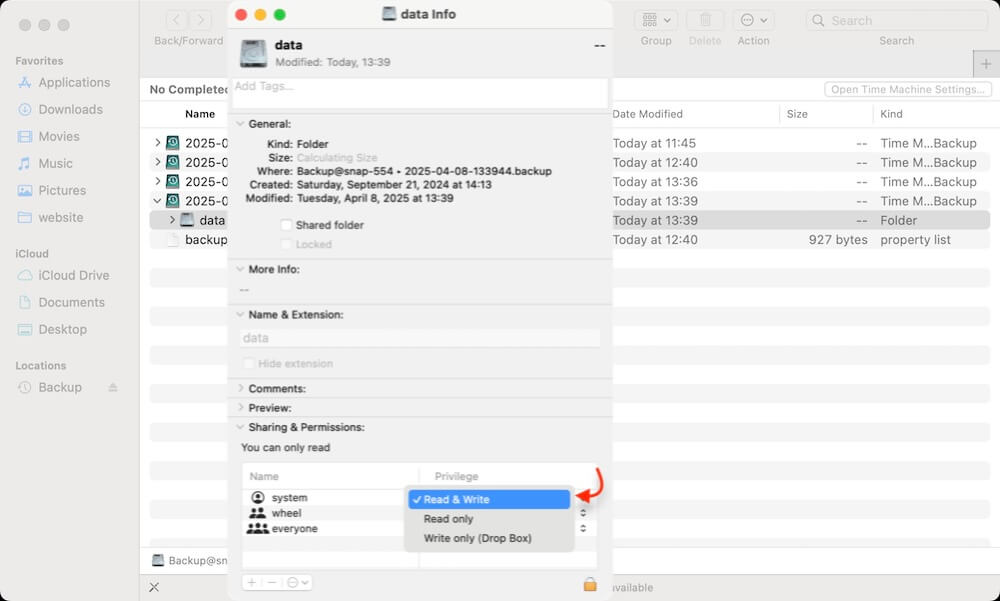
a) Check File Permissions
- Right-click the backup folder on the old drive.
- Select Get Info.
- Scroll down to the Sharing & Permissions section.
- If your user account does not have "Read & Write" access, click the lock icon at the bottom, enter your admin password, and change the permission settings.
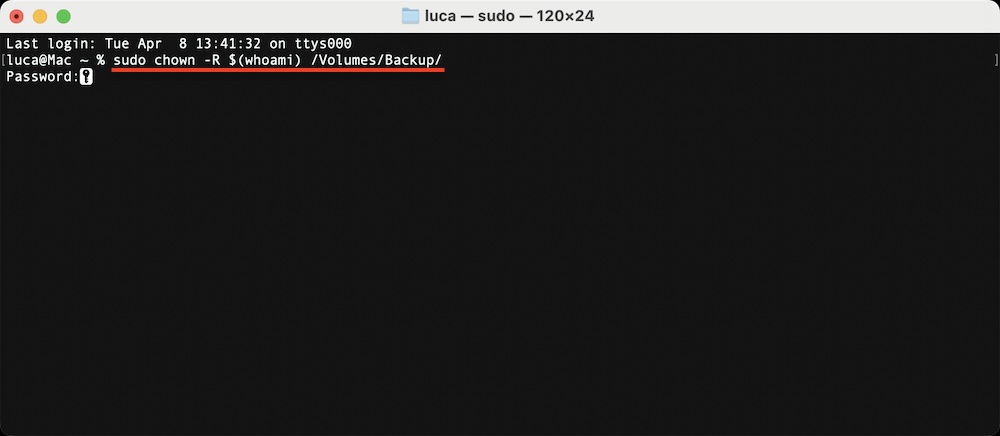
b) Use Terminal to Fix Permissions
If Finder does not allow you to change permissions, use the following Terminal command:
sudo chown -R $(whoami) /Volumes/Backup/
This will assign ownership of the backup folder to your current user, allowing you to move files without restrictions.
c) Use rsync Instead of Finder for Copying
If Finder still refuses to copy the backups, use the rsync command, which is more reliable:
sudo rsync -avh /Volumes/OldTimeMachineDrive/ /Volumes/NewTimeMachineDrive/
This command ensures that all files, including hidden and system files, are copied correctly while preserving their metadata.
3. Backup Corruption or Missing Files
If the backup appears incomplete or corrupt after transferring it to a new drive, you need to verify the data integrity and repair any errors.
Possible Causes:
- The copying process was interrupted.
- Some files were not transferred properly.
- The old drive had errors that were carried over.
Solutions:
a) Run First Aid on Both Drives
- Open Disk Utility.
- Select the old Time Machine drive and click First Aid to check for errors.
![Copy Time Machine Backups to a New Drive]()
- Do the same for the new drive.
- If Disk Utility finds errors, repair them before retrying the transfer.

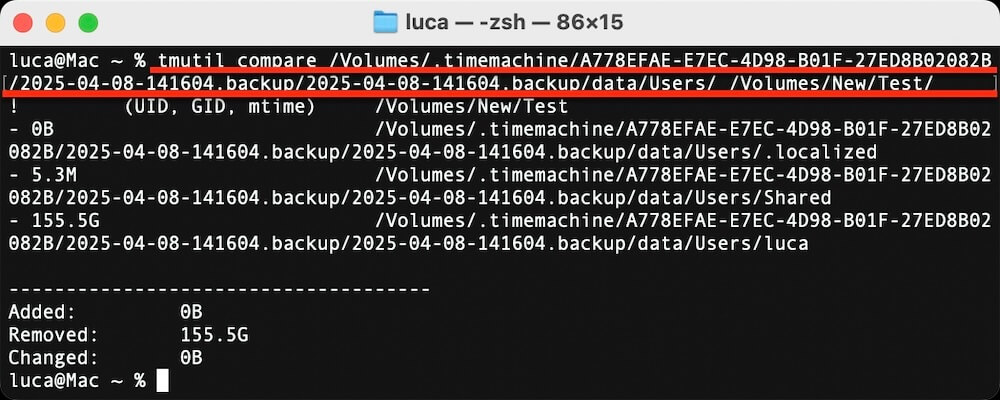
b) Verify the Backup Integrity
Use the following Terminal command to verify the backup on the new drive:
tmutil compare /Volumes/OldTimeMachineDrive/Path /Volumes/NewTimeMachineDrive/Path
This will compare the backups on both drives and show any differences.
c) Recopy the Backup Using rsync
If files are missing or corrupted, delete the incomplete backup and recopy it using the rsync command mentioned earlier.
Final Troubleshooting Tip: Start Fresh if Nothing Works
If none of the above solutions work and Time Machine still refuses to recognize the new drive, consider starting a new backup from scratch:
- Open Time Machine Settings.
- Remove the old backup disk from the list.
- Select the new drive and start new backup.
- Allow Time Machine to create a fresh backup.
This ensures you have a functional backup without any compatibility issues, although it means losing access to past versions of your files.
Conclusion
Migrating Time Machine backups to a new drive ensures that your data remains safe while upgrading or replacing your backup disk. There are two main methods:
- Cloning the drive using Disk Utility or Terminal for a seamless transition.
- Copying backups manually, using rsync, or copy with Donemax Disk Clone for Mac if you only want to transfer the backup data.
Regardless of the method, always verify that Time Machine recognizes the new drive and test it by performing a backup. Keeping your backups safe is essential to ensuring data security in case of system failure or accidental data loss.
Donemax Disk Clone for Mac
An award-winning disk cloning program to help Mac users clone HDD/SSD/external device. It also can create full bootable clone backup for Macs.
Related Articles
- Feb 12, 2026How to Clone HDD on Mac?
- Feb 12, 2026How to Install or Reinstall macOS?
- Feb 03, 2026How to Clone Hard Drive on macOS 10.15 Catalina?
- Sep 23, 2025Top 10 Disk Cloning Software for Mac - macOS Tahoe Supported
- Apr 12, 2024Carbon Copy Cloner Clone Won't Boot, How to Fix It
- Jul 14, 2023How to Make A Bootable Clone Backup Before Upgrading to macOS Sonoma?

Contributing Writer
Steven
Steven has been a senior writer & editor of Donemax software since 2020. He's a super nerd and can't imagine the life without a computer. Over 6 years of experience of writing technical solutions and software tesing, he is passionate about providing solutions and tips for Windows and Mac users.

Editor in chief
Gerhard Chou
In order to effectively solve the problems for our customers, every article and troubleshooting solution published on our website has been strictly tested and practiced. Our editors love researching and using computers and testing software, and are willing to help computer users with their problems