Written byStevenUpdated on Mar 28, 2025
Clone Mac to An SD Card: A Step-by-Step Guide
Approved byGerhard Chou
Summary: Clone macOS system to SD card is easy with Donemax Disk Clone for Mac. Connect an SD card with enough space to Mac and run the software. Choose "OS Clone" option to clone the Mac to SD card. After it's done, the cloned SD card will be bootable directly.
PAGE CONTENT:
Cloning a Mac to an SD card can be a useful solution for various scenarios. Whether you need a portable backup, a bootable macOS setup, or a lightweight testing environment, cloning your macOS system to an SD card allows flexibility and convenience. This guide will walk you through the entire process, covering prerequisites, step-by-step cloning methods, booting from the SD card, troubleshooting, and alternative solutions.
Introduction
In the world of macOS, backups and system portability are essential. While external SSDs and USB drives are common choices, an SD card offers a compact and cost-effective alternative. Cloning a Mac to an SD card can help in various cases:
- Backup Purposes: Having a clone of your macOS on an SD card ensures you have a backup in case of system failure.
- Portability: You can carry your macOS environment with you and use it on another compatible Mac.
- Testing macOS Updates or Beta Versions: Instead of risking your main system, you can test macOS updates on a cloned SD card.
- Running a Lightweight macOS System: If you have limited internal storage, running macOS from an SD card may help free up space.
This guide will cover everything you need to know to successfully clone your Mac to an SD card and boot from it.
Prerequisites
Before beginning, ensure you have the necessary tools and requirements:
Hardware Requirements:
1. A compatible SD card:
- Minimum 64GB storage (preferably 128GB+ for a full macOS clone).
- A UHS-II or UHS-I SD card for better speed.
- A Class 10 or V30/V60/V90-rated card is recommended.
2. SD Card Reader:
- Built-in SD card slot (on older Macs).
- An external USB-C SD card reader (for newer MacBooks).
3. Enough free storage on your Mac:
- Ensure you have sufficient space on your Mac and the SD card for cloning.
Software Requirements:
- macOS Disk Utility (Built-in macOS tool).
- Terminal (For advanced users using the dd command).
- Third-Party Cloning Tools:
Preparing the SD Card
Before cloning, you need to properly format the SD card for macOS.
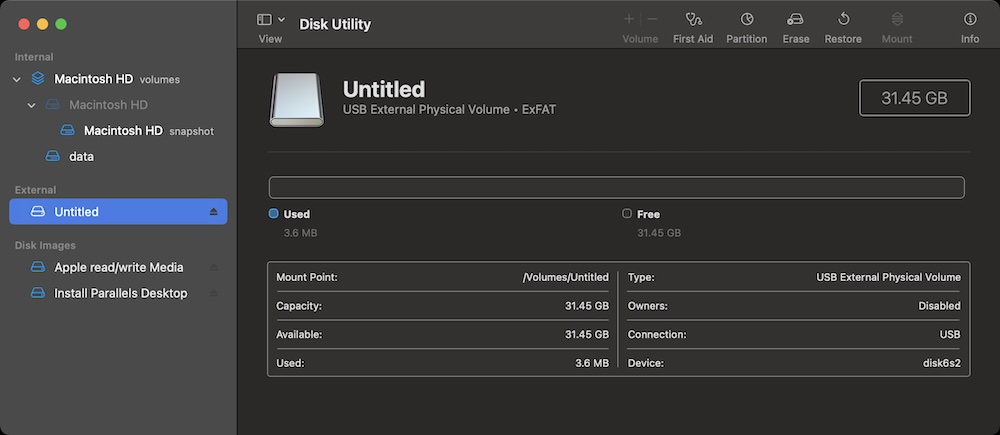
Step 1: Insert and Identify the SD Card
- Insert the SD card into your Mac's built-in SD card reader or external USB reader.
- Open Disk Utility (Go to Applications > Utilities > Disk Utility).
![clone Mac to an SD card]()
- In the left panel, locate your SD card (usually labeled as "Untitled" or the manufacturer's name).
![clone Mac to an SD card]()

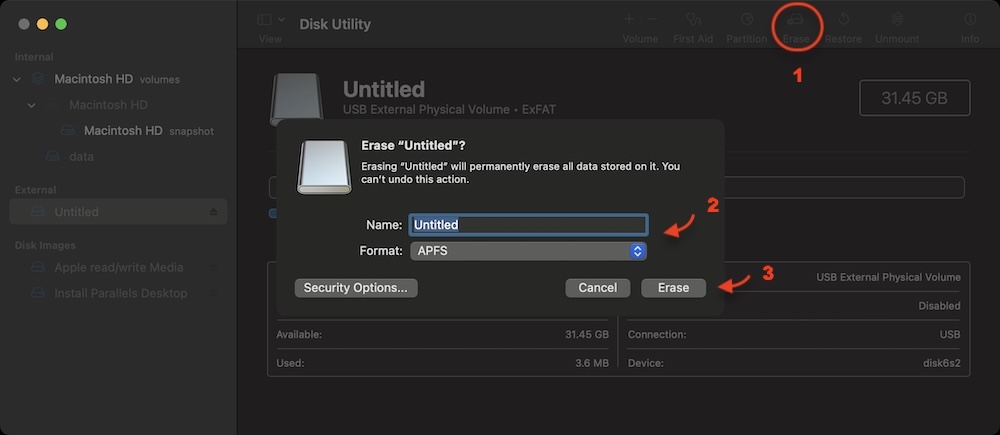
Step 2: Format the SD Card
- Select the SD card and click Erase.
- Choose the appropriate format:
- APFS (For macOS High Sierra and later).
- Mac OS Extended (Journaled) (For older macOS versions).
- ExFAT (If you need cross-compatibility with Windows).
- 3. Set the Scheme to GUID Partition Map (Required for macOS bootability).
- 4. Click Erase and wait for the process to complete.
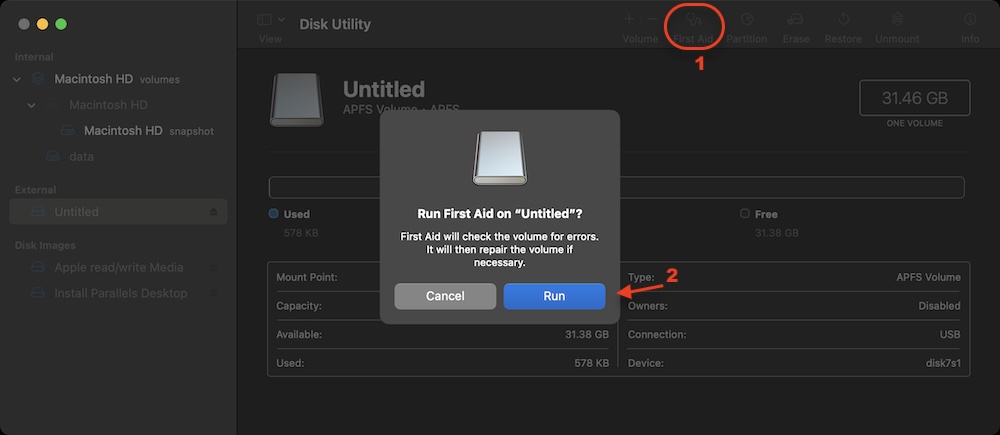
Step 3: Check for Errors
Once formatted, run First Aid in Disk Utility to check for any potential errors.
Cloning the Mac to the SD Card
There are multiple methods to clone your Mac:
Method 1: Using Disk Utility (Recommended for Beginners)
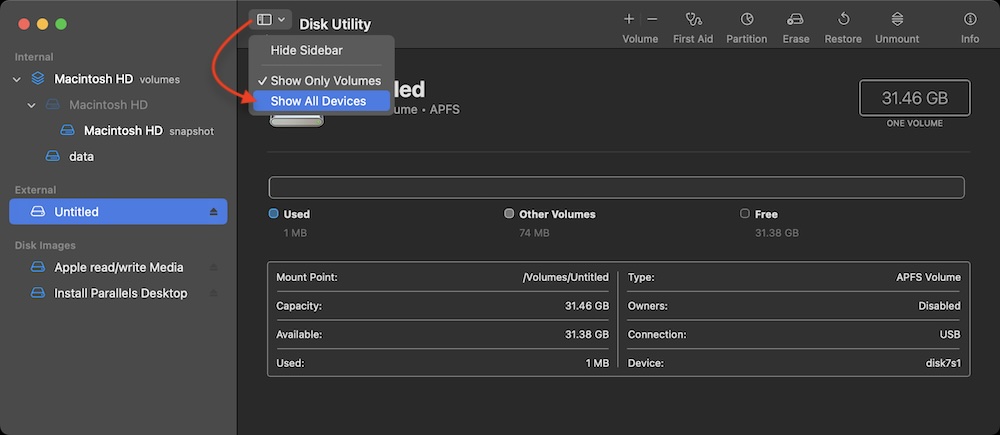
- Open Disk Utility. Click View > Show All Devices to see all available drives.
![clone Mac to an SD card]()
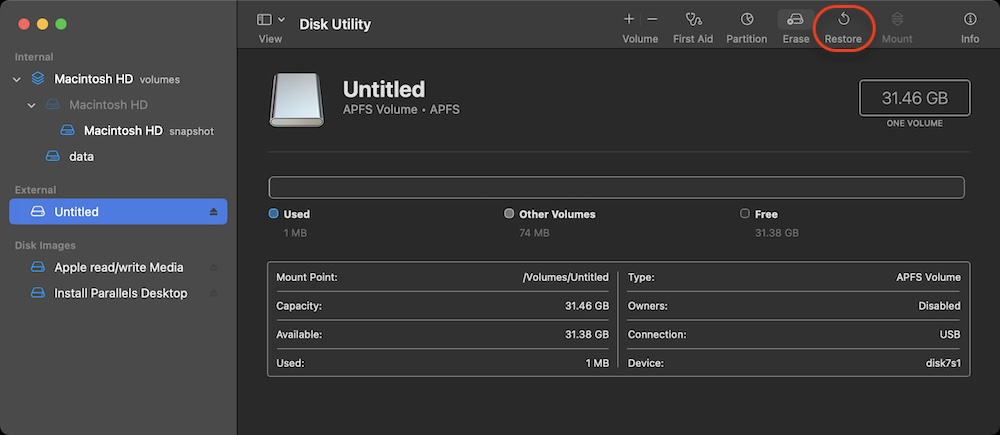
- Select your SD card. Click Restore in the toolbar.
![clone Mac to an SD card]()
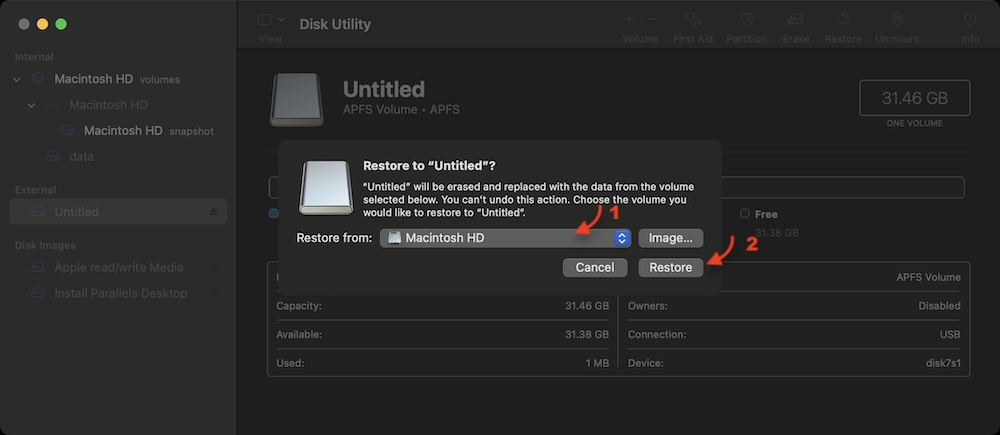
- Choose the Mac's internal drive (Macintosh HD)as the destination. Click Restore to start cloning.
![clone Mac to an SD card]()
💡 Note: This method creates an exact copy of your Mac but may not always result in a bootable SD card.
Method 2: Using Terminal & dd Command (For Advanced Users)
The dd command provides a low-level cloning method.
Steps:
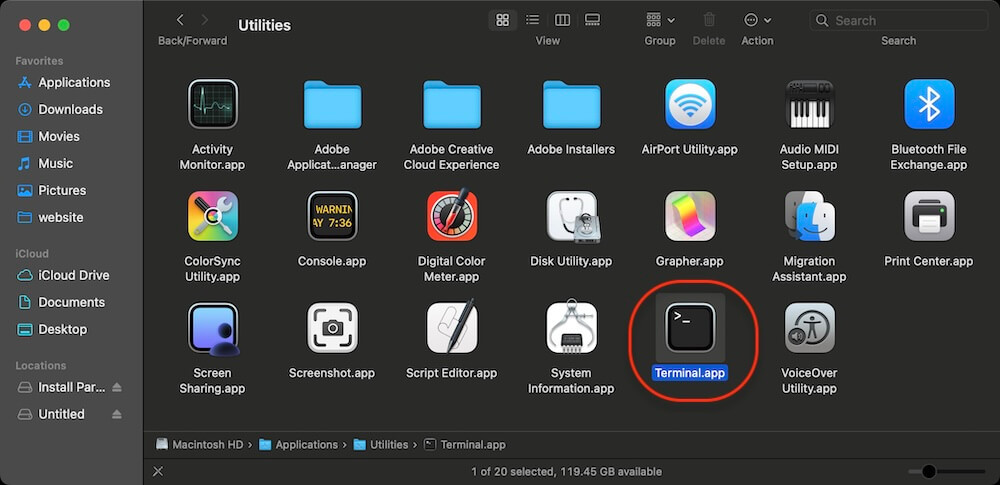
- Open Terminal from Applications and then Utilities folder.
![clone Mac to an SD card]()
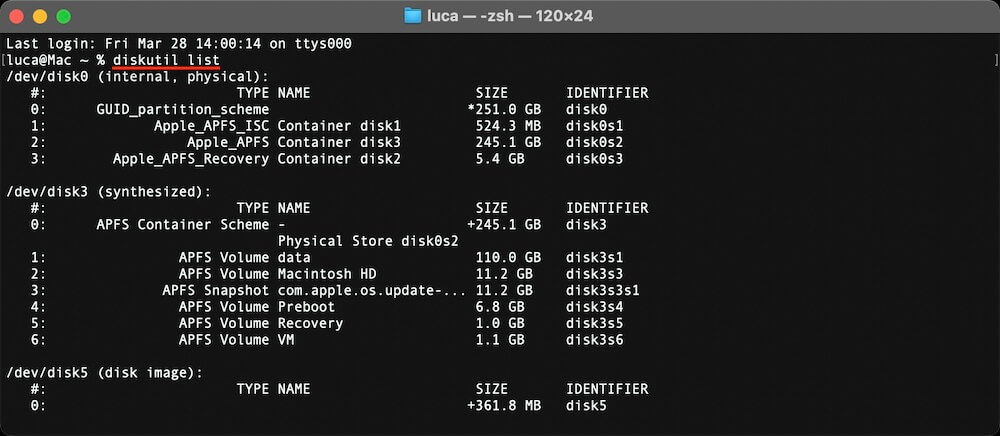
- Identify your Mac's drive and SD card using: diskutil list
- Note the disk identifier (e.g., /dev/disk2).
![clone Mac to an SD card]()
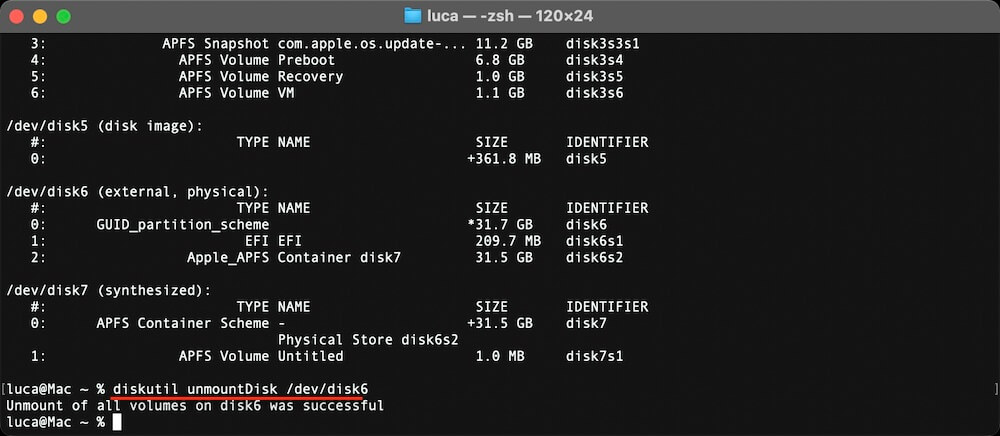
- Unmount the SD card to prevent conflicts: diskutil unmountDisk /dev/disk2
![clone Mac to an SD card]()
- Run the cloning command: sudo dd if=/dev/disk1 of=/dev/disk2 bs=4M status=progress
- Replace /dev/disk1 with your Mac's drive identifier.
- Replace /dev/disk2 with your SD card identifier.
![clone Mac to an SD card]()
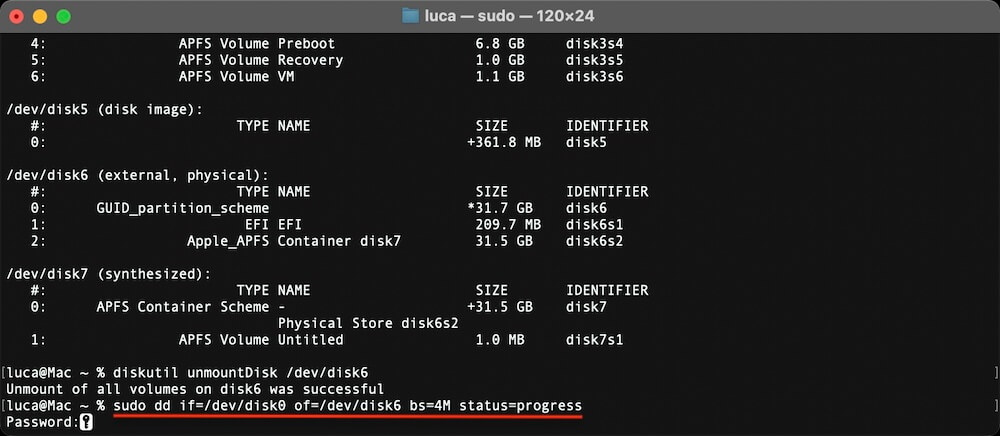
Warning: The dd command is powerful and can erase data if used incorrectly.
Method 3: Using Donemax Disk Clone for Mac (Easiest & Recommended)
There is a reliable and simple way to clone macOS to SD card using third-party disk clone tool Donemax Disk Clone for Mac. The software can clone system, settings, apps and personal files from Mac to SD card and guarantee the cloned SD card will be bootable.
Donemax Disk Clone for Mac
- Reliable and easy-to-use Mac clone and backup software.
- Create bootable clone backup for macOS.
- Copy hard drive and make disk image.
Here are the simple steps to clone Mac to SD card with Donemax Disk Clone for Mac:
- Download and install Donemax Disk Clone for Mac on the computer.
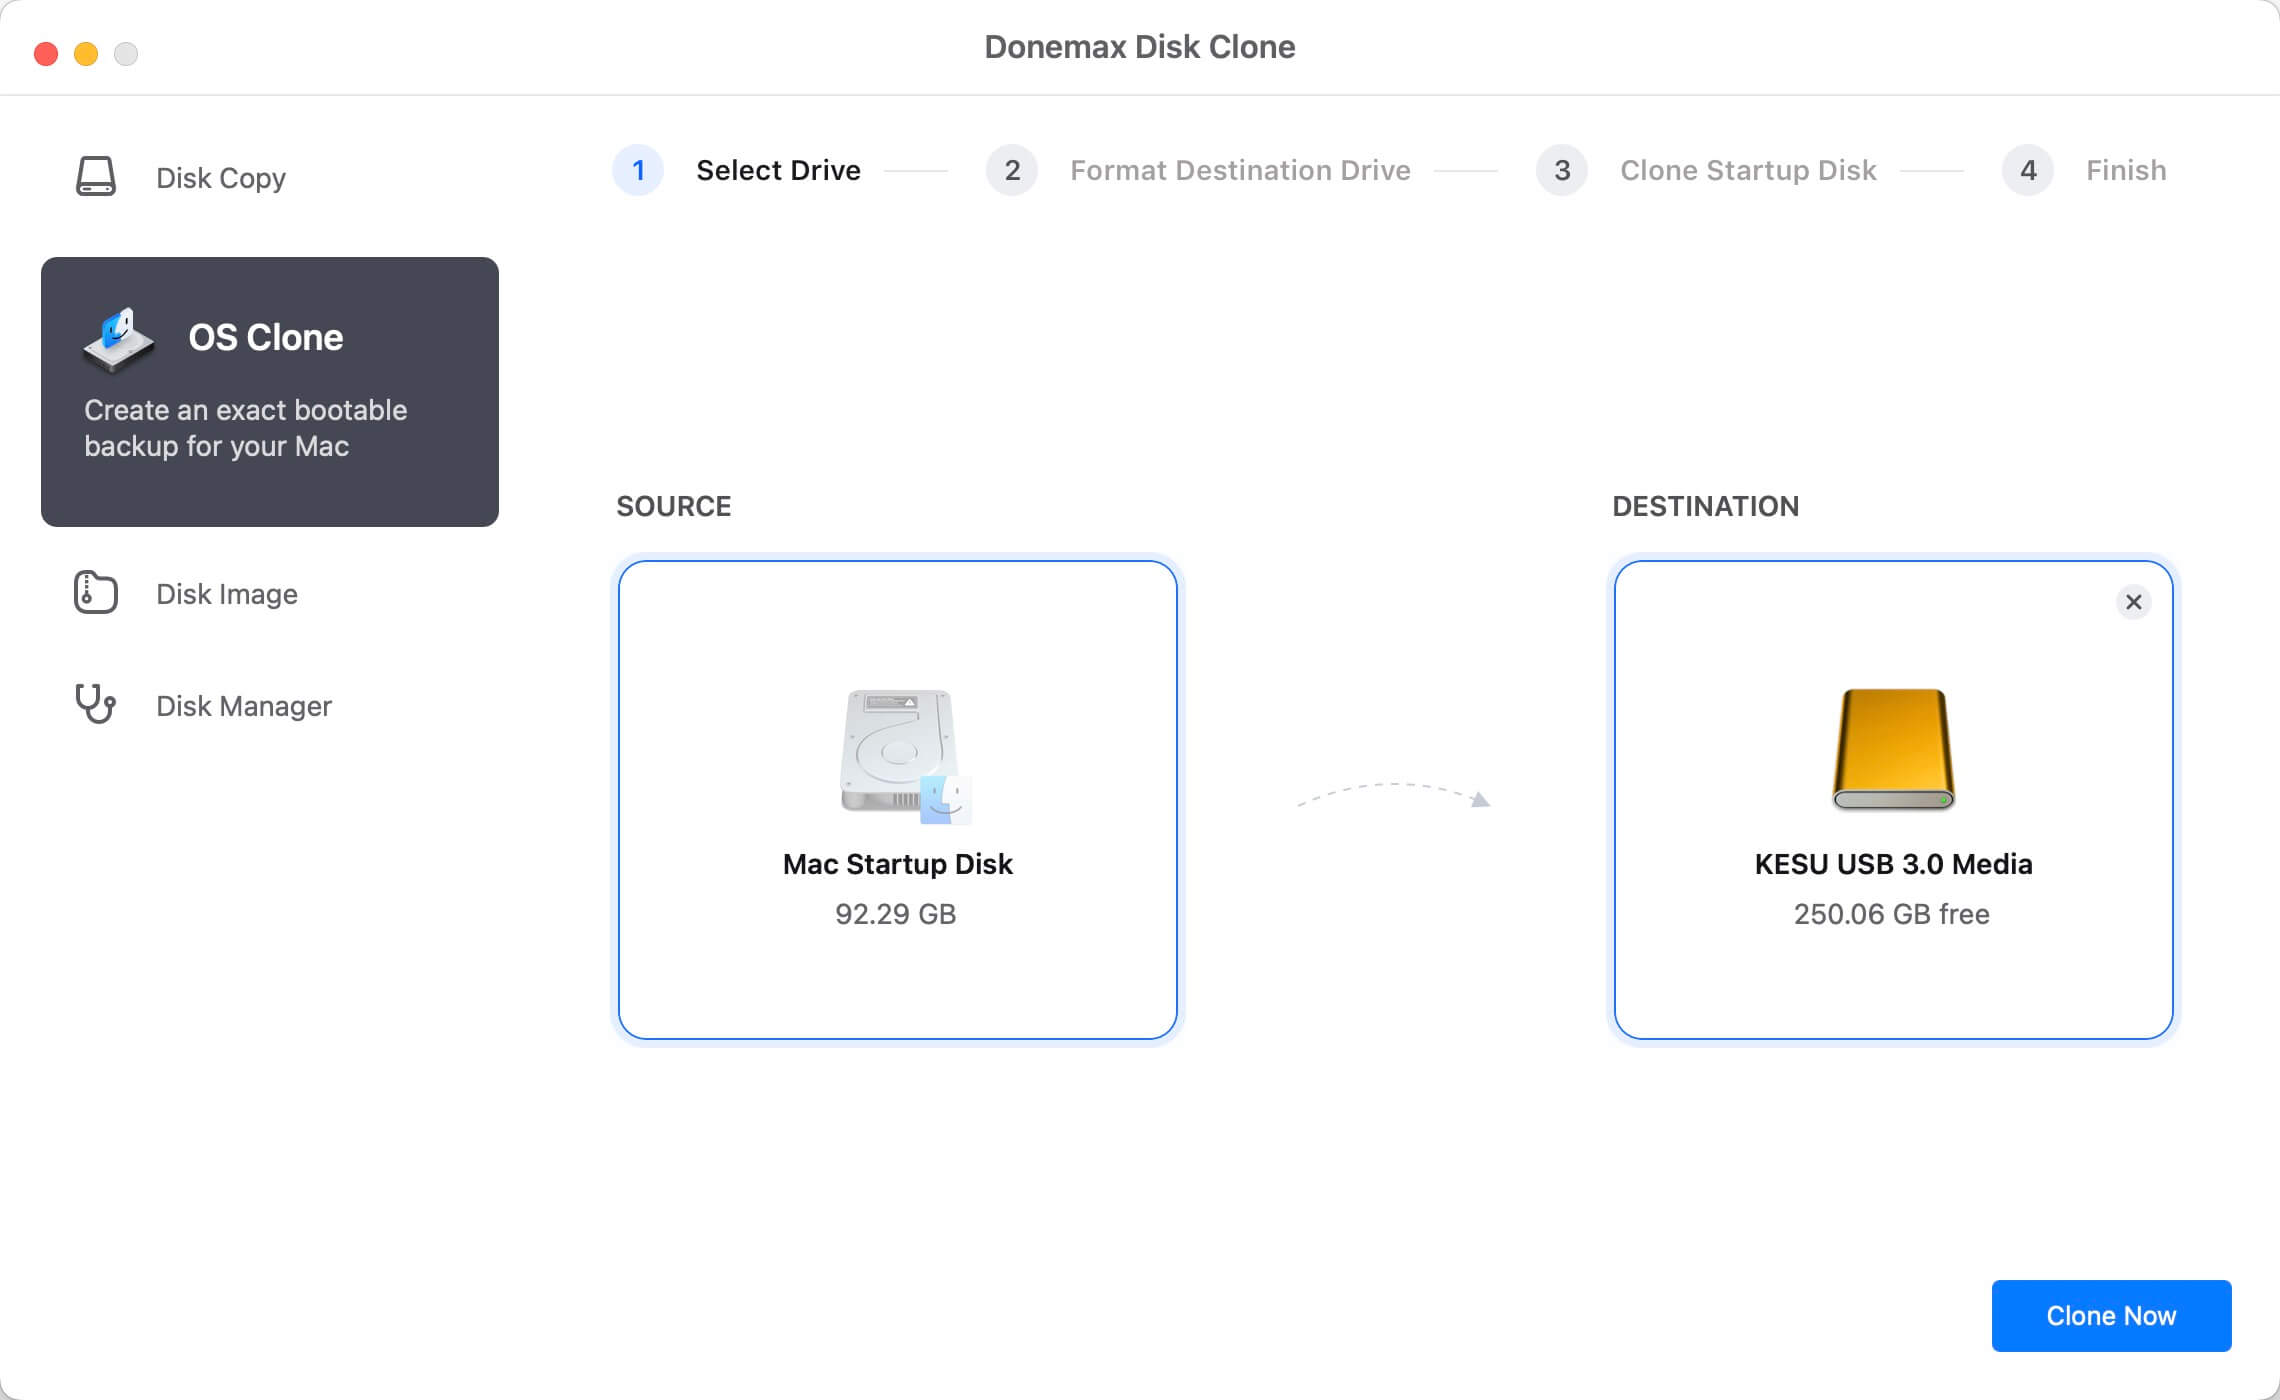
- Open the software from launchpad. Choose the OS Clone mode. It will set the Mac system disk as source automatically.
![clone Mac to an SD card]()
- Choose the SD card as the destination.
![clone Mac to an SD card]()
- Click Clone Now and wait for the process to finish.
![clone Mac to an SD card]()
- Once the process is finished, you can click Done button to finish.
![clone Mac to an SD card]()


Advantages: Donemax Disk Clone for Mac ensures bootability and handles system files properly.
Booting from the Cloned SD Card
After successfully cloning your Mac to an SD card, the next crucial step is to boot from it. This process allows you to use the cloned macOS environment as if it were running from your internal drive. However, booting from an SD card can sometimes present challenges, such as speed issues, incompatibility, or boot failures. Let's go through the step-by-step process and troubleshooting solutions.
Step 1: Restart and Enter Startup Manager
Once the cloning process is complete, follow these steps to boot from the SD card:
For Intel-based Macs:
- Insert the SD card into your Mac's built-in SD card slot or an external SD card reader.
- Restart your Mac.
- Hold down the Option (⌥) key immediately after pressing the power button.
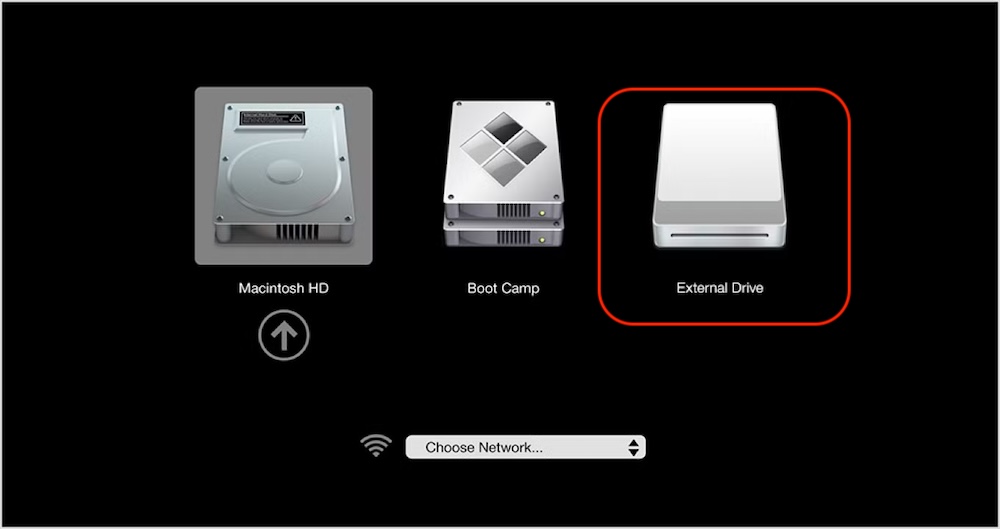
- The Startup Manager will appear, displaying available bootable drives.
- Select the SD card from the list (it may appear as "EFI Boot" or the name you assigned during formatting).
- Press Enter (↵) to boot from the SD card.
For Apple Silicon (M1/M2/M3/M4) Macs:
- Turn off your Mac completely.
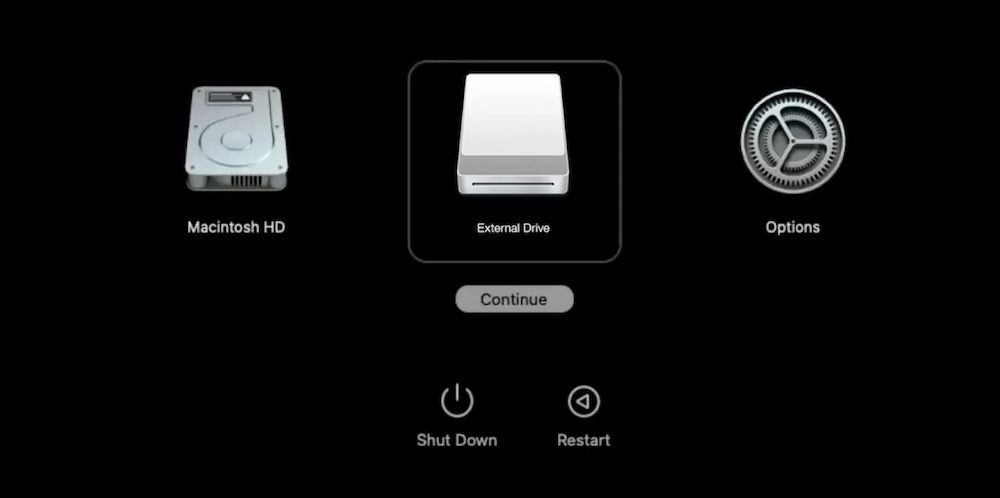
- Press and hold the Power (Touch ID) button until the "Loading startup options" screen appears.
- Select the SD card from the list of bootable drives.
- Click Continue to boot from the SD card.
Step 2: Checking macOS Performance on the SD Card
Once macOS boots from the SD card, it may feel different compared to running from an internal SSD. Here's what you can expect:
- Slower Boot Time: SD cards have significantly lower read/write speeds than SSDs, which can result in slower startup times.
- Laggy Performance: Applications may take longer to load, and overall system responsiveness may be reduced.
- Limited Lifespan: SD cards have a limited number of write cycles, so using one as a primary macOS drive can wear it out faster.
If performance is too slow, consider using a high-speed UHS-II SD card or switching to an external SSD.
Step 3: Troubleshooting Boot Issues
1. Mac Doesn't Recognize the SD Card as a Boot Option
Solution:
- Ensure that the SD card is formatted with GUID Partition Map and APFS or Mac OS Extended (Journaled).
- Reinsert the SD card and restart the Mac.
- If using an external SD card reader, try a different reader, as some may not support booting.
2. Mac Displays "No Bootable Device" Error
Solution:
- The cloning process may have failed; try recloning using Donemax Disk Clone for Mac.
- Reformat and restore macOS using Disk Utility before retrying the cloning process.
3. Slow Performance or Freezing Issues
Solution:
- Use an SD card with higher read/write speeds (at least V30 or higher).
- Close background applications that consume excessive system resources.
- If possible, use an external SSD instead of an SD card for better performance.
4. macOS Won't Load User Profile from Cloned SD Card
Solution:
- Ensure that all system files were properly cloned.
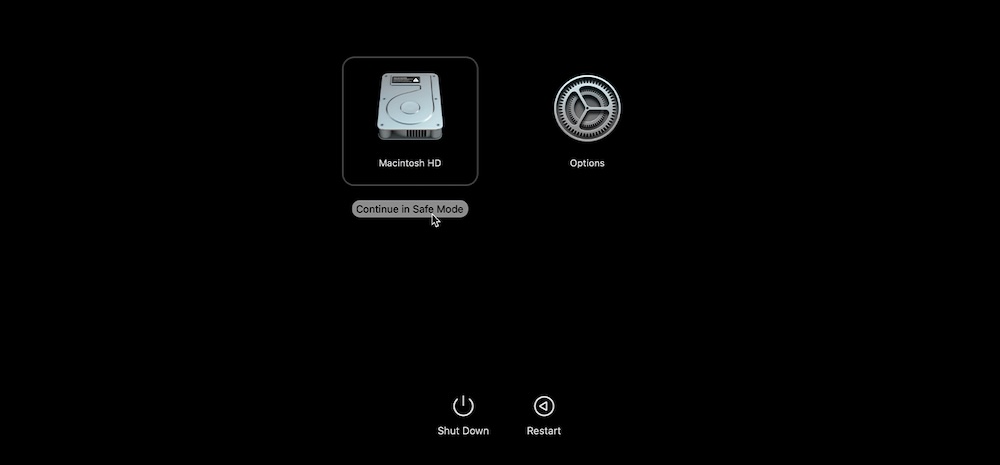
- Try booting into Safe Mode (Shift key during boot) to troubleshoot issues.
- Create a new user profile to bypass corrupted account settings.
Step 4: Enabling Secure Boot Options (For T2 and Apple Silicon Macs)
If your Mac has a T2 Security Chip (2018+ Intel models) or runs on Apple Silicon (M1/M2/M3/M4), you may need to adjust Startup Security settings to allow external booting.
Steps to Enable External Boot on T2 Macs:
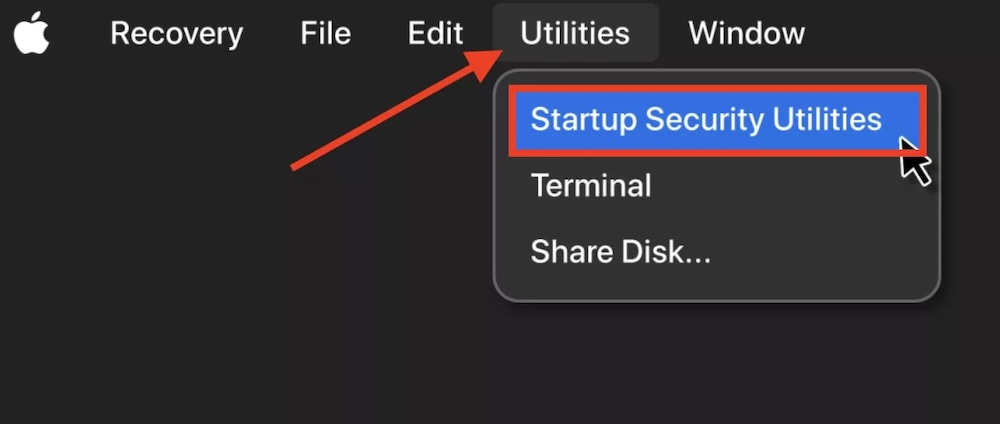
- Restart the Mac and hold Command (⌘) + R to enter macOS Recovery mode.
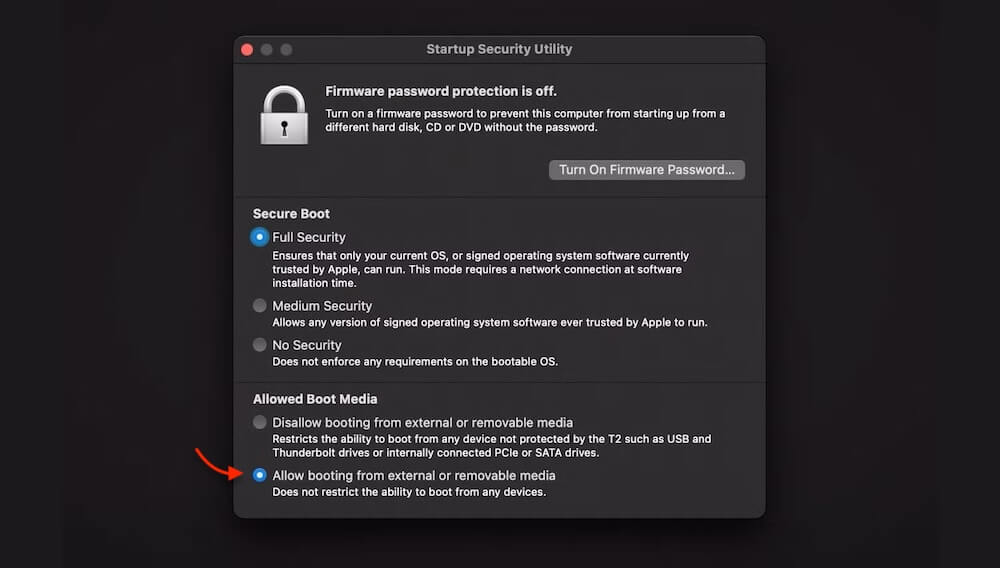
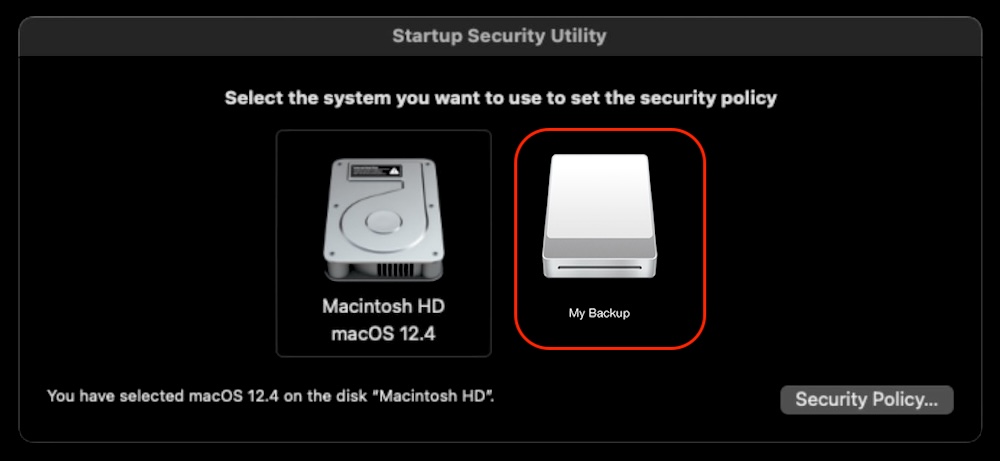
- Click Utilities > Startup Security Utility.
![clone Mac to an SD card]()
- Select Allow booting from external media.
![clone Mac to an SD card]()
- Restart your Mac and try booting from the SD card again.
Steps for Apple Silicon Macs:
Apple Silicon Macs allow external booting by default, but if you experience issues:
- Boot into macOS Recovery mode (hold the Power button during startup).
- Go to Startup Disk > Select SD Card.
- Click Continue and follow the on-screen instructions.
Step 5: Verifying System Stability
Once macOS is successfully running from the SD card, check the following:
System Preferences Load Properly: Ensure macOS settings function normally.
Apps Open Without Crashing: Test basic apps like Safari, Finder, and Notes.
Wi-Fi and Bluetooth Work: External booting can sometimes disable wireless connectivity.
No Kernel Panics or Freezes: If the system crashes, the clone may be corrupted.
Alternative Solutions
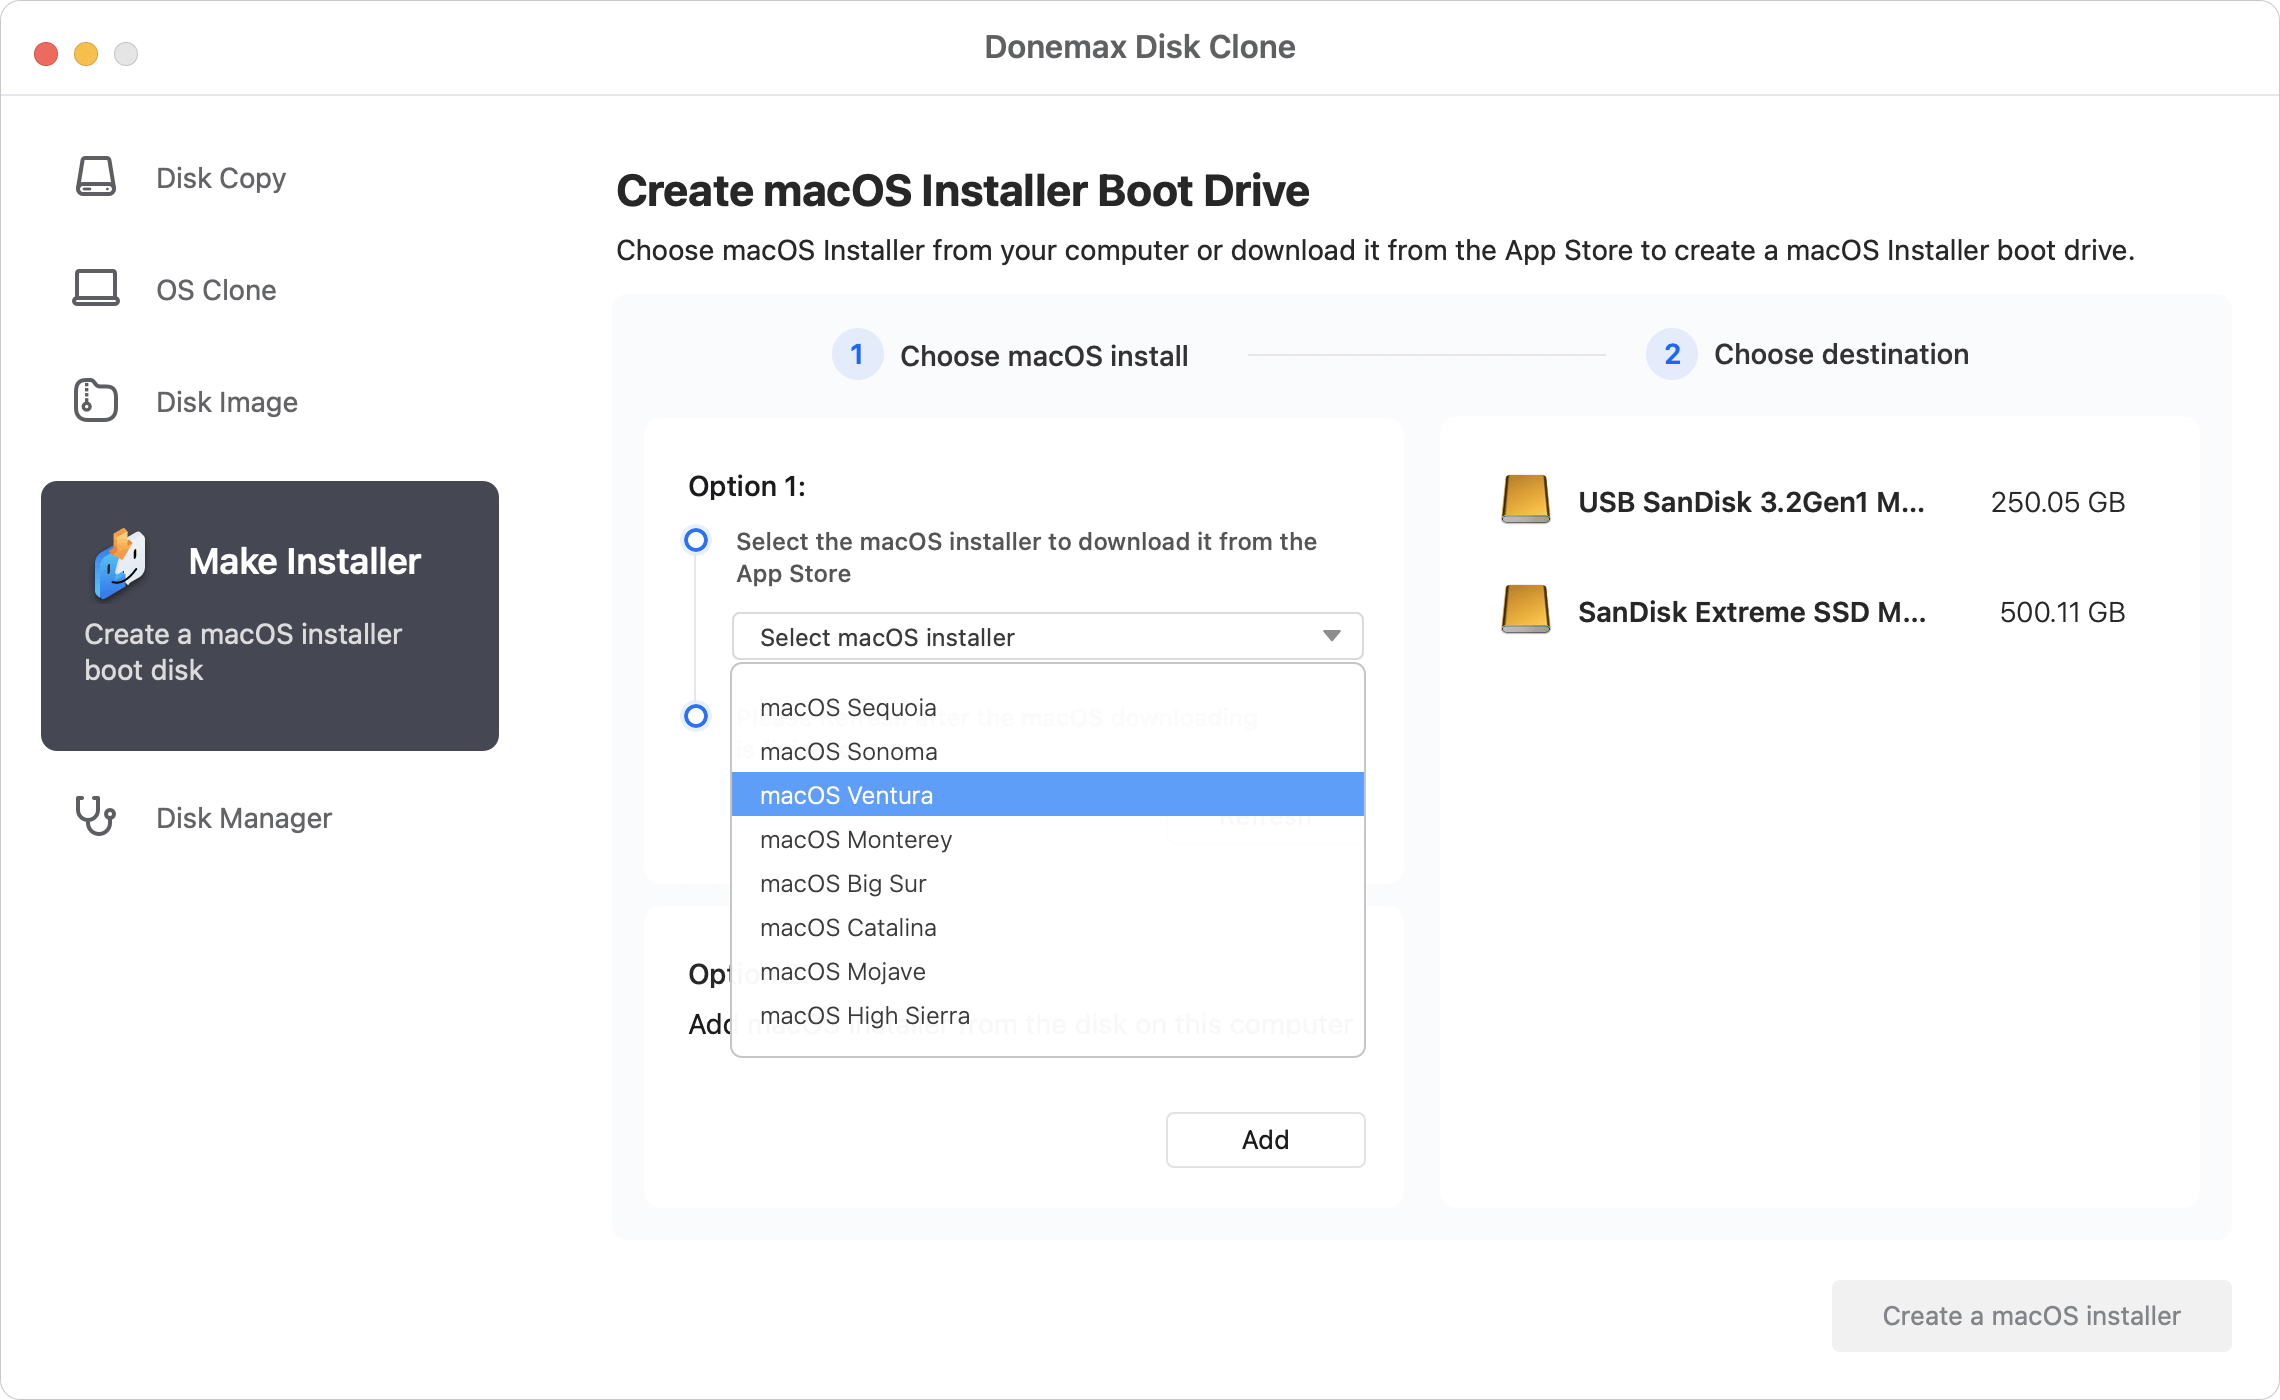
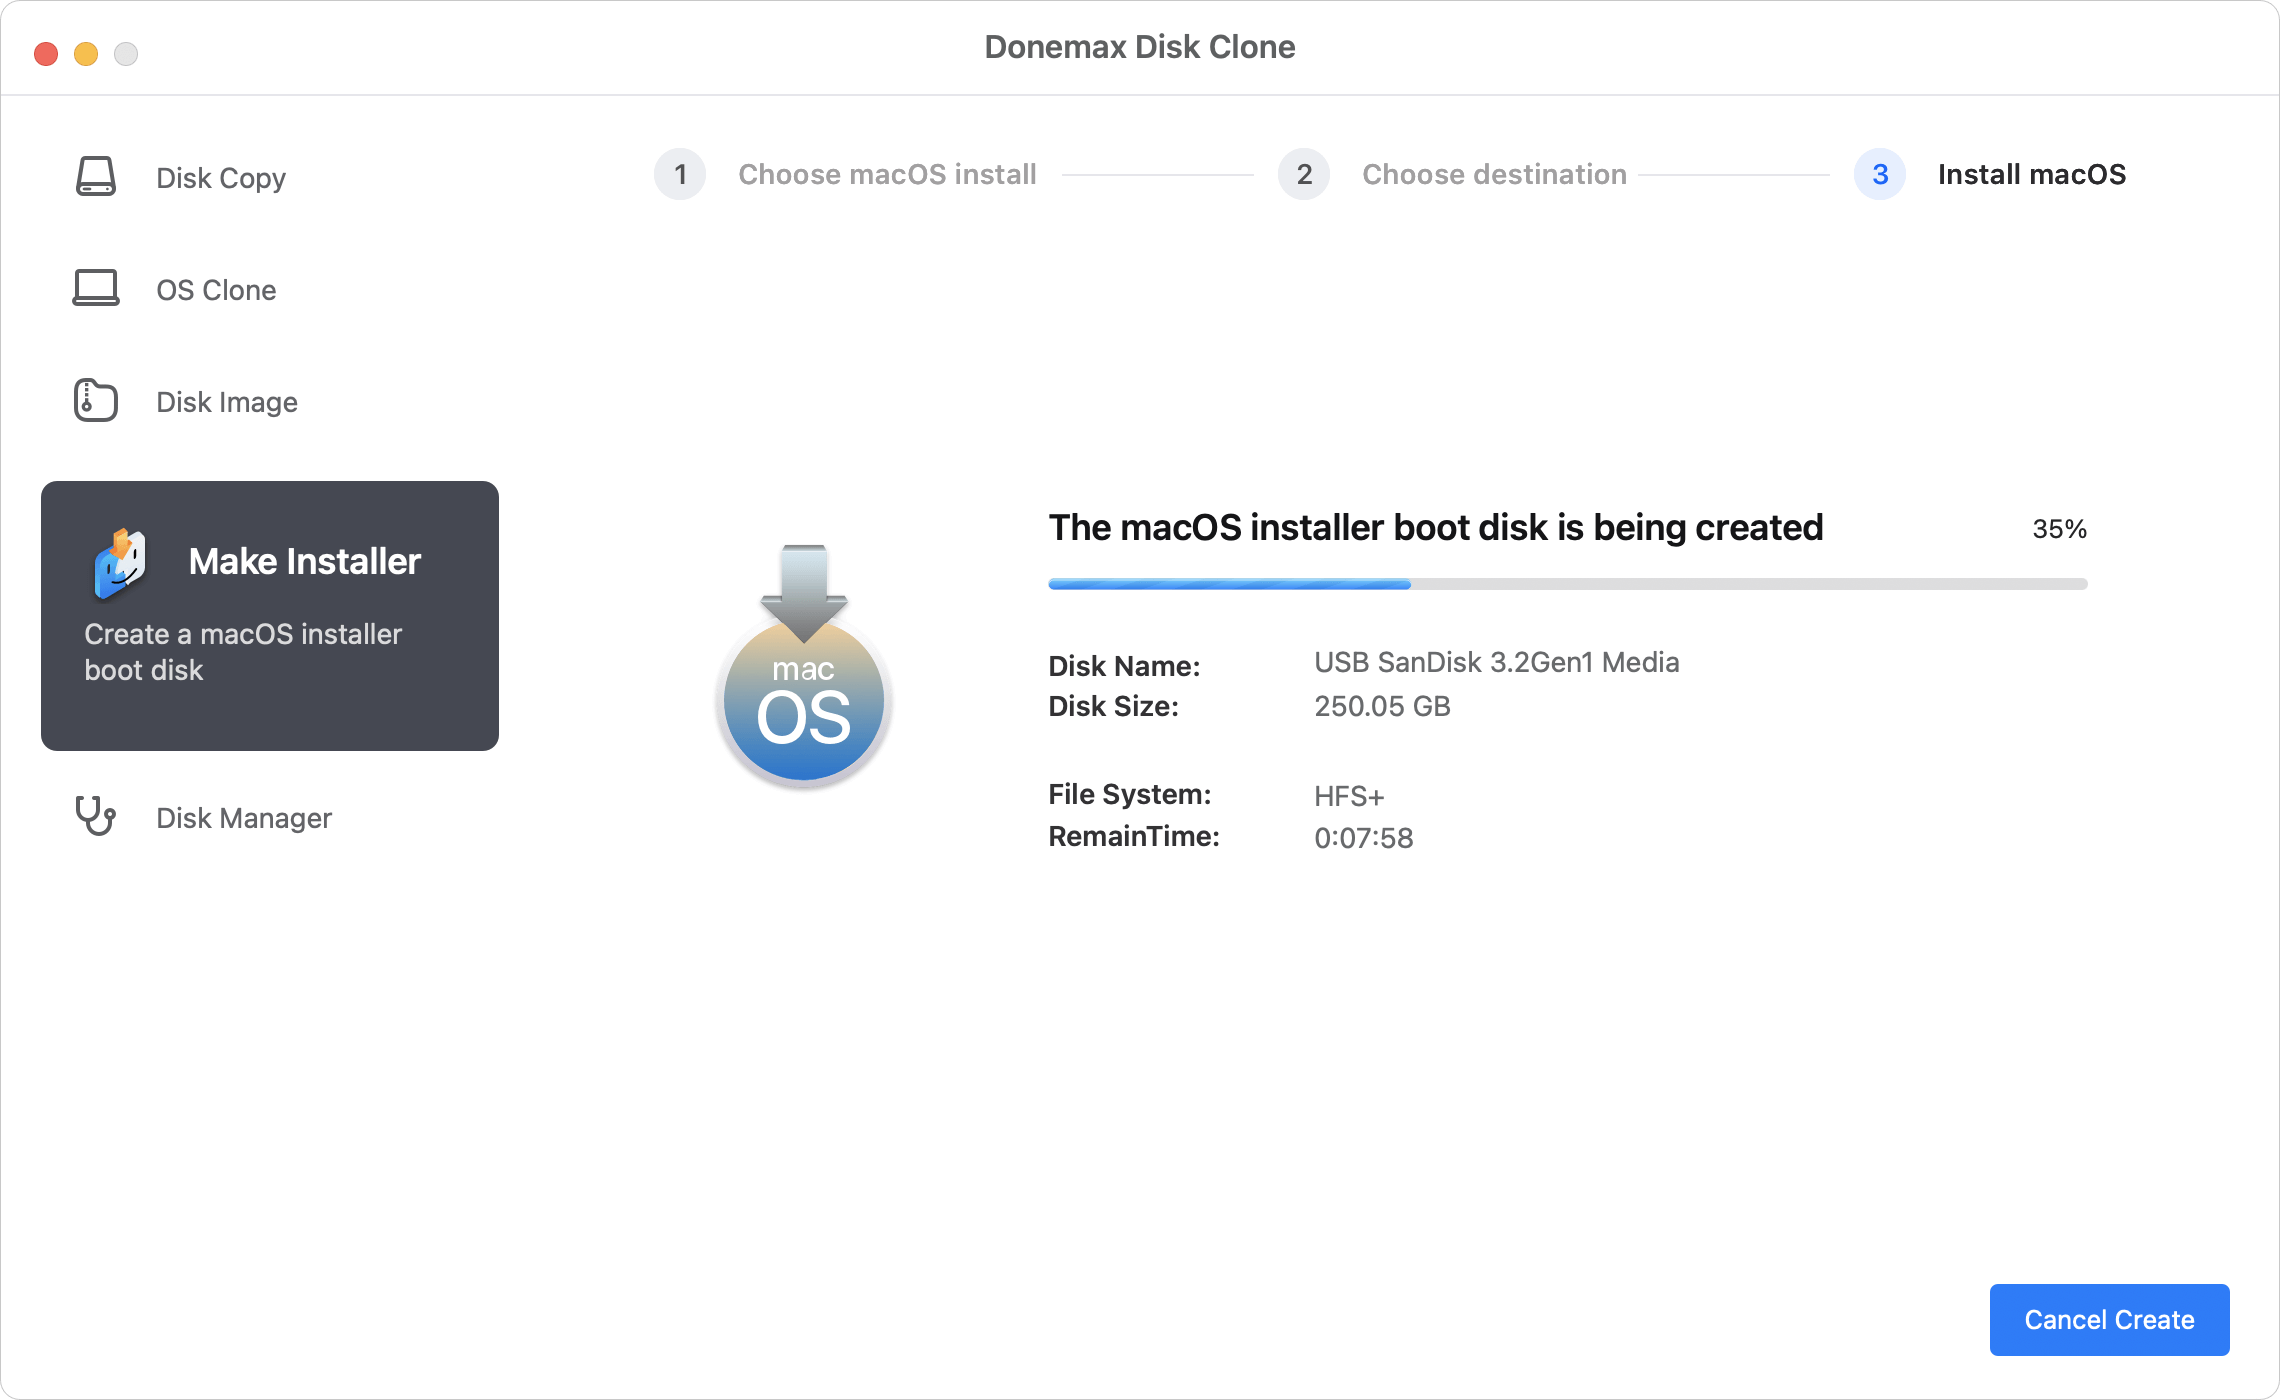
1. Creating a macOS Installer on an SD Card
If you only need macOS installation, create an installer. It's very easy to create a macOS bootable installer with the software Donemax Disk Clone for Mac.
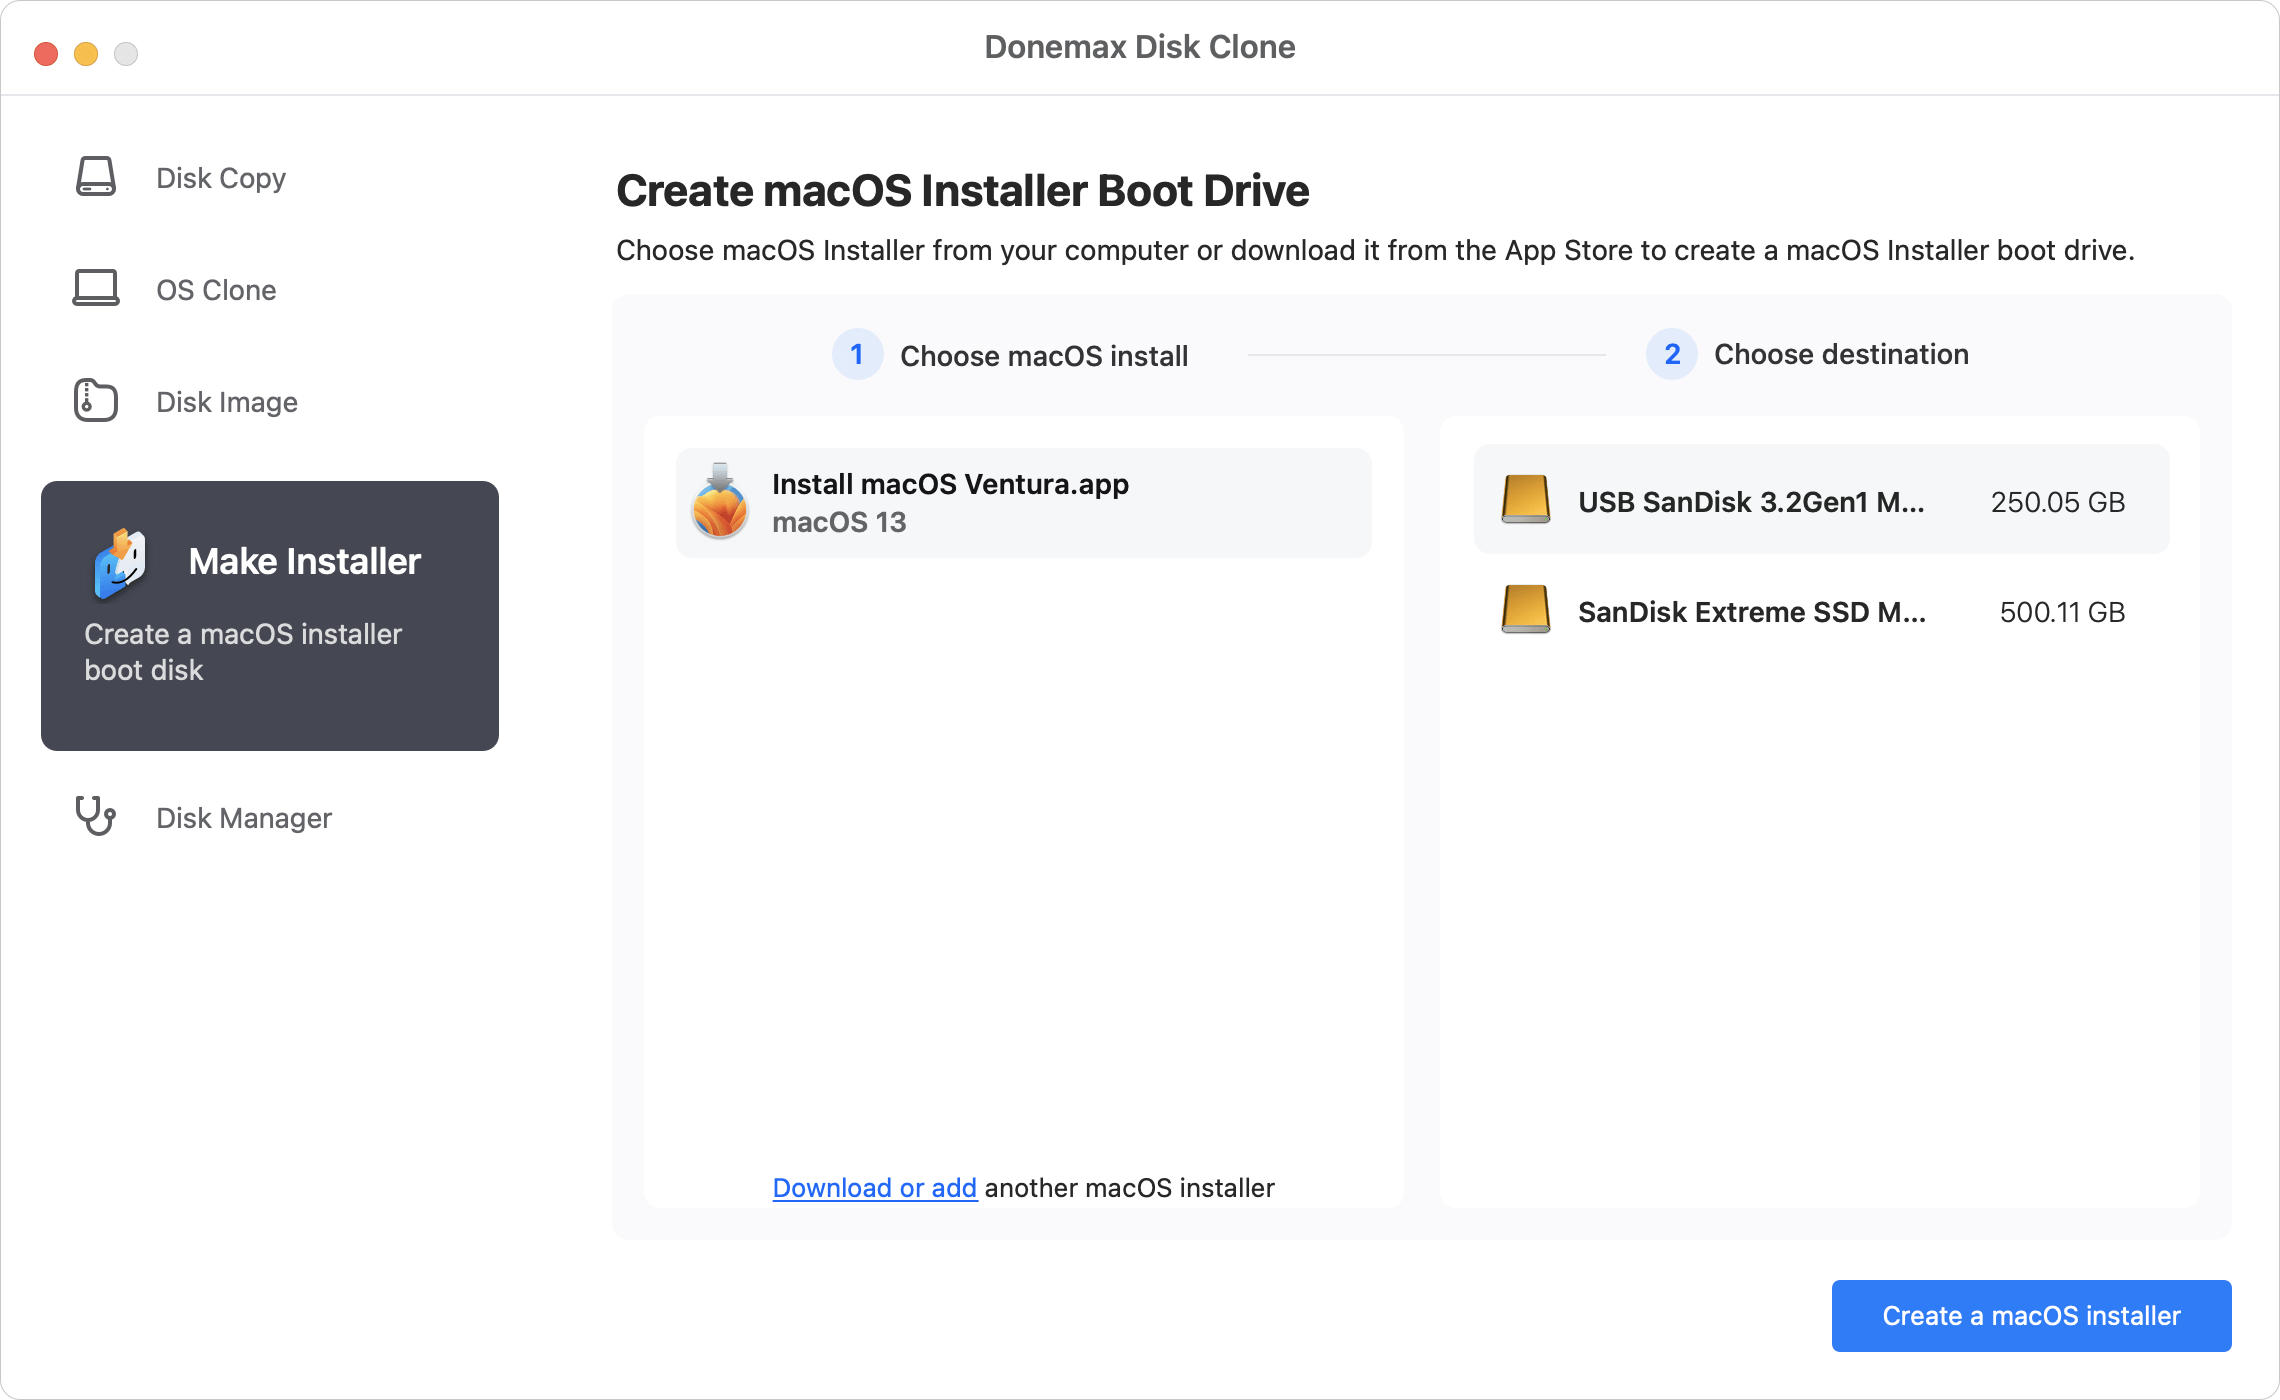
- Start the software from launchpad and change to Make Installer option. Select macOS version for installer. It will start to download the installation file. Once it's done, click Refresh button.
![clone Mac to an SD card]()
- Choose the SD card as destination at the right side.
![clone Mac to an SD card]()
- Click Create a macOS installer button and the software will start to create a bootable installer on the SD card.
![clone Mac to an SD card]()
2. Choose an external SSD instead of SD card
If performance is an issue, consider an external SSD instead of an SD card for:
- Faster read/write speeds.
- Better longevity and reliability.
Conclusion
Cloning a Mac to an SD card provides a lightweight, portable macOS setup. Whether you're using it for backups, portability, or testing, choosing the right method is crucial.
- For beginners: Use Donemax Disk Clone for Mac or Disk Utility.
- For advanced users: Use the dd command in Terminal.
- For performance users: Consider an external SSD instead.
By following this guide, you can successfully clone and boot macOS from an SD card, ensuring flexibility and security for your Mac environment.
Donemax Disk Clone for Mac
An award-winning disk cloning program to help Mac users clone HDD/SSD/external device. It also can create full bootable clone backup for Macs.
Related Articles
- Jun 25, 2023The Best Way to Clone Hard Drive on macOS Monterey
- Jul 28, 2023Move Data from the Old Mac to New Mac Studio
- Dec 17, 2024Create Bootable Clone Backup for macOS High Sierra
- Sep 23, 2025Top 10 Disk Cloning Software for Mac - macOS Tahoe Supported
- Jul 30, 2025Methods to Create macOS Ventura USB Installer
- Jul 23, 2025How to Install macOS to An External Hard Drive?

Contributing Writer
Steven
Steven has been a senior writer & editor of Donemax software since 2020. He's a super nerd and can't imagine the life without a computer. Over 6 years of experience of writing technical solutions and software tesing, he is passionate about providing solutions and tips for Windows and Mac users.

Editor in chief
Gerhard Chou
In order to effectively solve the problems for our customers, every article and troubleshooting solution published on our website has been strictly tested and practiced. Our editors love researching and using computers and testing software, and are willing to help computer users with their problems