Written byCharlesUpdated on Apr 10, 2025
How to Recover Photos from iCloud on Mac?
Approved byGerhard Chou
Tip: If you can't restore photos from iCloud on Mac, you can use Mac data recovery software - such as Donemax Data Recovery to deeply scan the Mac's disk and find all lost photos.
PAGE CONTENT:
iCloud is a powerful cloud storage solution designed by Apple, allowing users to store and sync photos, videos, and other files across multiple Apple devices. While it provides a seamless way to access your media files anywhere, accidental deletions, system glitches, or sync issues can sometimes lead to the loss of important photos. If you have deleted or lost photos stored in iCloud on your Mac, there are several ways to recover them.
This guide will walk you through various recovery methods, from retrieving photos from the Recently Deleted folder to using iCloud backups, Time Machine, and third-party recovery tools. Whether your photos were accidentally removed or disappeared due to an iCloud syncing issue, this article provides step-by-step instructions to help you restore them successfully.

What is iCloud Photo Storage?
Before attempting to recover lost photos, it's important to understand how iCloud manages photo storage.
1. What is iCloud Photos?
iCloud Photos automatically syncs and stores photos across all your Apple devices, ensuring that any image captured on an iPhone is accessible from your Mac, iPad, or even the iCloud website.
2. Key Features of iCloud Photos
- Synchronization: When you delete a photo from any Apple device, it is removed from iCloud and all synced devices.
- Recently Deleted Folder: iCloud retains deleted photos for up to 30 days before permanently removing them.
- Optimized Storage: If enabled, Optimize Mac Storage replaces full-resolution images with smaller thumbnails, keeping the original in iCloud.
- iCloud Backup: Unlike iCloud Photos, an iCloud Backup stores data from specific devices, which may include photos if iCloud Photos was disabled during backup.
Understanding these concepts is crucial because it determines whether your lost photos are recoverable and where to look for them.
Top 6 Methods to Recover Photos from iCloud on Mac
Method 1. Restore Photos from the Recently Deleted Folder
The first place to go if you unintentionally erased any images is the images app's Recently Deleted section.
Steps to Recover Photos from Recently Deleted Folder:
- Launch the Mac's Photos app.
![Recovering photos from iCloud on a Mac]()
- From the left sidebar, select Recently Deleted.
- Browse through the deleted photos and select the ones you want to restore.
- Click Recover to restore them to your main Photos Library.
![Recovering photos from iCloud on a Mac]()

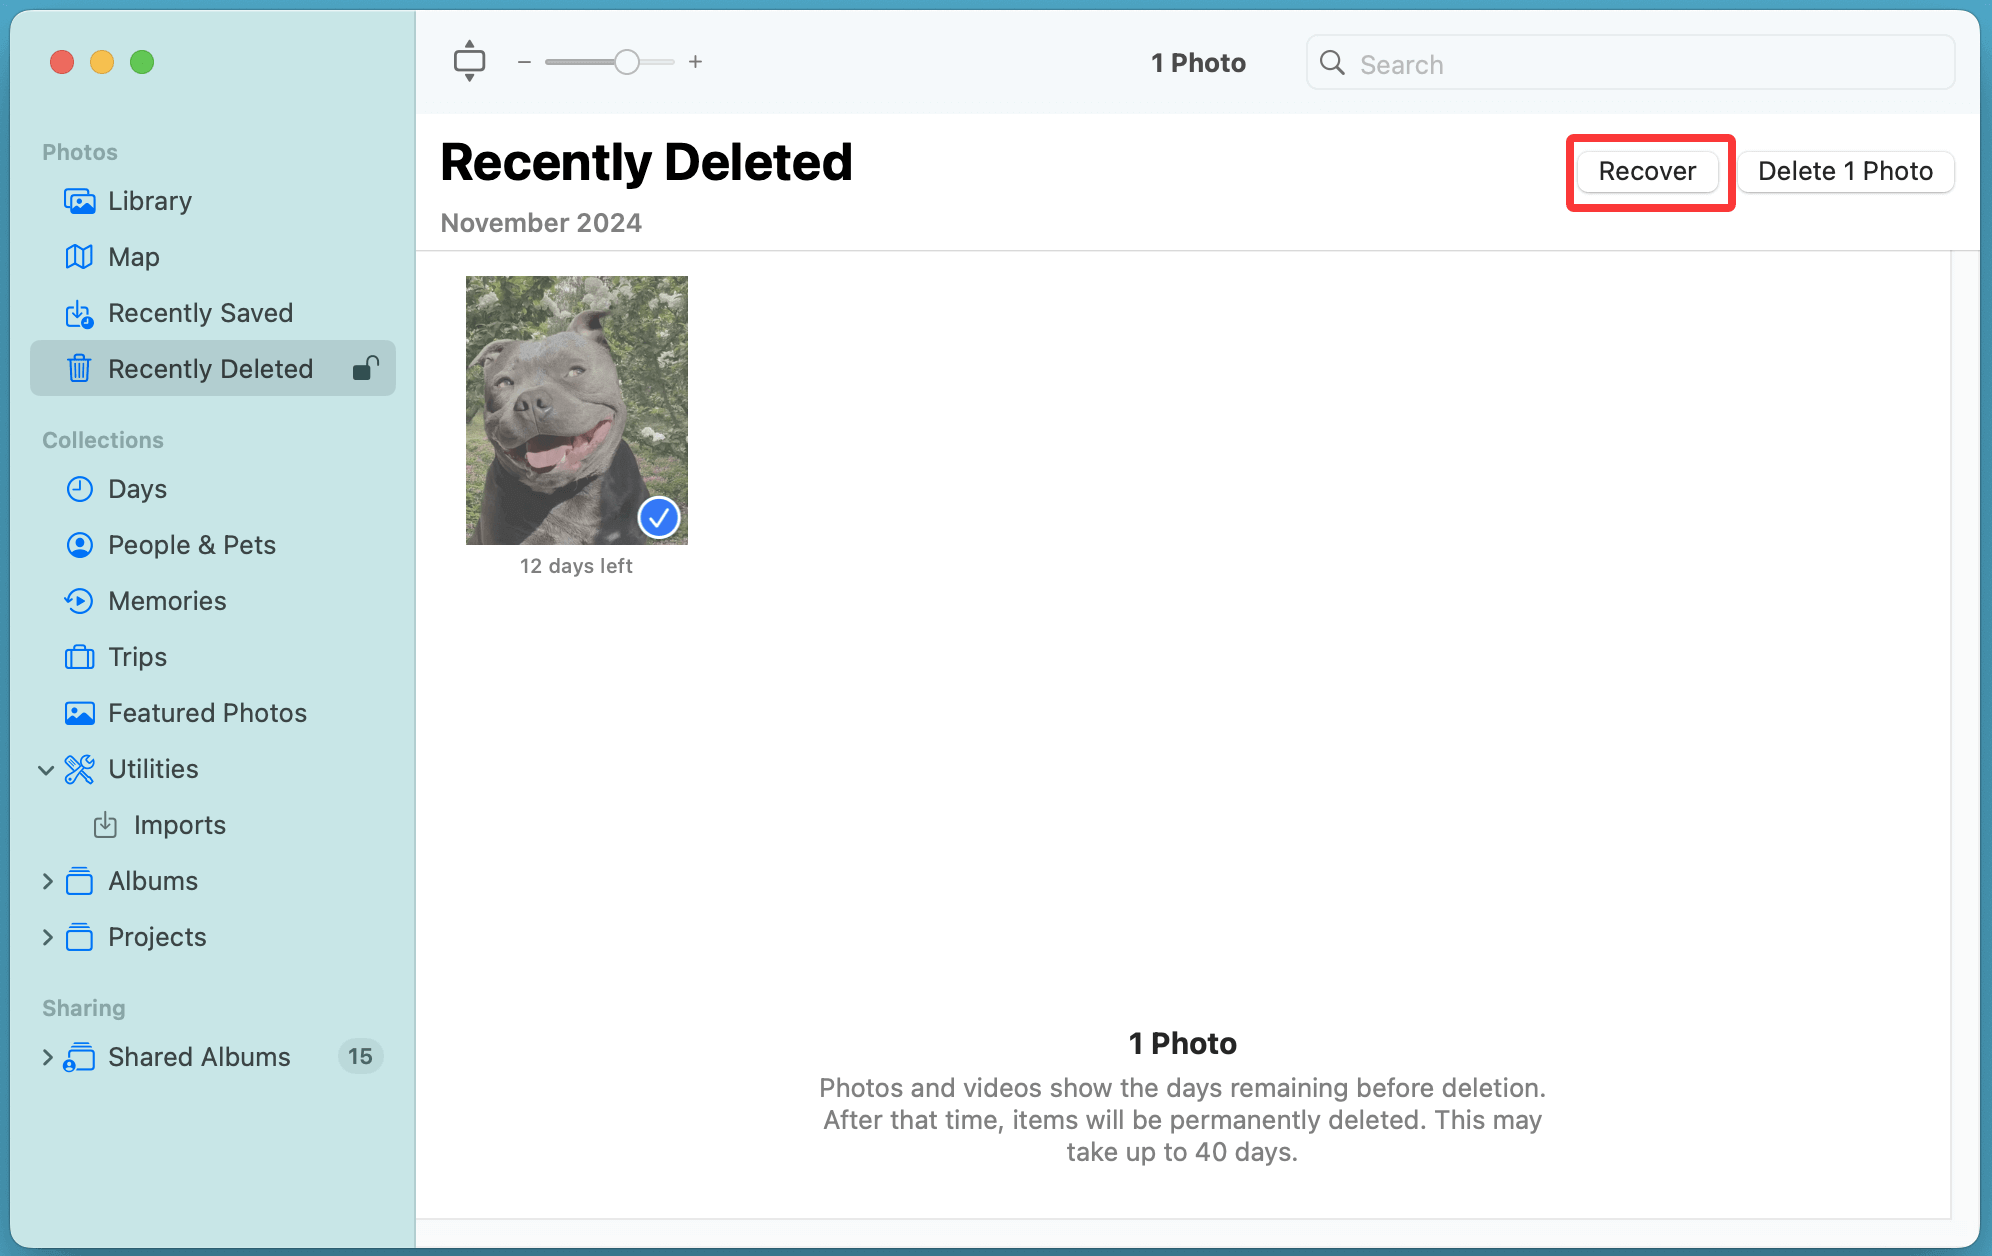
💡 Note: Deleted photos remain in this folder for 30 days before being permanently removed. If more than 30 days have passed, use an alternative recovery method.
Method 2. Check iCloud.com for Deleted Photos
If your Mac's Recently Deleted folder is empty, try checking iCloud.com.
Steps to Restore Photos from iCloud.com:
- On your Mac, launch a web browser and navigate to iCloud.com.
- Enter your Apple ID and password to log in.
- Click on Photos and then navigate to Recently Deleted in the left sidebar.
- Select the photos you want to recover and click Recover.
![Recovering photos from iCloud on a Mac]()
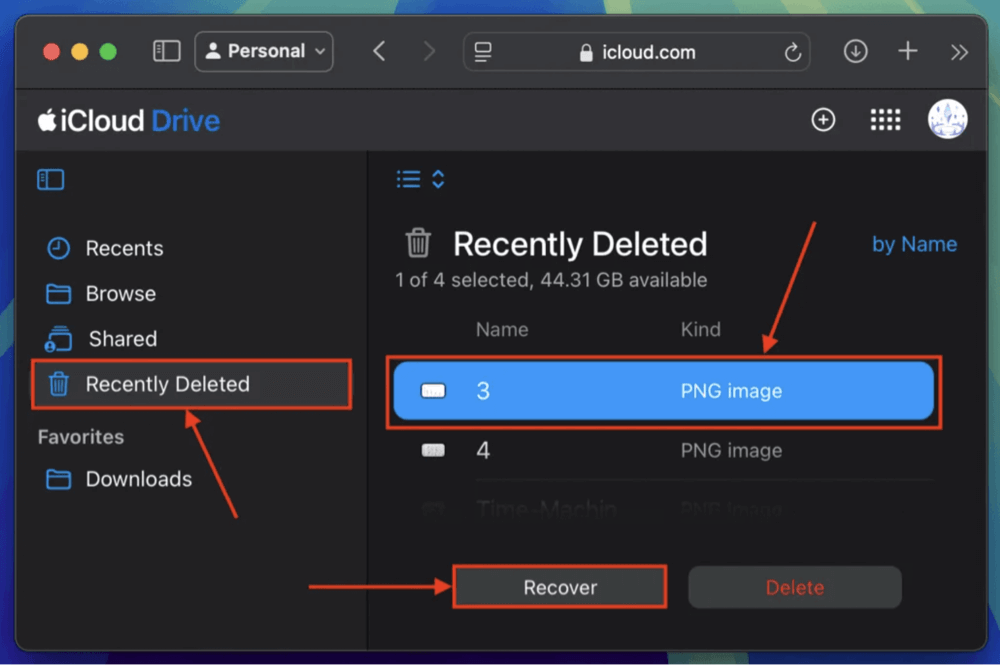
This method is effective if your Mac is not syncing correctly but iCloud still retains the deleted images.
Method 3. Recover Photos from iCloud Backup
If your photos are missing and you cannot find them in the Recently Deleted folder or on iCloud.com, your next option is to check if they are stored in an iCloud Backup. However, this method has some limitations and should only be used if iCloud Photos was disabled at the time of the backup. This is because iCloud Photos automatically syncs across devices, meaning it does not store photos in iCloud Backups.
1. Understand iCloud Backup vs. iCloud Photos
Many users assume that iCloud Backup stores all their data, including photos, but this is not always the case. Here’s how the two services differ:
| Feature | iCloud Photos | iCloud Backup |
|---|---|---|
| Syncs photos across devices? | Yes | No |
| Stores all photos permanently? | Yes (if storage allows) | Only if iCloud Photos was disabled |
| Allows individual file recovery? | Yes | No, only full device restore. |
| Requires erasing the Mac for restoration? | No | Yes |
| Accessible via iCloud.com? | Yes | No |
Thus, before attempting to restore from an iCloud Backup, first check if iCloud Photos is enabled in your Mac's system settings. If it is, then your photos were never included in iCloud Backups, and you should use other recovery methods.
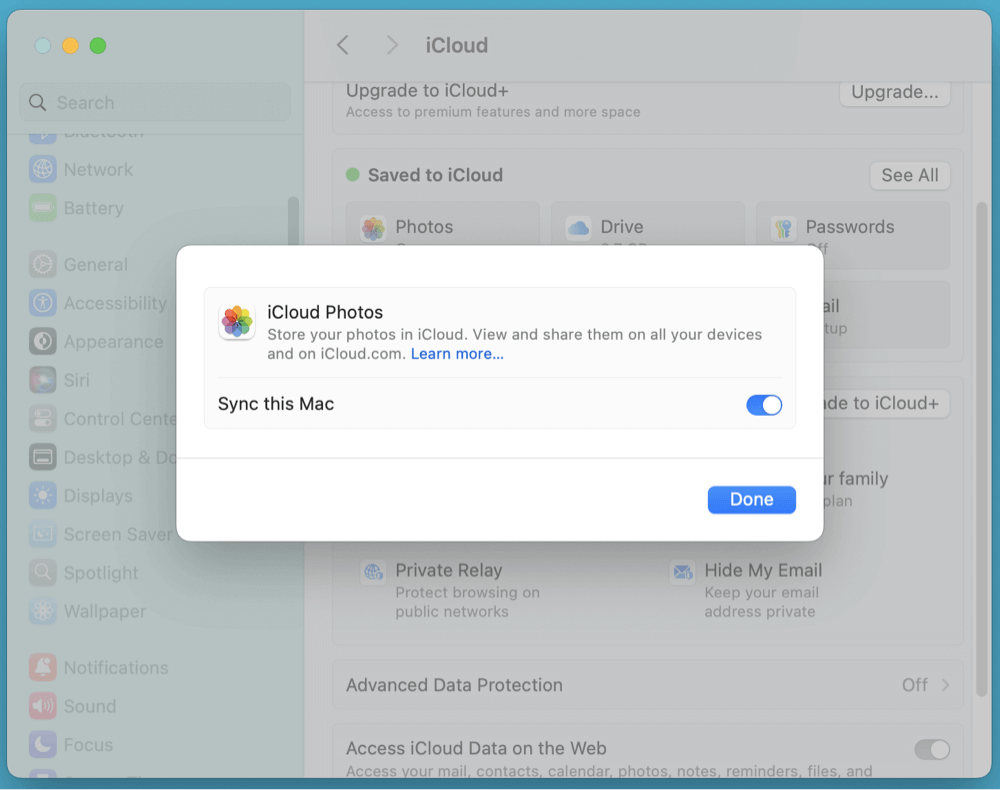
2. How to Check if an iCloud Backup Contains Your Photos
To determine whether an iCloud Backup includes your lost photos, follow these steps:
- On your Mac, click the Apple menu in the upper-left corner.
- Select System Settings or System Preferences.
- Click Apple ID > iCloud.
- Scroll down and select Manage Storage > Backups.
- Look for the latest backup and check the list of included apps.
- If Photos is listed, there's a chance that your photos are in the backup.
If iCloud Photos was enabled, your photos are not included in iCloud Backup, and you should not proceed with restoring from a backup. Instead, use iCloud.com, Time Machine, or a data recovery tool.
3. Steps to Restore Photos from an iCloud Backup
If you confirm that your iCloud Backup contains the missing photos, follow these steps to restore them. Warning: This process erases your Mac's current data and settings, so ensure you have a backup of any new files before proceeding.
Step 1: Back Up Your Current Data
Before restoring from an iCloud Backup, create a backup of your current files to prevent additional data loss:
- Use Time Machine: Connect an external hard drive and back up your current Mac files.
- Copy Important Files Manually: Transfer critical files to an external drive or cloud storage.
Step 2: Erase Your Mac and Reset to Factory Settings
To restore an iCloud Backup, your Mac needs to be reset to factory settings:
- On your Mac, click the Apple menu in the upper-left corner.
- Go to General > Transfer or Reset Mac > Erase All Content and Settings.
- Enter your administrator password and confirm the reset.
- Your Mac will restart and display the Setup Assistant.
Step 3: Restore from iCloud Backup
- During setup, when prompted, choose Restore from iCloud Backup.
- Sign in with your Apple ID and select the most recent backup that contains your missing photos.
- Wait for the restore process to complete. This may take several hours depending on the size of the backup.
- Once the Mac restarts, open the Photos app and check if the missing images have been restored.
4. Limitations of iCloud Backup Recovery
While restoring from an iCloud Backup can be effective, it comes with significant downsides:
- Full system restore required: You must erase your entire Mac, potentially leading to additional data loss.
- No selective recovery: Unlike Time Machine, iCloud does not allow users to restore only photos - everything in the backup is restored.
- iCloud Photos must be disabled: If iCloud Photos was enabled at the time of backup, photos were not included in the backup.
- Time-consuming process: Restoring from an iCloud Backup can take several hours.
5. Alternative to iCloud Backup: Using Time Machine
If restoring an iCloud Backup is not a viable option, consider checking Time Machine, Apple's built-in backup tool, which allows you to recover only the missing photos without erasing your Mac.
- Open Time Machine and navigate to the date before the photos were deleted.
- Select your Photos Library and click Restore.
![Recovering photos from iCloud on a Mac]()
Using Time Machine is often a safer and more efficient method than restoring from iCloud Backup.
6. When to Use iCloud Backup for Photo Recovery
Restoring from an iCloud Backup should be considered only if:
- You are certain that iCloud Photos was disabled at the time of backup.
- You do not have a Time Machine backup or any local copies of your photos.
- The lost photos are critical, and you are willing to erase your Mac to restore them.
Method 4. Recover Photos from Mac’s Local Storage
If you don't find your photos in iCloud, try checking local storage on your Mac.
1. Restore Photos from Time Machine Backup
If you use Time Machine, you may be able to recover photos from an earlier backup.
Steps to Recover Photos from Time Machine:
- Attach your Mac to the Time Machine backup drive.
- Launch the Photos application.
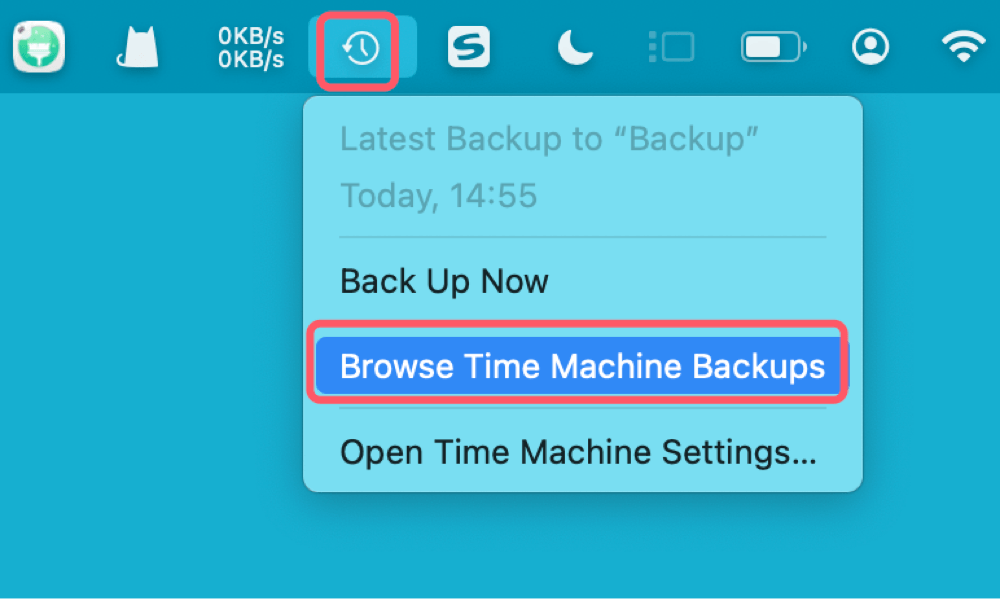
- Choose Enter Time Machine or Browse Time Machine Backups after clicking the Time Machine symbol in the top menu.
![Recovering photos from iCloud on a Mac]()
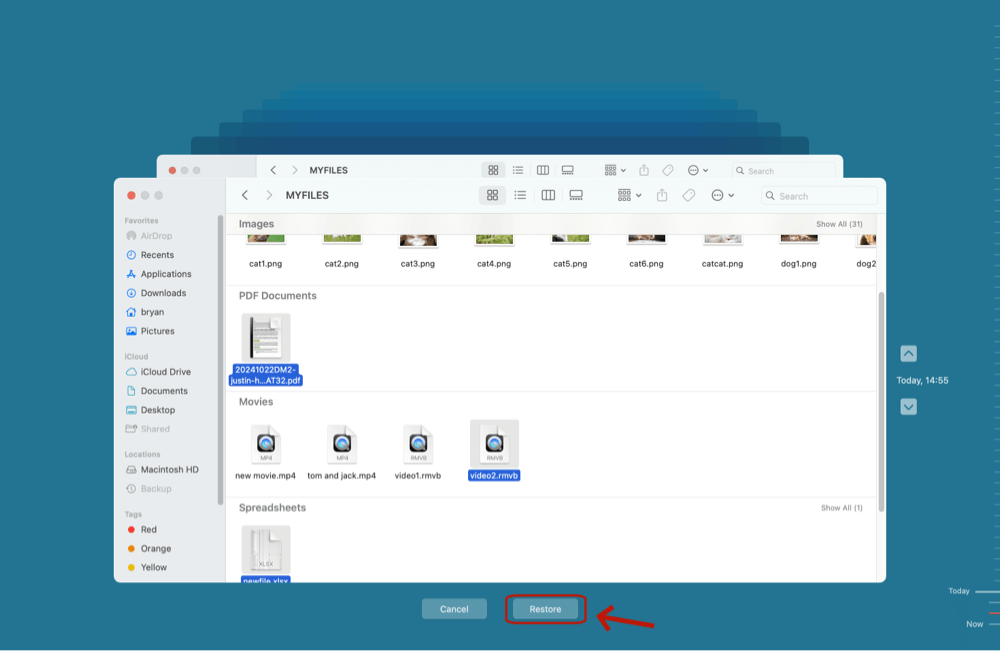
- Go to a previous backup where the lost images are still accessible.
- Select the photos and click Restore.
![Recovering photos from iCloud on a Mac]()

2. Use Spotlight Search to Locate Missing Photos
Sometimes, missing photos may still be on your Mac but saved in an unexpected location.
Steps to Use Spotlight to Find Photos:
- Press Command (⌘) + Space to open Spotlight Search.
- Type the name of the missing photo or file format (e.g., .jpg, .png).
![Recovering photos from iCloud on a Mac]()
- Browse the search results to check if the photos are stored elsewhere on your Mac.

Method 5. Use Third-Party Data Recovery Software
If your photos were permanently deleted and are not found in iCloud or Time Machine, using professional data recovery software is your best option.
Donemax Data Recovery for Mac is a reliable data recovery program. It supports to securely and completely recover photos from internal disk or iCloud drive on Mac.
Step 1. Download and install Donemax Data Recovery for Mac on your Mac.
Step 2. Open Donemax Data Recovery for Mac, select the internal disk - Macintosh HD to start data recovery.

Step 3. Click on Scan button to deeply scan the disk and find all recoverable files including photos and RAW images.

Step 4. After scan, you can preview the photos. Then select the wanted photos, click on Recover button to save them.

Method 6. Contact Apple Support for Assistance
If all recovery methods fail, reach out to Apple Support for help.
Steps to Contact Apple Support:
- Visit Apple Support.
- Select Apple ID & iCloud > iCloud Photos.
- Choose a contact method (phone, chat, or in-store visit).
Apple Support may be able to retrieve lost photos from iCloud servers if they were recently deleted.
Preventative Measures to Avoid Photo Loss in the Future
To avoid losing photos in the future, follow these best practices:
- Enable iCloud Photos: Go to System Settings > Apple ID > iCloud > Photos and turn it on.
- Regular Backups: Use Time Machine or an external drive to back up your photo library.
- Use Google Photos or Dropbox: Keep a secondary cloud backup in case iCloud fails.
- Check Storage Settings: Make sure Optimize Mac Storage is not enabled if you want full-resolution images available locally.
Conclusion
Recovering photos from iCloud on a Mac is possible using multiple methods, including checking Recently Deleted, iCloud.com, iCloud Backup, Time Machine, and third-party recovery tools. The success of recovery largely depends on how quickly you act after data loss.
By enabling automatic backups, using alternative cloud storage, and carefully managing iCloud sync settings, you can prevent losing important memories in the future. If recovery methods fail, Apple Support may provide additional solutions.
Donemax Data Recovery for Mac
Donemax Data Recovery for Mac is one of the best Mac data recovery software. It is easy-to-use and can help in recovering deleted, formatted, inaccessible or lost data from Mac HDD/SSD, external disk, USB drive, SD card, camera or other storage devices.
Related Articles
- May 18, 2024Mac Documents Folder Emptied or Missed Suddenly – How to Recover Lost Files?
- Nov 29, 2024Mac Trash Recovery: A Comprehensive Guide to Recovering Deleted Files on Mac
- Jun 16, 2023How to Recover Lost Data from An Formatted APFS Hard Drive?
- Mar 06, 2025Three Methods to Recover Lost Data from WD My Passport on Mac
- Feb 29, 2024SDHC Card Recovery on Mac: Completely Recover Deleted/Formatted Data
- Dec 31, 2024No Files on USB Drive on Mac, How to Get the Lost Files Back?

Contributing Writer
Charles
Charles, who lives in Sydney, Australia, is an editor & writer of Donemax Team. He is good at writing articles related with Apple Mac computers, Windows operating systems, data recovery, data erasure, disk clone and data backup, etc. He loves reading and playing tennis in his spare time and is interested in testing new digital devices such as mobile phones, Macs, HDDs, SSDs, digital cameras, etc.

Editor in chief
Gerhard Chou
In order to effectively solve the problems for our customers, every article and troubleshooting solution published on our website has been strictly tested and practiced. Our editors love researching and using computers and testing software, and are willing to help computer users with their problems