Before we start: Can't find your notes on Mac? Don't worry, you can use Mac data recovery software - such as Donemax Data Recovery for Mac to easily and completely recover deleted/lost notes on Mac.
PAGE CONTENT:
The Notes app on Mac is a crucial tool for organizing thoughts, storing important information, and maintaining checklists. Whether used for work, study, or personal organization, losing important notes can be frustrating and stressful. Notes can be accidentally deleted due to user mistakes, system crashes, macOS updates, or sync issues. Fortunately, Mac provides multiple ways to recover deleted notes, depending on how and when they were deleted.
In this detailed guide, we will explore various methods to recover deleted notes on Mac. Whether they were recently deleted, lost due to iCloud syncing, or permanently removed, this article will walk you through every possible recovery option to retrieve your important data.
6 Methods to Recover Deleted/Lost Notes on Mac
Method 1: Check the Recently Deleted Folder
What is the Recently Deleted Folder?
Mac's Notes app features a "Recently Deleted" folder where deleted notes are temporarily stored before being permanently erased. This folder retains deleted notes for up to 30 days, allowing users to restore them easily. If you accidentally deleted a note within this time frame, recovery is straightforward.
Steps to Restore Notes from Recently Deleted Folder:
- Open the Notes App on your Mac.
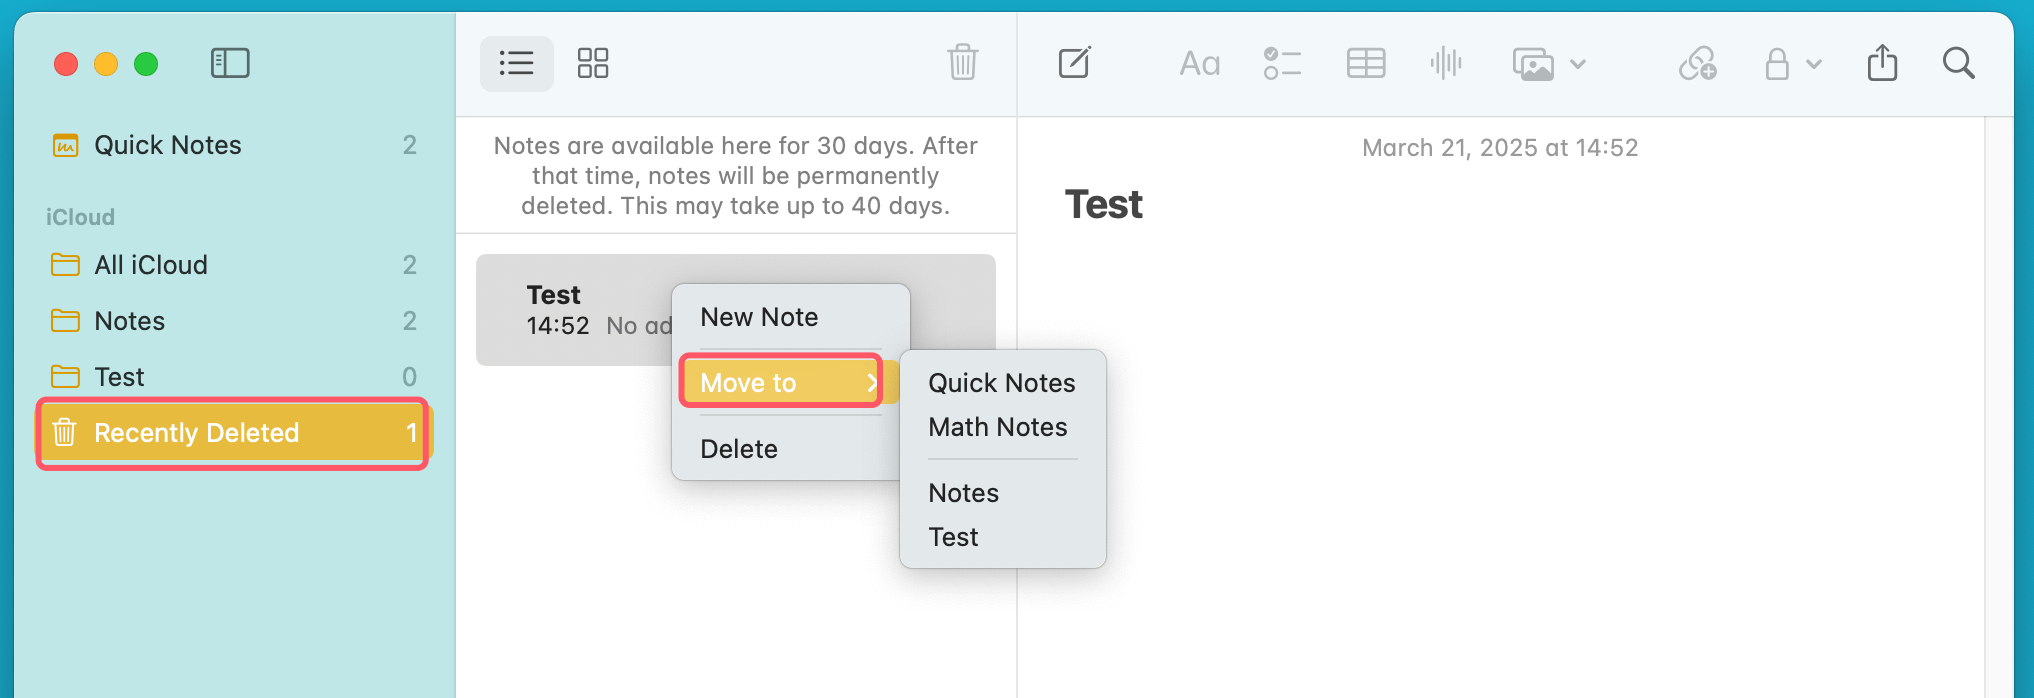
- Look for the Recently Deleted folder in the sidebar.
- Browse through the deleted notes and locate the one you want to recover.
- Right-click (or control-click) on the note and select Move To → Notes or drag it back to your main Notes folder.
What If the Note Isn't in the Recently Deleted Folder?
- If more than 30 days have passed, the note may have been permanently deleted.
- The folder might be empty if iCloud syncing has removed the note across devices.
- In such cases, try other recovery methods below.
Method 2: Restore Notes from iCloud
If you have enabled iCloud syncing for Notes, there's a good chance your deleted notes are still available on iCloud. iCloud automatically backs up and syncs your notes across multiple Apple devices, which can help in recovering lost data.
Steps to Recover Notes from iCloud:
- Go to iCloud.com
- Open your web browser and visit iCloud.com.
- Log in with your Apple ID credentials.
- Access Notes
- Click on the Notes icon.
- Check the Notes list to see if your deleted note is still available.
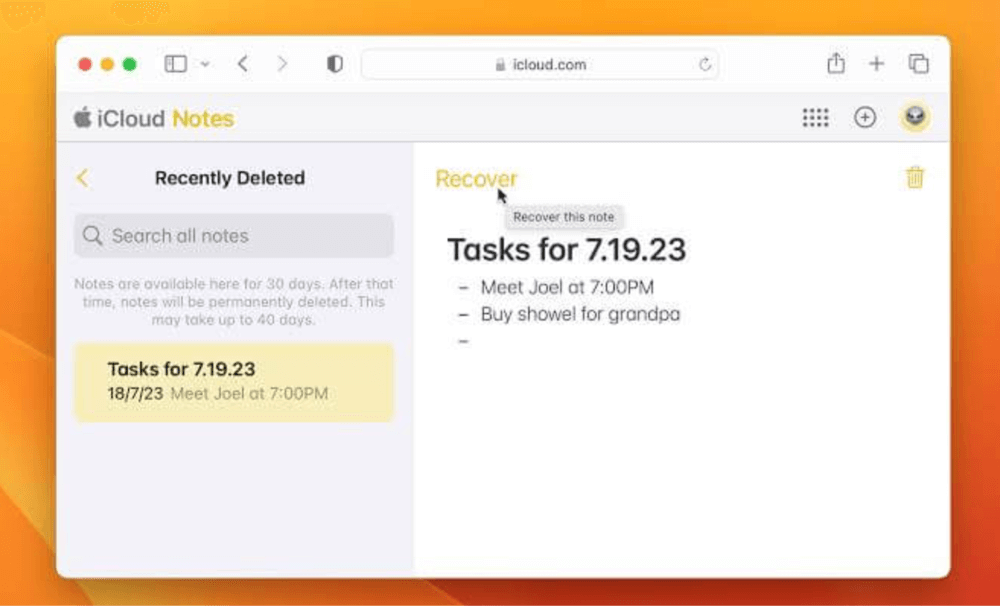
- Restore from Recently Deleted Folder
- If the note was deleted recently, check the Recently Deleted folder in iCloud Notes.
- Select the note and click Recover to restore it.
![recover deleted notes on Mac]()
Alternative: Restore iCloud Backup (if syncing is enabled)
If iCloud syncing is enabled, you can restore an earlier iCloud backup:
- Go to System Settings → Apple ID → iCloud.
- Click iCloud Backup → Restore from Backup.
- Select a backup that was made before the note was deleted.
- Wait for the restore process to complete and check the Notes app.
Method 3: Retrieve Notes from a Time Machine Backup
If you regularly back up your Mac using Time Machine, you may be able to restore deleted notes from an earlier backup. Time Machine creates snapshots of your system, including files from the Notes app.
Steps to Restore Deleted Notes Using Time Machine:
- Connect your Time Machine backup drive to your Mac.
- Open the Finder and navigate to:
~/Library/Containers/com.apple.Notes/Data/Library/Notes/
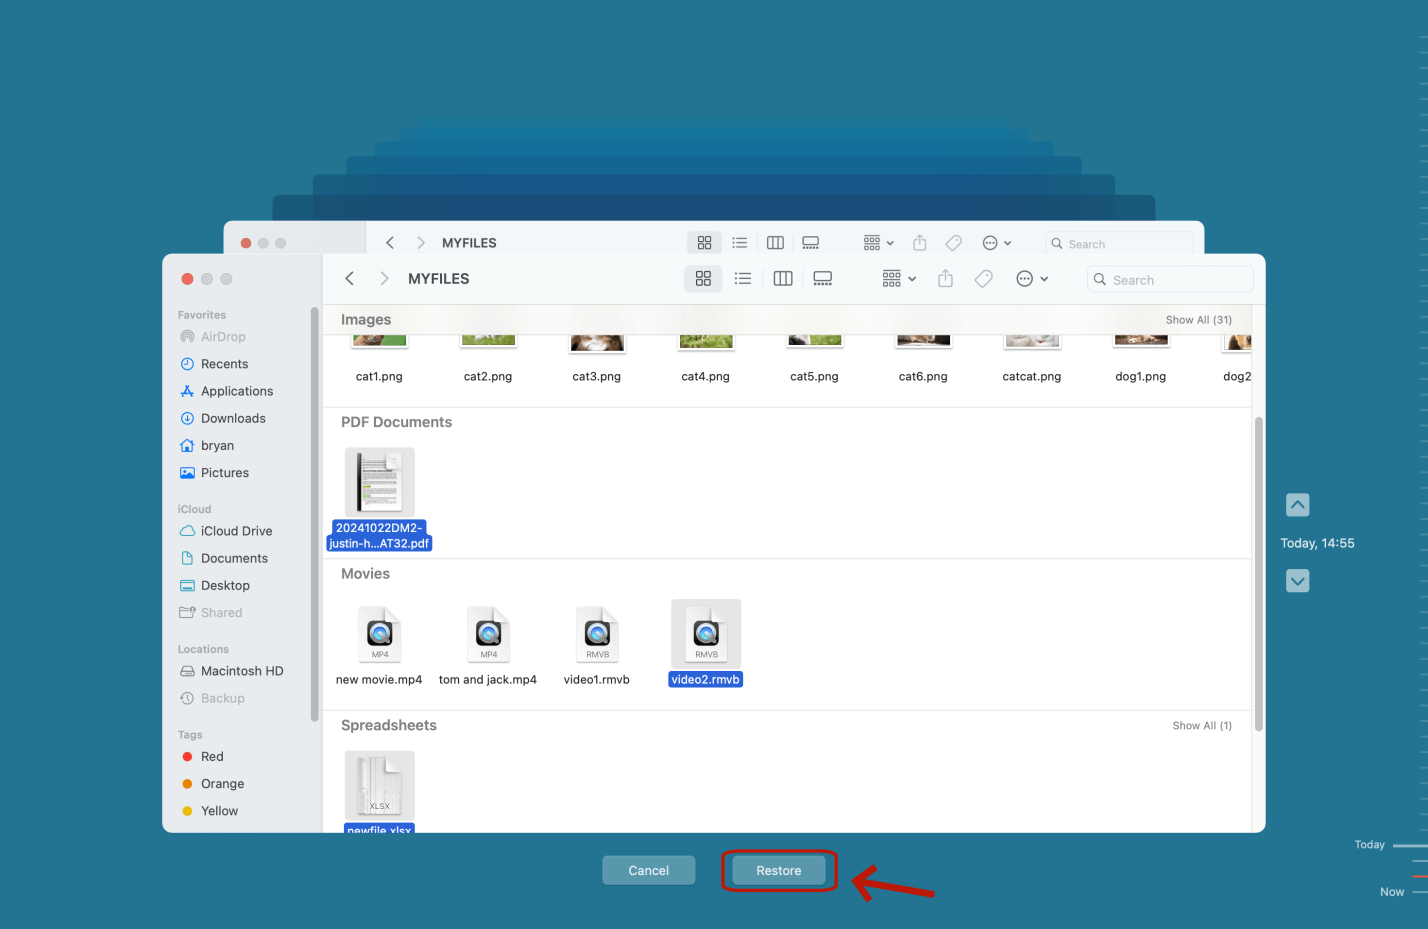
- Open Time Machine from the menu bar and browse backups from before the deletion occurred.
- Locate the deleted Notes database file (NotesV7.storedata or similar).
- Select the file and click Restore.
![recover deleted notes on Mac]()
- Restart the Notes app and check if your deleted note has reappeared.
Limitations of Time Machine Recovery:
- Works only if Time Machine was enabled before the note was deleted.
- Restoring an older backup may overwrite recent changes.
Method 4: Restore Notes from Mac Trash
Sometimes, deleted notes may end up in the Trash instead of the Notes app's Recently Deleted folder. This usually happens if the note was deleted via the Finder or another method.
How to Check and Recover Notes from Trash:
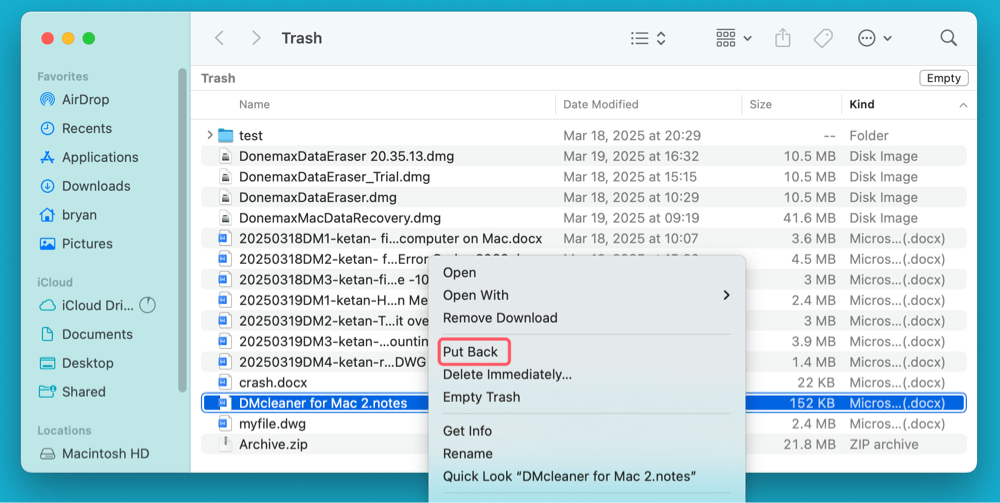
- Open Trash from your Dock.
- Use the search bar and type "Notes" to find relevant files.
- If you locate a deleted note, right-click it and select Put Back.>
![recover deleted notes on Mac]()
- Open the Notes app to check if the note has been restored.
Method 5: Use Third-Party Data Recovery Software
If built-in recovery options like the Recently Deleted folder, iCloud, or Time Machine don't work, third-party data recovery software can be a viable solution. These tools can scan your Mac's storage for deleted or lost files, including the Notes database.
Recommended Data Recovery Software for Mac
There are various data recovery tools available, each with its strengths. Below are some of the most reliable options for recovering deleted Notes:
1. Donemax Data Recovery for Mac
- One of the most popular Mac recovery tools.
- Provides a simple user interface with a high success rate.
- Can recover lost Notes, documents, photos, and other file types.
2. EaseUS Data Recovery Wizard
- Powerful recovery software with a user-friendly interface.
- Offers both quick and deep scans for better recovery chances.
- Supports various file formats and storage devices.
3. Tenorshare UltData – Mac
- Specifically designed for macOS data recovery.
- Can scan and recover lost Notes from Mac’s internal storage.
- Works well with macOS Ventura, Monterey, and earlier versions.
How to Recover Deleted Notes Using Data Recovery Software
Step 1. Download and install Donemax Data Recovery for Mac on your Mac.
Step 2. Open Donemax Data Recovery for Mac, select the Mac internal SSD - such as Macintosh HD to start data recovery.

Step 3. Click on Scan button to deeply scan the selected drive and find all recoverable files.

Step 4. Once the scan is completed, you can find and preview the deleted notes. Then select them, click on Recover button to save them.

Limitations and Risks of Data Recovery Software
- Not always 100% effective – If the deleted file has been overwritten, recovery may be impossible.
- Premium versions required – Most tools offer limited free recovery and require a paid license for full functionality.
- Security concerns – Always download software from trusted sources to avoid malware risks.
When to Use Professional Data Recovery Services
If the deleted note is extremely important and software tools fail, consider professional data recovery services. These services use advanced recovery techniques to retrieve lost data from Mac's SSD or hard drive.
By following these steps, you can maximize your chances of recovering deleted notes using third-party recovery software.
Method 6: Check Email Accounts for Synced Notes
If you have configured Notes to sync with an email account (Gmail, Outlook, etc.), the deleted notes might still be stored in your email account.
How to Check Email for Notes:
- Open Mail or log in to your email provider (Gmail, Outlook, Yahoo).
- Look for a folder named Notes under your email account.
- If the deleted note is found, copy it back into the Notes app manually.
How to Enable Email Sync for Notes (Prevention Tip):
- Go to System Settings → Internet Accounts.
- Select your email account and ensure that Notes Sync is enabled.
Prevention Tips to Avoid Losing Notes in the Future
To prevent accidental loss of important notes, follow these best practices:
1. Regularly Back Up Notes Using Time Machine
- Set up automatic Time Machine backups.
- Store backup copies on an external drive for extra security.
2. Enable iCloud Syncing for Notes
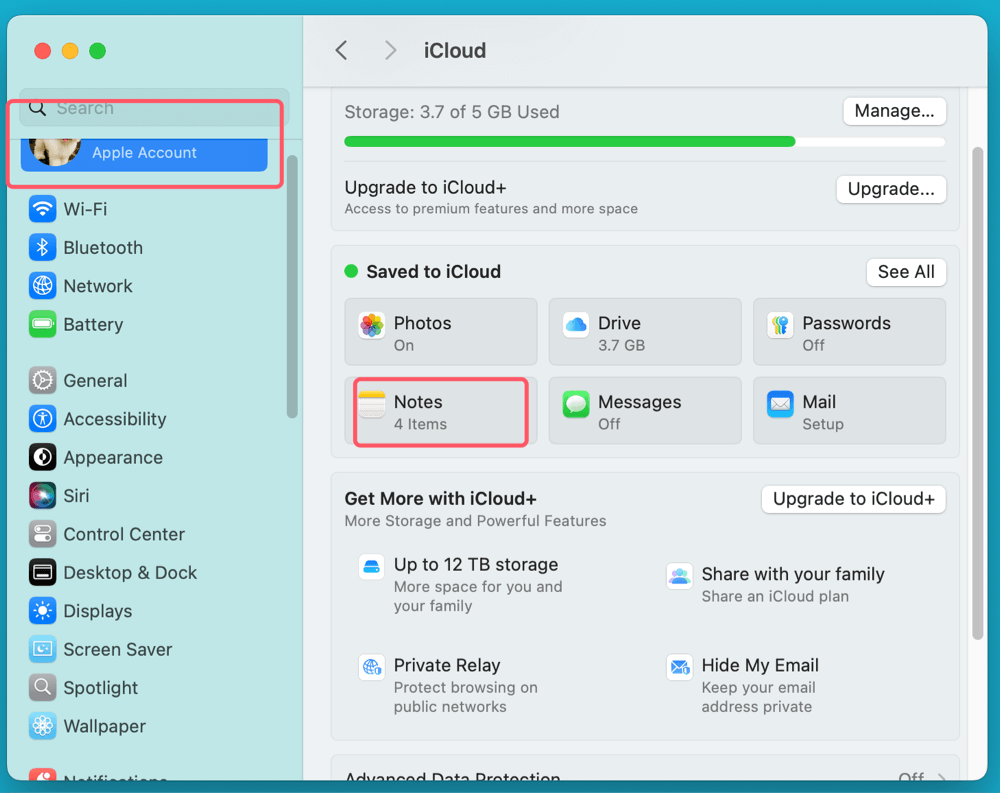
- Ensure iCloud backup is enabled in System Settings → Apple ID → iCloud → Notes.
![recover deleted notes on Mac]()
- Use iCloud.com to recover deleted notes if needed.
3. Organize and Archive Important Notes
- Instead of deleting notes, create an "Archive" folder within Notes.
- Move older notes to the archive instead of deleting them.
4. Use a Third-Party Note-Taking App for Extra Security
- Consider using apps like Evernote, Notion, or OneNote, which offer better backup and recovery features.
Conclusion
Losing notes on a Mac can be frustrating, but multiple recovery methods exist. The Recently Deleted folder and iCloud backups are the first places to check. If those don't work, Time Machine, Trash, third-party recovery tools (such as Donemax Data Recovery for Mac), and email syncing may help restore lost data.
To avoid future note loss, regular backups, enabling iCloud sync, and organizing notes properly are highly recommended. By following these methods, you can ensure that your important notes remain secure and recoverable.
If your notes are still missing after trying all methods, professional data recovery services may be the last option.


Donemax Data Recovery for Mac
Donemax Data Recovery for Mac is one of the best Mac data recovery software. It is easy-to-use and can help in recovering deleted, formatted, inaccessible or lost data from Mac HDD/SSD, external disk, USB drive, SD card, camera or other storage devices.
Related Articles
- Jan 21, 2025How to Recover Data From FileVault Hard Drive on Mac?
- Feb 17, 2025Recover Lost Data from XQD Card on Mac: A Complete Guide
- Mar 21, 2025Recover Deleted/Erased or Lost AutoCAD's DWG Files on Mac
- Mar 26, 2025How to Recover Replaced Files or Folders on Mac?
- Nov 01, 2024How to Recover Deleted or Lost MP4 Videos on Mac?
- Jul 11, 20235 Methods to Recover Lost Data after Upgrading to macOS Sonoma

Maria
Maria is one of the senior writers & editors of Donemax who lives and works in Sydney, Australia. She loves PC, Mac and Internet Technology. She has 6 years of writing articles about data recovery on PC/Mac, disk cloning solution, data eraser and computer OS optimization, etc. She is also interested in testing various software and digital products.

Gerhard Chou
In order to effectively solve the problems for our customers, every article and troubleshooting solution published on our website has been strictly tested and practiced. Our editors love researching and using computers and testing software, and are willing to help computer users with their problems
