Written byCharlesUpdated on Apr 18, 2025
How to Format a Drive to exFAT by Using CMD (Command Prompt - diskpart)?
Approved byGerhard Chou
PAGE CONTENT:
Formatting a drive is a crucial operation that prepares the storage medium for use by an operating system. Among the different file systems available, exFAT stands out as an excellent choice for users who need to transfer large files between different platforms like Windows, macOS, and Linux. This guide will walk you through how to format a drive to exFAT using Command Prompt (CMD), step-by-step, and explain the reasoning behind each command.

Whether you're dealing with a USB flash drive, external SSD, or SD card, this tutorial will help you understand the formatting process and perform it successfully using command-line tools.
What Is exFAT and Why Use It?
When formatting a drive, choosing the right file system is crucial, especially if you plan to use the drive across different devices and operating systems. One of the most versatile options available today is exFAT, or Extended File Allocation Table. Introduced by Microsoft in 2006, exFAT was specifically designed to bridge the gap between the older FAT32 file system and the more advanced but Windows-centric NTFS.
▪️ About exFAT File System
exFAT is a lightweight file system that retains the simplicity of FAT32 while eliminating many of its limitations. It was built primarily for use with flash memory storage like USB flash drives, SD cards, and external SSDs. Unlike FAT32, which has a file size limitation of 4GB, exFAT can handle files as large as 16 exabytes (though practical limits depend on the OS and hardware implementation).
This makes exFAT ideal for tasks like:
- Storing HD or 4K videos
- Backing up disk images
- Sharing software packages or virtual machines
- Using high-capacity external hard drives or SSDs
▪️ exFAT vs FAT32 vs NTFS
| Feature | FAT32 | exFAT | NTFS |
|---|---|---|---|
| Max File Size | 4 GB | 16 EB (theoretically) | 16 TB+ |
| OS Support | Universal | Windows/macOS/Linux | Windows, limited macOS/Linux |
| Best Use Case | Old devices | External drives | Internal Windows drives |
▪️ Cross-Platform Compatibility
One of exFAT's biggest strengths is its broad compatibility. Unlike NTFS, which macOS can only read (without third-party drivers), exFAT works out-of-the-box on the following platforms:
- Windows (XP and later) – full support
- macOS (10.6.5 and later) – full support
- Linux – full support with exfat-utils or exfatprogs
- Android – limited support (depends on version and manufacturer)
- Game consoles – supported by many modern systems like PS4/PS5 and Xbox One/Series X
- Smart TVs and Media Players – more support than NTFS, especially for large media files
This makes exFAT the best choice for users working in hybrid environments, such as developers switching between macOS and Windows, or content creators transferring media to different platforms.
▪️ Use Case Scenarios for exFAT
Here are some common real-world scenarios where exFAT shines:
1. Video Editing and Media Workflows
If you're working with 4K footage or raw photography files, FAT32's file limits just won't cut it. exFAT allows transferring massive files quickly between editing stations, whether they run macOS, Windows, or Linux.
2. Gaming and Console Backups
exFAT-formatted USB drives are ideal for storing game saves, media content, or mods. Many modern gaming consoles like PlayStation 5 and Xbox Series X support exFAT out of the box.
3. Data Recovery and Backup
exFAT makes it easier to move full drive images and large backups. Most recovery tools and backup software work smoothly with exFAT-formatted drives due to the absence of complex file system features like encryption and journaling.
4. Software Development
Developers testing across OS platforms often use exFAT drives for portability of virtual machines, app builds, or large software libraries.
Why Use CMD to Format a Drive?
Formatting a drive through Command Prompt (CMD) gives you complete control and can be faster and more efficient than using graphical tools. It's especially useful in cases where:
- The GUI format tool is not responding
- You want to script the formatting process
- You need to clean partitions or format protected drives
However, you must be cautious because CMD doesn't warn you before wiping data. Always double-check the drive letter or disk number before executing any commands.
Preparation Before Formatting the Drive to exFAT:
Before you begin the formatting process using CMD, perform the following steps:
1. Backup Data
Formatting deletes all the data on the drive. Make sure to back up anything important.
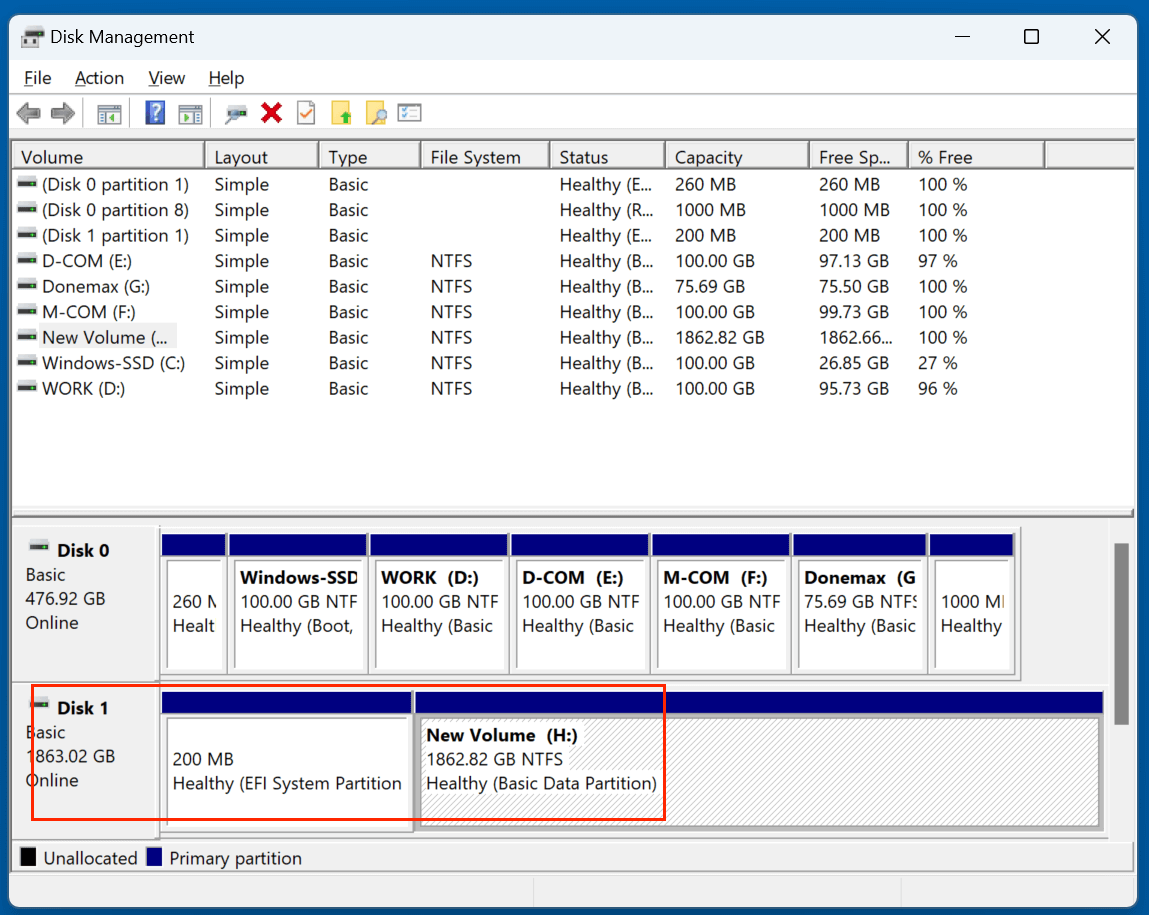
2. Check Drive Letter or Disk Number
- Plug in the USB or external drive.
- Press Win + X → Select Disk Management.
![Format a Drive to exFAT by Using CMD]()
- Locate your drive and note the disk number (e.g., Disk 1) and/or drive letter (e.g., H:).
![Format a Drive to exFAT by Using CMD]()
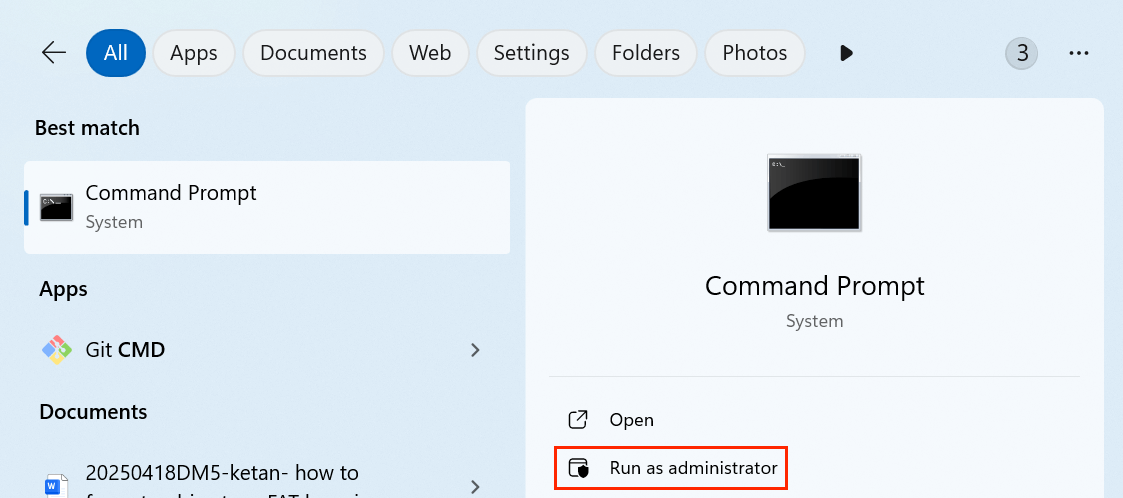
3. Run CMD as Administrator
- Search for "cmd" in the Start Menu.
- Right-click and choose “Run as administrator”.
![Format a Drive to exFAT by Using CMD]()
- This is essential for system-level changes like formatting.
Methods to Format a Drive to exFAT Using CMD
Before format the drive, back up your important files to another drive or Cloud storage. Then you can format the drive to exFAT by using Command Prompt.
Method 1: Format a Drive to exFAT Using DiskPart
The DiskPart utility is a powerful disk management tool that works from within CMD. Here's how to use it to format a drive:
Step-by-Step Instructions:
Step 1: Launch DiskPart
diskpart
This opens the DiskPart environment inside CMD.
Step 2: List All Available Disks
list disk
This displays all storage devices connected to your system. Identify your target drive by its size.
Step 3: Select the Target Disk
select disk X
Replace X with the disk number of the drive you want to format. Example:
select disk 1
Important: Make sure it’s the correct disk. If you choose the wrong one, you could erase your system drive.
Step 4: Clean the Disk (Optional but Recommended)
clean
This command wipes all partitions on the selected disk. It's a clean slate approach, useful for corrupt or previously partitioned drives.
Step 5: Create a Primary Partition
create partition primary
Step 6: Format the Partition to exFAT
format fs=exfat quick
- The quick flag performs a quick format.
- You can leave it out for a full format, but that takes longer.
If you want to perform a full format, enter: format fs=exfat
Step 7: Assign a Drive Letter
assign
This will automatically assign the next available drive letter.
Step 8: Exit DiskPart
Exit
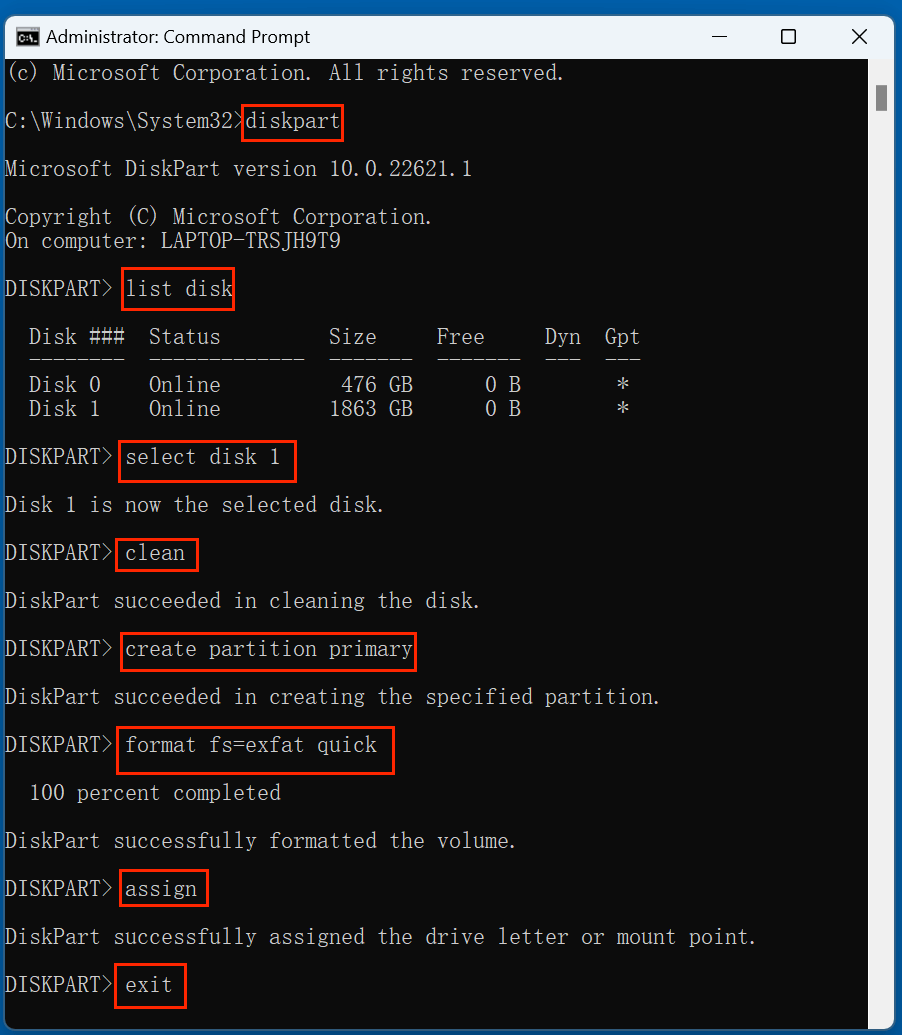
You've now successfully formatted the drive to exFAT using DiskPart!
Method 2: Use the format Command Directly in CMD
If you don't need to clean partitions or manage multiple disks, you can use the standard format command.
Step-by-Step Instructions:
Step 1: Find the Drive Letter
Use File Explorer or Disk Management to determine the current drive letter (e.g., H:).

Step 2: Run the Format Command
format H: /FS:exFAT /Q /V:MyDrive
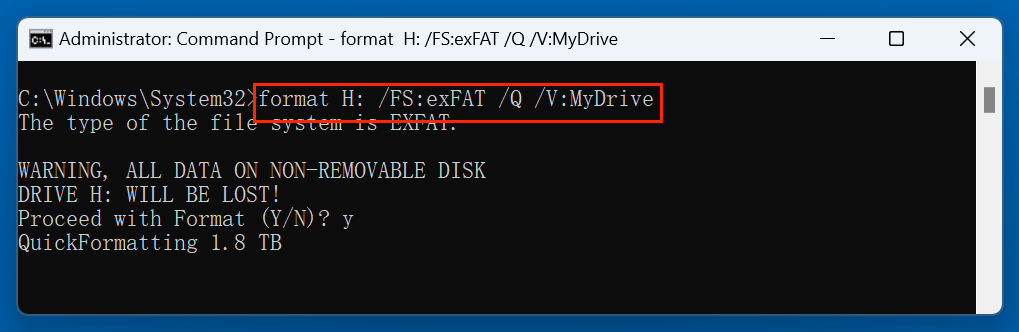
Explanation:
- E: → Replace with your actual drive letter
- /FS:exFAT → Specifies exFAT file system
- /Q → Performs a quick format
- /V:MyDrive → (Optional) Assigns a volume label ("MyDrive")
Example:
format H: /FS:exFAT /Q /V:BackupUSB
Step 3: Press Enter and Confirm
You may be prompted to insert a volume label or confirm the format - type Y and press Enter.
This method is faster and works well for USB drives that already have one partition.
Format a Drive to exFAT Common Errors and Troubleshooting
1. Access Denied
- Problem: You're not running CMD as Administrator.
- Solution: Right-click on cmd and choose Run as administrator.
2. The Format Did Not Complete Successfully
- Cause: Drive is corrupted, damaged, or in use.
- Fix: Use DiskPart to clean and reformat the drive.
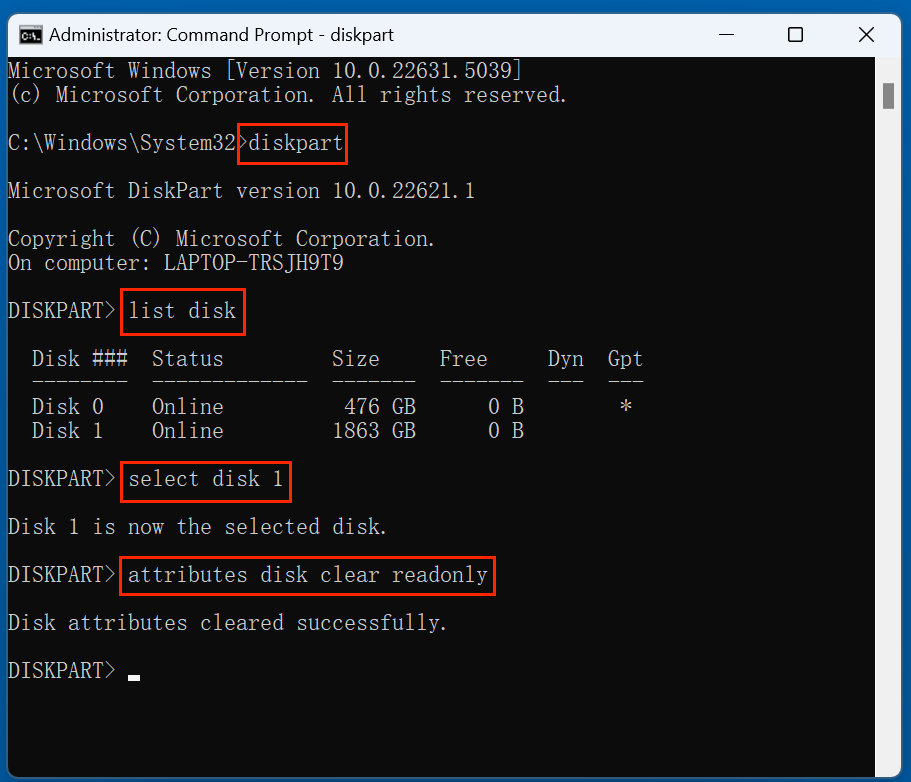
3. The Volume Is Write-Protected
Fix: Remove write protection via DiskPart:
attributes disk clear readonly
4. Cannot Format System or Boot Drive
You cannot format the disk containing the OS you're currently using. Make sure you're targeting an external or secondary drive.
5. "There is no volume selected."
Ensure you've selected the correct disk and partition in DiskPart before issuing the format command.
Tips for Using exFAT Drives
1. Safely Eject Drives
Always use the "Safely Remove Hardware" option to avoid corrupting the exFAT file system.
2. Enable TRIM on SSDs
For external SSDs, ensure TRIM is enabled for better longevity and performance.
3. Avoid for System Drives
exFAT isn't meant for operating system installation - use NTFS instead.
4. Mac Users
macOS supports exFAT natively. You can format drives in Windows with CMD and use them on Mac without any additional setup.
5. Use Antivirus Scans
Before formatting unknown drives (e.g., from others), scan for malware. Formatting doesn't always clean firmware-level infections.
Use Case Examples
- Photographers
Need to transfer 4K RAW video files between Mac and PC.
- Gamers
Use exFAT-formatted external SSDs to back up game installs.
- Backup Users
Store system images and large backups across platforms.
When Not to Use exFAT
While exFAT is versatile, there are certain scenarios where you might want to consider alternatives:
- Security Needed? → Use NTFS for encryption and file permissions.
- Compatibility with Old Devices? → Use FAT32, especially for legacy hardware like older TVs or media players.
- Booting a System? → Use NTFS or HFS+ depending on the OS.
Recover Lost Data After Formatting a Drive to exFAT Using CMD
If you have lost data due to formatting the drive to exFAT using cmd, you can use data recovery program - such as Donemax Data Recovery to unformat the drive and get all lost data back.
Step 1. Download and install Donemax Data Recovery on your computer.
Step 2. Open Donemax Data Recovery, then select the formatted drive (exFAT drive) to start data recovery.

Step 3. Click on Scan button to deeply scan the exFAT drive and find all deleted/formatted/lost files.
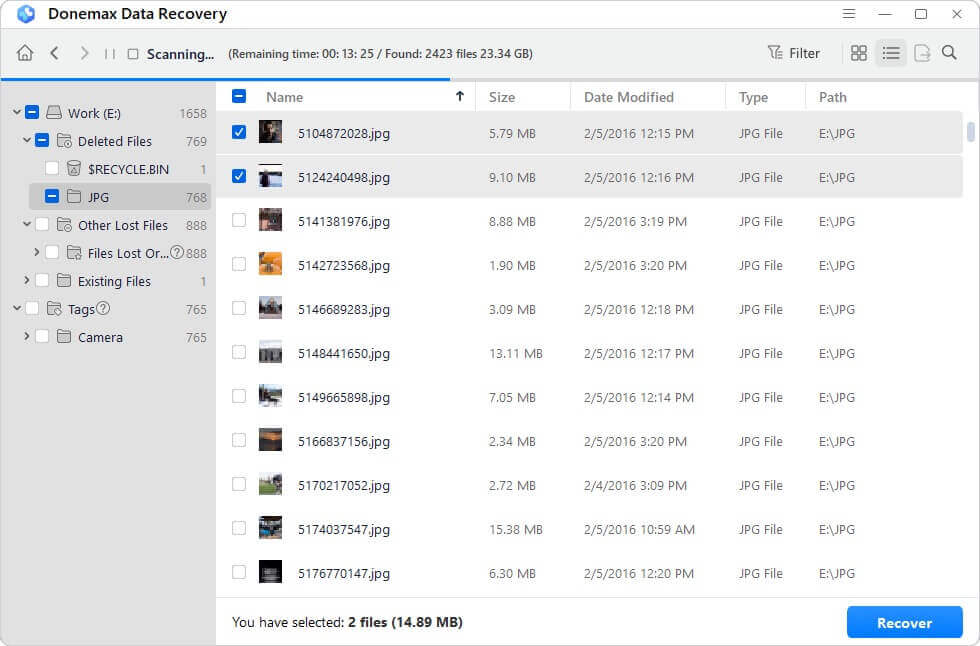
Step 4. Once the scan is completed, you can preview all recoverable files. Then select the wanted files, click on Recover button to save them.

Donemax Data Recovery also can help you repair damaged drive, reformat a drive to exFAT, etc.
Conclusion
Formatting a drive to exFAT using CMD is a straightforward and powerful way to prepare your storage device for universal compatibility and large file transfers. Whether you're using DiskPart for a full wipe or just issuing a single-line format command, the Command Prompt provides precise control over the process.
To recap:
- Use DiskPart when dealing with raw drives or complex partitions.
- Use the format command for quick jobs.
- Always double-check disk numbers or drive letters to avoid accidental data loss.
- Back up before formatting.
By understanding the commands and options outlined in this article, you can confidently format any drive to exFAT using CMD and avoid common pitfalls in the process.
Donemax Data Recovery
One of the best data recovery programs to recover deleted, formatted or lost data from PC, Mac, HDD, SSD, USB drive, SD card, camera, RAID, Sever or other storage devices.
Related Articles
- Apr 28, 2025Use External Storage as Primary Default Storage
- Sep 16, 2025Top 5 Methods to Format External Hard Drive on Windows 11
- Mar 22, 2024What Is SMC? How to Reset SMC on Mac?
- Nov 20, 2024How to Clean Install macOS Catalina?
- Mar 06, 2026How to Reinstall macOS Tahoe – Complete Guide 2026
- Nov 20, 2023How to show & hide files/folders on Mac?

Contributing Writer
Charles
Charles, who lives in Sydney, Australia, is an editor & writer of Donemax Team. He is good at writing articles related with Apple Mac computers, Windows operating systems, data recovery, data erasure, disk clone and data backup, etc. He loves reading and playing tennis in his spare time and is interested in testing new digital devices such as mobile phones, Macs, HDDs, SSDs, digital cameras, etc.

Editor in chief
Gerhard Chou
In order to effectively solve the problems for our customers, every article and troubleshooting solution published on our website has been strictly tested and practiced. Our editors love researching and using computers and testing software, and are willing to help computer users with their problems