Written byCoco LinUpdated on Apr 15, 2025
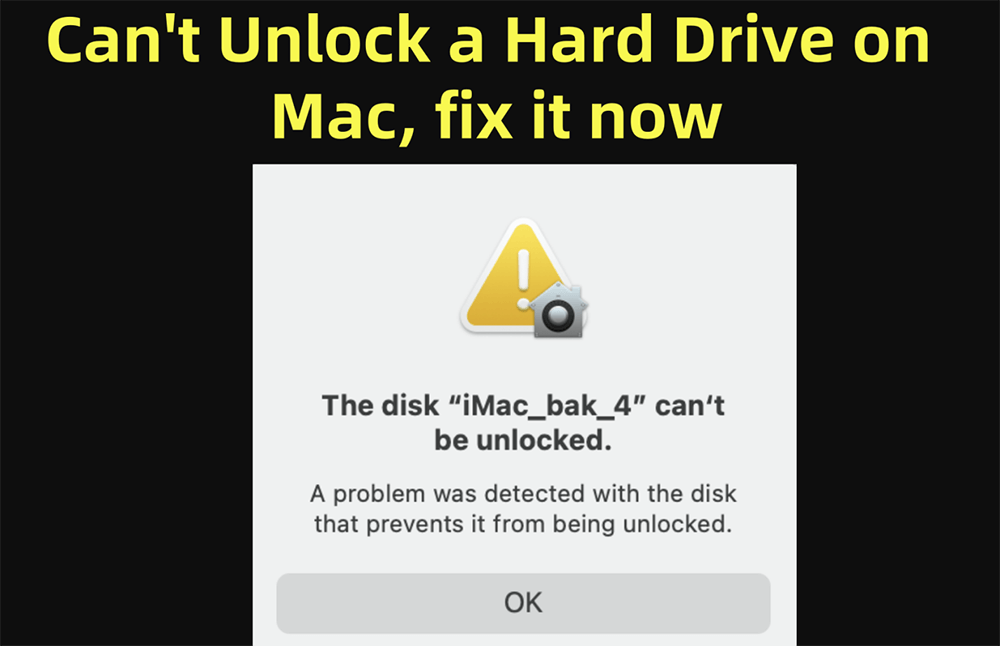
Can't Unlock a Hard Drive on Mac? How to Fix It?
Approved byGerhard Chou
Tip: Before fixing can't unlock a hard drive on Mac, you can use a data recovery program - such as Donemax Data Recovery for Mac to export/recover inaccessible files from the locked or encrypted drive to your Mac.
PAGE CONTENT:
Many Mac users encounter a frustrating issue where they are unable to unlock an external or internal hard drive. This problem can occur due to encryption settings, file system corruption, software conflicts, or hardware malfunctions. If you're facing this issue, don't worry - there are multiple ways to troubleshoot and resolve it.
In this guide, we'll explore why your hard drive might be locked, and provide step-by-step solutions to regain access.
Identify the Cause of the Problem: Why Can't Unlock the Hard Drive on Mac
Before applying fixes, it's crucial to understand why your hard drive is locked. The issue could be related to encryption, file system errors, security settings, or even hardware failure. Here are the key things to check:
◾Check for Error Messages
macOS often provides error messages when a drive cannot be accessed. Some common ones include:
- The disk you inserted was not readable by this computer.
- Mac can't repair the disk.
- The disk is encrypted and requires a password to unlock.
- You don't have permission to access this drive.
Each of these errors provides clues about the cause of the problem.
◾Determine if the Drive is Encrypted
If your drive is encrypted using FileVault or third-party software, you’ll need the correct password or recovery key to unlock it.
◾Verify Physical Connections
Sometimes, connection issues are mistaken for locked drive problems. Try:
- Making use of an alternative USB port or cable.
- Attaching the drive to a different Mac.
- Checking if the drive is visible in Disk Utility (Applications > Utilities > Disk Utility).
◾Confirm the Drive's Format
If the drive is formatted in NTFS, macOS may allow read-only access but not write access. This can give the impression that the drive is locked. You can check the format in Disk Utility under the "Format" section.
Recover Data from an Inaccessible Drive on Mac
If your Mac cannot unlock the hard drive and you need to recover important files, there are several methods you can try. Depending on the severity of the issue, you might be able to recover data using built-in macOS tools or third-party software.
Method 1. Use macOS Recovery Mode
macOS Recovery Mode is a built-in utility that can help diagnose and recover data from a locked or corrupted drive.
Steps to Access macOS Recovery Mode:
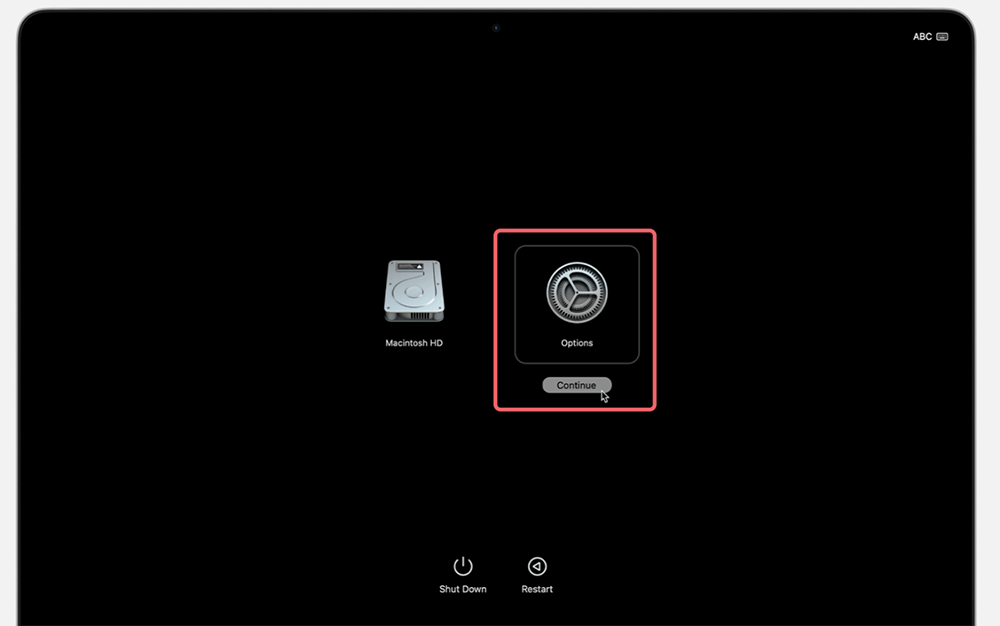
- Shut down your Mac completely.
- Holding down Command + R, turn it back on until the Apple logo shows. If you are using an Apple silicon Mac, press and hold Power button until Loading startup option appears, then choose Options, click Continue.
![choose Options and click Continue]()
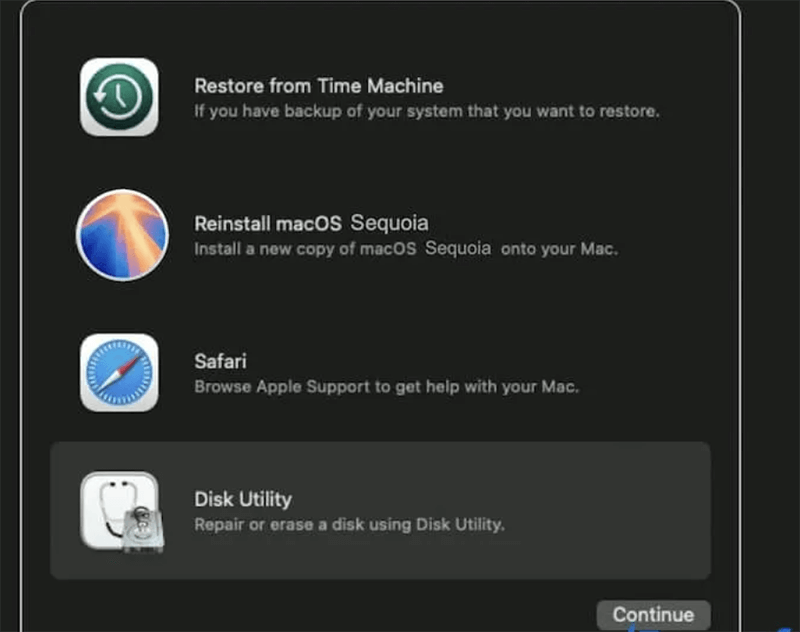
- When the macOS Utilities window appears, choose Disk Utility.
![choose Disk Utility]()
- Select the locked or corrupted drive from the list on the left side.
- Click "Mount" (if available).
- If the drive mounts successfully, copy important files to another storage device.
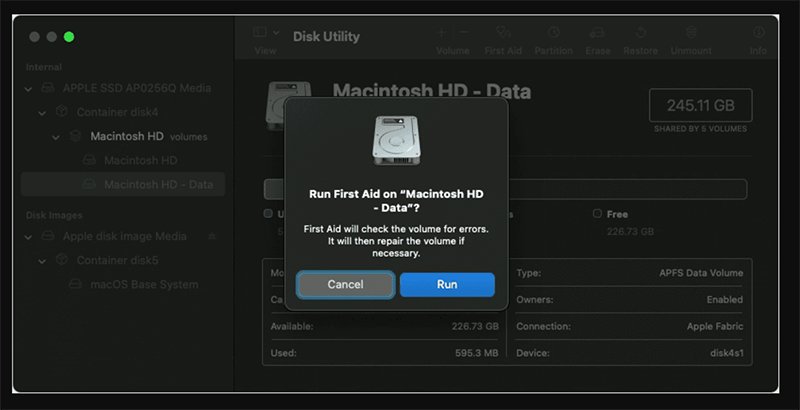
- If it doesn't mount, proceed to First Aid and click Run to attempt repairs.
![proceed to First Aid and click Run]()
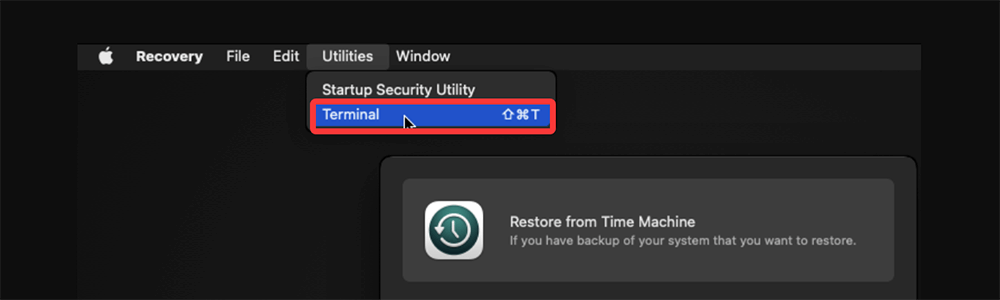
Use Terminal in Recovery Mode:
If Disk Utility doesn't work, you can try accessing files through Terminal:
- In macOS Utilities, select Utilities > Terminal.
![Use Terminal in Recovery Mode]()
- Type the following command to check the available drives:
diskutil list
- If your drive appears but is unmounted, try mounting it manually:
diskutil mountDisk /dev/diskX
(Replace diskX with the correct disk identifier from the previous command.)
- If you can mount the drive, use Finder or Terminal to copy files to another location.
Method 2. Use Third-Party Data Recovery Tools
If macOS Recovery Mode doesn't work, you can try professional data recovery software. These tools can scan locked or corrupted drives and extract files.
Top Data Recovery Tools for Mac
Here are some of the best tools for recovering data from inaccessible drives:
| Tool | Key Features |
| Donemax Data Recovery for Mac | Supports APFS, HFS+, NTFS, FAT32; Recovers from failed drives |
| EaseUS Data Recovery Wizard | Deep scan feature; Recovers from formatted or corrupted disks |
| Stellar Data Recovery | Can recover from encrypted drives; Bootable recovery options |
| R-Studio | Advanced recovery; Supports macOS, Windows, Linux |
| PhotoRec (Open-source) | Works on damaged drives, but no GUI (Terminal-based) |
How to Recover Data Using Donemax Data Recovery for Mac:
Step 1. Download and install Donemax Data Recovery for Mac.
Step 2. Open Donemax Data Recovery for Mac, choose the locked drive to start data recovery.

Step 3. Click on Scan button to deeply scan the drive and find all files including existing files, inaccessible/hidden files, deleted/formatted/lost files, etc.

Step 4. After scan, you can check and preview the recoverable files. Then select the wanted files, click on Recover button to save them.

Note: Avoid saving recovered files to the same drive you're recovering from, as this can overwrite data.
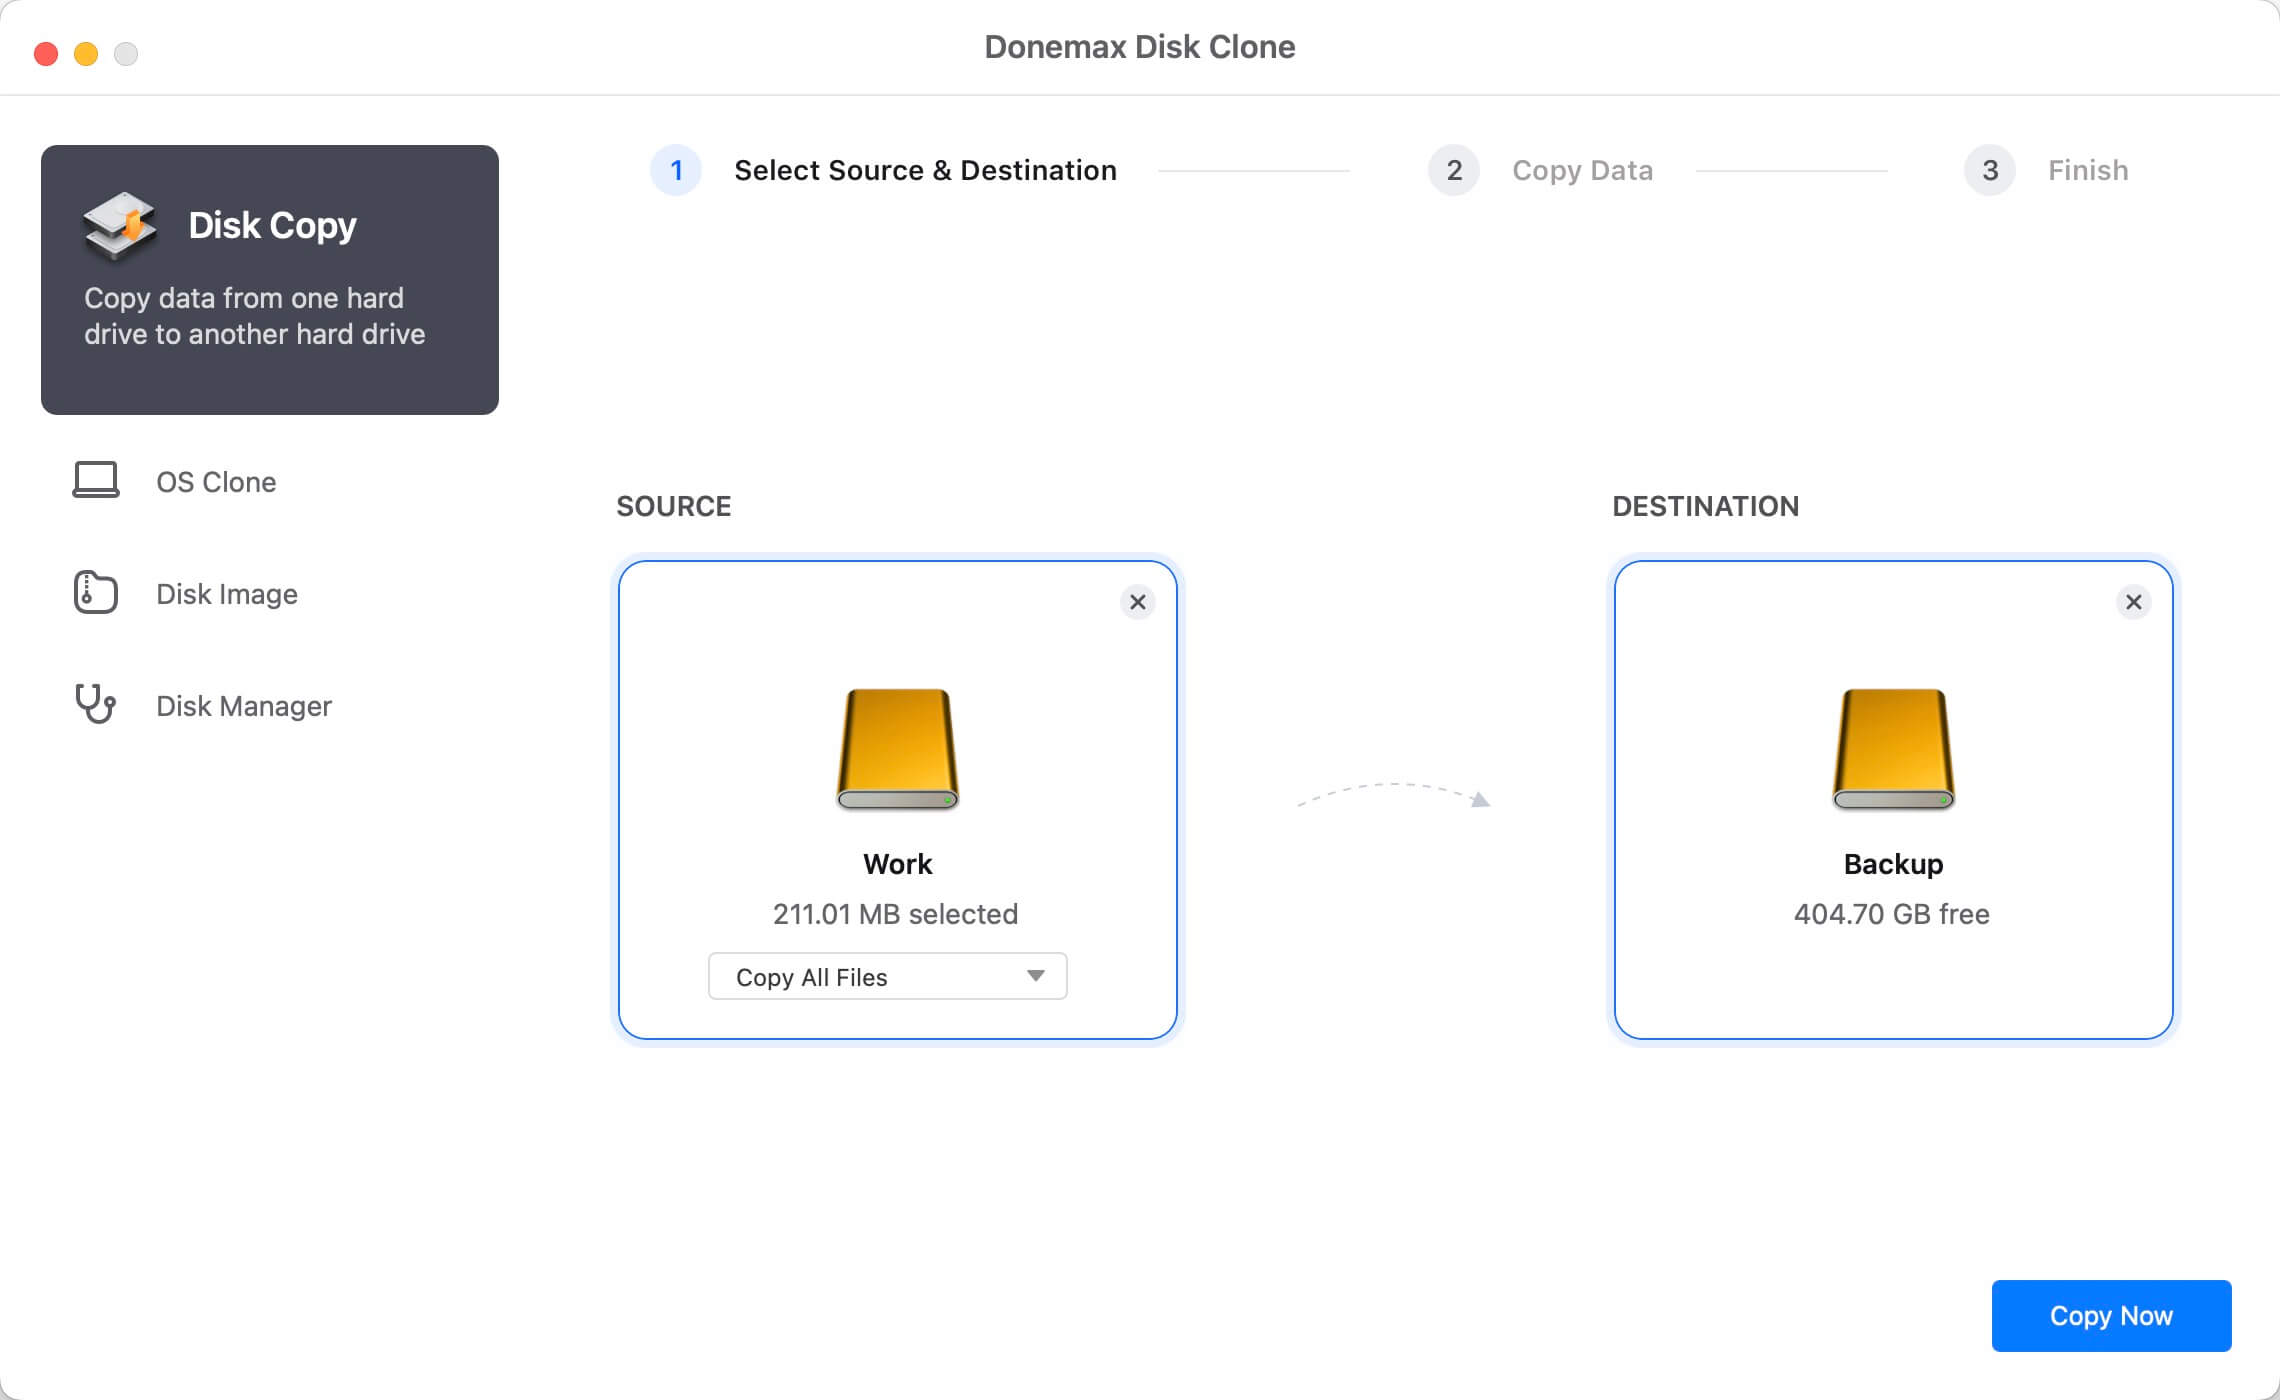
Method 3. Clone the Drive Before Recovery
If your hard drive is failing (e.g., making clicking noises or frequently disconnecting), it's best to clone it before attempting further recovery. Cloning creates an exact copy of your drive, which you can then scan for lost files without further stressing the failing disk.
Cloning a Drive Using Donemax Disk Clone for mac:
Step 1. Download and install Donemax Disk Clone for Mac and connect a good drive to your Mac.
Step 2. Open Donemax Disk Clone for Mac, choose Disk Copy mode, select the failed drive as the source drive, select the good drive as the destination drive. Click on Copy Now button to copy all data from the source drive to the destination drive.
Method 4. When to Consult a Data Recovery Service
If your hard drive is physically damaged (e.g., clicking noises, not spinning up), software-based recovery won't work. In such cases, you may need a professional data recovery service.
Signs You Need Professional Help:
- The drive is making strange noises (clicking, beeping, or grinding).
- The drive is not detected at all, even in Disk Utility or Terminal.
- You've tried multiple recovery methods with no success.
Preventive Measures to Avoid Future Data Loss
To avoid data loss in the future, consider these best practices:
- Enable Time Machine Backups:
- Go to System Preferences > Time Machine or System Settings > General > Time Machine (for macOS Ventura or later).
- Select Backup Disk and set up automatic backups to an external drive.
- Use Cloud Storage for Important Files:
- Services like iCloud Drive, Google Drive, or Dropbox provide off-site backups.
- Monitor Drive Health with SMART Tools:
- Install DriveDx or use Terminal:
diskutil info /Volumes/DriveName
- Check for SMART errors (e.g., failing sectors) and replace the drive if necessary.
- Install DriveDx or use Terminal:
- Eject Drives Properly:
- Always click Eject before unplugging external drives to prevent corruption.
How to Fix Can't Unlock a Hard Drive on Mac?
Fix 1. Basic Troubleshooting Steps to Fix Can't Unlock a Hard Drive on Mac
Before diving into complex fixes, try these simple troubleshooting steps:
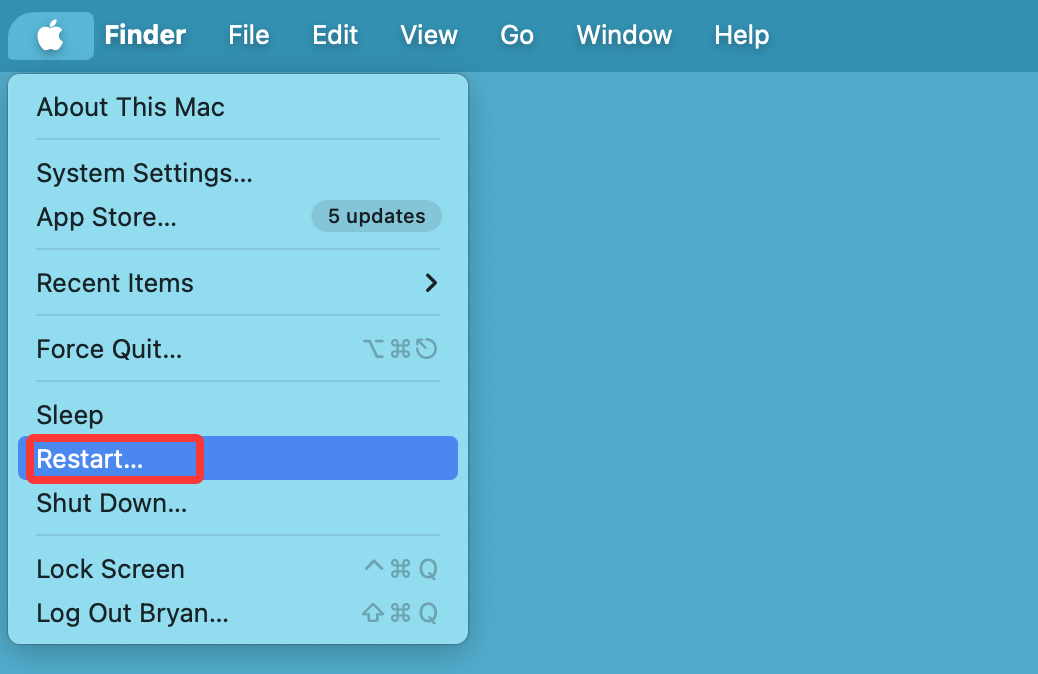
◾Restart Your Mac
A system reboot can resolve temporary software glitches that might be affecting drive access.
◾Try a Different Mac or USB Port
If the drive works on another Mac, the issue might be with your system's configuration or USB port.
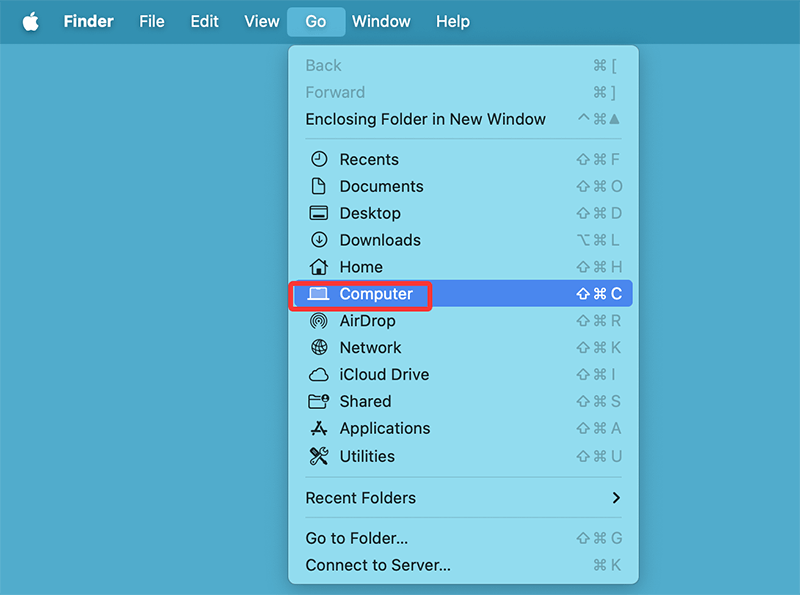
Check Finder & Disk Utility:
- Open Finder > Go > Computer and see if the drive appears.
![Open Finder > Go > Computer and see if the drive appears]()
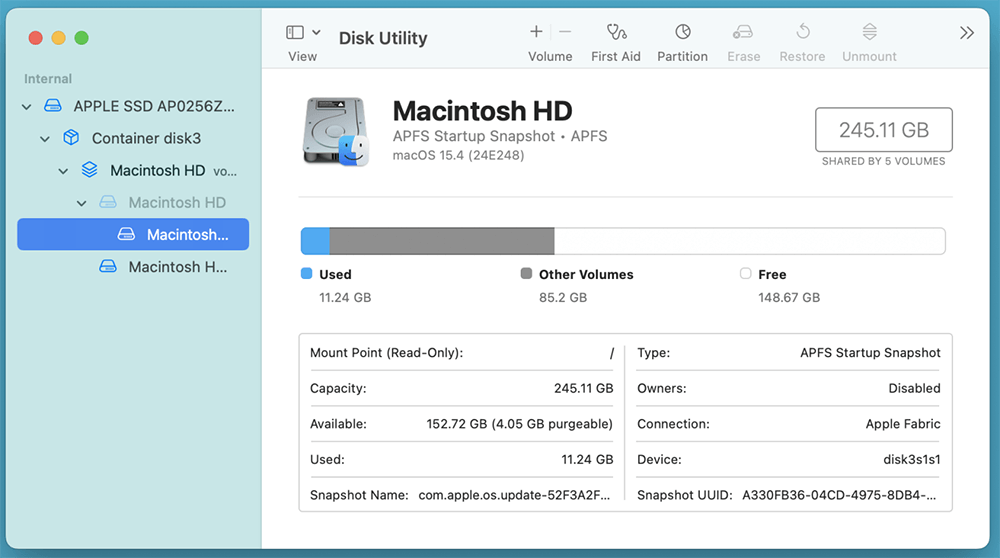
- Open Disk Utility and check if the drive is detected but not mounted. If it's listed but greyed out, you may need to manually unlock or mount it.
![Open Disk Utility and check if the drive is detected]()
Fix 2. Unlock an Encrypted Hard Drive on Mac
If your drive is encrypted, you'll need to unlock it using one of the following methods:
◾Use the Correct Password
Ensure that you're entering the correct password. If you have forgotten it, look for the recovery key that was provided when the drive was encrypted.
◾Use FileVault Recovery Key
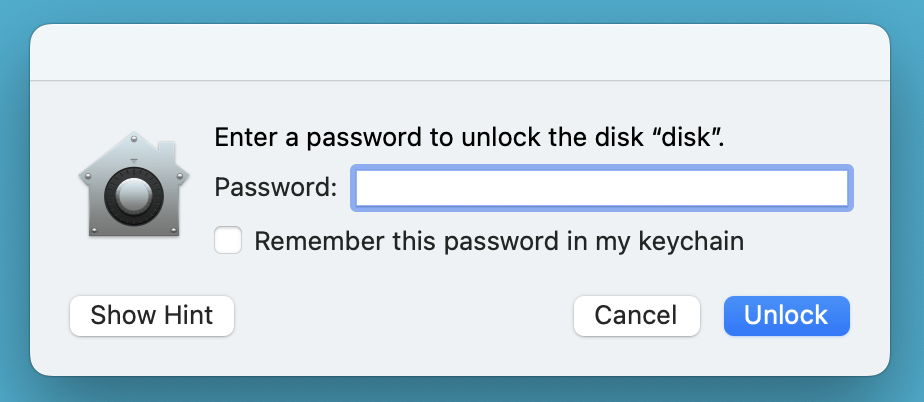
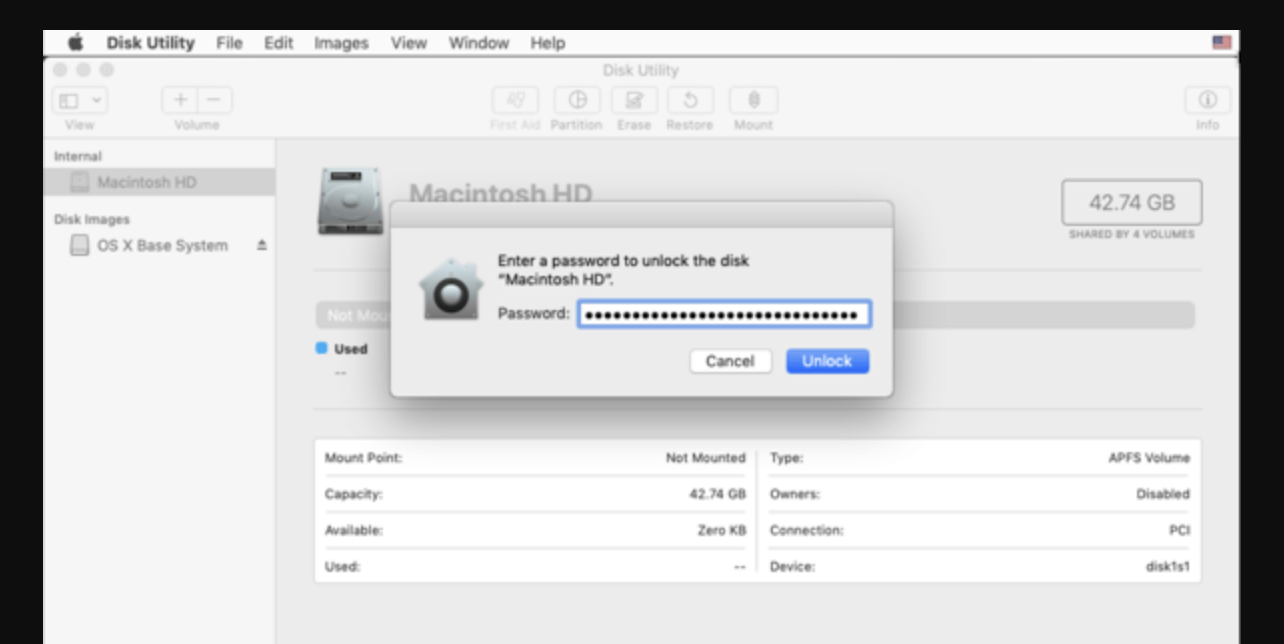
If the drive was encrypted using FileVault, you can unlock it using the recovery key:
- Open Disk Utility from Utilities via Applications.
- Select the locked drive.
- Click Unlock and enter the FileVault recovery key.
![Click Unlock and enter the FileVault recovery key]()
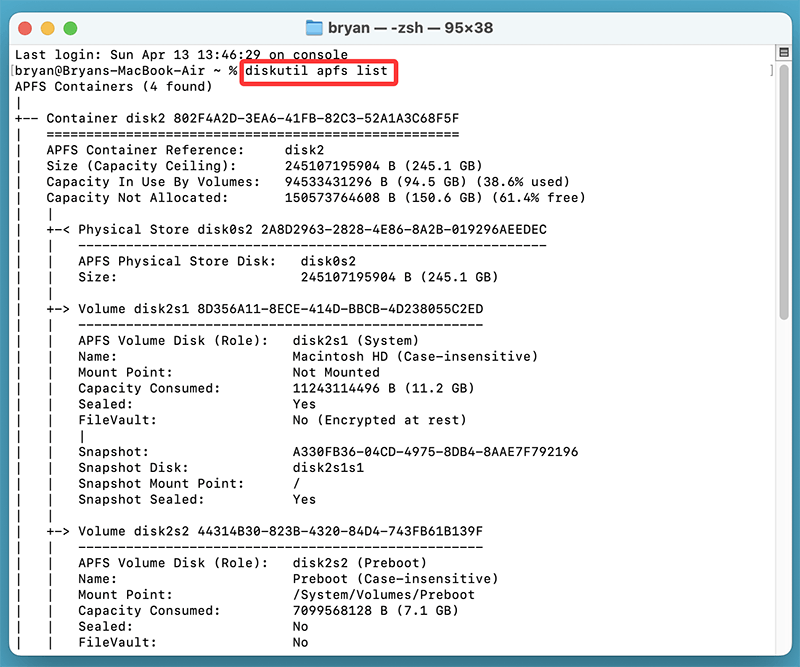
◾Unlock via Terminal
If the graphical interface doesn't work, try using Terminal:
- Open Terminal from Utilities via Applications.
- Type the following command and press Enter:
diskutil apfs list
![Unlock via Terminal]()
This will display all APFS volumes. Note the UUID of the locked drive.
- Use the following command to unlock it:
diskutil apfs unlockVolume UUID
Replace UUID with the actual volume identifier.
Fix 3. Fix File System Errors
If the drive is locked due to file system corruption, follow these steps:
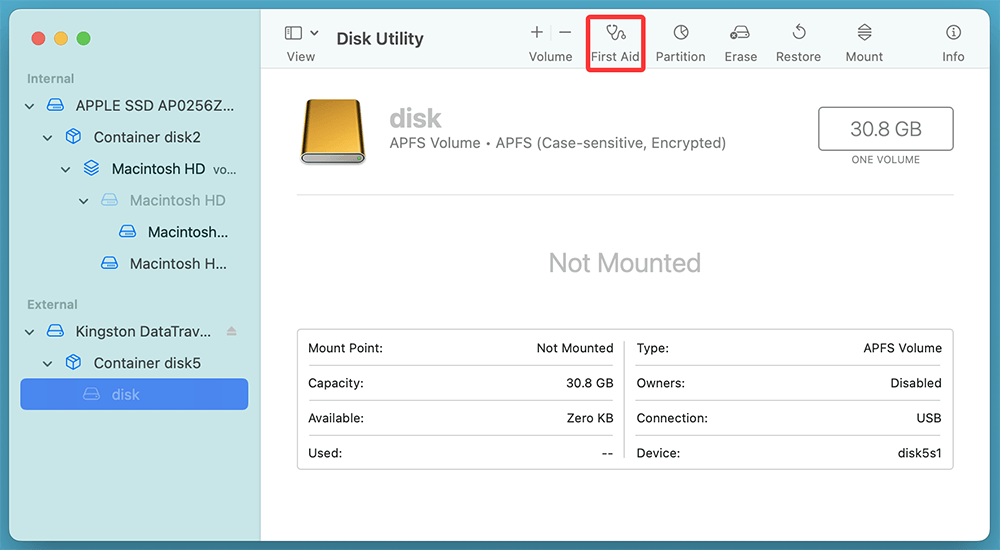
◾Run First Aid in Disk Utility
- Open Disk Utility.
- Select the affected drive.
- Click First Aid > Run.
![Run First Aid in Disk Utility]()
- If First Aid finds and fixes issues, try unlocking the drive again.
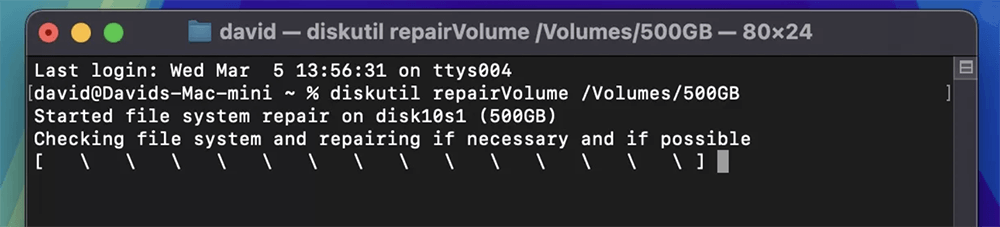
◾Use Terminal to Repair the Disk
If First Aid doesn't work, try repairing the disk using Terminal:
- Open Terminal.
- Run the below command:
diskutil repairVolume /Volumes/DriveName
![Use Terminal to Repair the Disk]()
Replace DriveName with the actual name of your locked drive.
◾Check for Read-Only Mode
If your drive is formatted as NTFS, macOS will only allow read access. Use a third-party tool like Donemax NTFS for Mac to enable writing.
Step 1. Download and install the reliable NTFS driver - Donemax NTFS for Mac on your Mac.
Step 2. Open Donemax NTFS for Mac and select the NTFS drive, if it is not mounted, click on Mount button.

Step 3. Click on Enable Writable button to allow your Mac to write data to the NTFS drive.

Fix 4. Reset Mac Security Settings (If T2 Chip Blocks Access)
If you have a Mac with a T2 security chip (MacBook Pro/Air 2018+), the security settings might be preventing access to external drives.
Check Startup Security Utility
- Restart your Mac and boot into macOS Recovery Mode (hold Command + R at startup).
- Click Utilities > Startup Security Utility.
- Ensure "Allow booting from external media" is enabled.
![Check Startup Security Utility]()
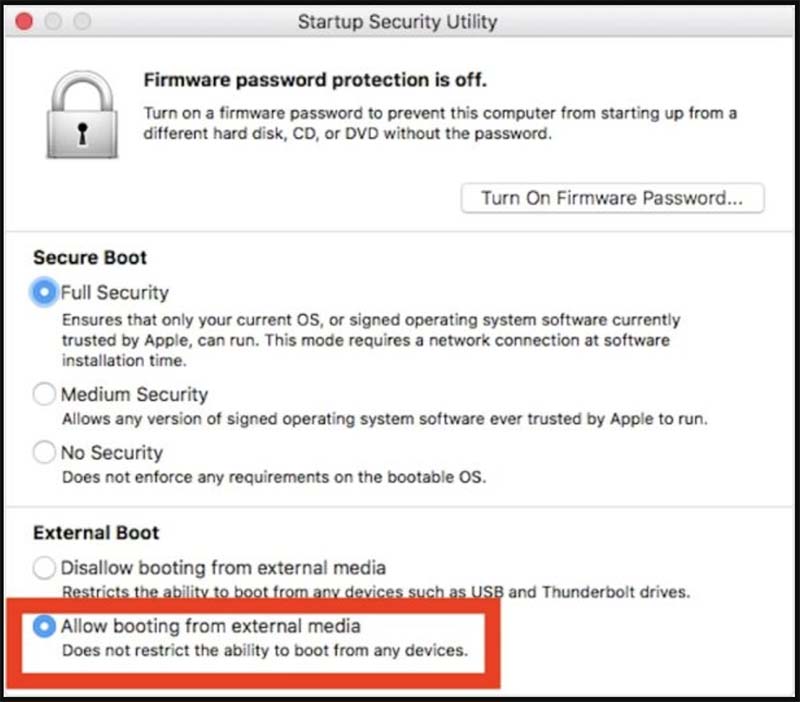
Disable Secure Boot Temporarily: If Secure Boot is enabled, try disabling it to access non-Apple formatted drives.
Fix 5. Format the Hard Drive
If none of the above methods work and the data is not important (or already backed up), formatting the drive might be the only solution.
Backup Important Data (If Possible)
Before formatting, try to recover and back up important files.
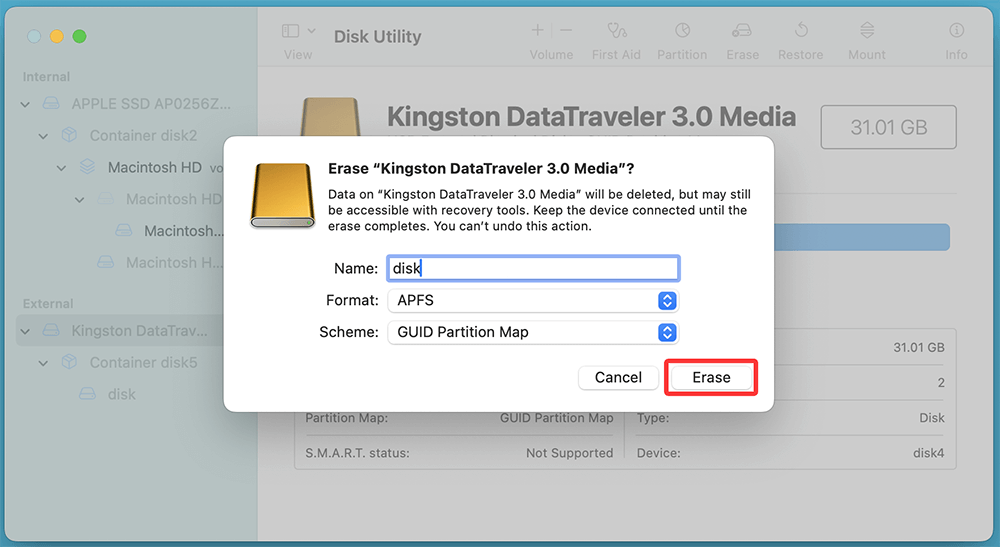
Use Disk Utility to Erase and Reformat
- Open Disk Utility.
- Select the drive and click Erase.
- Choose a format:
- APFS (For modern macOS devices).
- Mac OS Extended (Journaled) (For older Macs).
- ExFAT (For cross-platform use with Windows).
- Click Erase to reformat the drive.
![Use Disk Utility to Erase and Reformat]()
Reinstall macOS If Necessary:
If this is an internal drive and macOS isn't working, you may need to reinstall macOS after formatting.
Related link: how to reinstall macOS.
Conclusion
Unlocking a hard drive on Mac can be challenging, but by following these steps, you should be able to regain access. Here's a quick recap:
- Identify whether the drive is encrypted, corrupted, or physically damaged.
- Try basic troubleshooting (restarting, checking connections).
- Use Disk Utility and Terminal commands to unlock or repair the drive.
- Reset security settings if the Mac's T2 chip is causing issues.
- Recover data using macOS Recovery Mode or third-party tools.
- As a last resort, format the drive and start fresh.
If none of these solutions work, consider seeking expert help or contacting Apple Support for further assistance.
Donemax Data Recovery for Mac
Donemax Data Recovery for Mac is one of the best Mac data recovery software. It is easy-to-use and can help in recovering deleted, formatted, inaccessible or lost data from Mac HDD/SSD, external disk, USB drive, SD card, camera or other storage devices.
Related Articles
- Feb 19, 2025Fix WD My Passport Access Denied Error or Fix Unreadable WD My Passport Drive
- Mar 17, 20258 Solutions to Fix Seagate One Touch External Hard Drive Not Working on Mac
- Dec 23, 20247 Solutions to Fix 'Cannot Reinstall macOS' – Troubleshooting and Solutions
- Feb 22, 2025How to Fix Corrupted XQD Card Without Losing Data?
- Feb 05, 2025How to Fix No Media in Disk Management Error? [8 Methods]
- Oct 12, 2024External Hard Drive Not Appearing In Finder (Mac), Fix It Now

Contributing Writer
Coco Lin
Coco has been a writer and a chief programmer at Donemax software since 2018. Over 10 years of experience of writing troubleshooting articles in the software industry, she is passionate about programming and loves to providing solutions to Windows and Mac users. Also she enjoys music and palying tennis in her free time.

Editor in chief
Gerhard Chou
In order to effectively solve the problems for our customers, every article and troubleshooting solution published on our website has been strictly tested and practiced. Our editors love researching and using computers and testing software, and are willing to help computer users with their problems
Hot Donemax Products
Clone hard drive with advanced clone technology or create bootable clone for Windows/Mac OS.

Completely and easily recover deleted, formatted, hidden or lost files from hard drive and external storage device.
Certified data erasure software - permanently erase data before selling or donating your disk or any digital device.