100% Effective data recovery software to completely recover deleted, formatted and lost files.

Windows 11 File Recovery Quick Navigation:
- Solution 1: See If You're Signed in with A Temporary Profile.
- Solution 2: Look for The Files Using Search in Windows 11.
- Solution 3: Recover Lost Files from A Backup.
- Solution 4: Enable a Windows 7 Administrator Account.
- Solution 5: Recover Lost Files after Upgrading to Windows 11 with Donemax Data Recovery.
“I upgraded to Windows 11 yesterday. Everything is OK and my PC is successfully upgrade to Windows 11. But when I check my working documents, I cannot find them. I feel so sad because the documents are very important. They may get deleted. Is there any way to get them back?”
There are some tips for you to locate and recover lost files after upgrading to Windows 11.
Solution 1: See If You're Signed in with A Temporary Profile.
You might be logged in with a temporary profile due to corrupted files and folders on your current user profile. At this time, you cannot access your files and find the important data. You can try to remove the temporary account and your files should be available again.
Step 1. Click Start button> Settings > Accounts > Sync your settings.

Step 2. Restart your PC and sign in again If you see a message at the top that states: You are logged on with a temporary profile. Roaming options are currently unavailable.

Restarting your PC and signing in again also works if you see a message that states: We can't sign into your account. This problem can often be fixed by signing out of your account and then signing back in.
Please note that you might need to restart your PC more than once before you can see you files again.
Solution 2: Look for The Files Using Search in Windows 11.
If you cannot find your files by the solution 1, you can try Search feature in Windows 11 to help you find your files.
Step 1. Open This PC.

Step 2. Type in the name of a file you want to find in the search box.
If you files are not deleted, and you will see them in the search results.
Please note: Look for all files of a certain type using the asterisk (*). For example, to search for all Word documents, search for *.doc. For music files, search for *.mp3.
Your files might be hidden from view. On this condition, you can try the following steps to get your files back.
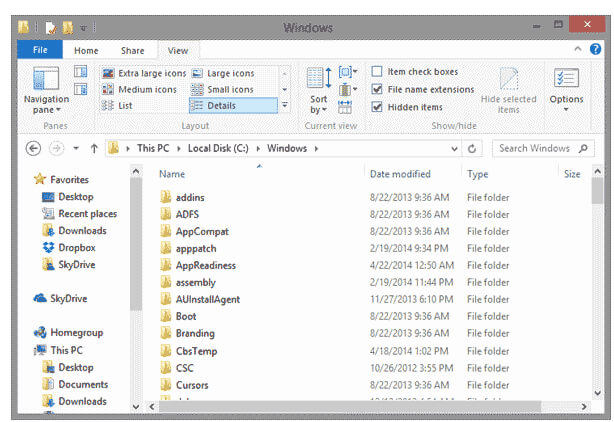
Type File Explorer Options in the search box, then select View > Hidden files and folders > select Show hidden files, folders, and drive.

Then the hidden files and folders will appear.
Solution 3: Recover Lost Files from A Backup.
If you have created a restore point, you can try to recover your files from a backup file. Try the following steps.
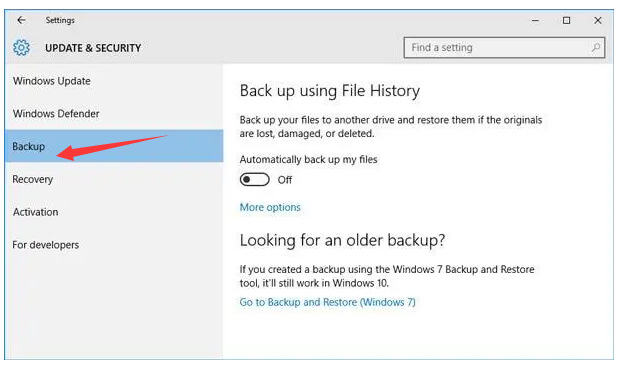
Step 1. Click Start > Settings > Update & security > Backup.

Step 2. Select Backup and restore (Windows 7).
Step 3. Select Restore my files and follow the instructions to restore your files.
Now, your backup files will be restored.
Solution 4: Enable a Windows 7 Administrator Account.
If you created a new Microsoft account when you upgraded from old Windows operating system, your files may be located in a disabled administrator account. At this time, you'll need to enable this account and sign in again to find your files.
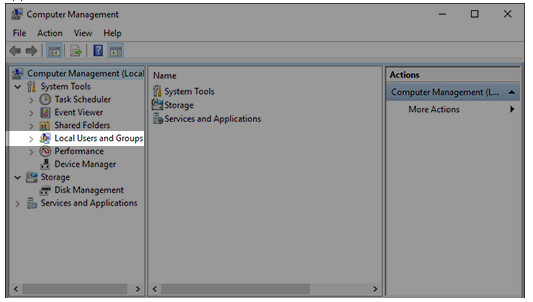
Step 1. Type computer management in the search box and then select the Computer Management (Desktop app).

Step 2. Select Local Users and Groups, and then select Users. If the user named Administrator has a down arrow on its icon, it's been disabled.

Step 3. Double-click the Administrator icon to pen the Properties dialog box. Then, clear the Account is disabled check box, and then select Apply.

Step 4. Sign out and then sign in again using the Administrator account.
Finally, your files come back.
Solution 5: Recover Lost Files after Upgrading to Windows 11 with Donemax Data Recovery.
If you cannot recover your lost files by using above 4 methods, you can try a useful and powerful software, Donemax Data Recovery, which will help you locate and recover your lost files after upgrading to Windows 11. Donemax Data Recovery can recover different types of files no matter your files are deleted due to deletion, hard drive formatting, partition deletion or system crash. Here are the steps for how to recover your lost files.
Step 1: Download and install Donemax Data Recovery on your PC, then launch this software.
Step 2: Select the location to scan the lost data. If you know the location where the text file was saved, you can specify the location.

Step 3. Click on Scan button to deeply scan the location to find deleted or lost files.

Step 4: Preview and recover the deleted text files. You can filter the found files by using Filter feature.

Donemax Data Recovery is a free and professional data recovery tool, which can recover lost files, pictures, documents and videos simply and quickly after deleting, formatting, partition loss, OS crash, virus attack, and other data loss scenarios. Even if you lost your important data after upgrading to Windows 11, Donemax Data Recovery will quickly help you get your data back.
Donemax Data Recovery
- Recover deleted, formatted or lost files on Windows 11.
- Recover lost hard drive partition on Windows 11.
- Recover all types of lost files from HDD, SSD, memory card, USB flash drive, digital camera, RAID, Server, etc.
Donemax Data Recovery

Hot Articles
- Best 10 data recovery software for Windows and Mac OS
- Easy Way to Recover Permanently Deleted Files
- Fix Corrupted SD Card and Recover Lost Images and Videos
- Fix External Device Not Showing Up and Recover Data
- Recover Lost or Unsaved Word Documents
- Recover Deleted or Lost Hard Drive Partition
- Recover Lost Data on Windows 11 PC
- Recover Lost Data from Formatted SSD
- Recover Deleted Photos from Digital Camera
- How to Fix WD Portable Drive Not Showing Up