PAGE CONTENT:
As Apple continuously improves its macOS lineup, the latest release, macOS Sequoia, comes with enhanced features and a refined interface. For most users, managing applications, including installing and uninstalling them, is a routine task. However, despite its simplicity, uninstalling apps can sometimes be tricky, especially when dealing with stubborn software or leftover files. This article will guide you through the process of uninstalling apps on macOS Sequoia, ensuring your system remains clean and efficient.

The Basics of App Management in macOS
macOS, including Sequoia, offers various ways to uninstall apps. Apple has made it relatively easy for users to manage their installed applications, and the process can be completed through simple drag-and-drop, using Launchpad, or through third-party tools. However, there are often additional files left behind after uninstalling an app, such as caches, preferences, and other data. Knowing how to locate and remove these files is important to keep your Mac running smoothly.
Why Uninstalling Apps Is Important:
Over time, your Mac can accumulate unnecessary apps and files, which can slow down performance, take up valuable storage space, and even affect the overall user experience. Keeping your Mac tidy by removing apps you no longer need ensures that it runs more efficiently and extends its lifespan.
Top 6 Methods to Uninstall Apps on macOS Sequoia
There are several methods to uninstall apps on macOS Sequoia, each suited to different user needs and levels of technical experience. Below, we'll explore the most common approaches.
Method 1. Uninstalling Apps from the Applications Folder
One of the simplest and most widely used methods to uninstall apps on macOS Sequoia is via the Applications folder in Finder. Below are the steps to follow:
Step 1: Open Finder
Launch Finder by clicking on its icon from the Dock or by pressing Command + N while on the desktop. Once Finder is open, click on the Applications folder from the sidebar.
Step 2: Locate the App You Want to Uninstall
Locate the software you wish to uninstall by scrolling through the Applications folder. Apps are usually listed alphabetically, making it easier to locate them.
Step 3: Drag the App to the Trash
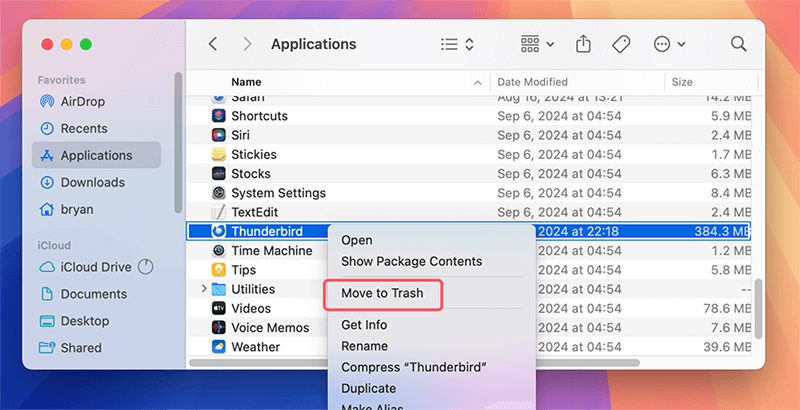
Once you've found the app, simply, you may drag it to the Dock's Trash icon. As an alternative, you may choose Move to Trash when you right-click on the application.

Step 4: Empty the Trash
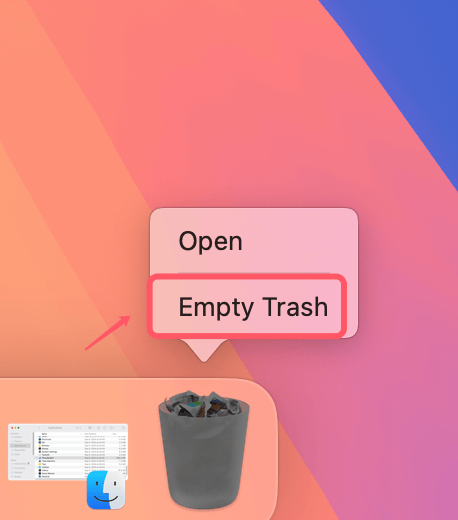
After dragging the app to the Trash, it's not completely removed from your system until you empty the Trash. Empty Trash is the option that appears when you right-click on the Trash icon in the Dock. A confirmation pop-up will show up; click Empty Trash to complete the removal.

Why This Method Works Best for Basic Users
- This method is effective for most apps, particularly those that were downloaded directly from the App Store or third-party websites. It's easy to follow and doesn't require any advanced knowledge, making it perfect for everyday Mac users.
Method 2. Using Launchpad to Uninstall Apps
Another convenient way to uninstall apps is through Launchpad, Apple's built-in app launcher. This method is particularly useful for removing apps that were installed from the Mac App Store.
Step 1: Open Launchpad
To open Launchpad, click on its icon in the Dock, or press the F4 key (or the equivalent on your keyboard). This will display all your installed applications in a grid format.
Step 2: Locate the App You Want to Remove
Locate the program you wish to remove by scrolling through the Launchpad interface.
Step 3: Enter "Jiggle Mode"
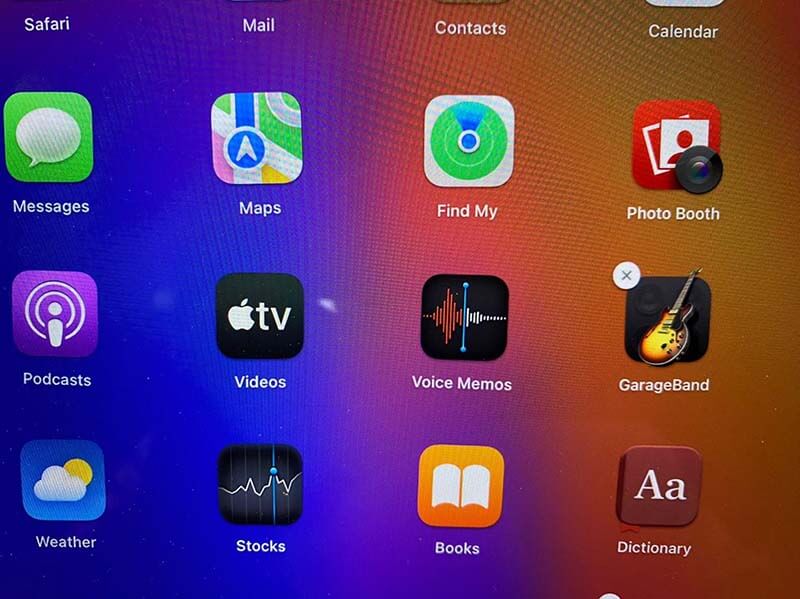
Once you locate the app, click and hold the app icon until all the icons begin to "jiggle." This is similar to the behavior on iOS devices when you’re organizing or deleting apps.
Step 4: Click the "X" to Uninstall
Apps installed from the Mac App Store will display an X in the upper-left corner of the icon. Click on the X, and a prompt will appear asking if you want to delete the app. Click Delete to confirm.

Step 5: No Need to Empty the Trash
Unlike uninstalling apps from Finder, using Launchpad removes the app directly without the need to empty the Trash.
Limitations of Using Launchpad
- Launchpad only allows you to uninstall apps that were installed from the Mac App Store. If the app was downloaded from a third-party website, it won’t show the "X" and cannot be removed via Launchpad. In such cases, you'll need to use the Finder method mentioned earlier.
Method 3. Uninstalling Apps via Start Menu
macOS Sequoia Start menu app - DMmenu for Mac can help you quickly uninstall apps and delete all leftovers.
Step 1: Download and install DMmenu on your Mac which is running macOS Sequoia.
Step 2: Open DMmenu for Mac, then click AppUninstaller.
Step 3: Select the apps you want to uninstall, then click on Uninstall button.
Step 4: Completely uninstall the selected apps and delete all leftovers.

Method 4. Removing Leftover Files
Even though dragging an app to the Trash deletes the application, some apps leave behind residual files such as preferences, logs, and cache data. These leftover files can accumulate over time and take up valuable storage space.
Step 1: Open Finder and Go to the Library Folder
Open Finder, click Go in the menu bar, and choose Go to Folder to get rid of any residual files. In the search field, type ~/Library/ and press Enter.
This will take you to the Library folder where many app-related files are stored.
Step 2: Check These Subfolders for Leftover Files
- Application Support: This folder contains app-specific data that some apps leave behind even after being uninstalled. Look for the app's name or folder here and delete it.
- Preferences: This folder stores user preferences for apps. Find and remove any files associated with the software you removed once more.
- Caches: Cached files are stored here. Navigate to this folder and delete any files associated with the app.
Step 3: Empty the Trash
After deleting the leftover files, remember to empty the Trash to free up space on your Mac.
Method 5. Using Third-Party Free Uninstaller Tools
For users who want a more thorough approach, third-party uninstaller tools are highly recommended. These tools automate the process of finding and deleting leftover files, ensuring that the app is completely removed from your system.
Donemax AppRemover for Mac is one of the best free uninstaller. It can help you quickly uninstall apps on macOS Sequoia and delete all leftovers.
Step 1: Download and install Donemax AppRemover for Mac on your Mac.
Step 2: Select the apps you want to uninstall, then click on Uninstall button.

Step 3. Check what will be removed from your Mac, click on Uninstall button again to uninstall the apps and delete all related files.

Method 6. Uninstalling Apps from the Terminal (Advanced Users)
For tech-savvy users, the Terminal provides a powerful way to uninstall applications. This method gives you full control over the removal process and can be especially useful if you want to remove system-level apps or components.
Step 1: Open Terminal
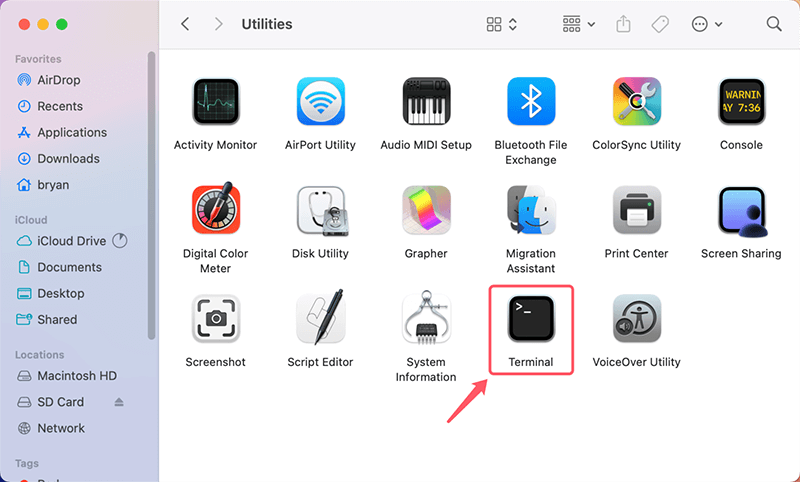
Launch Terminal by searching for it in Spotlight (press Command + Space and type "Terminal").

Step 2: Use the "sudo rm" Command
To uninstall an app, you'll need to use the sudo rm command, which allows you to remove files with root privileges.
Example Command:
sudo rm -rf /Applications/AppName.app
Replace AppName with the actual name of the app you want to uninstall.
Step 3: Confirm the Deletion
You may be asked to enter your administrator password to confirm the command. Once the command runs, the app will be permanently removed.
Step 4: Be Cautious
The Terminal method is powerful but risky. If you delete the wrong files, it could affect your system's functionality. Always double-check the commands before executing them.
Note: The uninstalled apps and related files are not lost for good and can be recovered by data recovery software. If you want to permanently erase the apps from your Mac, just use a data erasure program to wipe free disk space of the Mac.
Step 1. Download and install Donemax Data Eraser for Mac on your Mac and empty the trash bin.
Step 2. Open Donemax Data Eraser for Mac, choose Erase Free Space mode, then select the Mac internal disk, click on Erase Now button.

It will securely wipe free disk space of the Mac and permanently erase all deleted/lost data including the deleted files, uninstalled apps, etc.
Conclusion
Uninstalling apps on macOS Sequoia is straightforward for the most part, but depending on the app, there may be some nuances. From dragging apps to the Trash in Finder to using third-party uninstaller tools for a deeper clean, you have several options available. For casual users, Finder and Launchpad are quick and easy methods, while advanced users may prefer Terminal for full control.
No matter which method you choose, remember that leftover files can accumulate and affect your Mac's performance, so periodically checking for and removing these files is a good habit to develop. By complying this article, you will make sure that your Mac remains clean, fast, and clutter-free.
Related Articles
- Oct 29, 2024How to Uninstall macOS Sequoia?
- Sep 30, 2024What Is The Best Mac Junk Cleaner? [macOS Sequoia Supported]
- Nov 07, 2024How to Uninstall CleanMyMac and Delete All Leftovers?
- Oct 24, 2024How to Clear Chrome Data on Mac?
- Jun 17, 2024How to Protect Internal and External SSD on Mac?
- Sep 29, 2024Best 10 Mac Uninstaller to Remove Apps from Mac (macOS Sequoia Ready)

Coco Lin
Coco has been a writer and a chief programmer at Donemax software since 2018. Over 10 years of experience of writing troubleshooting articles in the software industry, she is passionate about programming and loves to providing solutions to Windows and Mac users. Also she enjoys music and palying tennis in her free time.

Gerhard Chou
In order to effectively solve the problems for our customers, every article and troubleshooting solution published on our website has been strictly tested and practiced. Our editors love researching and using computers and testing software, and are willing to help computer users with their problems