PAGE CONTENT:
macOS Sequoia is a powerful operating system that many Mac users have embraced for its advanced features, sleek interface, and seamless integration across Apple's ecosystem. However, there may come a time when you want to uninstall macOS Sequoia. Whether it's because you prefer an older macOS version or you're encountering issues that make Sequoia unsuitable for your needs, the process of uninstalling macOS and reverting to a previous version is manageable but requires careful steps.
In this article, we will understand the process of uninstalling macOS Sequoia. We will cover everything from backing up your data to creating a bootable installer, erasing Sequoia, and reinstalling a previous version of macOS. Let's get started.
Introduction: Why Uninstall macOS Sequoia?
macOS Sequoia offers many compelling features, including enhanced security, better system performance, and new visual elements. Yet, like any major operating system update, it's not perfect for everyone. There are several reasons why you might want to uninstall macOS Sequoia:
- Compatibility Issues: Older apps and hardware may not work well with Sequoia.
- Performance Problems: Some users report that Sequoia runs slower on older Macs.
- Preference for a Familiar Environment: You might simply prefer how a previous macOS version looks and feels.
- Frequent Bugs or Glitches: Despite regular updates, there may be bugs that affect your workflow.
Regardless of your reason, uninstalling macOS Sequoia can be done safely if you follow the right steps. Prior initiating the uninstallation process, it is beneficial to take some precautionary measures.
Pre-Uninstallation Checklist
Before uninstalling macOS Sequoia, it's crucial to prepare. Uninstalling an operating system is a significant process, and without the right preparation, you could lose data or face compatibility issues.
✦ Backup Your Data
Before making any significant modifications to your system, you should always make a backup of your data. Using Apple's built-in backup program, Time Machine, is the ideal method to accomplish this.
To make a Time Machine backup, follow these steps:
- Link your Mac to an external hard disk.
- 2Select Time Machine under System Settings > General.
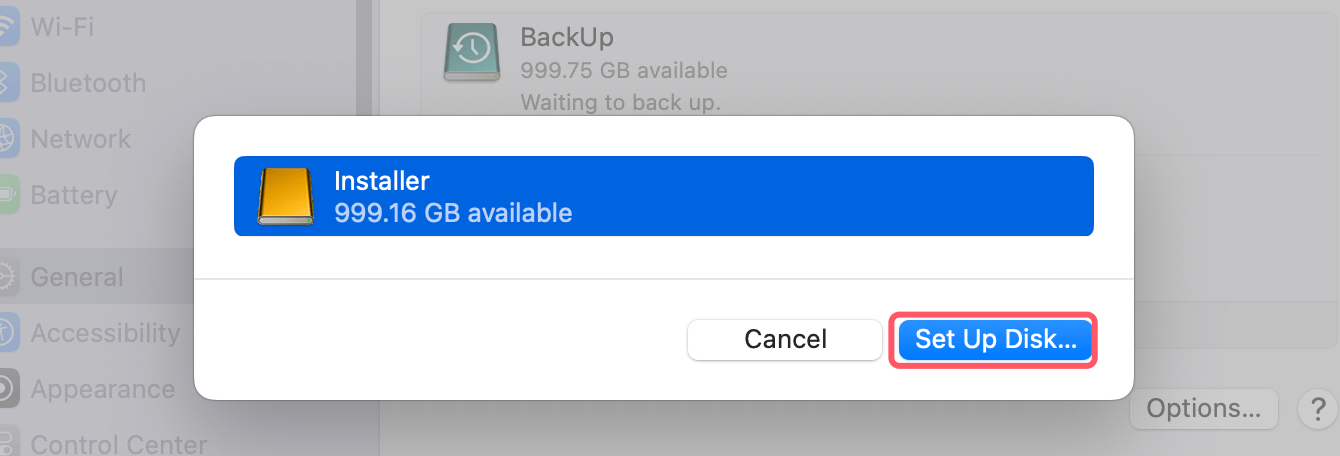
- 3Select your external disk by clicking on Add Backup Disk or + button > Set Up Disk.
![Backup Your Data]()
- To begin the backup procedure, click Back Up Now.
In addition to Time Machine, you might also want to copy important files to cloud storage or an additional external drive for extra security.
💡 Note: If you want to create a full bootable clone backup for your Mac, just try Mac disk cloning software.
✦ Ensure Compatibility of Older macOS Versions
Before proceeding with the uninstallation, after deleting Sequoia, it's critical to confirm that the version of macOS you choose to install is compatible with your Mac. Each version of macOS has system requirements, and older Macs may not support the latest versions.
To check compatibility:
- Visit Apple's website and search for the system requirements for the macOS version you plan to install.
- Compare these requirements to your Mac’s specifications. You can verify your Mac's specifications by clicking the Apple logo in the upper-left corner and selecting About This Mac.
✦ Download macOS Installer
Next, you'll need to download the installer for the version of macOS you want to install after Sequoia. If you’re reverting to a recent version like Sonoma, Monterey or Big Sur, you can find the installer in the App Store or on Apple's website.
Here's how to download an older macOS version:
- Open the App Store on your Mac.
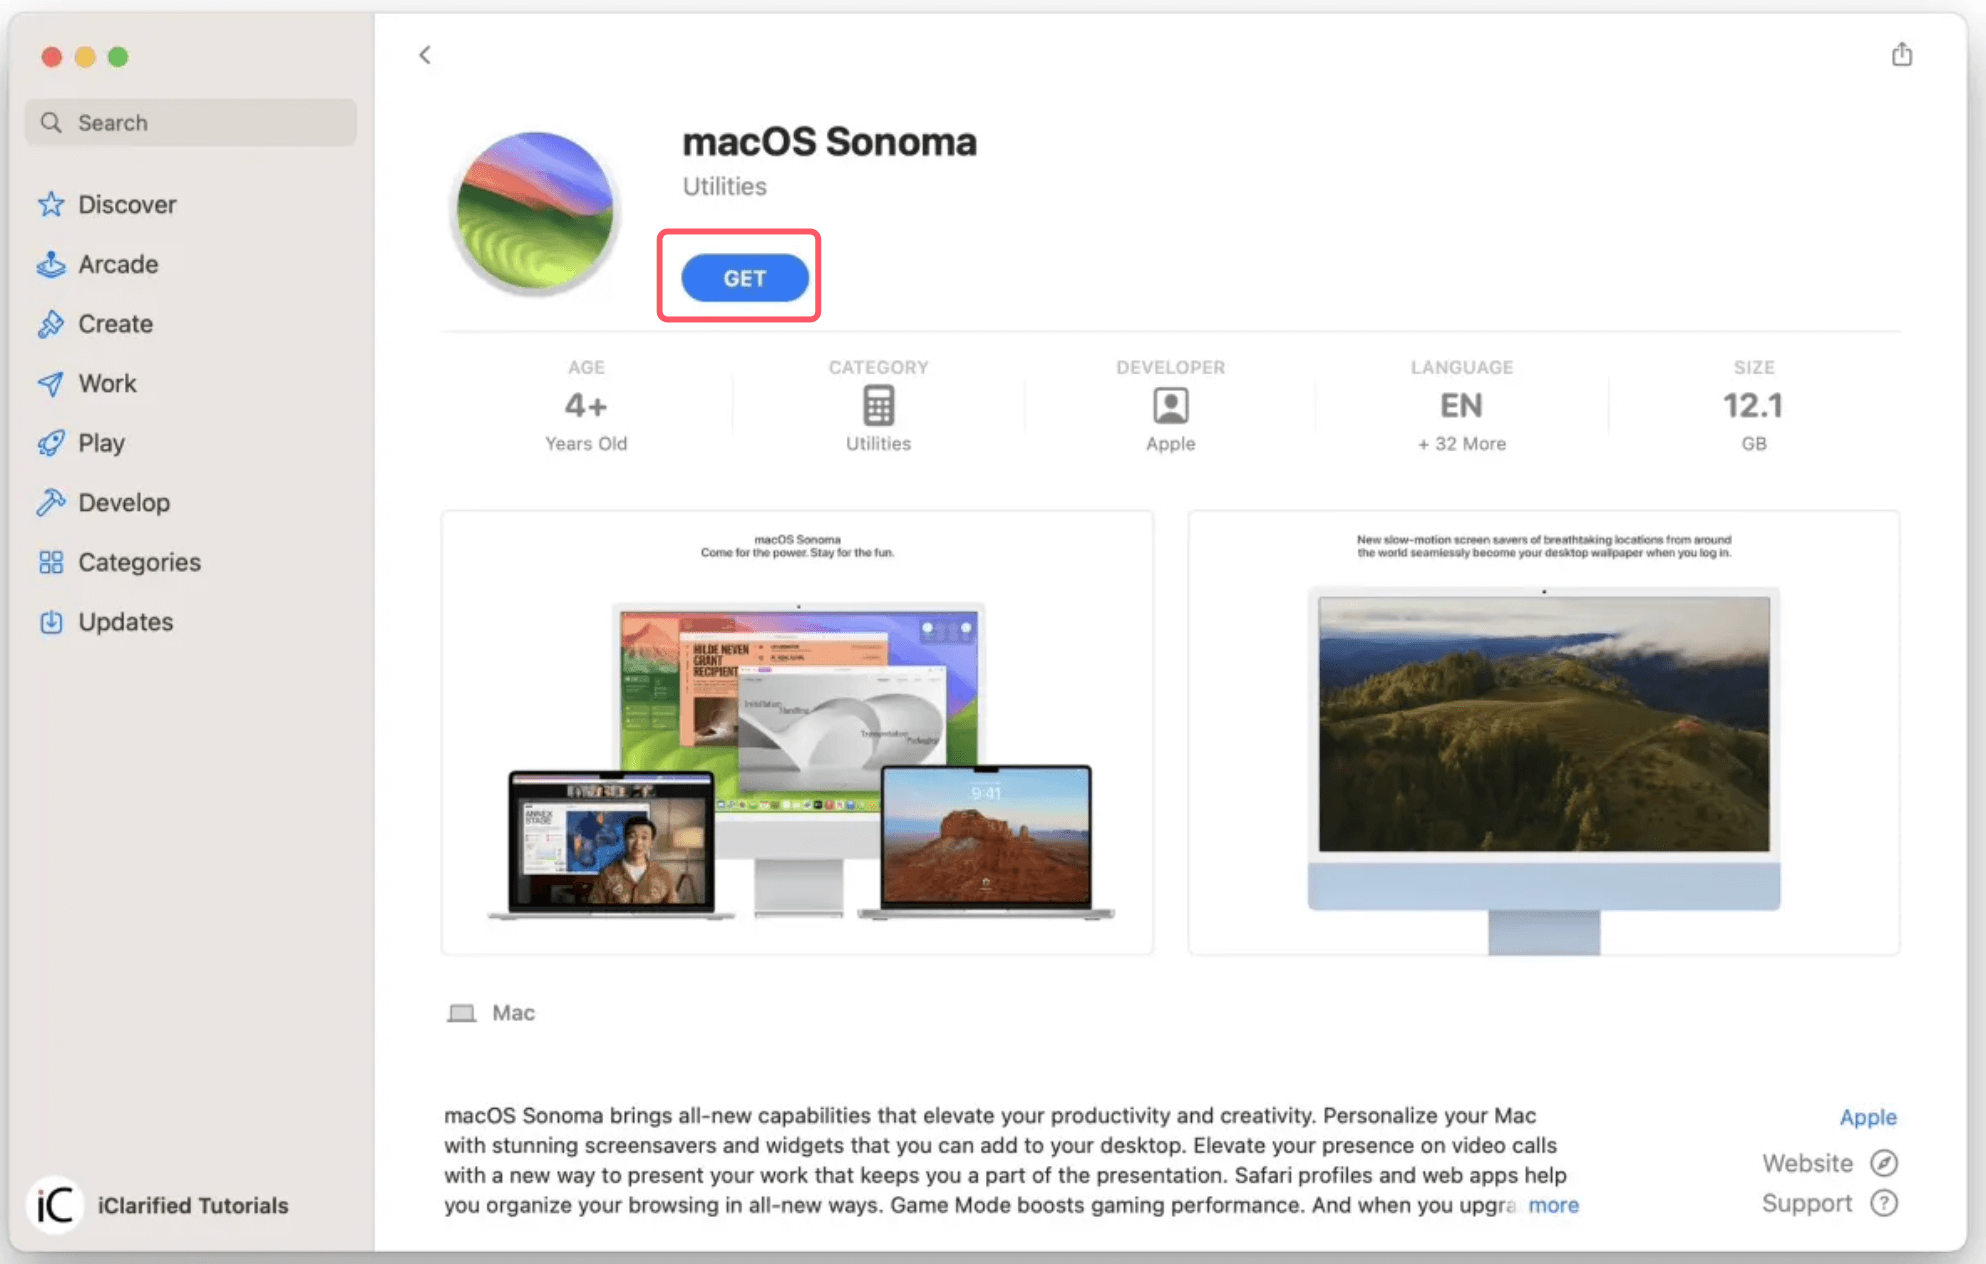
- Look for the macOS version that you wish to install (macOS Sonoma, for example).
- To download the installation, click Get.
![Download macOS Installer]()
Make sure you don't run the installer after downloading. You'll need it to create a bootable USB installer later.
Step-by-Step Guide to Uninstall macOS Sequoia
Now that you're ready to begin, let's go through the steps to uninstall macOS Sequoia and revert to a previous version of macOS.
✦ Create a Bootable macOS Installer
Creating a bootable installer is an essential step when you want to uninstall macOS Sequoia and install a different version of macOS. This process ensures that you have a standalone, functional macOS installer on a USB drive, which is especially useful if you encounter issues with your current operating system.
Here's how to create a bootable macOS installer:
1. Prepare the USB Drive
First, you'll need a USB flash drive with at least 8GB of capacity. If possible, use a USB 3.0 drive for faster installation. Make sure there's nothing important on the drive, as the process will erase all the data on it.
- Attach the USB disk to the Mac.
- To access Disk Utility, navigate from Applications to Utilities.
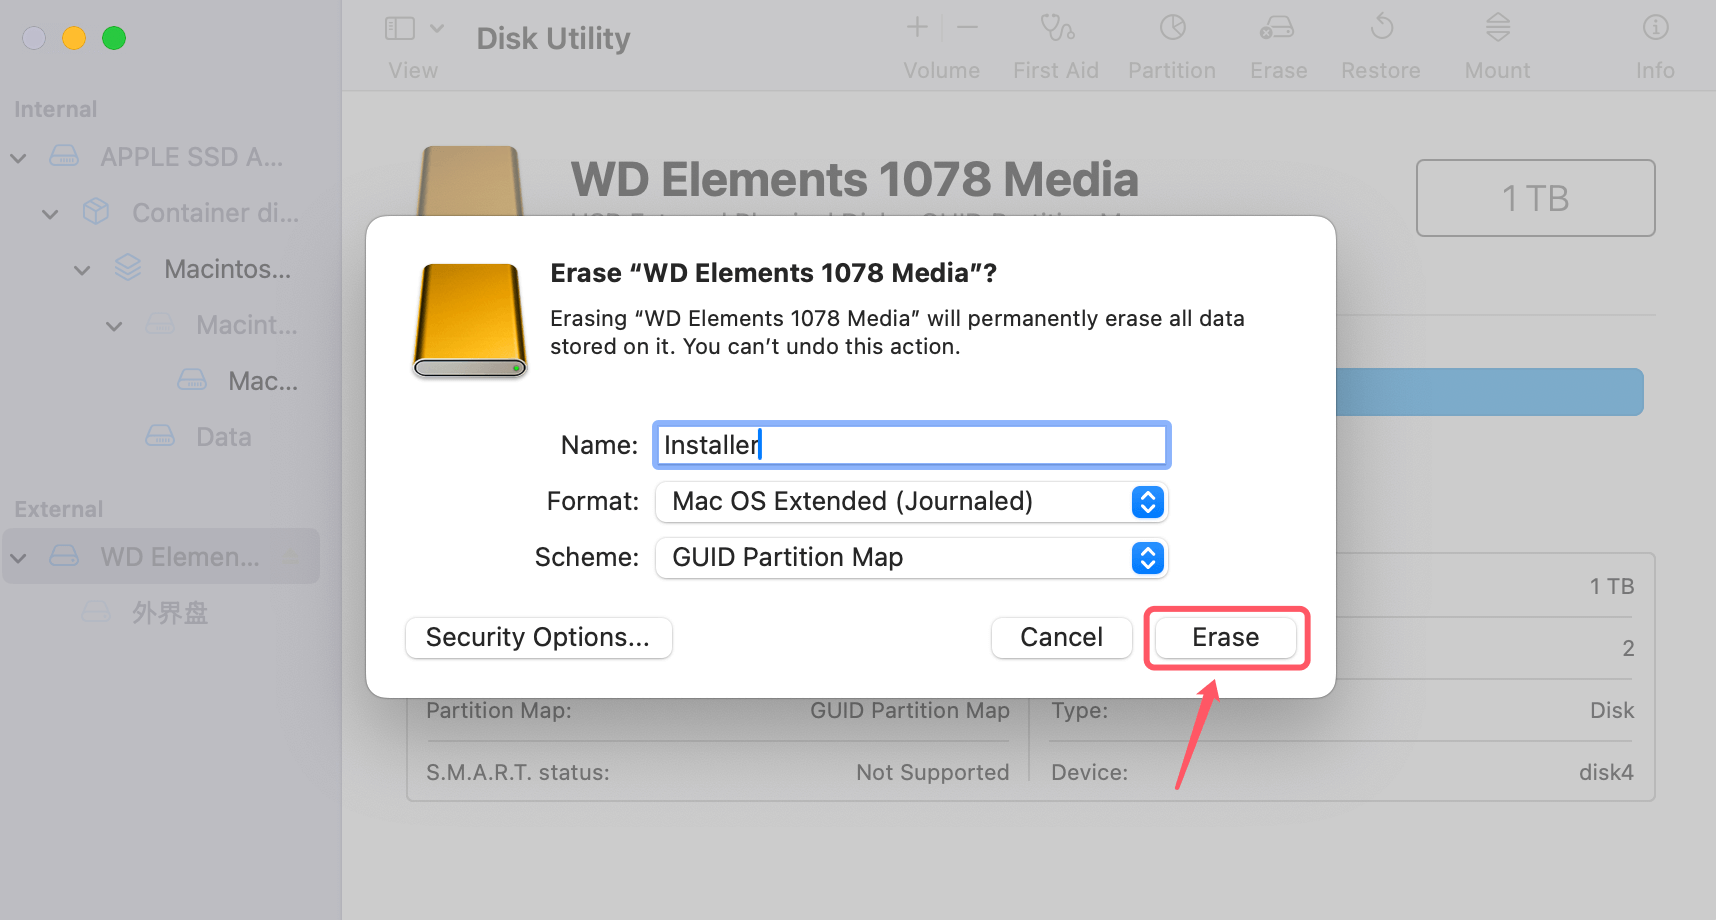
- Locate your USB drive in the sidebar on the left of the Disk Utility window. Be careful you choose the right one!
- Tap the Erase button at the top.
- You’ll be prompted to choose a name and format for the USB drive. Choose the following options:
- Name: Use something recognizable like "Installer."
- Format: Select APFS or Mac OS Extended (Journaled).
- Scheme: Select GUID Partition Map.
- Click Erase to reformat the drive.
![Prepare the USB Drive]()
2. Download the macOS Installer
Next, you need the installer for the version of macOS you wish to install after uninstalling Sequoia. Depending on the version you want to revert to, this could be Sonoma, macOS Big Sur, Monterey, or even an older version like Catalina.
To download the macOS installer:
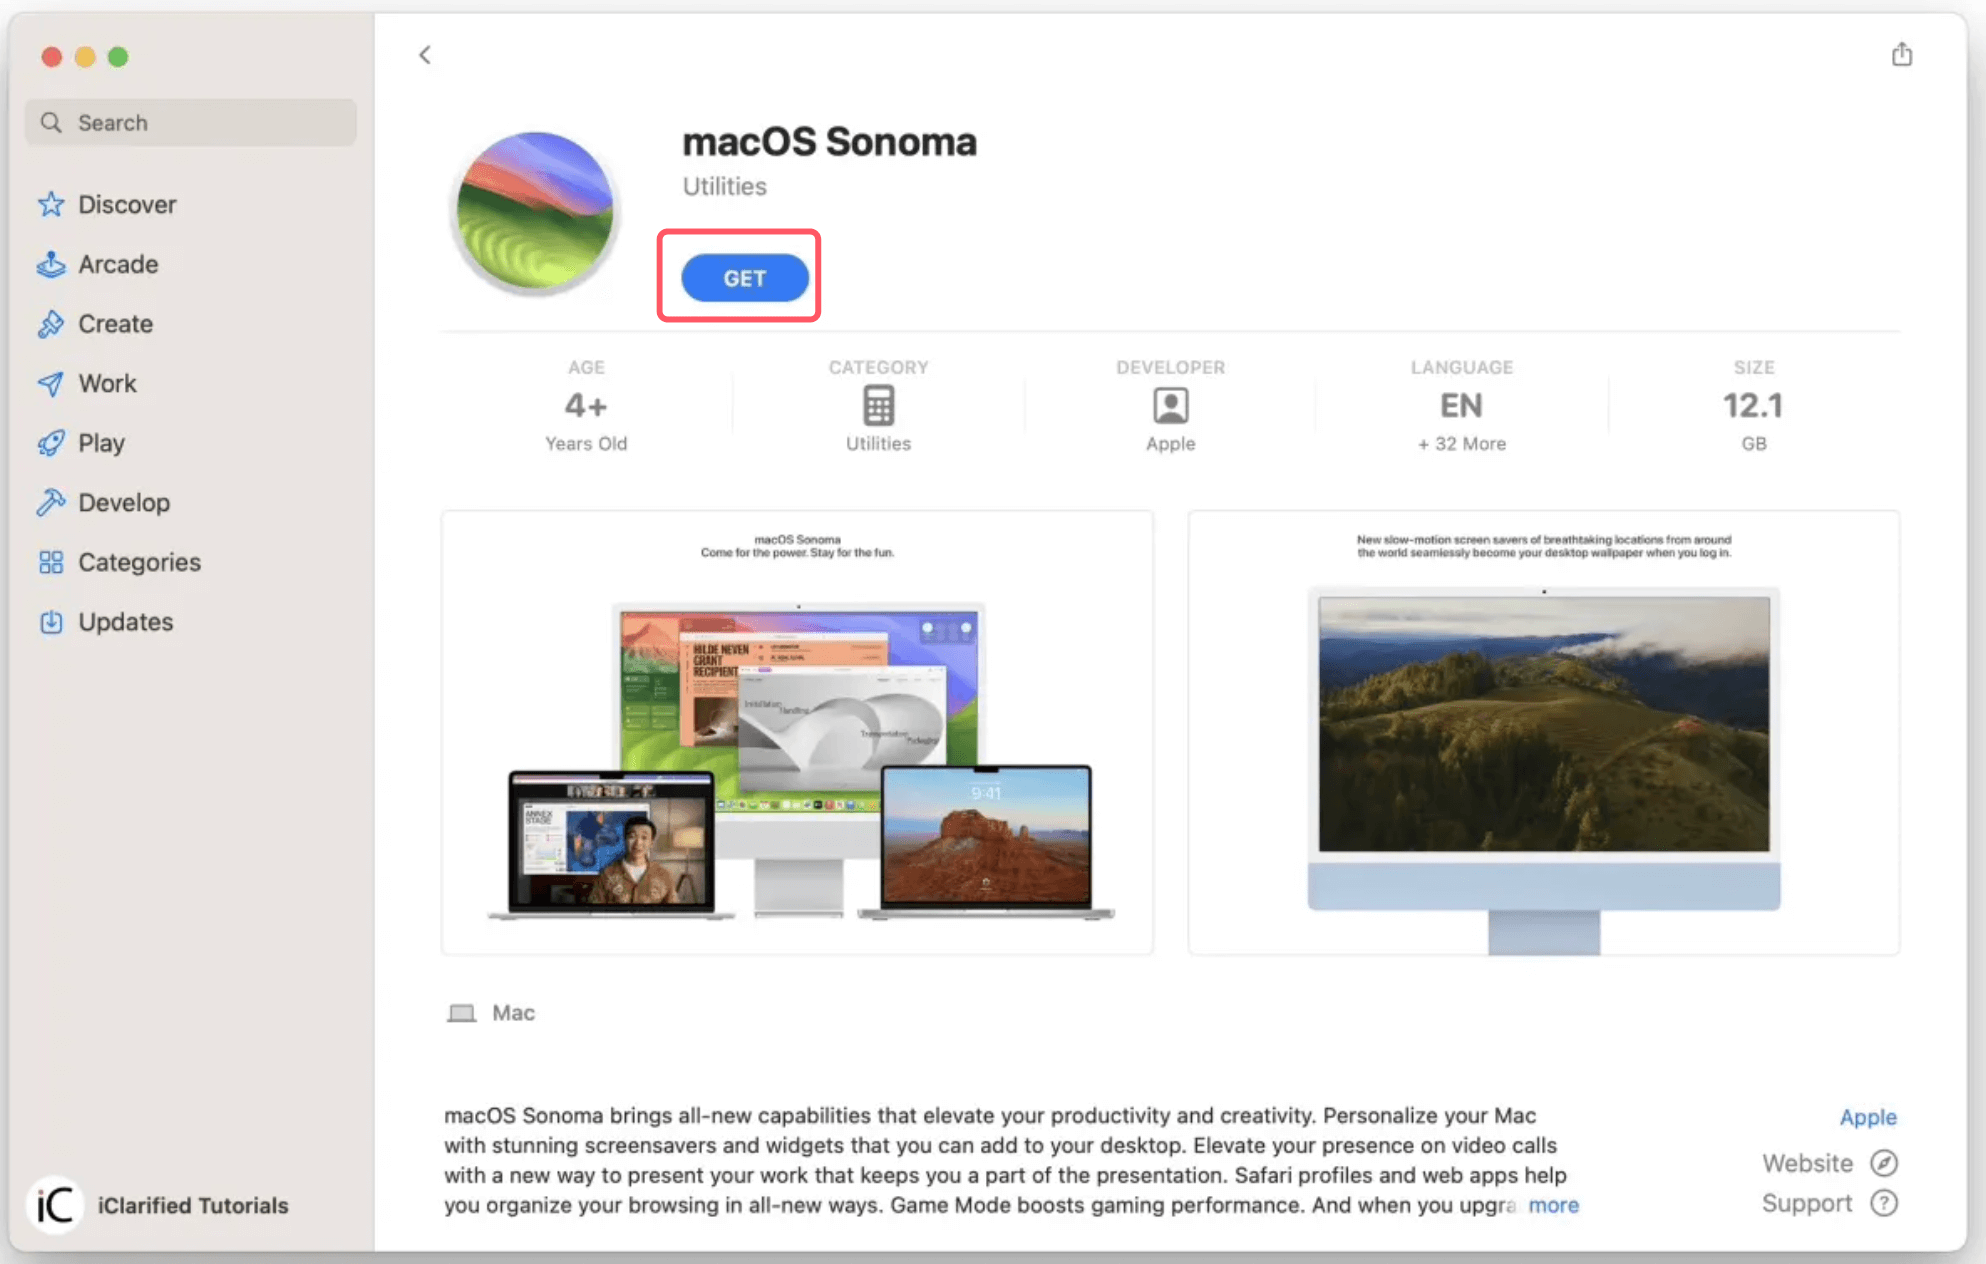
- Launch the App Store and type in the desired macOS version (macOS Sonoma, for example).
- To download the installer, click Get. The installer will download and then appear in your Applications folder.
![Download the macOS Installer]()
It's important not to run the installer after downloading it. We'll use it in the next step to create the bootable installer.
3. Create the Bootable Installer Using Terminal
Now that you've prepared your USB drive and downloaded the macOS installer, it's time to turn your USB drive into a bootable installer. This requires using Terminal, which is Apple's command-line interface.
Here's how to do it:
- Open Terminal from Applications > Utilities.
- In Terminal, type the following command to create a bootable installer, but be sure to replace Sonoma with the name of the macOS version you're installing. Also, make sure the installer path matches your system (most likely, it will be in the Applications folder):
sudo /Applications/Install\ macOS\ Sonoma.app/Contents/Resources/createinstallmedia --volume /Volumes/Installer
- In this command, sudo gives you administrative rights to make changes.
- /Volumes/Installer refers to the name of your USB drive, which you should have named earlier.
- Press Enter. Your administrator password - the one you use to access your Mac - will need to be entered.
- After entering your password, the process of creating the bootable installer will begin. Terminal will display a message saying it's erasing the drive, copying the macOS installer, and making the drive bootable.
- When the process is complete, Terminal will notify you that the installer is ready. You can now eject the USB drive by typing:
sudo diskutil eject /Volumes/Installer
You now have a fully functional macOS bootable installer on your USB drive. Keep it handy, as you’ll use it in the next steps to reinstall your desired version of macOS after uninstalling Sequoia.
✦ Boot Your Mac into Recovery Mode
You must boot your Mac into Recovery Mode in order to begin the removal of macOS Sequoia.
Here's how to do it:
- Start your Mac Again.
- Press and hold Command + R (for Intel-based Mac) or Power button (for Apple silicon Mac) until the Apple logo shows as soon as the screen goes dark.
- You'll enter macOS Recovery Mode. From here, you'll be able to erase macOS Sequoia.
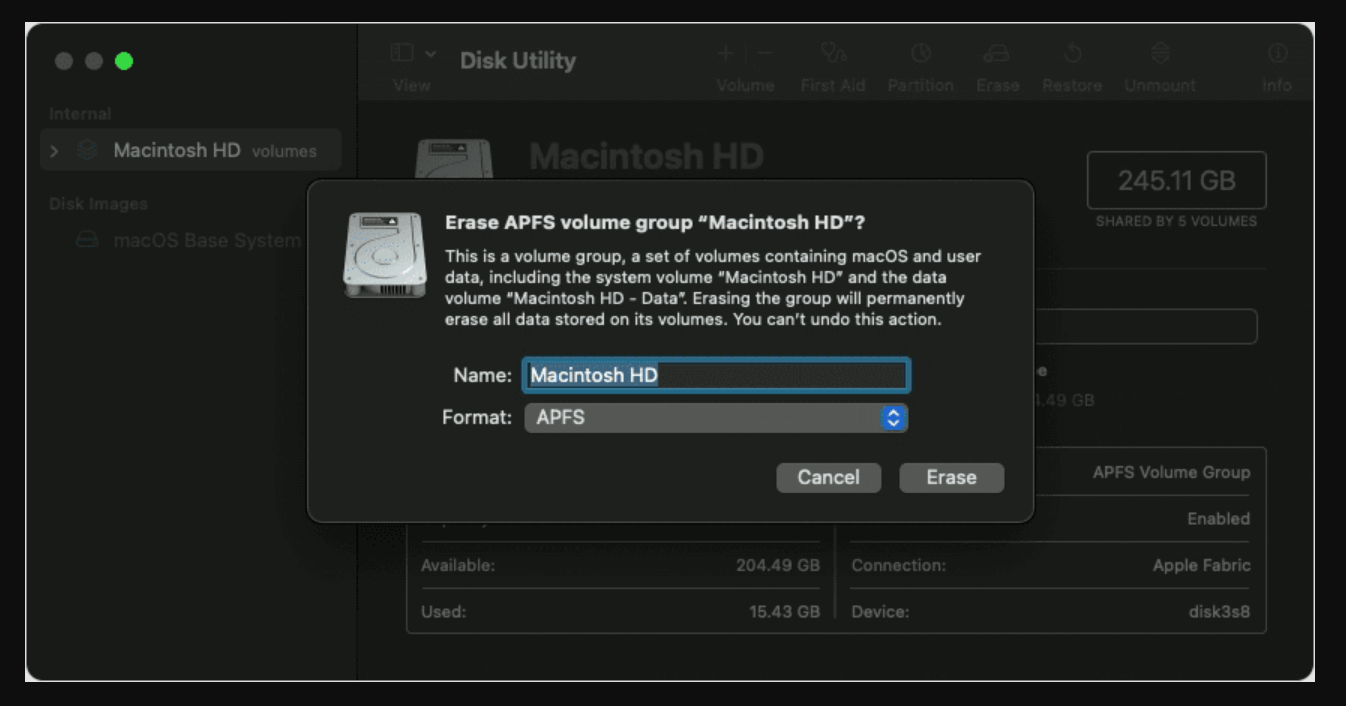
✦ Erase macOS Sequoia Using Disk Utility
Once in Recovery Mode, follow these steps to erase macOS Sequoia:
- From the macOS Utilities menu, select Disk Utility.
- In Disk Utility, select the Startup Disk (typically named "Macintosh HD").
- Click Erase.
- Choose a format for the disk:
- For Macs with an SSD, select APFS.
- For older Macs with a traditional hard drive, select Mac OS Extended (Journaled).
![Erase macOS Sequoia Using Disk Utility]()
- Confirm your choice and click Erase again.
This will wipe macOS Sequoia from your Mac, allowing you to install a new macOS version.
4. Install the New macOS
Now it's time to install the macOS version you've selected.
If you created a bootable USB installer, follow these steps:
For Intel-based Mac:
- Restart your Mac while holding Option (Alt).
- You'll see a list of bootable drives. Select the USB installer.
- Follow the on-screen instructions to install macOS. The installation process should take around 30-45 minutes, depending on your Mac's performance and the version of macOS you're installing.
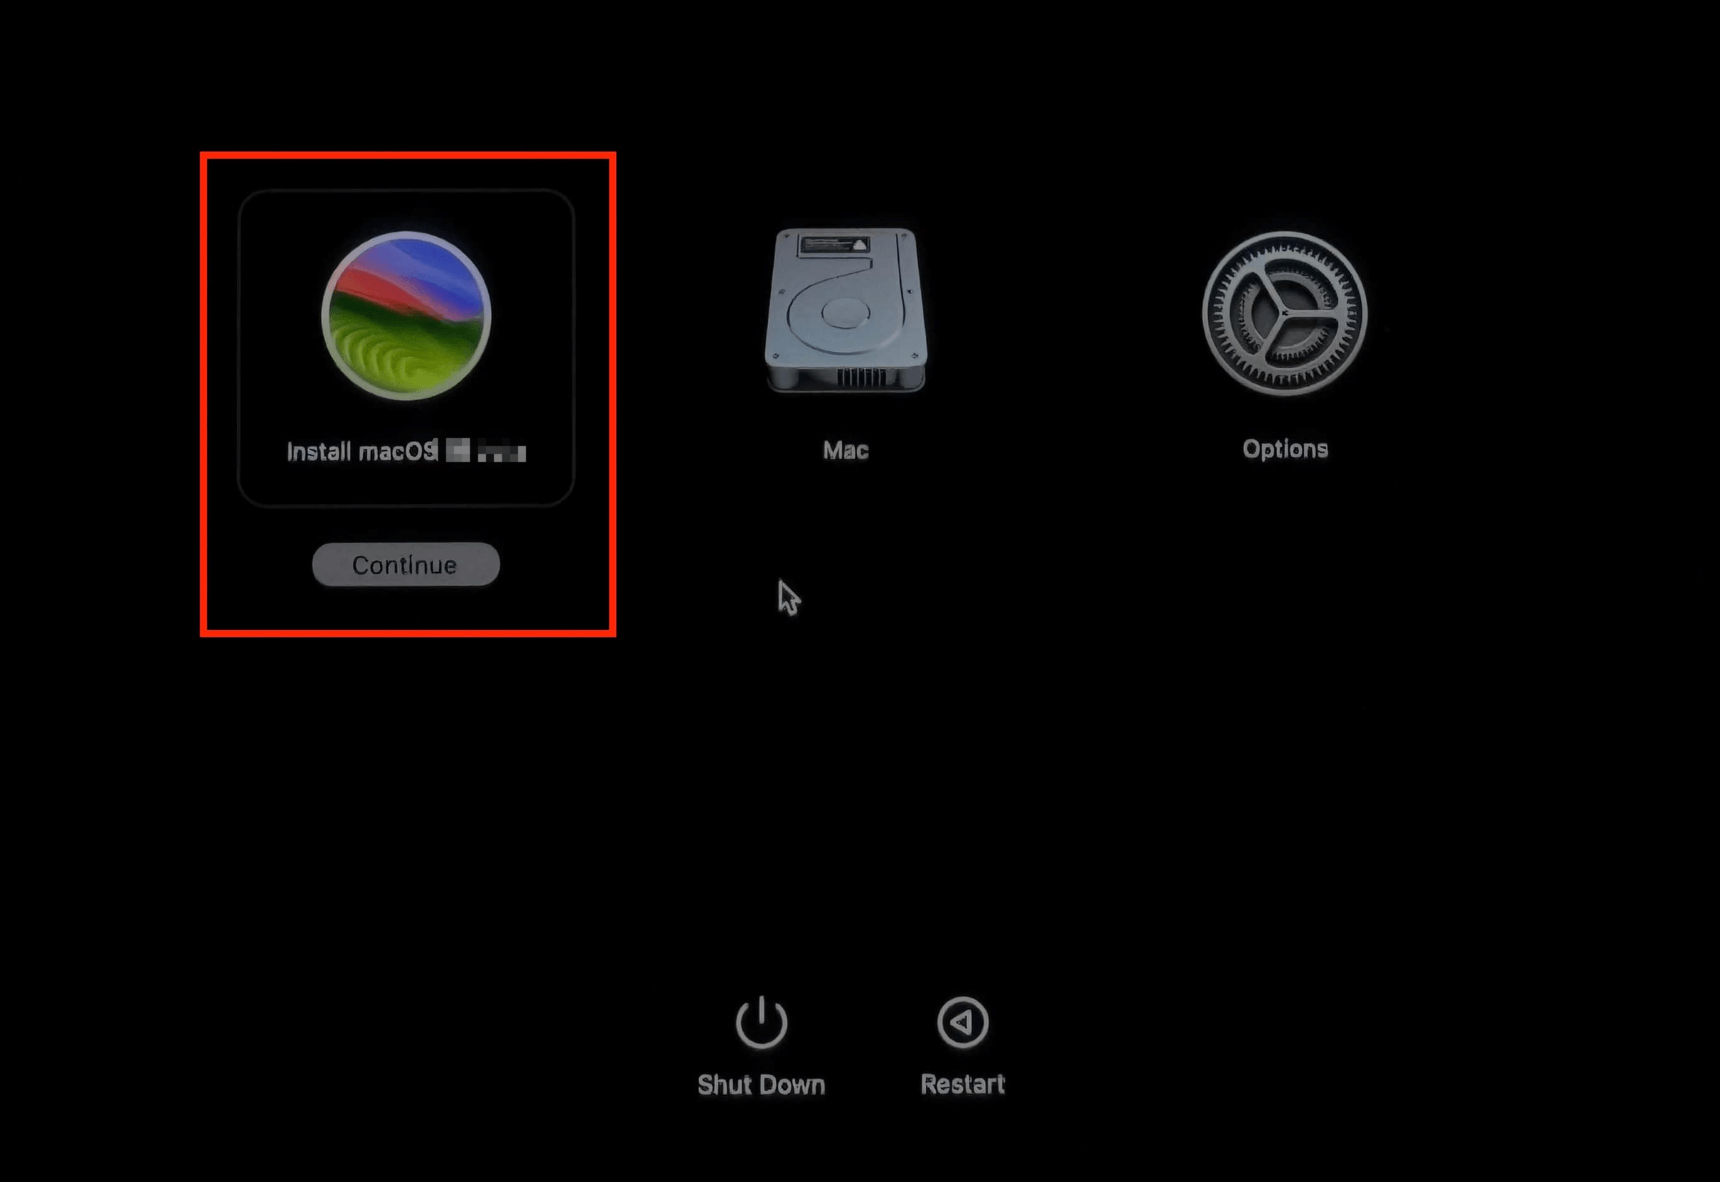
For Apple silicon Mac:
- Turn off the Mac, then press and hold Power button.
- It boots into macOS Recovery mode.
- Select the USB installer, and then install the macOS.
![Install the New macOS]()
Alternatively, you can use Internet Recovery Mode to install a version of macOS. Restart your Mac while holding Command + Option + R, then select Reinstall macOS from the Utilities menu. This will install the version of macOS that originally came with your Mac or the closest available version.
Post-Uninstallation Steps
Once the installation of your chosen macOS version is complete, you'll need to set up your Mac and restore your data.
✦ Restoring Data
If you created a Time Machine backup before uninstalling macOS Sequoia, you can now restore your files. During the macOS setup process, you'll be prompted to Restore from a Time Machine Backup. Follow these steps:
- Connect your Time Machine backup drive.
- Choose Restore from Time Machine in the macOS Setup Assistant.
- Select the latest backup and wait for the restore process to complete.
Your files and settings will now be restored to their previous state.
✦ Reinstalling Apps
After restoring your data, you'll need to reinstall any apps that are not included in the Time Machine backup. Check the compatibility of your apps with the new macOS version, especially if you've reverted to an older version of macOS.
Troubleshooting Common Issues
Uninstalling an operating system and reinstalling another is a complex process, so it's not uncommon to run into issues. Here are some troubleshooting tips:
✦ Installation Fails or Hangs
If the installation of the new macOS version fails or gets stuck, try the below hack:
- Check Internet Connection: If you're utilizing Internet Recovery Mode, make sure your internet connection is steady.
- Retry the Installation: Reboot your Mac and attempt the installation again.
- Use a Different USB Drive: If using a bootable installer, the USB drive might be faulty. Try creating a new one.
✦ Internet Recovery Issues
Sometimes, Internet Recovery Mode fails to connect to Apple's servers. If this happens:
- Use a Wired Connection: If possible, connect your Mac to the router via an Ethernet cable.
- Reset NVRAM/PRAM: Hold Option + Command + P + R for around 20 seconds after restarting your Mac to make it restart again.
How to Recover Lost Data After Uninstalling macOS Sequoia?
The erased or deleted data is not lost for good and can be recovered by data recovery software. If you have lost data due to erasing the internal drive and uninstalling macOS Sequoia, you can use Mac data recovery software to get the lost data back.
Step 1. Download and install Donemax Data Recovery for Mac. It supports to recover all types of lost files on Mac.
Step 2. Open Donemax Data Recovery for Mac, select the Macintosh HD to start data recovery.

Step 3. Click on Scan button to deeply scan the internal drive and find all recoverable files.

Step 4. Once the scan is completed, you can check what it has found. Then select the wanted files, click on Recover button to save them.

Conclusion
Uninstalling macOS Sequoia and reverting to an older version of macOS can be a straightforward process if you follow the right steps. By backing up your data, ensuring compatibility with older macOS versions, creating a bootable installer, and properly erasing your current OS, you can smoothly transition away from Sequoia.
Whether you're uninstalling Sequoia due to compatibility issues, bugs, or personal preferences, the process outlined in this article will help you restore your Mac to a state that works best for your needs. Be sure to carefully follow the steps and enjoy your newly installed macOS version.
Related Articles
- Jul 27, 2025How to Delete Temporary Files on Mac: A Complete Guide
- Aug 06, 2024How to Completely Uninstall Chrome on Mac?
- Apr 29, 2025How to Uninstall Firefox on Mac? [Step-by-step Guide]
- Aug 18, 2025Complete Guide to Free Up Disk Space on Mac
- Jun 17, 2024How to Protect Internal and External SSD on Mac?
- Oct 29, 2024Clear Caches on Mac: A Complete Guide

Christina
Christina is the senior editor of Donemax software who has worked in the company for 4+ years. She mainly writes the guides and solutions about data erasure, data transferring, data recovery and disk cloning to help users get the most out of their Windows and Mac. She likes to travel, enjoy country music and play games in her spare time.

Gerhard Chou
In order to effectively solve the problems for our customers, every article and troubleshooting solution published on our website has been strictly tested and practiced. Our editors love researching and using computers and testing software, and are willing to help computer users with their problems

