PAGE CONTENT:
Apple's macOS offers two primary file systems: APFS (Apple File System) and HFS+ (Hierarchical File System Plus). APFS, introduced in 2017, is the default file system for modern macOS devices, especially those with SSDs. On the other hand, HFS+ served as the primary macOS file system for over a decade before APFS. While APFS offers advanced features, there are situations where users may need to revert to HFS+. This guide will detail how to convert an APFS drive to HFS+ safely, without data loss.
Understanding APFS and HFS+
What is APFS?
APFS is optimized for SSDs and modern computing needs. It supports features such as:
- Space Sharing: Multiple volumes can share the same storage container.
- Snapshots: Read-only versions of the file system at a point in time.
- Encryption: Full-disk and per-file encryption options.
- Performance: Faster read and write speeds, especially for SSDs.
APFS is the default for macOS High Sierra and later.
What is HFS+?
HFS+, also known as Mac OS Extended, was introduced in 1998. While less advanced than APFS, it is:
- Compatible: Works with older macOS versions and many non-Apple systems.
- Journaled: Helps protect against data corruption.
- Stable: Designed for HDDs, making it suitable for legacy systems.
Key Differences
| Feature | APFS | HFS+ |
|---|---|---|
| Compatibility | Limited to modern macOS | Supported by older macOS |
| Performance | Optimized for SSDs | Better on HDDs |
| Encryption | Strong, built-in | Limited |
| Snapshot Support | Yes | No |
Why Convert APFS to HFS+ (Mac OS Extended)?
- Compatibility Issues: Older macOS versions or external devices may not support APFS.
- Performance on HDDs: HFS+ can perform better than APFS on spinning hard drives.
- Legacy Software: Some applications and workflows may require HFS+.
Prerequisites for Conversion:
● Evaluate the Need
Before proceeding, confirm the conversion is necessary. APFS is superior for most modern use cases. However, if compatibility or legacy support is critical, conversion to HFS+ may be justified.
● Backup Your Data
Data loss is a potential risk during any file system conversion. Ensure your data is fully backed up:
- Time Machine: Use Apple's built-in backup solution.
- Disk Clone: Clone everything from your Mac to an external hard drive, creating a bootable clone.
- External Drive Backup: Copy files manually to an external drive.
- Cloud Storage: For smaller datasets, services like iCloud or Google Drive can be useful.
● Prepare the System
- Check macOS Compatibility: Ensure your macOS supports Disk Utility or third-party tools.
- Ensure Adequate Space: Make sure you have enough free space on the target device for the conversion.
- Update Tools: Use the latest versions of any third-party software required for conversion.
How to Convert APFS to HFS+ (Mac OS Extended) on Mac?
Method 1: Using macOS Disk Utility
macOS Disk Utility is Apple's built-in application for managing disks and volumes. Although it requires reformatting the drive, it is a straightforward and reliable method.
- Backup Data:
- Use Time Machine, an external drive, or cloud storage to back up all important files.
- Verify the backup integrity by checking for missing or corrupted files.
- Open Disk Utility:
- Navigate to Applications > Utilities > Disk Utility.
- Alternatively, press Command + Space, type Disk Utility, and hit Enter.
- Select APFS Partition:
- In the left-hand sidebar, locate and select the APFS-formatted drive or volume you want to convert.
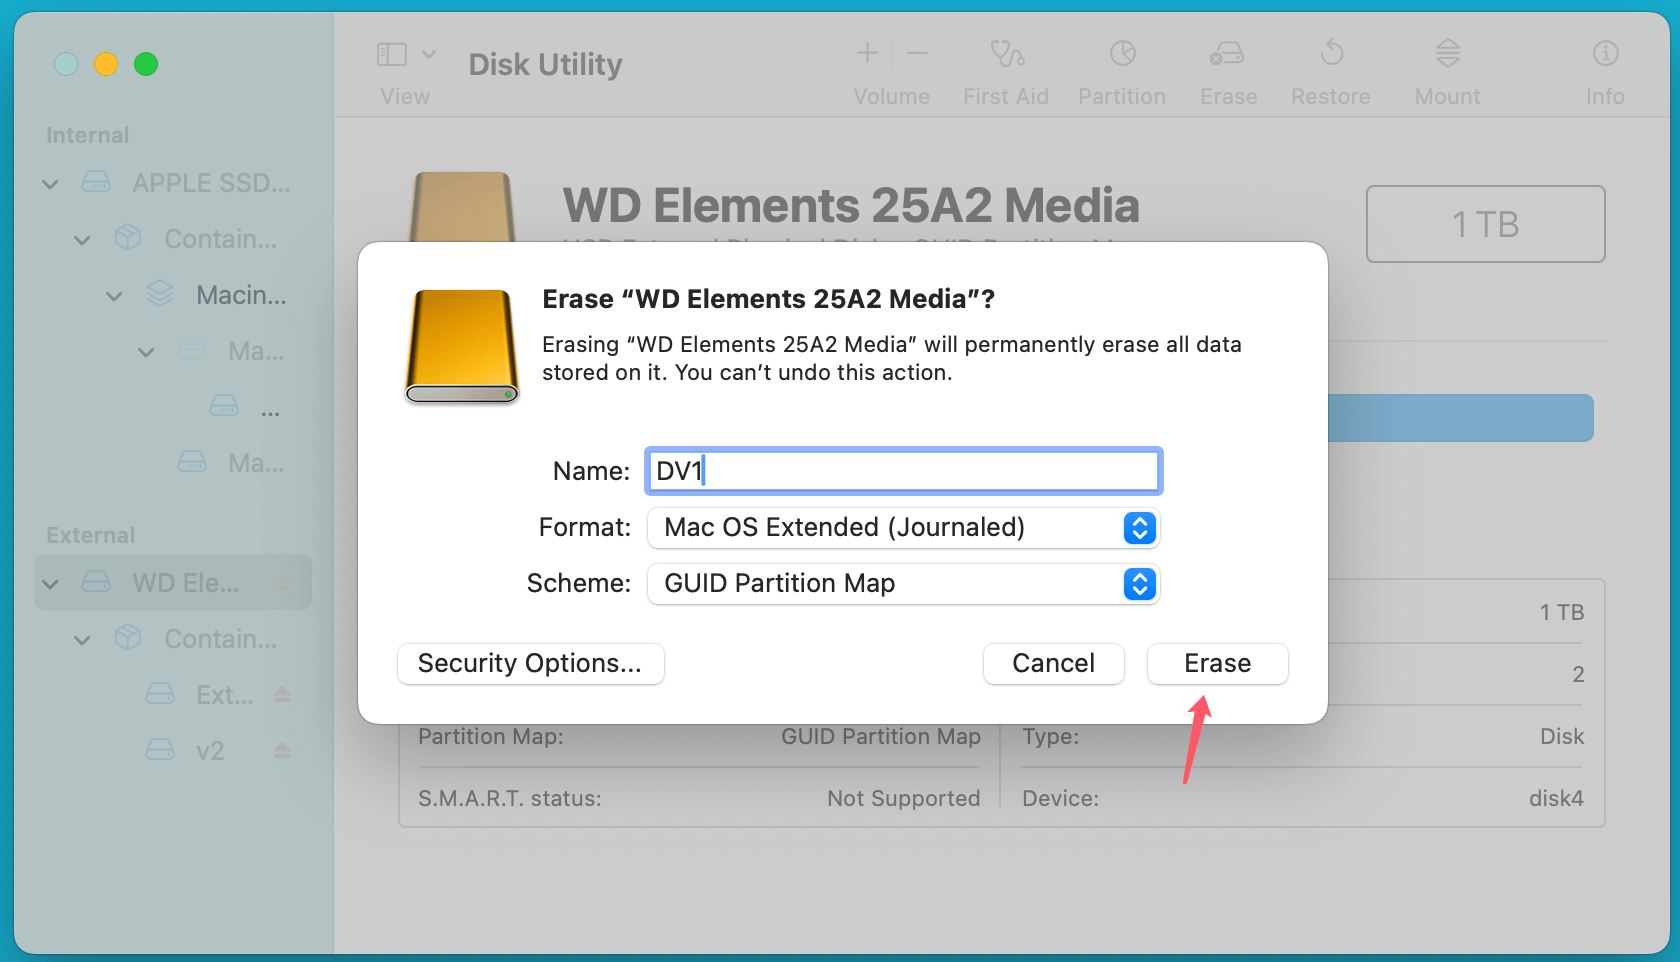
- Format the Partition to HFS+ (Mac OS Extended):
- Click Erase in the top menu.
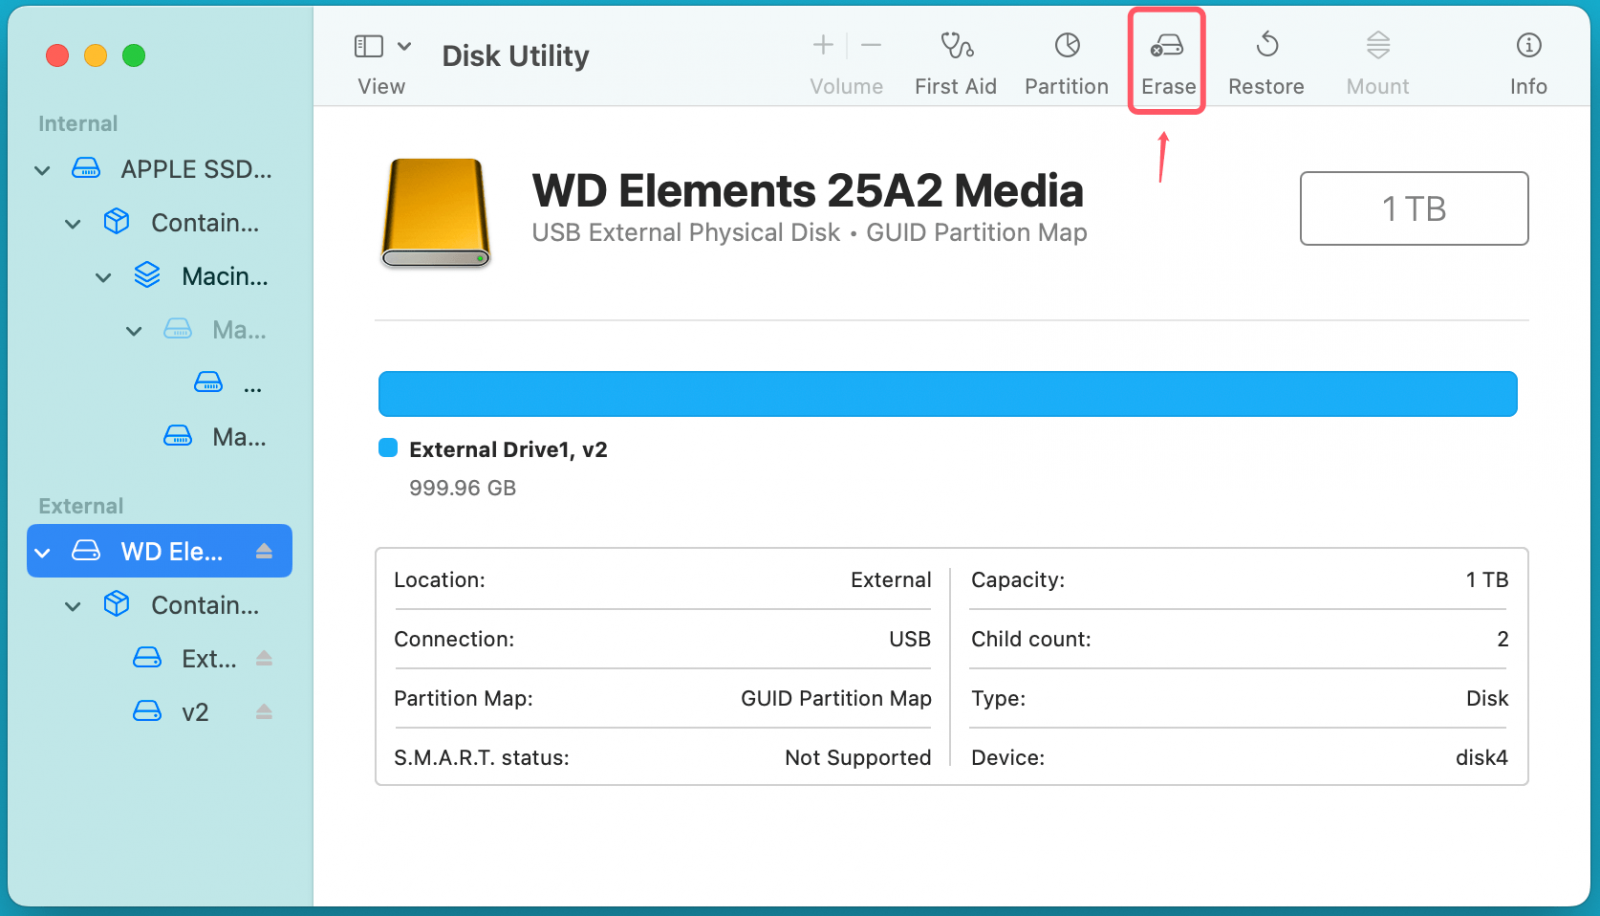
- Under Format, select Mac OS Extended (Journaled) or Mac OS Extended (Case-sensitive, Journaled) as per your preference.
![Converting an APFS drive to HFS+]()
- Provide a name for the partition and confirm the operation.
- Disk Utility will reformat the drive, erasing all existing data.
- Click Erase in the top menu.
- Restore the Backup:
- Once the reformatting process is complete, use your backup to restore files to the HFS+ partition.
- Confirm that all files have been restored successfully.
Limitations of this Method:
- All data on the drive is erased during the process, requiring a reliable and complete backup.
- Time-consuming for large datasets.
- Limited flexibility for those who cannot afford to erase their drive.
Method 2: Using Third-Party Tools
Third-party disk management tools can simplify the conversion process and, in some cases, retain data during the conversion. These tools are especially useful for users unfamiliar with Disk Utility or who want to avoid manual intervention.
Recommendations for Tools:
- Donemax Data Recovery for Mac: A famous data recovery tool which also supports to format APFS to HFS+ (Mac OS Extended).
- Donemax Data Eraser for Mac: Format your APFS drive to HFS+ and permanently wipe all data from the drive.
- DMmenu for Mac: A start menu for macOS, it offers disk formatting tool to format APFS to HFS+ on Mac.
For example, you can use Donemax Data Recovery to format APFS to HFS+:
- Install and Launch the Tool: Donemax Data Recovery for Mac is an easy-to-use tool. Just download and install it on your Mac.
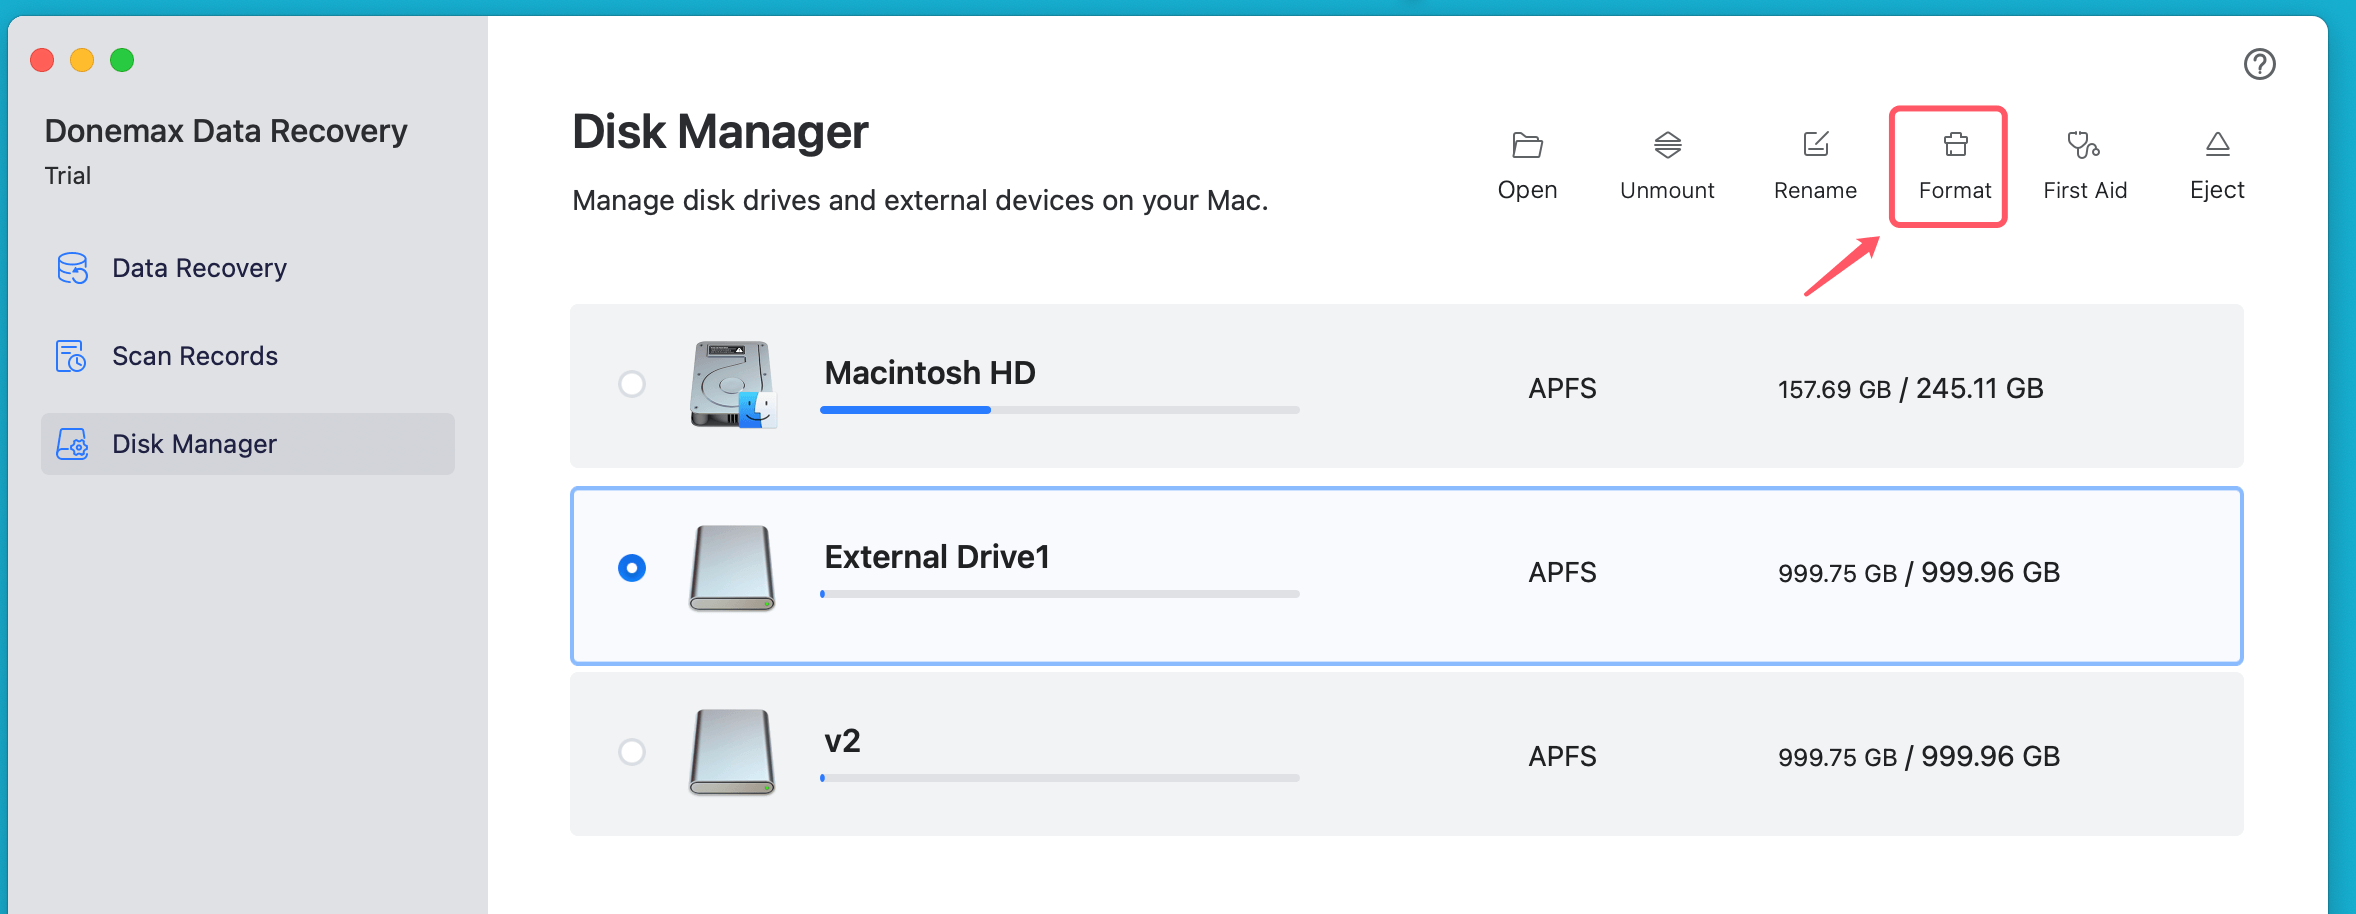
- Format the Drive: Open Donemax Data Recovery for Mac, choose Disk Manager, then select the APFS drive, click on Format button.
![Converting an APFS drive to HFS+]()
Select Mac OS Extended as the file system, click on Continue button to format the APFS drive to Mac OS Extended.
Advantages
- Minimal manual intervention.
- Some tools allow for conversion without erasing data.
Limitations
- Requires purchasing software in most cases.
- Success depends on the reliability of the tool.
Method 3: Reformat and Migrate
If other methods fail or are not viable, manually reformatting the drive and migrating data is a safe but time-intensive option.
Steps
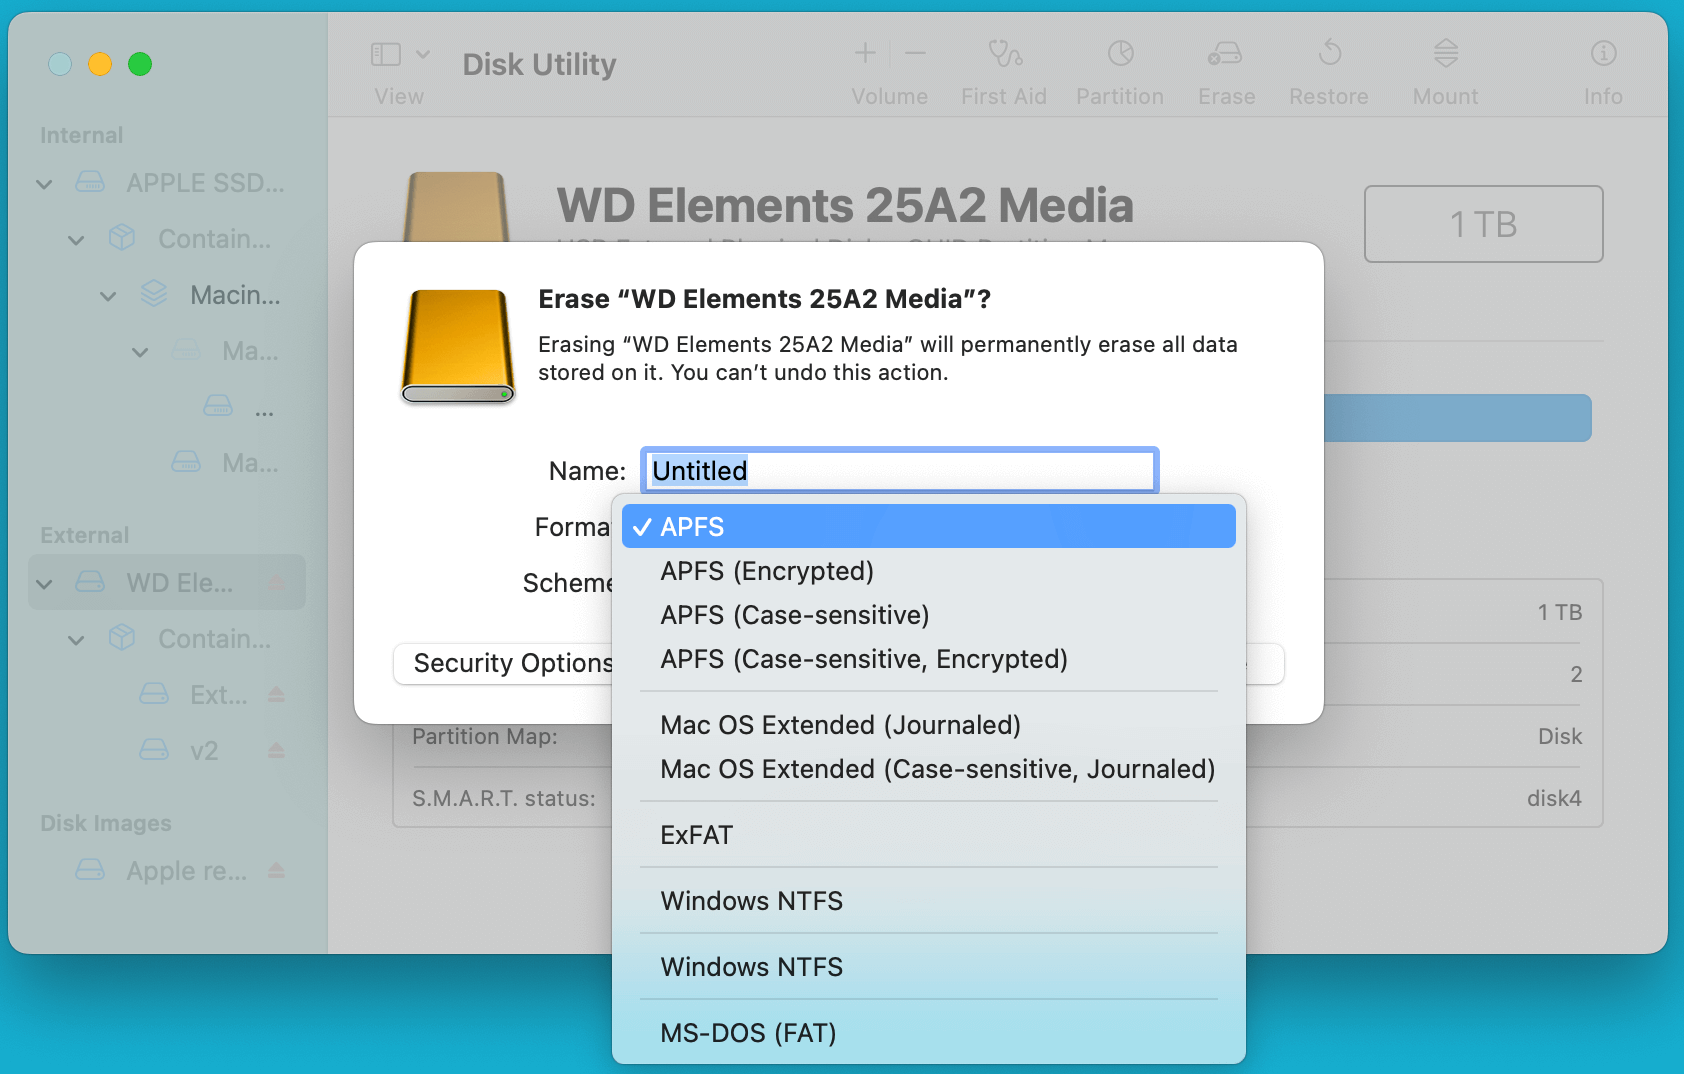
- Reformat the Drive: Use Disk Utility to erase the drive and reformat it to HFS+.
![Converting an APFS drive to HFS+]()
- Migrate Data: Restore files from a backup or manually copy them back to the reformatted drive.
Pros
- Guarantees a clean file system.
- Works in all cases where reformatting is feasible.
Cons
- Involves significant manual effort.
- Requires adequate backup storage.
Method 4: Using Terminal Commands
Advanced users comfortable with macOS's command-line interface can leverage Terminal to reformat drives. This method is faster than using Disk Utility but requires caution.
Steps
- Backup Data:
- As with other methods, ensure a complete backup of all important files.
- Launch Terminal:
- Open Terminal from Applications > Utilities.
- List Drives:
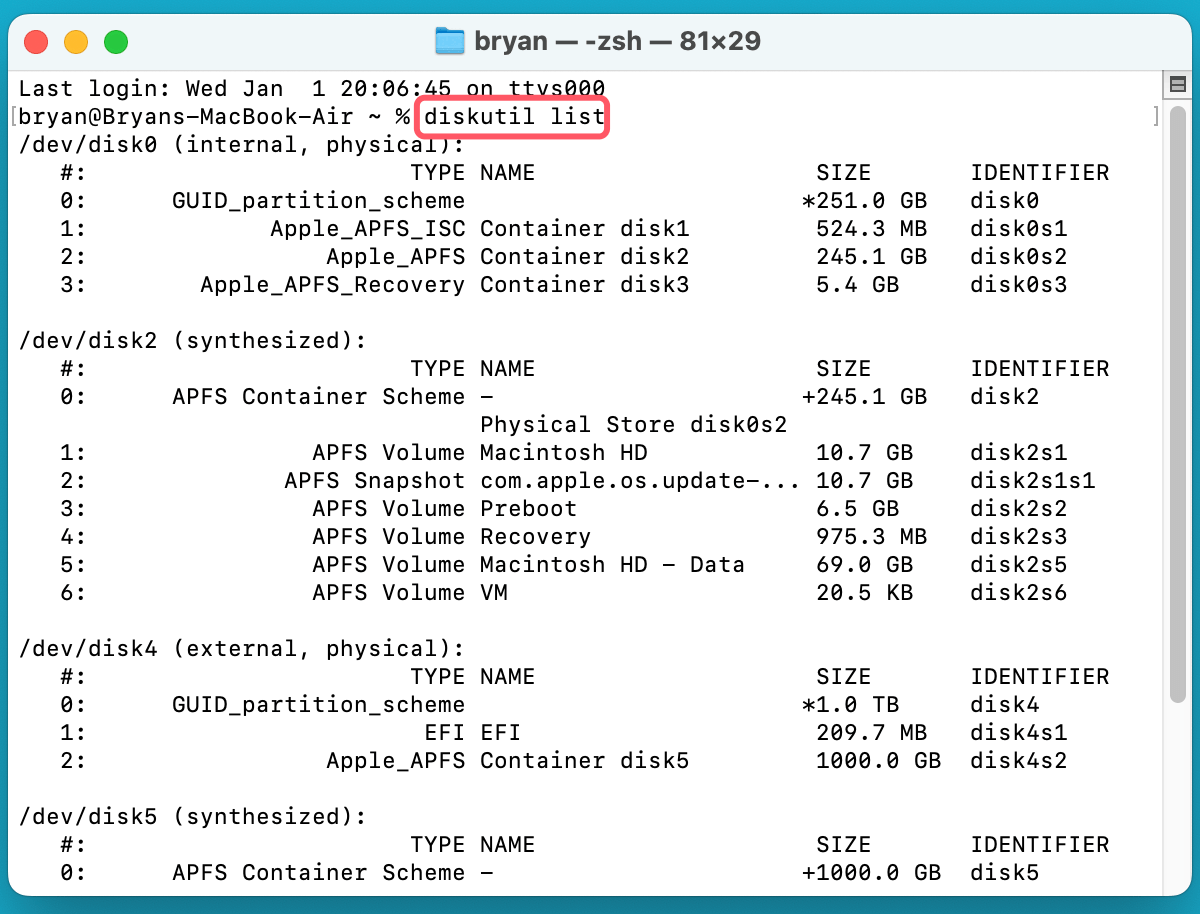
- Type diskutil list to display all connected drives and their identifiers.
![Converting an APFS drive to HFS+]()
- Identify the APFS-formatted drive (e.g., disk4).
- Type diskutil list to display all connected drives and their identifiers.
- Erase and Reformat:
- Use the following command to reformat the drive:
diskutil eraseDisk HFS+ "DriveName" /dev/disk4
- Replace "DriveName" with your desired drive name and /dev/disk4 with the correct identifier from the previous step.
![Converting an APFS drive to HFS+]()
- Use the following command to reformat the drive:
- Restore Data:
- Restore your files from the backup.
Pros
- Faster than using Disk Utility's graphical interface.
- Useful for scripting or automating the process.
Cons
- Requires technical knowledge.
- Errors in commands can lead to unintended data loss.
Method 5: Dual-Boot and Cross-File System Transfer
For users who need to work with both APFS and HFS+ temporarily, setting up a dual-boot environment allows cross-file system transfers before committing to HFS+.
Steps
- Partition the Drive:
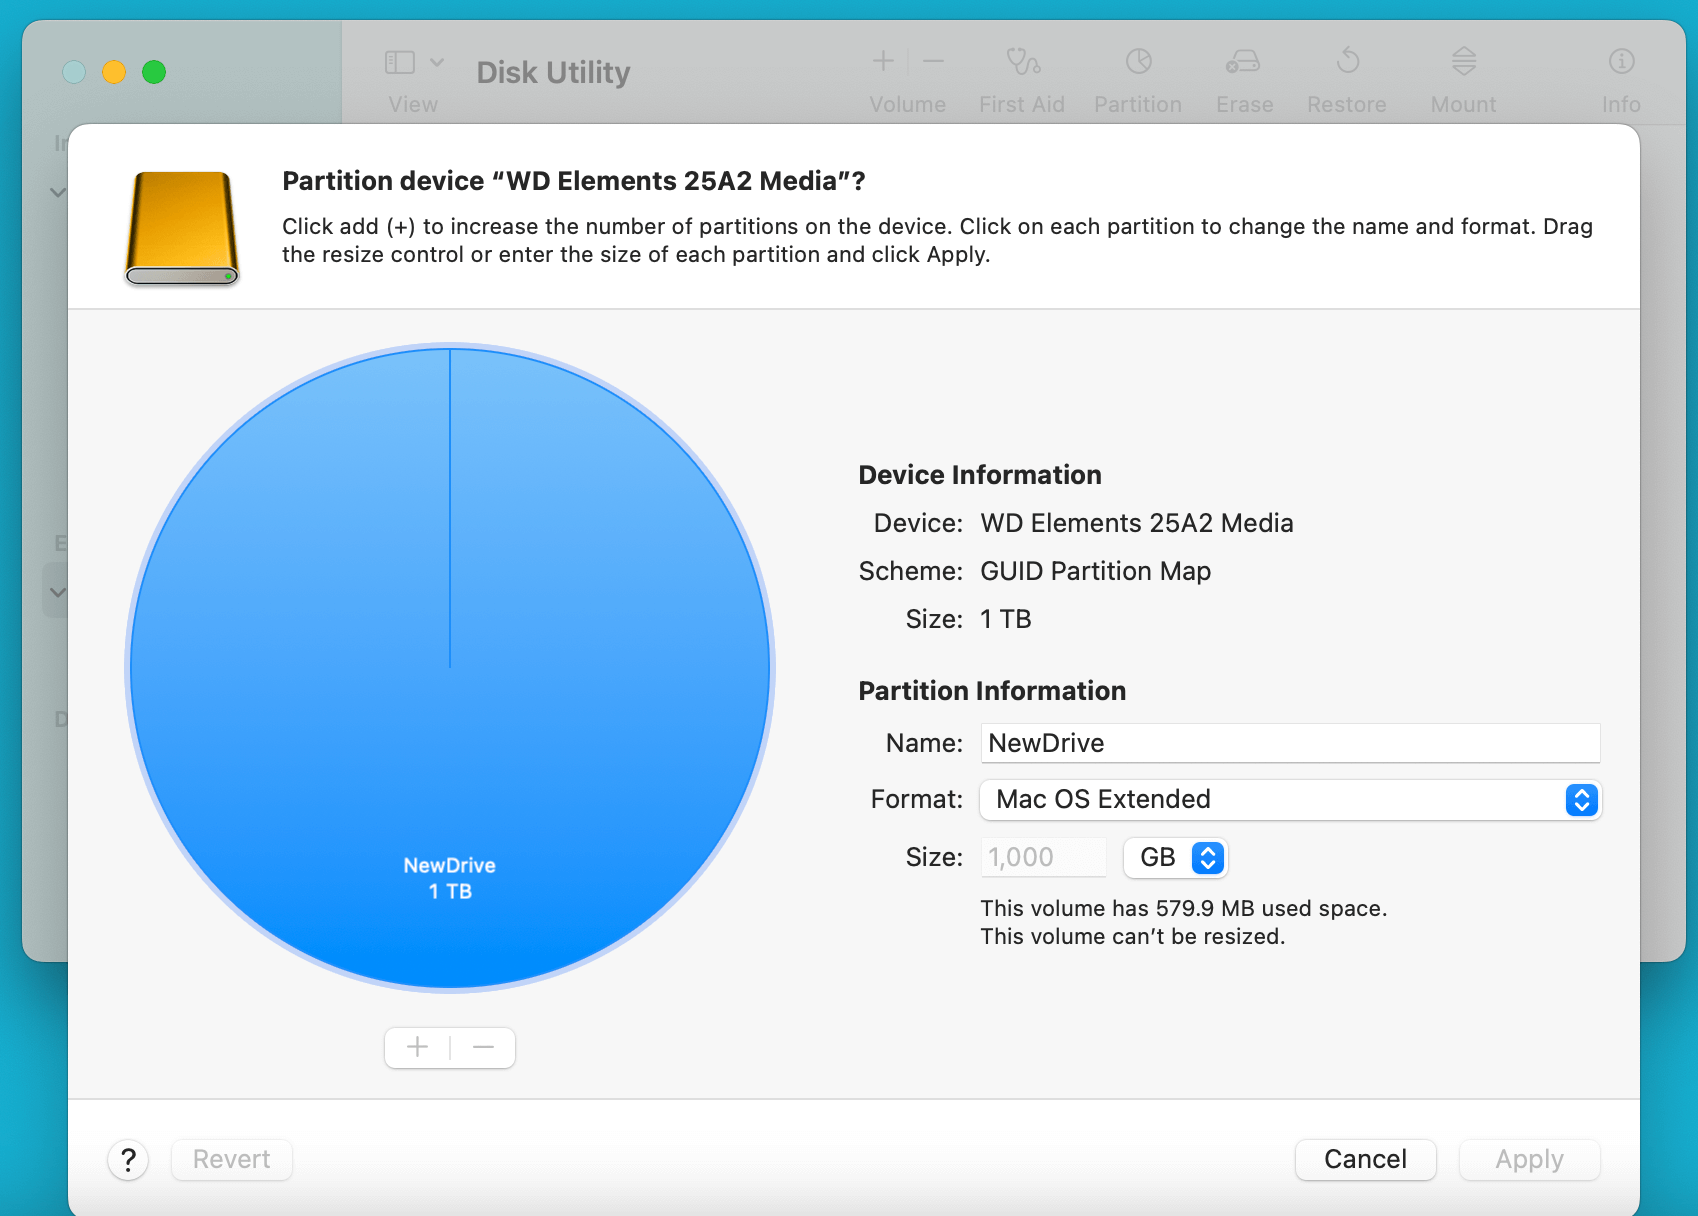
- Use Disk Utility to create a new partition formatted as HFS+ alongside the APFS partition.
![Converting an APFS drive to HFS+]()
- Use Disk Utility to create a new partition formatted as HFS+ alongside the APFS partition.
- Install macOS on HFS+:
- Install a macOS version compatible with HFS+ on the new partition.
- Transfer Data:
- Boot into the HFS+ macOS partition and transfer data from the APFS partition.
- Verify data integrity after the transfer.
- Reformat the APFS Partition:
- Once all data is safely migrated, reformat the APFS partition to HFS+.
Pros
- Gradual migration allows time to adapt.
- Ideal for systems with both legacy and modern requirements.
Cons
- Requires extra storage space for dual-boot setup.
- More complex than other methods.
Choosing the Right Method
The best method depends on your specific needs:
- For Simplicity: Use Disk Utility (Method 1).
- For Retaining Data: Opt for third-party tools (Method 2).
- For Advanced Users: Use Terminal commands (Method 4).
- For Gradual Migration: Set up a dual-boot system (Method 5).
Each approach has trade-offs, but careful preparation and backups will ensure a smooth conversion to HFS+.
Common Challenges and Solutions
- Data Loss During Conversion
- Challenge: Accidental data loss can occur if backups are incomplete.
- Solution: Double-check backup integrity before starting. Use multiple backup methods if necessary.
- Compatibility Issues
- Challenge: HFS+ may not support some features of modern macOS.
- Solution: Ensure the software and hardware environment supports HFS+.
- Error Messages in Disk Utility
- Challenge: Errors like "Disk Could Not Be Erased" can occur.
- Solution: Try restarting your Mac in Recovery Mode and use Disk Utility from there.
- Large Data Volumes
- Challenge: Handling drives with extensive data can be slow.
- Solution: Use high-speed external drives for backups and restoration.
Tips for a Successful Conversion
- Plan Ahead: Understand why you need HFS+ and confirm it's the right choice.
- Use Reliable Tools: Whether Apple's Disk Utility or third-party options, ensure the tool is compatible and updated.
- Test the Drive: After conversion, verify the functionality and integrity of the new HFS+ file system.
- Keep macOS Updated: Ensure your system has the latest updates to avoid compatibility issues.
Recover Lost Data After Formatting APFS to HFS+
If you don't back up your data and the APFS drive has been formatted to HFS+, you will lose all of your data. Don't panic, you can use data recovery software - such as Donemax Data Recovery for Mac to get the lost data back.
Step 1. Download and install one of the best data recovery software - Donemax Data Recovery for Mac on your Mac.
Step 2. Open Donemax Data Recovery for Mac, select the formatted drive to start data recovery.

Step 3. Click on Scan button. Donemax Data Recovery for Mac will deeply scan the formatted drive and find all deleted/erased files.

Step 4. Once the scan is completed, you can use Preview feature to preview all recoverable files. Then select the wanted files, click on Recover button to save them.

Conclusion
Converting an APFS drive to HFS+ requires careful planning to avoid data loss. While APFS offers superior performance and features, certain scenarios justify reverting to HFS+. Following the outlined methods ensures a smooth transition. Always back up your data, choose the right tools, and verify the success of the process before regular use.
By understanding the prerequisites and potential challenges, you can confidently convert your file system while preserving your data.


Donemax Data Recovery for Mac
Donemax Data Recovery for Mac is one of the best Mac data recovery software. It is easy-to-use and can help in recovering deleted, formatted, inaccessible or lost data from Mac HDD/SSD, external disk, USB drive, SD card, camera or other storage devices.
Related Articles
- Jun 30, 2025How to Delete Backup Disk in Time Machine?
- Feb 21, 2025How to Fix Overheated Hard Drive?
- Jul 17, 2023What to Do If An USB Flash Drive Not Working on Mac?
- Mar 19, 20252025 Guide: Fix WD External Hard Drive Not Mounting on Mac [11 Solutions]
- Jul 27, 20257 Methods to Fix External Hard Drive Not Showing Up on macOS Tahoe 26
- Jun 26, 2024Fix LaCie External Hard Drive Not Showing Up on Mac

Charles
Charles, who lives in Sydney, Australia, is an editor & writer of Donemax Team. He is good at writing articles related with Apple Mac computers, Windows operating systems, data recovery, data erasure, disk clone and data backup, etc. He loves reading and playing tennis in his spare time and is interested in testing new digital devices such as mobile phones, Macs, HDDs, SSDs, digital cameras, etc.

Gerhard Chou
In order to effectively solve the problems for our customers, every article and troubleshooting solution published on our website has been strictly tested and practiced. Our editors love researching and using computers and testing software, and are willing to help computer users with their problems
