Written byCharlesUpdated on Mar 30, 2026
Solved: Can't Erase Disk on Mac (Privilege & Permission Errors)
Approved byGerhard Chou
PAGE CONTENT:
Erasing a disk on a Mac is usually a straightforward process using Disk Utility or Terminal. However, users may sometimes encounter an error message stating:
"The calling process or user lacks the proper privileges to perform."
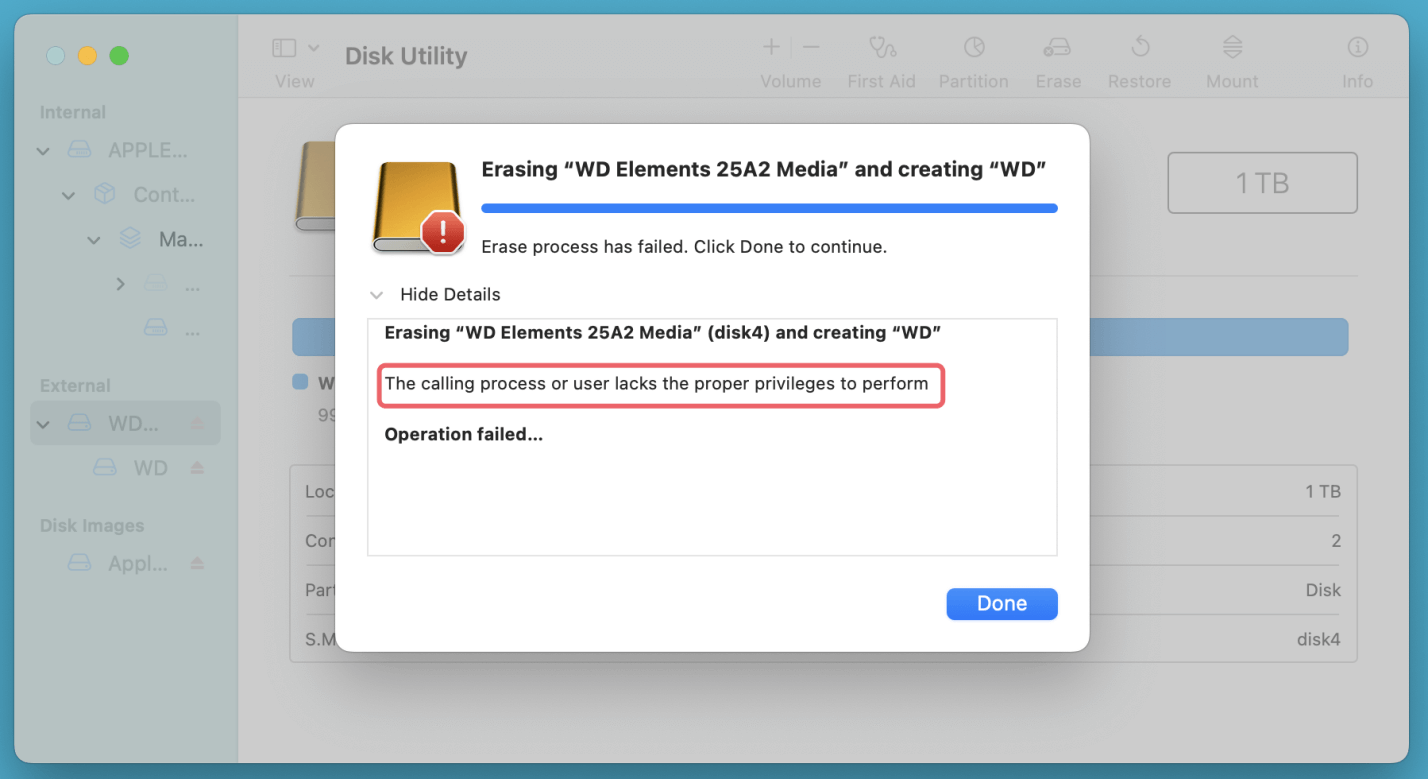
This issue prevents the disk from being erased, formatted, or even partitioned, making it difficult to repurpose or fix storage devices.
This error typically arises due to permission restrictions, system-level security features, file system corruption, or hardware issues. Resolving it requires checking user permissions, unmounting the disk properly, using macOS Recovery Mode, disabling System Integrity Protection (SIP), or troubleshooting potential disk errors.
This guide will walk you through the possible causes of this error and provide detailed step-by-step solutions to fix it.
Fast Fix for Privilege Errors:
- Use Terminal: Run sudo diskutil eraseDisk APFS [DiskName] /dev/disk[X] to bypass standard permissions.
- Recovery Mode: Restart and hold Cmd + R (Intel) or Power Button (Apple Silicon) to erase the disk without OS interference.
- Disable SIP: If the disk is system-protected, temporarily disable System Integrity Protection via Recovery Terminal using csrutil disable.
Common Causes of the Operation Lacks the Proper Privileges to Perform Error
Before jumping into solutions, it's important to understand why this issue occurs. The following are the most common reasons why macOS prevents a disk from being erased:
1. Lack of Administrative Privileges
If you're using a standard user account instead of an administrator account, you may not have the required permissions to erase or modify certain disks.
2. System Integrity Protection (SIP) Restrictions
macOS has a built-in security feature called System Integrity Protection (SIP) that prevents changes to critical system files and some storage devices. If the disk you’re trying to erase is protected by SIP, macOS will block any modification attempts.
3. Disk in Use by System or Applications
If the disk you want to erase is currently mounted and being accessed by macOS or an application, you won't be able to erase it. This happens frequently with external drives, Time Machine backups, or disks that macOS considers essential.
4. File System Corruption or Errors
If the disk has corrupted data, bad sectors, or an unsupported file system, macOS might not be able to modify it. Running disk repair tools like First Aid can help resolve this issue.
5. Hardware Issues or Write Protection
Some external drives and USB sticks have physical write protection switches. Additionally, if a disk is failing due to hardware defects, macOS may prevent erasing it to avoid data loss.
Now that we've identified the possible causes, let's go through the step-by-step solutions to fix this issue.
How to Fix the Issue "The Calling Process or User Lacks the Proper Privileges to Perform" on Mac
Solution 1. Check and Grant Proper Permissions
Since the error message mentions "privileges," the first step is to ensure that you're using an administrator account.
Check User Account Type:
- Open System Settings or System Preferences.
- Go to Users & Groups.
- Check if your account has Administrator privileges.
![The calling process or user lacks the proper privileges to perform]()

If you are using a Standard user account, you'll need an administrator to perform the disk operation.
Solution 2. Use Terminal to Force Erase the Drive
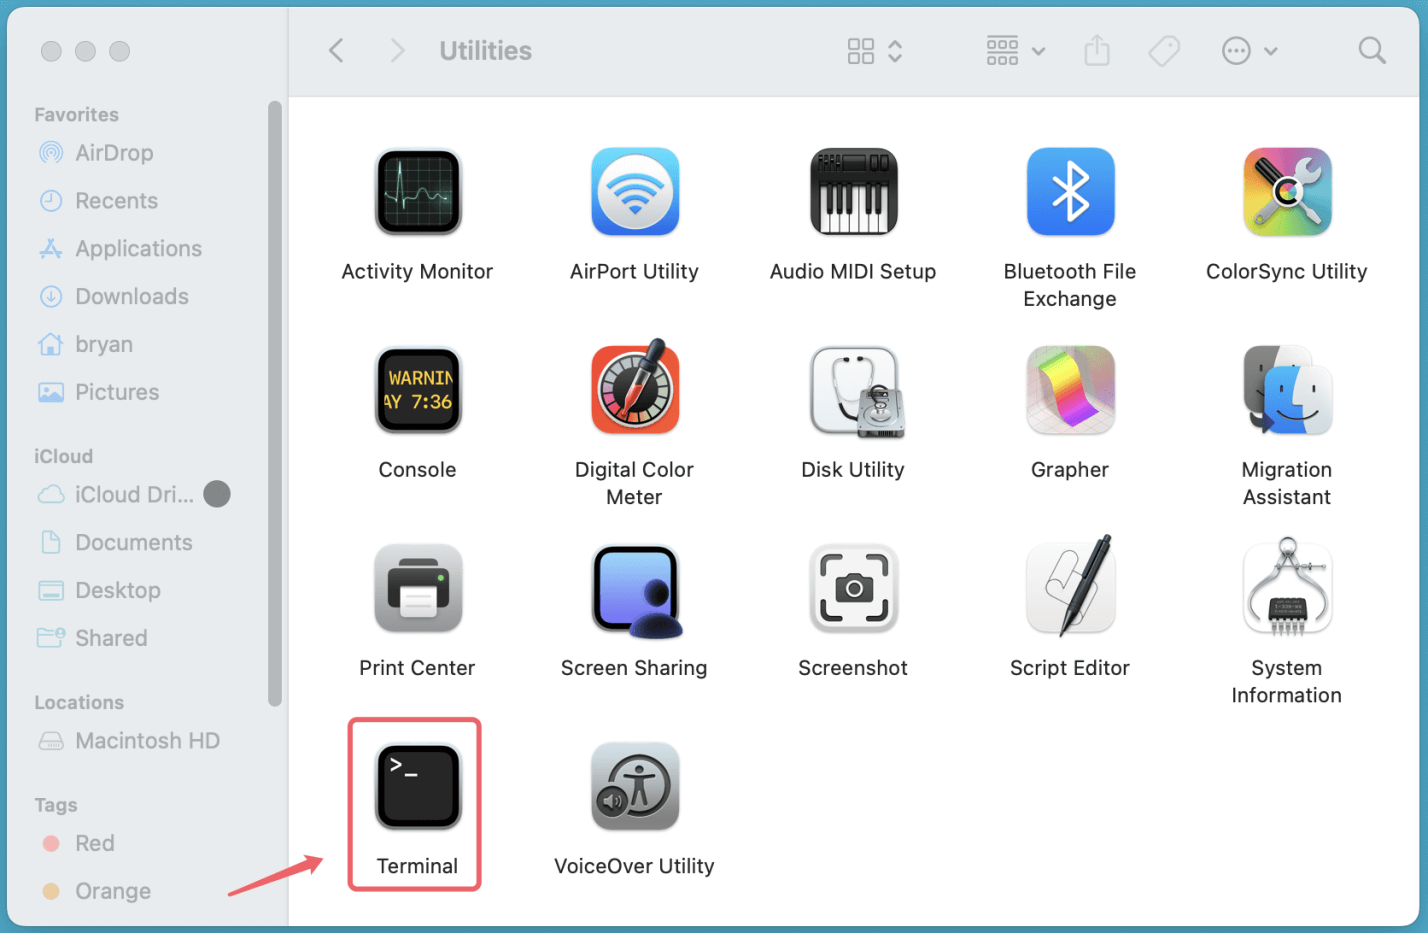
- Open Terminal from Utilities via Applications.
![The calling process or user lacks the proper privileges to perform]()
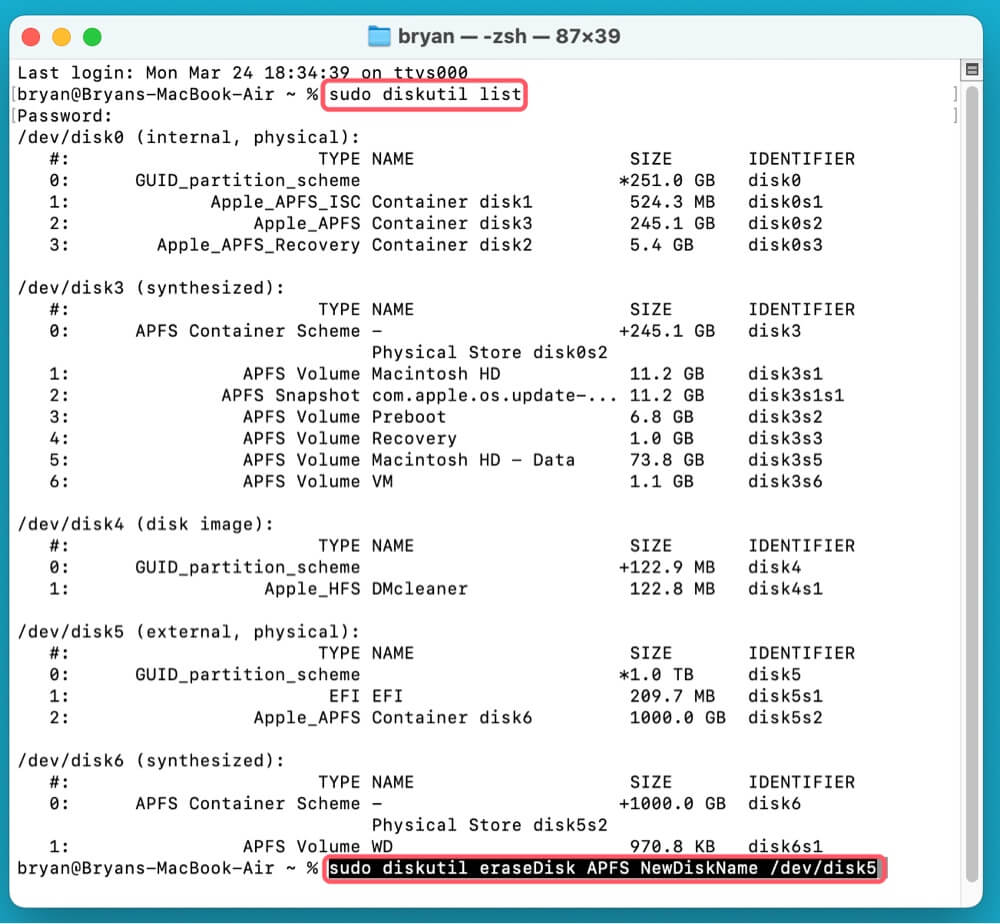
- Run the following command to open Disk Utility with admin privileges:
sudo diskutil list
- If prompted, enter your Mac login password.
- Identify the disk you want to erase (e.g., /dev/disk5).
- Run the erase command:
sudo diskutil eraseDisk APFS NewDiskName /dev/disk5
- Replace "NewDiskName" with your preferred name and /dev/disk5 with the correct disk identifier.
![The calling process or user lacks the proper privileges to perform]()
If this doesn't work, proceed to the next solution.
Solution 3. Use macOS Recovery Mode to Erase the Disk
When attempting to erase a disk on macOS, one of the most common obstacles is that the disk is currently in use by the system or an application. This can prevent modifications, including formatting or partitioning. If you encounter the error message "The calling process or user lacks the proper privileges to perform," one of the most effective solutions is to erase the disk from macOS Recovery Mode.
What is macOS Recovery Mode?
macOS Recovery Mode is a special boot environment designed for troubleshooting, disk management, and system recovery. By using Disk Utility within Recovery Mode, you can erase and format disks without interference from the running operating system.
This method is particularly useful when:
- The disk is the startup disk (macOS won't allow erasing it while it's running).
- The disk is mounted and actively in use.
- System permissions or security features like System Integrity Protection (SIP) are preventing erasure.
Steps to Erase a Disk Using macOS Recovery Mode:
Step 1: Boot Into macOS Recovery Mode
The method to enter Recovery Mode depends on whether your Mac uses Intel or Apple Silicon.
For Intel-based Macs:
- Restart your Mac.
- As soon as the screen turns off, press and hold Command (⌘) + R immediately.
- Keep holding the keys until you see the Apple logo or a spinning globe.
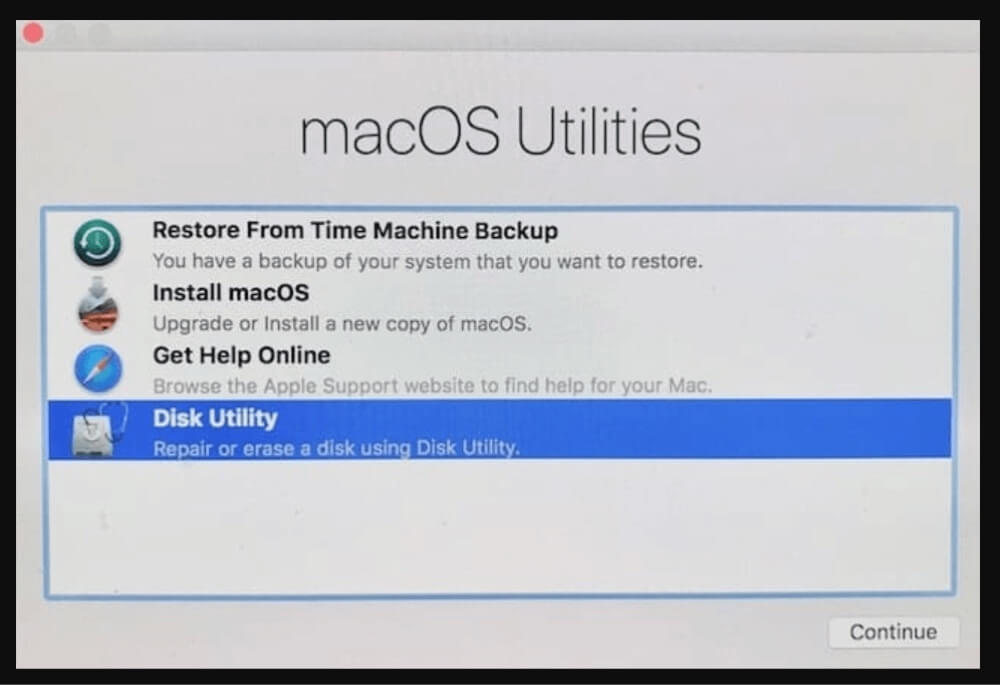
- You'll be taken to the macOS Utilities screen.
![The calling process or user lacks the proper privileges to perform]()
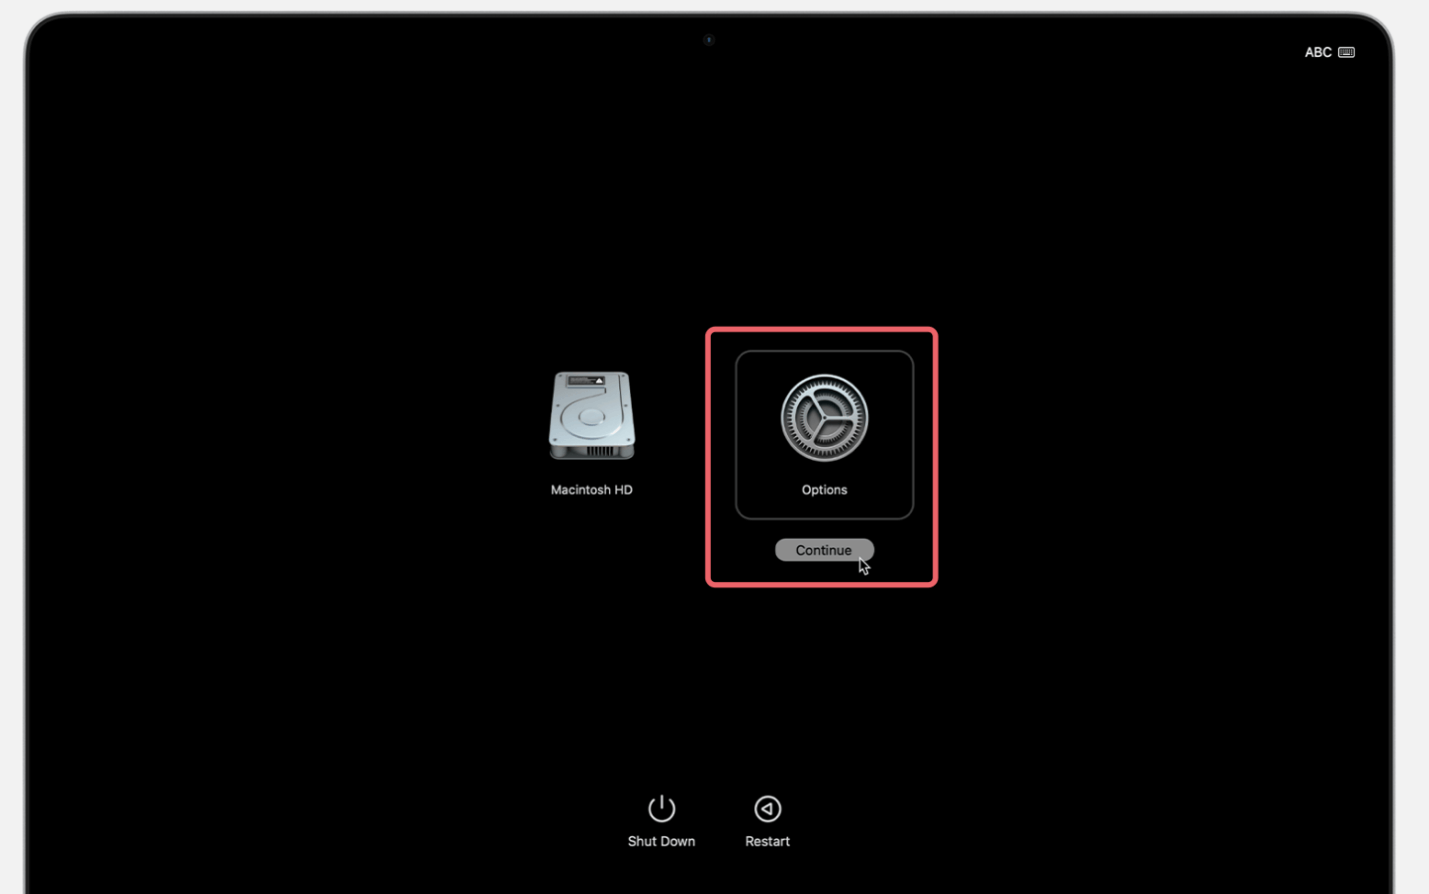
For Apple Silicon (M-chip) Macs:
- Shut down your Mac completely.
- Press and hold the Power button until you see "Loading startup options."
- Select Options and click Continue.
![The calling process or user lacks the proper privileges to perform]()
- This will bring you to the macOS Utilities screen.
![The calling process or user lacks the proper privileges to perform]()

Step 2: Open Disk Utility in Recovery Mode
- Once in macOS Utilities, select Disk Utility and click Continue.
- In Disk Utility, click View (top left) and choose Show All Devices to see all storage drives.
- Select the disk you want to erase.
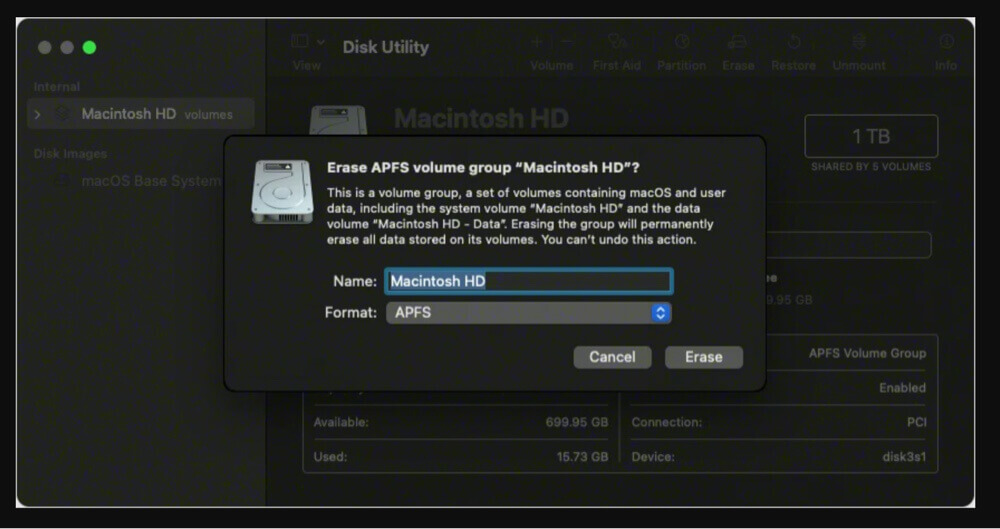
Step 3: Erase the Disk
- Click Erase at the top.
- Choose a file system format based on your needs:
- APFS: Best for macOS 10.13 (High Sierra) and later.
- Mac OS Extended (Journaled): Required for older macOS versions.
- ExFAT: If you need compatibility with Windows.
- Give your disk a new name (optional).
- Click Erase and confirm the action.
![The calling process or user lacks the proper privileges to perform]()
Step 4: Restart and Verify
- Once the erasing process completes, close Disk Utility.
- Click Apple Menu > Restart and boot back into macOS.
- Open Disk Utility from Utilities via Applications and check if the disk has been erased successfully.
What If the Disk Still Won't Erase?
If you still get an error, it could be due to System Integrity Protection (SIP), persistent disk errors, or hardware issues. Try the following additional steps:
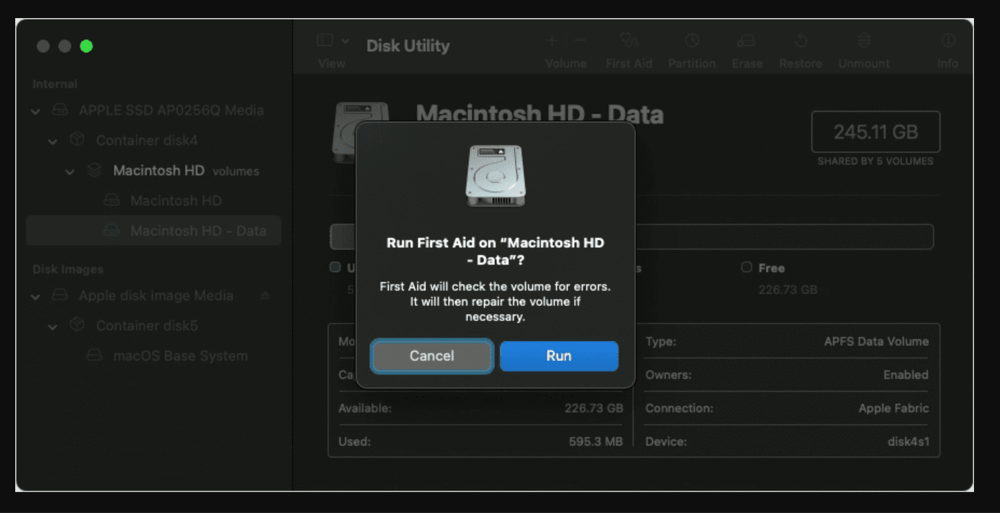
Run First Aid:
- In Disk Utility, select the disk and click First Aid to repair it.
![The calling process or user lacks the proper privileges to perform]()
- If errors are found, attempt to erase the disk again.
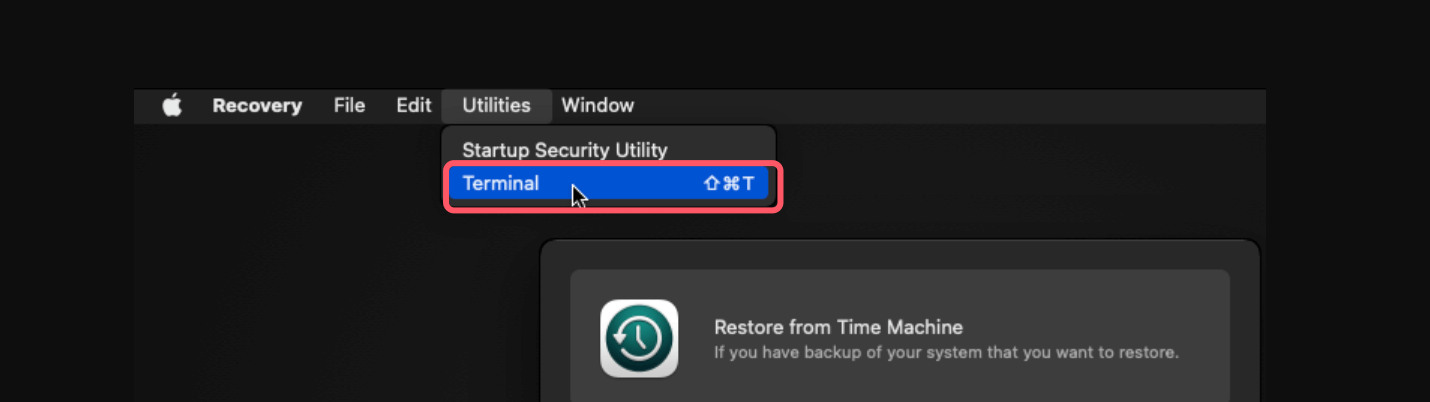
Erase Using Terminal in Recovery Mode:
- While in macOS Recovery Mode, go to Terminal from Utilities.
![The calling process or user lacks the proper privileges to perform]()
- List the connected disks:
diskutil list
- Find the disk identifier (e.g., /dev/disk5).
- Run the erase command:
diskutil eraseDisk APFS "NewDisk" /dev/disk5
- Replace "NewDisk" with your desired name and /dev/disk5 with the correct identifier.
![The calling process or user lacks the proper privileges to perform]()

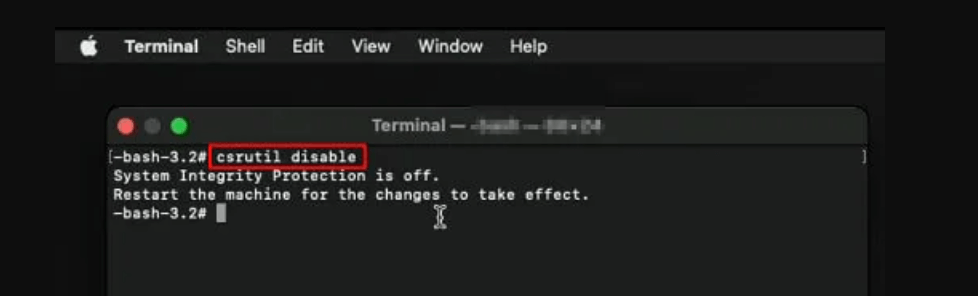
Disable SIP Temporarily (For Intel-based Mac):
If SIP is preventing the disk erasure, follow the instructions in the Disable SIP section below and then retry erasing the disk.
By following these steps, you should be able to erase the disk successfully, even if you previously encountered privilege errors or system restrictions.
Solution 4. Disable System Integrity Protection (SIP) on Intel-based Mac (If Necessary)
SIP is a security feature that prevents unauthorized modifications to system files and storage devices. Temporarily disabling SIP can help erase the disk.
Steps to Disable SIP:
- Restart your Mac into Recovery Mode (follow the steps in Solution 3).
- Click Utilities > Terminal.
- Run the following command:
csrutil disable
![The calling process or user lacks the proper privileges to perform]()
- Restart your Mac normally and try erasing the disk again using Disk Utility or Terminal.
💡 Important: After erasing the disk, re-enable SIP for security reasons.
- Restart into Recovery Mode, open Terminal, and run:
csrutil enable
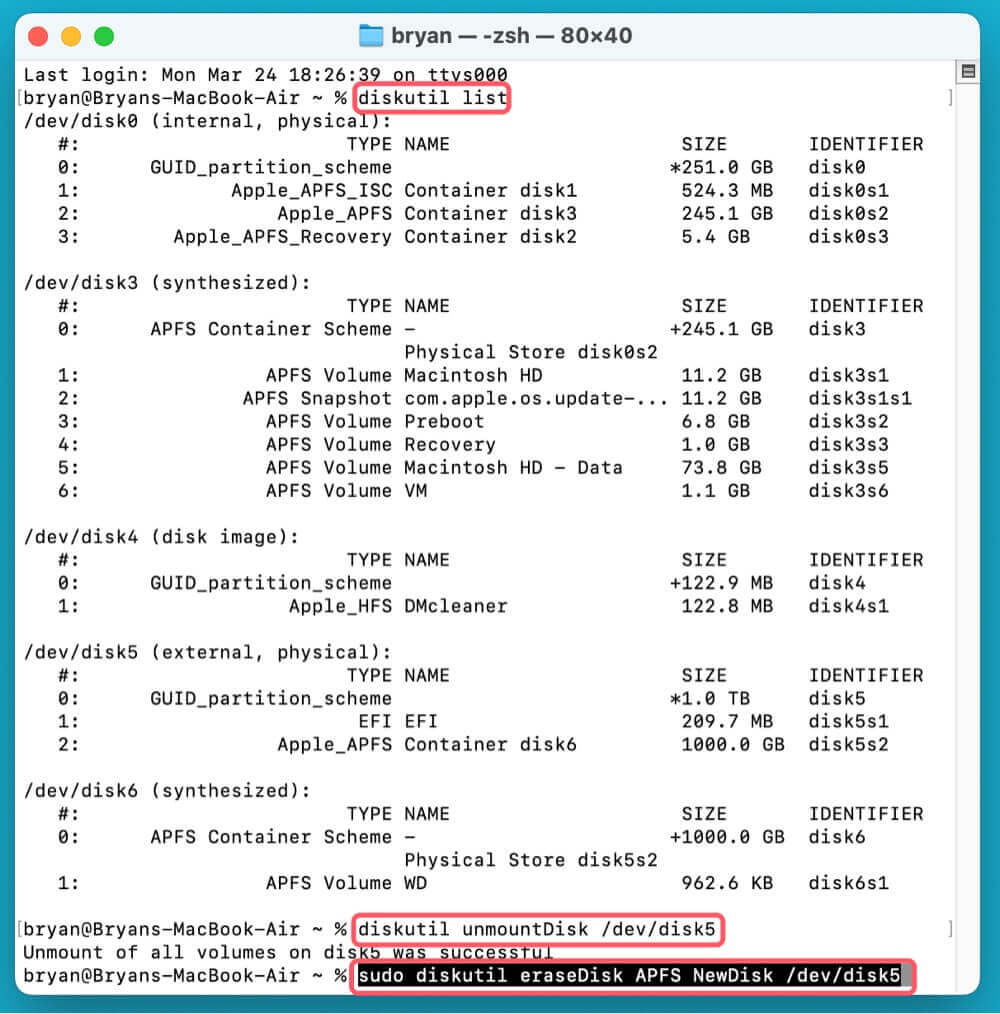
Solution 5. Unmount the Disk Before Erasing
If a disk is in use, you won't be able to erase it. Try manually unmounting it first.
Steps to Unmount a Disk Using Terminal:
- Open Terminal.
- List all connected disks:
diskutil list
- Identify the disk identifier (e.g., /dev/disk5).
- Unmount the disk using:
diskutil unmountDisk /dev/disk5
- Once unmounted, retry erasing the disk using Disk Utility or this command:
sudo diskutil eraseDisk APFS NewDisk /dev/disk5
![The calling process or user lacks the proper privileges to perform]()
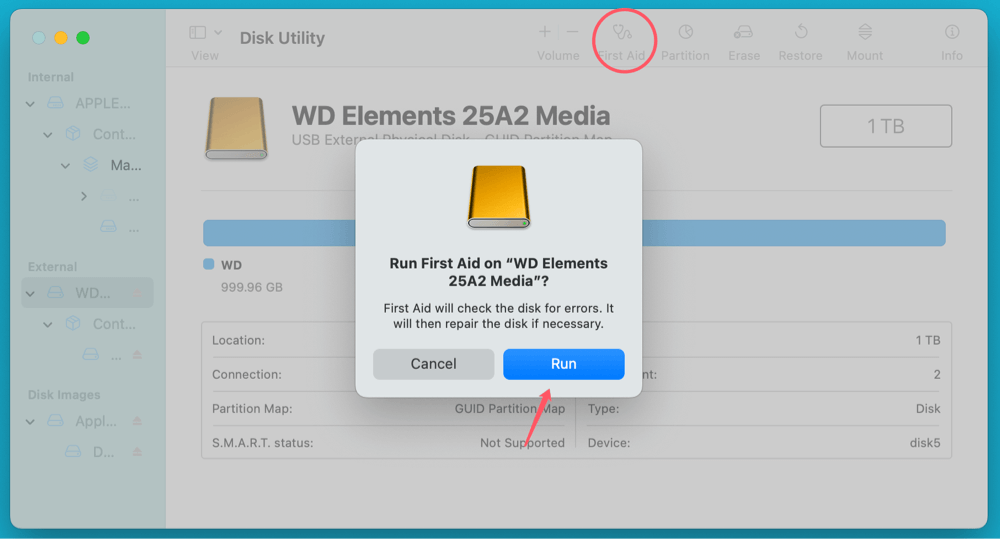
Solution 6. Run First Aid to Fix Disk Errors
If the disk has corruption issues, you need to repair it first.
Steps to Run First Aid in Disk Utility:
- Open Disk Utility.
- Select the problematic disk.
- Click First Aid, then Run.
![The calling process or user lacks the proper privileges to perform]()
- If errors are detected, follow the suggested repair steps.
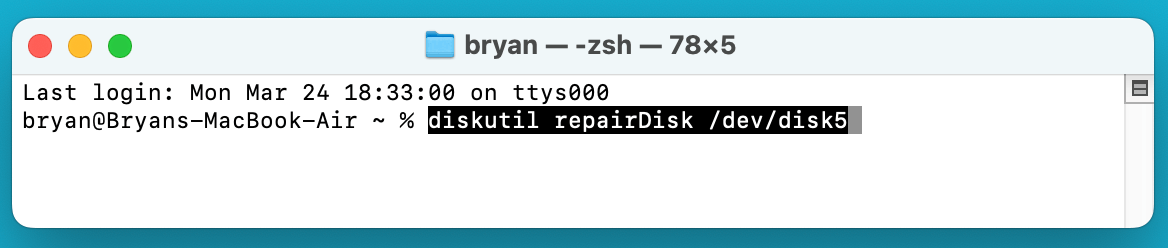
Alternatively, use Terminal:
diskutil repairDisk /dev/disk5
Solution 7. Check for Hardware Issues
If none of the above methods work, the disk might have physical damage or be write-protected.
How to Check for Hardware Issues:
- Try erasing the disk on another Mac or using a different USB-C/thunderbolt port.
- Check for a physical write-protection switch on external drives.
- Use a third-party disk utility like Donemax Data Recovery for Mac or Donemax Data Eraser to check for errors.
If the disk is failing, replacing it may be the only solution.
Conclusion
If you're unable to erase a disk on macOS due to "The calling process or user lacks the proper privileges to perform," the issue is likely related to permissions, system security settings, disk corruption, or hardware failures.
Quick Recap of Fixes:
- Check and use an administrator account.
- Use Terminal commands to erase the disk.
- Boot into macOS Recovery Mode to erase the disk.
- Temporarily disable SIP if necessary.
- Unmount the disk before erasing it.
- Run First Aid to fix disk errors.
- Check for hardware-related issues.
If none of these solutions work, consider seeking Apple Support or using third-party disk management tools. Always back up important data before performing disk operations!
If you have lost data from your hard drive, you can use data recovery tool - such as Donemax Data Recovery for Mac to get all lost data back.
Donemax Data Recovery for Mac
Donemax Data Recovery for Mac is one of the best Mac data recovery software. It is easy-to-use and can help in recovering deleted, formatted, inaccessible or lost data from Mac HDD/SSD, external disk, USB drive, SD card, camera or other storage devices.
Related Articles
- May 13, 20257 Solutions to Fix Flash Drive Not Showing Up on Mac Without Losing Data
- Feb 12, 2025USB Drive Keeps Disconnecting and Reconnecting: 6 Causes and 8 Solutions
- Feb 06, 2024Lexar Portable SSD Is Not Showing Up on Windows PC, Fix It Now
- Feb 17, 2025Fix SanDisk Device Won't Format Error on Windows 11/10/8
- Jan 12, 20256 Solutions to Fix Error Code 50 on Mac: A Comprehensive Guide
- Mar 21, 2025Word, Excel, PowerPoint Keep Crashing on Mac? Fix It Now!

Contributing Writer
Charles
Charles, who lives in Sydney, Australia, is an editor & writer of Donemax Team. He is good at writing articles related with Apple Mac computers, Windows operating systems, data recovery, data erasure, disk clone and data backup, etc. He loves reading and playing tennis in his spare time and is interested in testing new digital devices such as mobile phones, Macs, HDDs, SSDs, digital cameras, etc.

Editor in chief
Gerhard Chou
In order to effectively solve the problems for our customers, every article and troubleshooting solution published on our website has been strictly tested and practiced. Our editors love researching and using computers and testing software, and are willing to help computer users with their problems
Hot Donemax Products

Clone hard drive with advanced clone technology or create bootable clone for Windows/Mac OS.

Completely and easily recover deleted, formatted, hidden or lost files from hard drive and external storage device.
Certified data erasure software - permanently erase data before selling or donating your disk or any digital device.