PAGE CONTENT:
The evolution of file systems in computing has been rapid and diverse, with different formats providing unique benefits based on user needs. Apple's APFS (Apple File System) is designed primarily for macOS and iOS devices and boasts advanced features like encryption, fast directory sizing, and space sharing. However, APFS is not universally compatible across all platforms. When you need to use a drive formatted in APFS on both macOS and Windows, reformatting it to ExFAT is often the best solution.
ExFAT (Extended File Allocation Table) is a more universally supported file system, compatible with both Windows and macOS. Whether you're sharing large files between these operating systems or want a file system that works across multiple platforms, ExFAT could be the right choice. In this article, we will learn the the steps to format an APFS drive to ExFAT.
Understanding the Differences Between APFS and ExFAT
Before formatting your APFS drive to ExFAT process, it's important to understand the differences between the two file systems and why you might want to convert.
APFS: Apple's Modern File System
APFS was introduced by Apple in 2017, replacing HFS+ as the default file system for macOS High Sierra and later. It's optimized for flash and solid-state drives (SSDs) and supports several modern features:
- Encryption: APFS offers full-disk encryption as well as the option for per-file encryption.
- Snapshots: APFS allows for system snapshots, which is particularly useful for backups.
- Space Sharing: Multiple volumes on an APFS container can share space dynamically, meaning you don't have to allocate fixed storage sizes.
- Performance: APFS is designed to be faster and more efficient than its predecessors.
Despite its advantages, APFS has limited compatibility with non-Apple operating systems. While macOS supports both APFS and ExFAT, Windows does not support APFS natively without third-party software.
ExFAT: The Universal Solution
ExFAT was developed by Microsoft in 2006 and designed as a middle ground between FAT32 and NTFS. It's widely used for external storage devices, particularly because:
- Cross-Platform Compatibility: ExFAT is compatible with both macOS and Windows, making it an ideal choice for users who frequently switch between the two systems.
- File Size Limitations: ExFAT supports files larger than 4GB, unlike FAT32.
- Efficient Use of Space: It works well with all types of storage devices.
Because of its broad compatibility and capacity to handle large files, ExFAT is often the go-to format when a drive needs to work across different platforms.
Preparing to Format an APFS Drive to ExFAT
Before you begin formatting an APFS drive to ExFAT, there are a few essential steps you should follow:
Backup Your Data:
Formatting a drive will erase all data stored on it. If you have important files saved on your APFS drive, you must back them up before proceeding. You can use an external storage device, cloud services, or even a different partition on your drive to ensure your data is safe.
Check Drive Compatibility:
Make sure the device you plan to format supports ExFAT. While most modern operating systems and devices do, it's good to double-check. If you're using older systems or particular hardware like gaming consoles, ExFAT may not be recognized, so ensure it's compatible with all the devices you plan to use.
Steps to Format an APFS Drive to ExFAT on macOS
If you're using a macOS device, formatting an APFS drive to ExFAT is straightforward and can be done using the built-in Disk Utility tool. Follow these steps:
Step 1. Open Disk Utility.
You can access Disk Utility by searching for it in Spotlight (press Command + Space) or by navigating to Applications > Utilities > Disk Utility. This is the tool used for managing drives and partitions on macOS.
Step 2. Select the APFS Drive.
Once Disk Utility opens, you'll see a list of all available drives and partitions on your system. Find and select the APFS drive you want to format in the sidebar. Make sure you select the correct drive, as formatting will erase all data.
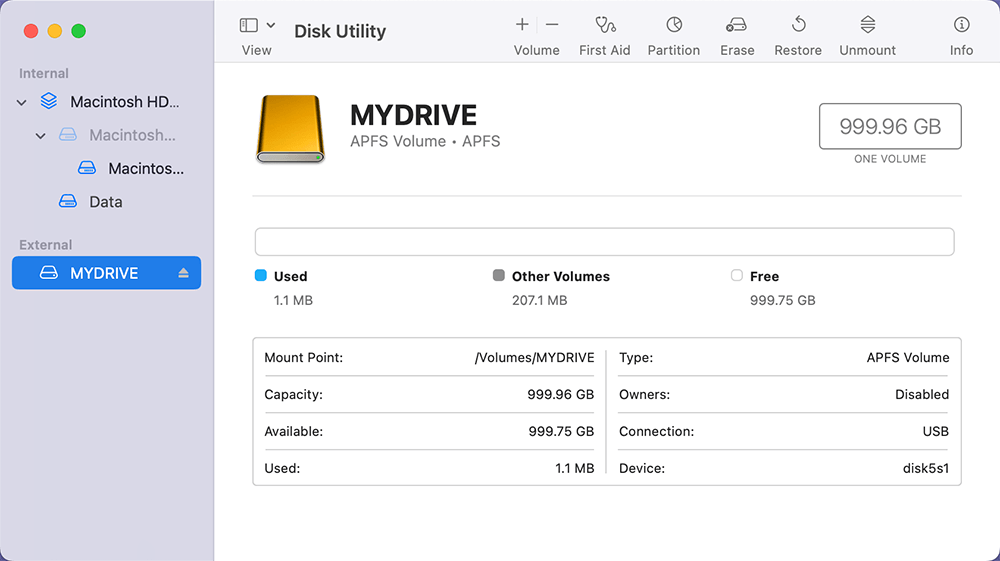
Step 3. Erase the APFS Drive.
With the drive selected, click the Erase button located at the top of the window. You may select the file system you wish to format the disk to by doing this, which will produce a dialog box.
- Name: Enter a name for your newly formatted drive.
- Format: Select ExFAT from the dropdown menu.
- Scheme: For most users, selecting GUID Partition Map is the best option, as it's compatible with both macOS and Windows.
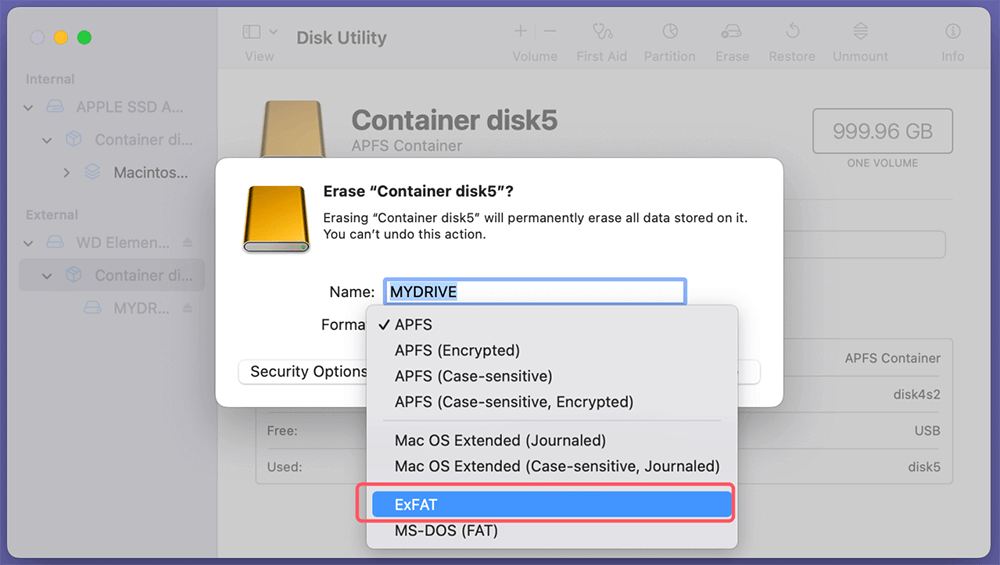
Once you've made your selections, click Erase. The process may take a few minutes, depending on the size of the drive.
Step 4. Verify and Eject the Drive.
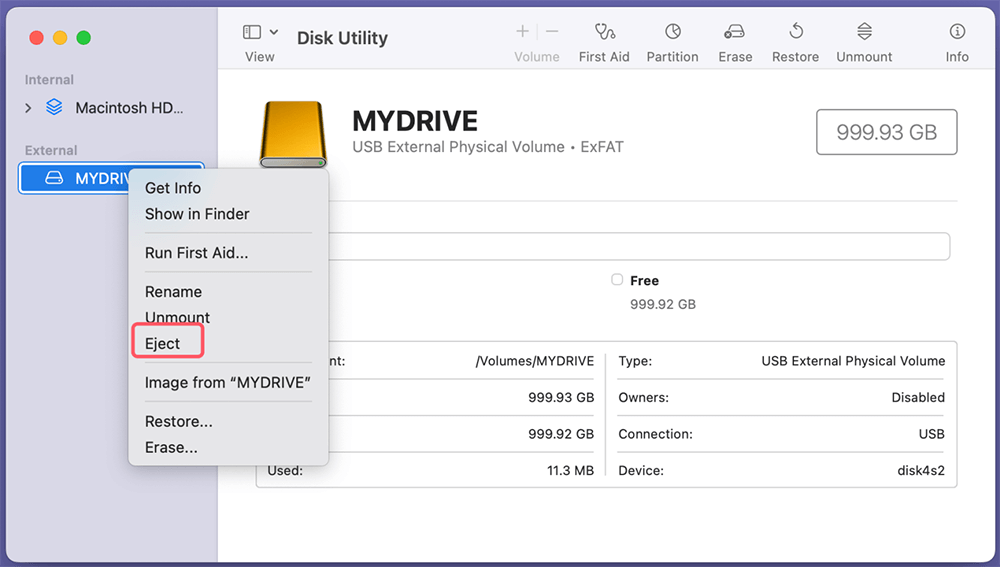
After the formatting process is complete, Disk Utility will automatically mount the newly formatted ExFAT drive. You can now check the drive by transferring some files to ensure everything works correctly. When you're done, safely eject the drive by clicking the Eject button in Disk Utility or dragging the drive icon to the Trash.
Steps to Format an APFS Drive to ExFAT on Windows
If you're using a Windows system and you've already connected the APFS drive to your Windows PC, follow these steps to format your drive to ExFAT:
Step 1. On your Windows system, press Windows Key + X and select Disk Management from the menu. This tool shows all connected storage devices and their current file systems.
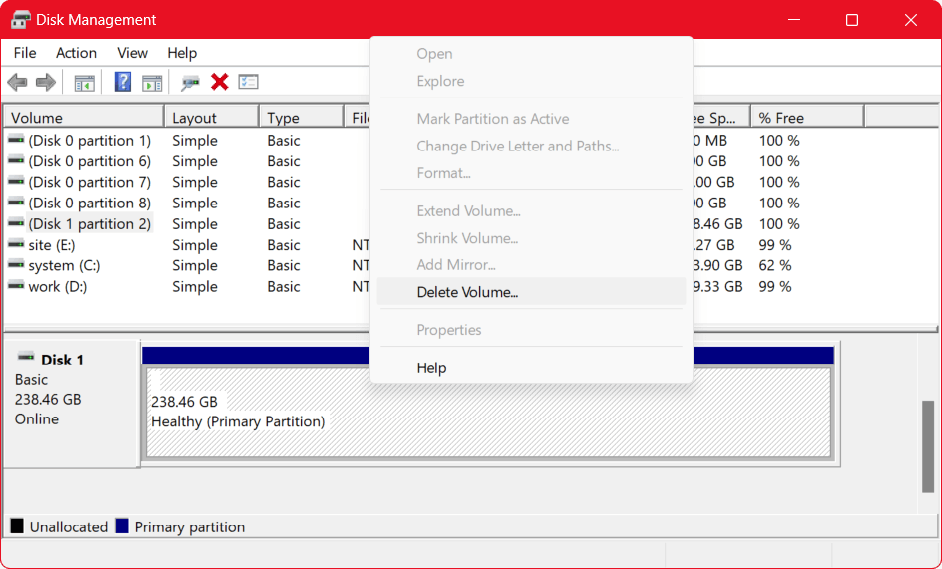
Step 2. In Disk Management, find your APFS drive and right-click on it. Select Delete Volume to remove the current APFS partition. As all data on the disk will be deleted, be sure you have previously backed up any crucial files before doing this.
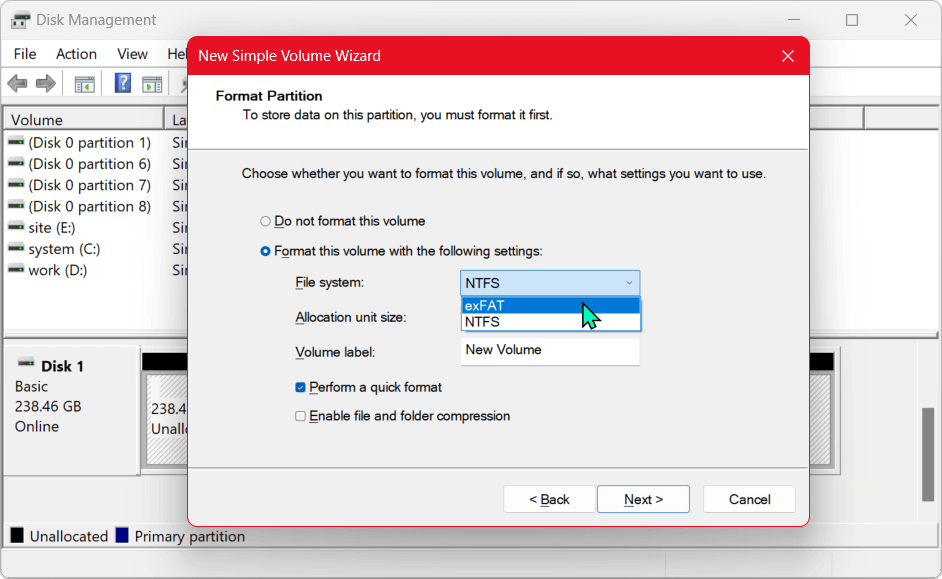
Step 3. After deleting the APFS partition, you'll see the drive as Unallocated space in Disk Management. When you do a right-click on the empty area, choose New Simple Volume. If you want to create a new partition, the New Simple Volume Wizard will walk you through it.
- Volume Size: Specify the volume size (usually the maximum available space).
- File System: Choose ExFAT as the file system format.
- Volume Label: Enter a name for your drive.
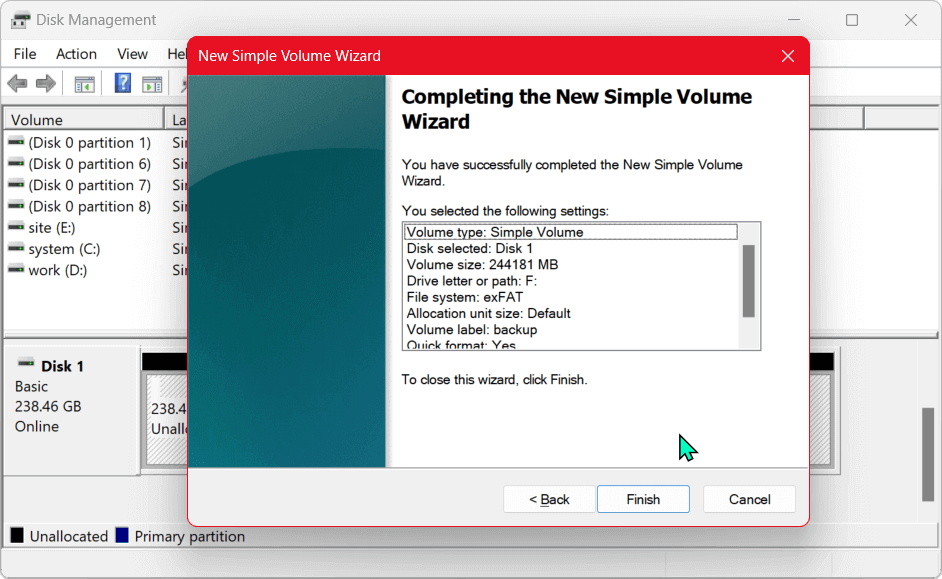
Click Finish to complete the process. Windows will format the drive as ExFAT, and it should now be usable on both macOS and Windows systems. Open This PC, check if you can use the ExFAT drive.
Post-Formatting: Verifying the Drive
After formatting the drive, it's important to verify that the process was successful.
Check the Drive Format:
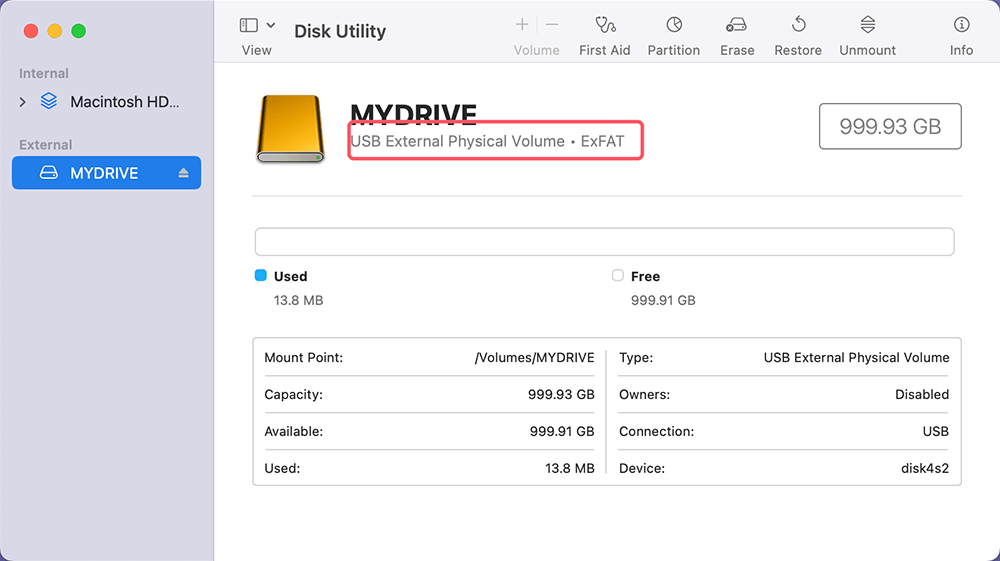
To verify that the drive has been formatted to ExFAT, follow these steps:
- Open Disk Utility.
- Select the newly formatted drive from the left column.
- Check the format type in the information pane. It should display as ExFAT.
![Check the Drive Format]()
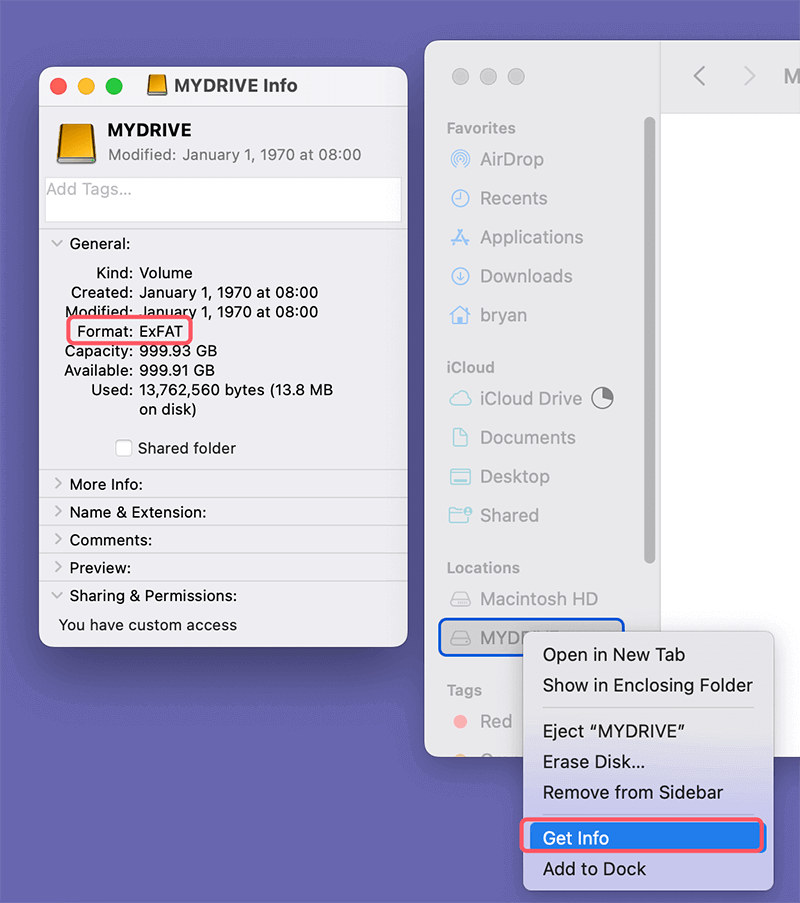
Alternatively, you can verify the drive format in Finder:
- Open Finder.
- Locate the drive in the left-hand sidebar.
- Right-click the drive and select Get Info. The format should be listed as ExFAT in the Info window.
![verify the drive format in Finder]()
Test Cross-Platform Compatibility:
To ensure that the drive works on both macOS and Windows, try connecting it to a Windows computer. The drive should appear in File Explorer on Windows and in Finder on macOS. You should be able to read from and write to the drive on both systems without any issues.
Troubleshooting Common Issues:
While the process of formatting an APFS drive to ExFAT is generally straightforward, you may encounter some common issues.
Drive Not Recognized After Formatting:
If your drive isn't recognized after formatting it to ExFAT, it may be due to compatibility issues with the device you're trying to use it with. Ensure that your operating system and devices support ExFAT. You can also try reconnecting the drive to a different computer to see if the issue persists.
Slow Transfer Speeds:
ExFAT is known for having slower transfer speeds compared to other file systems like NTFS or APFS, especially when dealing with smaller files. If you're experiencing slow speeds, ensure that your USB ports or connectors are functioning properly. Upgrading to USB 3.0 or higher may help improve performance.
Data Loss:
If you accidentally format the wrong drive or lose important data, don't panic. There are several data recovery tools available, such as Donemax Data Recovery for Mac which can help recover lost files after formatting.
Step 1. Download and install Donemax Data Recovery on your Windows PC or Mac.
Step 2. Open Donemax Data Recovery, then select the formatted hard drive to start data recovery.

Step 3. Click on Scan button to deeply scan the formatted drive and find all recoverable files including the deleted files and erased files.

Step 4. Once the scan is completed, you can preview all recoverable files. Then select the wanted files, click on Recover button to save them.

When to Use ExFAT vs. Other File Systems:
Choosing the right file system depends on your specific needs. ExFAT is ideal for:
- Cross-platform usage between macOS and Windows.
- External storage devices where compatibility is key.
- Drives used for storing large files, such as video editing projects or backups.
However, if you're working exclusively within the macOS ecosystem, APFS might still be the best choice due to its advanced features. For Windows-only environments, NTFS is generally a better option as it provides better security and performance.
Conclusion
Reformatting an APFS drive to ExFAT can be an essential step for those who work across both macOS and Windows. While APFS offers advanced features and optimizations for Apple devices, its limited compatibility makes ExFAT a practical alternative for external drives used on multiple platforms. By complying the process described above, you can smoothly convert your drive and ensure seamless data transfers between systems.
Regardless of the file system you choose, always ensure that you've backed up your data and understand the limitations and benefits of each format. With the right tools and a bit of preparation, formatting an APFS drive to ExFAT can be a quick and painless process.
Related Articles
- Oct 11, 2024How to Format a Drive to exFAT?
- Nov 13, 2024Can't Format System Hard Drive Partition? Find A Solution
- Feb 19, 2025Best 5 Methods to Format a Hard Drive on Windows 11 – A Comprehensive Guide
- Feb 17, 202510 Fixes for Fixing External Hard Drive Not Showing Up in File Explorer or This PC
- Feb 17, 2025Fix USB Port Not Working on Windows Laptop or Desktop
- Jan 17, 2025Fix Corrupted File System – A Comprehensive Guide

Lucien
Lucien is a writer and a chief programmer of Donemax software who has worked in the company for 5+ years. He has written much of the content on the site and devotes to providing troubleshooting and solution for Windows and Mac users including disk cloning, data recovery, migration, eraser, error fixes.

Gerhard Chou
In order to effectively solve the problems for our customers, every article and troubleshooting solution published on our website has been strictly tested and practiced. Our editors love researching and using computers and testing software, and are willing to help computer users with their problems
