Written byCharlesUpdated on Mar 06, 2025
How to Resolve 2003F Mac Error – A Quick Guide [8 Fixes]
Approved byGerhard Chou
PAGE CONTENT:
Mac computers are known for their reliability and smooth performance, but like any technology, they can run into issues. One such problem is the 2003F error, which typically occurs when users attempt to boot their Mac into Internet Recovery Mode. This error can be frustrating as it prevents access to macOS Recovery, making it difficult to reinstall macOS or troubleshoot issues.
The 2003F Mac error is usually linked to network-related issues, including unstable internet connections, Apple server problems, or even issues with the system's firmware.
By the end of this article, you'll understand why the 2003F error happens, how to troubleshoot it, and how to avoid it from occurring in the future.

Understand the 2003F Mac Error
What Does the 2003F Error Mean?
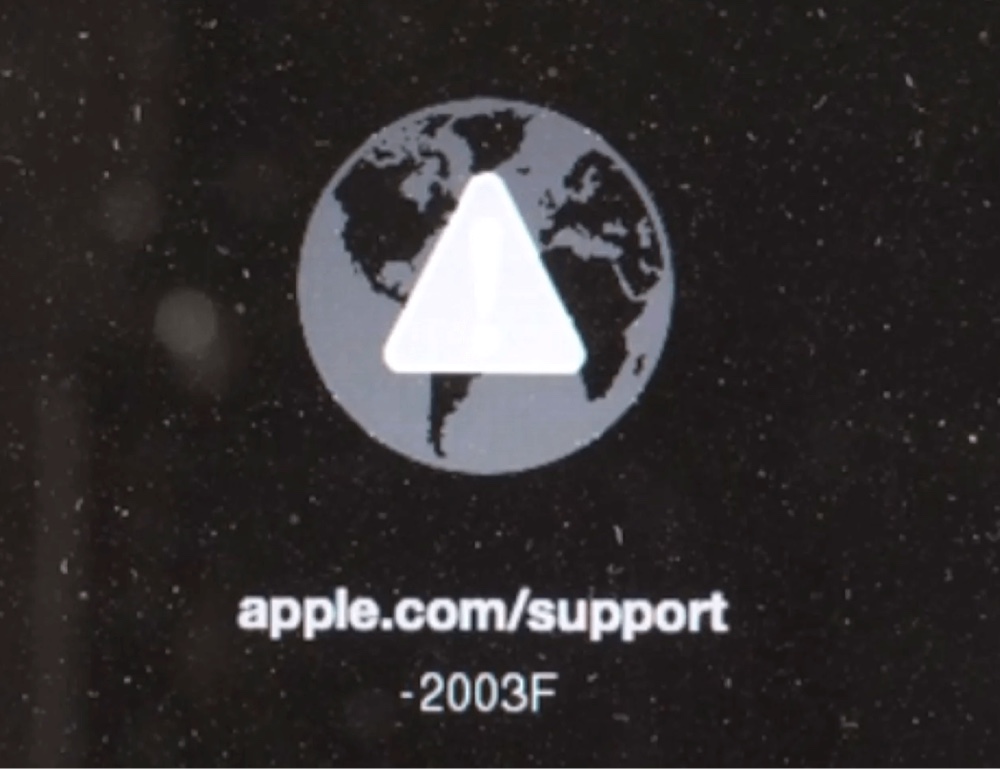
The 2003F error is a network-related error that appears when attempting to boot into macOS Internet Recovery Mode. Instead of loading the recovery options, your Mac displays a globe icon with an exclamation mark and the error code (-2003F).
When and Why Does It Occur?
Several factors can trigger this error, including:
- Unstable or slow internet connection – Internet Recovery requires a strong and stable internet connection to download recovery files. If the connection drops, the process fails, triggering the error.
- Apple server issues – Sometimes, Apple’s servers may be temporarily unavailable or experiencing high traffic, causing Internet Recovery to fail.
- Firmware issues – Corrupt firmware can prevent your Mac from booting into recovery mode properly.
- macOS corruption – If your macOS installation is damaged, your Mac may struggle to access recovery utilities.
- Security restrictions – Some networks (like corporate or public Wi-Fi) block necessary ports, preventing Internet Recovery from functioning correctly.
Now that we understand the error, let's dive into the solutions.
Common Fixes for the 2003F Error on Mac
Fix 1: Check Your Internet Connection
Since the 2003F error is primarily network-related, the first step is to check your internet connection.
Steps to Fix Internet Issues:
- Restart Your Router – After 30 seconds, unplug your modem and router and re-plug them. Next, give Internet Recovery another go.
- Switch to a Different Network – If you're using Wi-Fi, consider using a cable connection (Ethernet) or joining another Wi-Fi network.
- Use a 5GHz Connection – For a faster and more reliable connection, choose the 5GHz network if your router is capable of supporting dual-band Wi-Fi.
If your internet connection is stable but you're still getting the 2003F error, move on to the next fix.
Fix 2: Use a Wired Connection (Ethernet)
Wi-Fi can sometimes be unstable, leading to download failures during Internet Recovery. An Ethernet cable can offer a more dependable and quick connection.
How to Use Ethernet:
- Connect your Mac to the router directly using an Ethernet cable.
- Restart your Mac and try Internet Recovery again (Command + Option + R).
- If the issue persists, continue to the next solution.
Fix 3: Restart Your Mac and Try Again
A simple restart can sometimes resolve the issue. Here’s how:
- Holding down the power button will cause your Mac to shut off.
- After 30 seconds of waiting, switch it back on.
- Immediately press and hold Command + Option + R to enter Internet Recovery.
If the error persists, try resetting your NVRAM.
Fix 4: Reset NVRAM/PRAM
NVRAM stores system settings, including startup disk preferences. Resetting it can fix boot issues.
How to Reset NVRAM:
- Turn Off your Mac.
- Press and hold Command + Option + P + R as soon as you turn it on.
- Hold down the keys until the startup chime sounds twice, which should take roughly 20 seconds.
- Release the keys and try Internet Recovery again.
Fix 5: Boot into macOS Recovery Mode Manually
Instead of using Internet Recovery, try booting into standard Recovery Mode (if available).
Steps to Enter macOS Recovery:
- Turn Off your Mac.
- Press and hold Command + R (for Intel-based Mac) as soon as you turn it on.
![2003F Mac error]()
- If Recovery Mode loads successfully, select Disk Utility and check your startup disk.
If standard recovery mode is unavailable, move to the next solution.
Fix 6: Run Disk Utility to Repair Your Drive
A corrupted macOS installation can trigger the 2003F error. Running Disk Utility may help.
Steps to Run Disk Utility:
- Boot into macOS Recovery Mode (Command + R).
- Select Disk Utility > Choose Macintosh HD.
- Click First Aid > Run and let the tool repair disk errors.
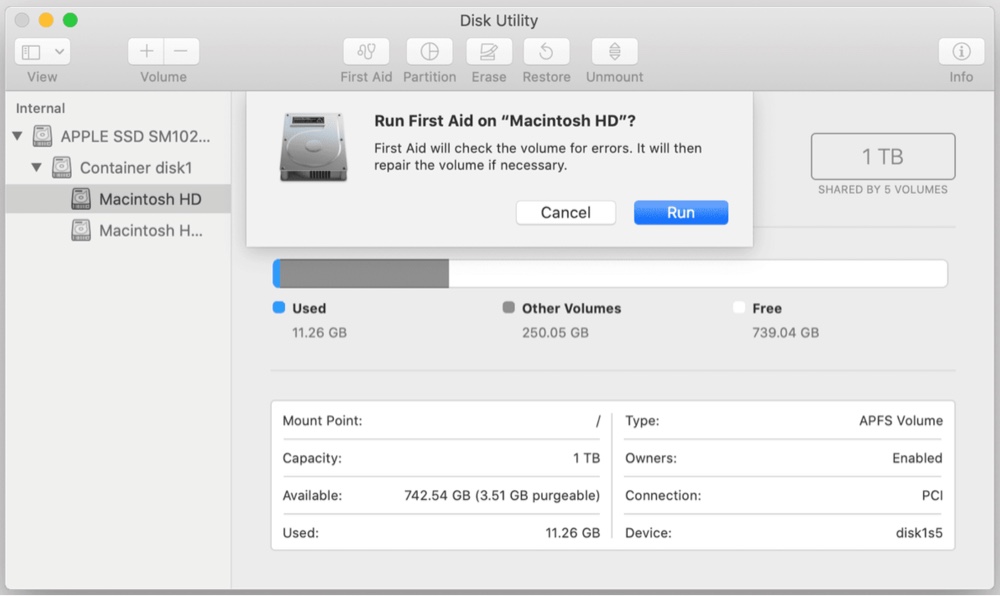
If the repair fails, consider reinstalling macOS.
Fix 7: Reinstall macOS via USB Installer
If Internet Recovery continues to fail due to the 2003F error, one of the most effective solutions is to reinstall macOS using a bootable USB installer. This method bypasses Internet Recovery and allows you to install macOS directly from an external USB drive.
Why Use a Bootable USB Installer?
- Works offline – No need for an internet connection during installation.
- Bypasses Internet Recovery – Avoids Apple server issues.
- Faster installation – Download macOS once and use it multiple times.
- Useful for troubleshooting – Can be used on multiple Macs.
What You Need
Before creating a bootable USB installer, ensure you have:
A working Mac – You'll need another Mac to download macOS.
A 16GB (or larger) USB drive – The macOS installer is large.
macOS installation file – Available from the Mac App Store or Apple's website.
Step 1: Download macOS Installer
You need to download a macOS version compatible with your Mac.
Where to Download macOS
- Open the Mac App Store on another working Mac.
- Search for your desired macOS version (e.g., macOS Ventura, Monterey, or Big Sur).
- Click Download, but don’t install it yet.
- Once downloaded, the installer file will be in Applications (/Applications/Install macOS Ventura.app).
Alternative: If you can't find your macOS version in the App Store, you can download it from Apple's official website
Step 2: Format the USB Drive
Before creating the bootable USB installer, you need to format the drive properly.
How to Format the USB Drive
- Insert your USB drive into the working Mac.
- Open Disk Utility (Find it via Spotlight: Command + Space, then type Disk Utility).
- Select the USB drive from the left panel.
- Click Erase and use the following settings:
- Name: MacInstaller
- Format: Mac OS Extended (Journaled)
- Scheme: GUID Partition Map
- Click Erase, then Done when the process completes.
Why Mac OS Extended (Journaled)? – This format ensures compatibility with macOS installation.
Step 3: Create the Bootable USB Installer
Now, use Terminal to make the USB drive bootable.
Steps to Create a Bootable macOS USB Installer
- Open Terminal (Command + Space, then type Terminal).
- Type the following command (replace macOSVersion with your actual macOS version):
sudo /Applications/Install\ macOS\ macOSVersion.app/Contents/Resources/createinstallmedia --volume /Volumes/MacInstaller
Example for macOS Ventura:
sudo /Applications/Install\ macOS\ Ventura.app/Contents/Resources/createinstallmedia --volume /Volumes/MacInstaller
- Press Enter, then enter your admin password when prompted.
- Wait for the process to complete (it may take several minutes).
- When finished, you’ll see the message:
Install media now available at '/Volumes/Install macOS Ventura'
Your USB installer is ready!
Step 4: Install macOS Using the Bootable USB Drive
Now, use the USB drive to install macOS on the affected Mac.
How to Boot from the USB Installer:
- Insert the USB drive into the affected Mac.
- Restart the Mac, then immediately press and hold Option (⌥).
- When the Startup Manager appears, select Install macOS (USB drive name).
- Click Continue and follow the installation prompts.
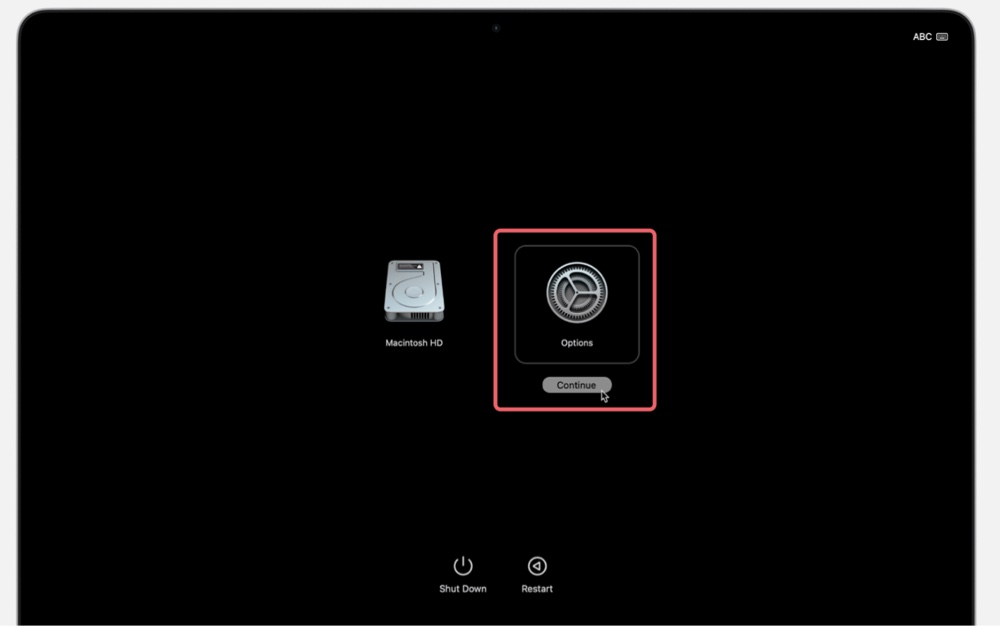
If your Mac has an Apple Silicon chip (M-chips):
- Turn off the Mac.
- Press and hold the power button until you see Startup Options.
- Select the USB drive, then click Continue.
![2003F Mac error]()
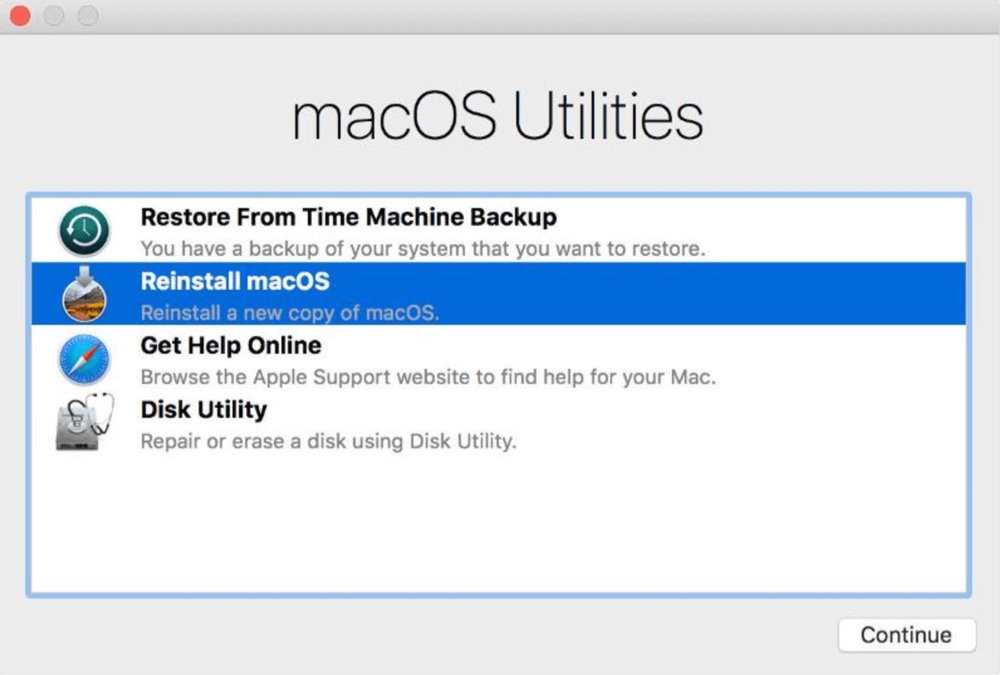
Step 5: Reinstall macOS
Once you boot from the USB installer:
- Select Disk Utility from macOS Utilities.
- Choose Macintosh HD, then click Erase.
- Format it as APFS or Mac OS Extended (Journaled).
- Close Disk Utility and click Install macOS.
- Follow the prompts to reinstall macOS.
Final Steps After Installation
After macOS is installed:
Set up your Mac – Follow the on-screen instructions.
Restore from a Backup – If you have a Time Machine backup, restore your data.
Reinstall Apps – Download necessary apps again.
Troubleshooting Bootable USB Issues
If the USB installer doesn't work, try these solutions:
USB Drive Not Showing in Startup Manager?
- Try another USB port.
- Ensure the USB drive is formatted correctly (Mac OS Extended).
- Recreate the bootable installer.
"This copy of macOS is damaged" Error?
- Redownload macOS from the App Store.
- Ensure your Mac's date is set correctly (Terminal > date).
Using a bootable USB installer is one of the best ways to fix the 2003F Mac error when Internet Recovery fails. This method ensures a smooth macOS installation without relying on Apple servers or Wi-Fi stability.
Fix 8: Contact Apple Support
If none of the solutions work, you may be dealing with a hardware issue or a deeper firmware problem. Contact Apple Support for further assistance.
Prevent the 2003F Error on Mac in the Future
To avoid encountering the 2003F error again, follow these best practices:
1. Keep macOS Updated
- Regularly update your macOS to prevent system bugs that could trigger the error.
- Go to System Settings > General > Software Update and install the latest version.
2. Maintain a Stable Internet Connection
- Use wired connections when performing system recovery.
- Avoid public or restricted Wi-Fi networks that might block necessary ports.
3. Regularly Back Up Your Data
- Use Time Machine or cloud backups to ensure you can restore data easily.
4. Keep a macOS USB Installer Ready
- Having a bootable macOS USB drive can save time if Internet Recovery fails again.
Recover Lost Data After Fixing 2003F Error on Mac
If you have lost data due to fixing 2003F error on Mac, you can use Mac data recovery software to deeply scan the internal drive and recover erased/lost files.
Step 1. Download and install the reliable Mac data recovery software - Donemax Data Recovery for Mac.
Step 2. Open Donemax Data Recovery for Mac, select the Mac internal disk - such as Macintosh HD to start data recovery.

Step 3. Click on Scan button to deeply scan the drive and find all recoverable files.

Step 4. Once the scan is completed, you can preview all recoverable files. Then select the wanted files, click on Recover button to save them.

Conclusion
The 2003F Mac error can be a frustrating issue, but it's usually fixable with the right troubleshooting steps. By following the above-mentioned solutions, you should be able to resolve the 2003F error and get your Mac back up and running. If you found this guide helpful, consider sharing it with others who might be facing the same issue!
Related Articles
- Feb 22, 2025Memory Card Not Working on Mac? Fix It Without Losing Data
- Dec 17, 2025Fixed: Safari Can't Connect to iCloud Private Relay on Mac
- Apr 07, 2025[2025 Updated] 10 Reliable Tips for Speeding Up a Slow Mac
- Nov 18, 2025How to Disable iPhone Mirroring on Mac?
- Jun 04, 2025How to Open and Read a PDF on Mac?
- Sep 25, 2024Fix Toshiba External Hard Drive Not Mounting on Mac (7 Solutions)

Contributing Writer
Charles
Charles, who lives in Sydney, Australia, is an editor & writer of Donemax Team. He is good at writing articles related with Apple Mac computers, Windows operating systems, data recovery, data erasure, disk clone and data backup, etc. He loves reading and playing tennis in his spare time and is interested in testing new digital devices such as mobile phones, Macs, HDDs, SSDs, digital cameras, etc.

Editor in chief
Gerhard Chou
In order to effectively solve the problems for our customers, every article and troubleshooting solution published on our website has been strictly tested and practiced. Our editors love researching and using computers and testing software, and are willing to help computer users with their problems