Summary: This guide will show you how to quickly factory reset macOS High Sierra and wipe everything from the startup disk. If you will sell or donate your old Mac which is running macOS High Sierra, you can use Mac disk wipe software - Donemax Data Eraser for Mac to securely and permanently wipe your private data, making data recovery be impossible.
PAGE CONTENT:
A factory reset of macOS High Sierra can seem like a daunting task, but whether you're troubleshooting persistent issues, selling your Mac, or simply wanting a fresh start, this guide will walk you through every step. From backing up important data to reinstalling the OS, we've got you covered.
Why You Might Need a Factory Reset?
There are a variety of reasons why you may need to reset your Mac to its factory settings. A fresh start can improve performance by removing clutter and outdated software that accumulates over time. Perhaps you're experiencing persistent software issues that no troubleshooting seems to fix, or you're preparing to sell or give your Mac away. Factory resetting ensures that all personal information is securely erased, giving the new owner a clean slate.
The process for resetting macOS High Sierra differs slightly from more recent versions of macOS, and this guide is designed specifically to help you through those differences.
Steps to Factory Reset macOS High Sierra
#1 Back Up Your Data
Before proceeding with a factory reset, it's critical to back up your data. A reset will wipe everything from your hard drive, and the only way to restore your files afterward is through a backup.
Using Time Machine:
Time Machine is macOS's built-in backup feature, and it's the most reliable way to back up all your files, including system settings, applications, and personal files.
Steps to Back Up Using Time Machine:
- Attach an external storage device to your Mac, such as an external hard disk or USB drive.
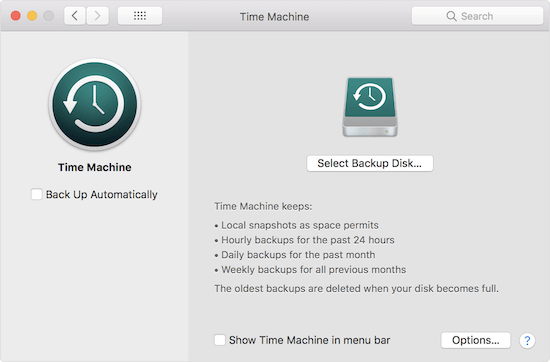
- Select Time Machine under System Preferences.
- Pick your external drive and select Select Disk.
![Steps to Back Up Using Time Machine]()
- Turn on Time Machine and click Back Up Now. Time Machine will now begin backing up your files.
Time Machine backs up everything on your Mac, allowing you to easily restore it after the reset.
Manual Backup of Essential Files:
If you prefer not to back up your entire system, make sure to at least back up important files such as:
- Documents, photos, and videos.
- Downloads and desktop files.
- Music and other media files.
#2 Sign Out of iCloud and Other Services
To avoid issues after the reset, it's important to sign out of all services connected to your Apple ID. This includes iCloud, iTunes, iMessage, and FaceTime.
Sign Out of iCloud:
- Open System Preferences > Apple ID (or iCloud in older versions).
- Select Overview and click Sign Out.
- When prompted, choose whether to keep a copy of your iCloud data on your Mac. Since you're factory resetting, it’s safe to remove everything.
Additionally, you must disable Find My Mac under iCloud settings to ensure the new owner doesn't run into issues when setting up the Mac.
Sign Out of iTunes:
- Open the iTunes app.
- In the menu bar, click Account by going to Deauthorize This Computer via Authorizations.
- Enter your Apple ID credentials and click Deauthorize.
Sign Out of iMessage and FaceTime:
- Open the Messages app, click Messages in the top menu, then Preferences. Navigate to the Accounts tab, select your iMessage account, and click Sign Out.
- Open the FaceTime app, click FaceTime in the top menu, then Preferences. Click Sign Out under the Settings tab.
#3 Erase the Startup Disk
Erasing the startup disk is the most critical part of the factory reset process, as it wipes all the data from your Mac and ensures a clean installation of macOS High Sierra.
Steps to Erase the Startup Disk:
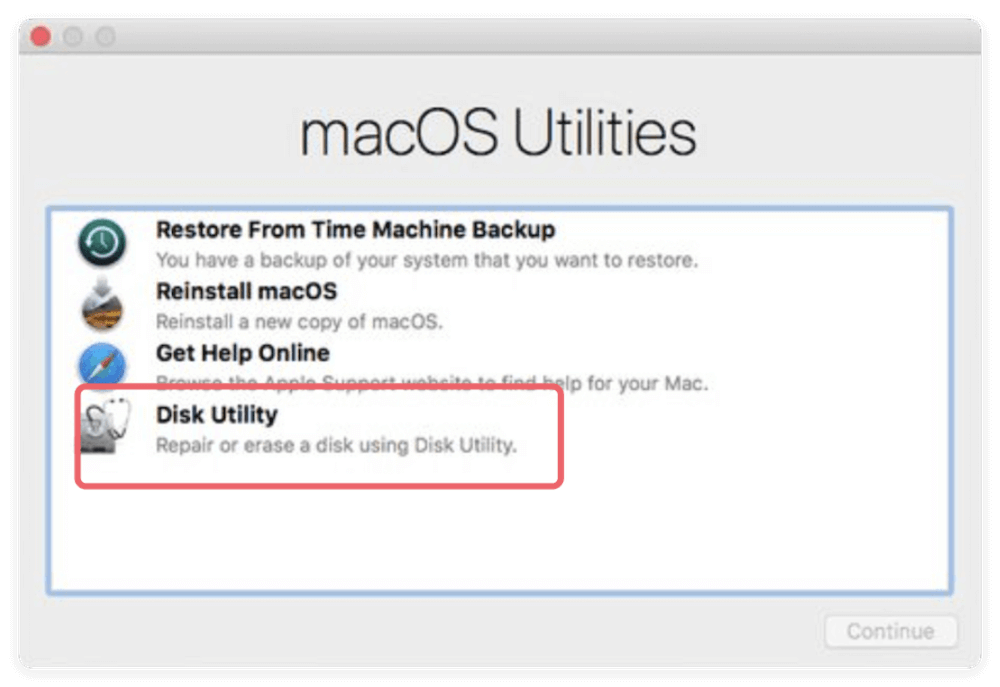
- Shut down the Mac, then turn it on, press and hold Command + R keys to enter into macOS Recovery mode.
![Steps to Erase the Startup Disk]()
- Choose Disk Utility from the Recovery Mode menu, then click Continue.
- Choose your Mac's initial disk (sometimes referred to as Macintosh HD) in Disk Utility.
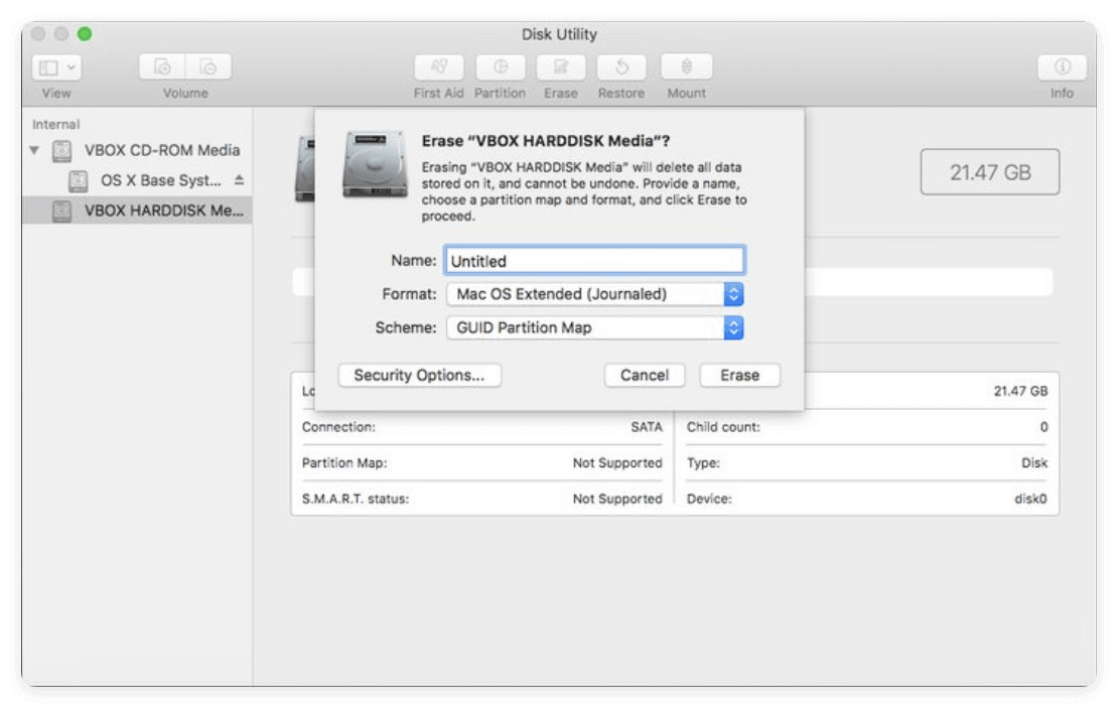
- At the top of the Disk Utility window, select Erase.
- Choose a new name for your disk (e.g., Macintosh HD), and select APFS as the format.
![Steps to Erase the Startup Disk]()
- Click Erase to confirm. Disk Utility will now wipe your disk clean.
Once the process is complete, you can close Disk Utility.
#4 Reinstall macOS High Sierra
Now that the disk has been erased, you can proceed with reinstalling macOS High Sierra.
Reinstall from Recovery Mode
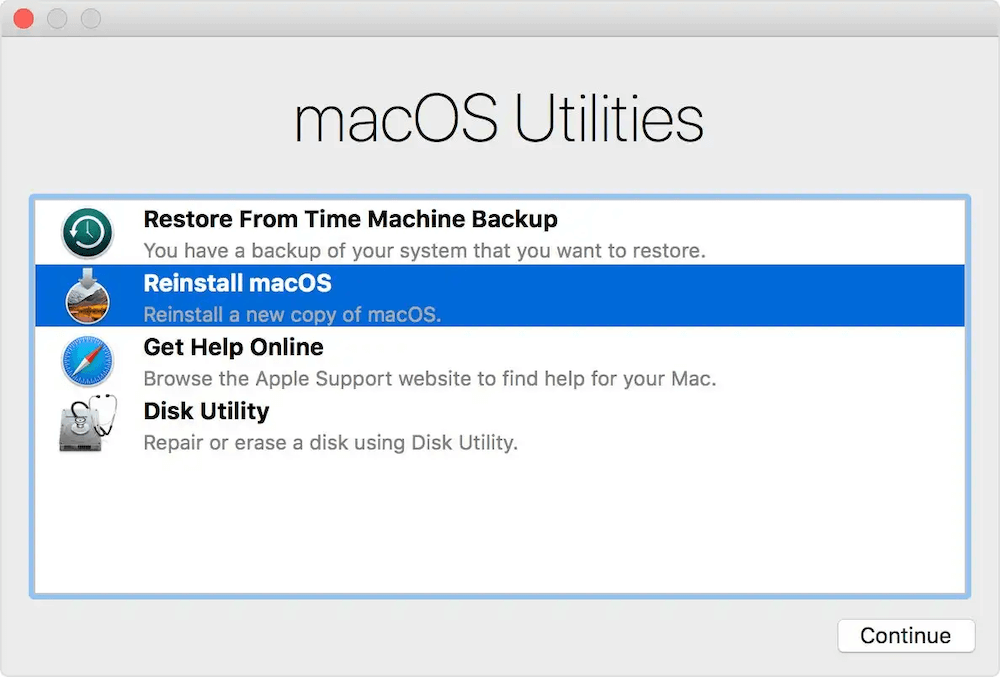
- Back in the Recovery Mode menu, select Reinstall macOS.
![Reinstall from Recovery Mode]()
- Follow the prompts to begin the installation. If you’re connected to the internet, your Mac will download a fresh copy of macOS High Sierra and install it.
Initial Setup After Factory Reset
Once the installation is complete, your Mac will restart and guide you through the initial setup process. Here’s what to expect:
Basic Configuration:
- Language and Region: Select the keyboard layout, language, and location that you like.
- Wi-Fi Connection: To proceed with the setup, connect to your Wi-Fi network.
- Apple ID: You can sign in with your Apple ID to sync your iCloud data and App Store purchases, or skip this step if you're setting up the Mac for someone else.
Restore From a Backup (Optional):
If you backed up your Mac using Time Machine, you’ll have the option to restore your data during the initial setup process. Select Restore from Time Machine Backup and follow the on-screen instructions to bring back your files and settings.
If you're selling or giving away your Mac, skip this step to leave the system in its factory-default state.
What to Do After macOS High Sierra Reset?
After your Mac has been reset and set up, there are a few things you should do to ensure it runs smoothly or is prepared for its new owner.
Install Software Updates:
Even though you've just installed macOS High Sierra, there may still be software updates available that include bug fixes and security patches. To check for updates:
- Open System Preferences > Software Update.
- If any updates are available, click Update Now to install them.
Reinstall Applications:
If you're keeping your Mac and plan to use it yourself, you can start reinstalling apps like Microsoft Office, Adobe Creative Cloud, or any other third-party software you had before. For App Store purchases, simply open the App Store and redownload your apps.
Security Check for Selling:
If you're selling the Mac, make sure the reset was successful and all personal data has been erased. You can verify this by restarting the Mac and confirming that the setup screen appears, indicating the Mac is ready for a new owner.
Securely and Permanently Wipe Data on macOS High Sierra
Please note that the data which is erased due to factory reset is not lost for good and can be recovered by data recovery software.
Related article: how to recover lost data after factory reset a Mac.
If you will sell, donate or dispose of your old Mac, you should wipe all sensitive data permanently, ensure no private file is recoverable. Mac disk wipe software can help you securely and permanently erase all existing data/deleted and erased data from your Mac which is running macOS High Sierra.
After factory resetting macOS High Sierra, just download and install Donemax Data Eraser for Mac on your Mac, then open it.
Then choose Erase Free Space mode. This mode will wipe free disk space of the internal HDD/SSD, then permanently erase all deleted/erased/lost data, making data recovery be impossible.

Select the startup disk (Macintosh HD), click on Erase Now button.

💡 Note: Once the process gets finished, the erased data is lost for good, cannot be recovered by any method.
Conclusion
Performing a factory reset on macOS High Sierra may seem like a complex process, but by following these steps carefully, you can ensure that your Mac is cleaned up and running smoothly. Whether you're preparing to sell it or just giving it a fresh start, a factory reset can breathe new life into your machine and provide you with a clean slate. Just remember to back up your data and sign out of all your accounts to avoid any issues after the reset.
With this guide, your factory reset process should go smoothly, leaving you with a fresh installation of macOS High Sierra ready to serve its next purpose.
FAQs About Factory Resetting macOS High Sierra
1. How to factory reset macOS High Sierra?
Follow the steps below to factory reset macOS High Sierra:
- Restart the Mac, press and hold Command+R keys until it boots into macOS Recovery mode.
- Choose Disk Utility, then use it to erase the startup disk.
- Get back to Utilities window, choose Reinstall macOS.
- Then clean install macOS High Sierra on the Mac.
2. How to wipe everything and clean install macOS High Sierra?
Step 1. Download macOS High Sierra.
Even though macOS High Sierra is no longer the latest operating system, you can still download it from the Mac App Store.
- Open the Mac App Store.
- Search for macOS High Sierra.
- Download the installer to your Applications folder.
Step 2. Create a Bootable USB Drive.
A USB device with at least 16GB of storage is required in order to produce a bootable USB installation. Then, follow these steps:
- Connect your Mac to the USB disk.
- Choose the USB drive, launch Disk Utility, and delete it. Be careful to use the GUID Partition Map method and format it as Mac OS Extended (Journaled).
- Once your drive is ready, open Terminal and enter the following command:
sudo /Applications/Install\ macOS\ High\ Sierra.app/Contents/Resources/createinstallmedia --volume /Volumes/MyVolume
Put the name of your USB drive in lieu of "MyVolume". Hit Enter and adhere to the instructions.
Your Mac will now create a bootable USB installer, which will take a few minutes to complete.
Step 3. Boot into macOS Recovery Mode.
Once your data is backed up and you've signed out of all services, it's time to boot into macOS Recovery Mode to begin the reset process.
Steps to Boot into Recovery Mode:
- Shut down your Mac completely.
- Turn it on while holding down Command + R until the Apple logo appears. This will boot your Mac into Recovery Mode.
- Once in Recovery Mode, you'll see a menu with options like Restore from Time Machine, Reinstall macOS, and Disk Utility.
Before reinstalling macOS, you'll need to erase your hard drive completely. Just choose Disk Utility and use it to erase the startup disk.
Step 4. Reinstall Using a Bootable USB Installer.
- Shut down your Mac, insert the bootable USB drive, and turn the Mac on while holding down Option.
- Select the bootable USB drive from the list that appears.
- The macOS installer will launch. Follow the prompts to install macOS High Sierra on your freshly erased startup disk.
3. How to permanently erase data on macOS High Sierra?
Data erasure software can help you securely and permanently erase data on macOS High Sierra.
- Permanently erase files and folders.
- Wipe entire drive to erase everything.
- Wipe deleted/erased/lost data.


Donemax Data Eraser for Mac
100% safe and powerful Mac data erasure program. It offers certified data erasure standards including U.S. Army AR380-19, DoD 5220.22-M ECE to help in securely and permanently erase data from Mac HDD/SSD and external storage device, making data recovery be impossible.
Related Articles
- Apr 09, 2024How to Format or Wipe WD External Hard Drive on Mac?
- Nov 18, 2024Factory Reset a Mac with Apple Silicon M4 Chip – Guide 2025
- Nov 20, 2024How to Factory Reset macOS Big Sur? [Intel-based/Apple silicon supported]
- Nov 25, 2024How to Permanently Erase Data on macOS Monterey – A Comprehensive Guide
- Nov 25, 2024How to Factory Reset macOS Monterey?
- Aug 25, 2023How to Permanently Wipe Old Intel Mac Data before Selling or Donating?

Christina
Christina is the senior editor of Donemax software who has worked in the company for 4+ years. She mainly writes the guides and solutions about data erasure, data transferring, data recovery and disk cloning to help users get the most out of their Windows and Mac. She likes to travel, enjoy country music and play games in her spare time.

Gerhard Chou
In order to effectively solve the problems for our customers, every article and troubleshooting solution published on our website has been strictly tested and practiced. Our editors love researching and using computers and testing software, and are willing to help computer users with their problems
