Written byMariaUpdated on Jun 24, 2025
How to Format Hard Drive on Window 7?
Approved byGerhard Chou
Before we start: Need to format your hard drive in Windows 7? There are 5 methods or tools recommended. Note that the formatted data is recoverable in some cases. To ensure the data is gone forever, use the tool Donemax Data Eraser to format and wipe data permanently.
PAGE CONTENT:
Even though it was released more than ten years ago, Windows 7 is still a popular operating system because it is stable and easy to use. Formatting the hard drive is important for maintaining and improving a computer's performance. This process can help fix system mistakes, speed things up, or prepare the drive for new data. In Windows 7, you can format a hard drive with several tools, each with its features and benefits.
This article discusses the best Windows 7 disk formatting tool and provides a full guide on how to format a hard drive using these tools. This article will help you understand and perform the formatting process quickly and correctly, whether you want to use the built-in Disk Management tool or more complicated third-party software.
About Hard Drive Formatting on Windows 7
Formatting is the process of getting a hard drive, solid-state drive, or USB flash drive ready to be used for the first time. Part of this is creating a file system that the operating system can read and write to.
Different ways to format:
- Quick Style: This process deletes the file system table and the root directory, but the disk is not checked for bad sectors. It works faster but not as well.
- Full Style: This process removes all the data on the disk, checks it for bad sectors, and writes zeros to the whole thing. It takes longer, but it keeps the disk healthy.
- Disk Wipe: Third-party disk wipe software can format and wipe the hard drive, and permanently erase all data from the drive, making data recovery be impossible.
Reasons for formatting the hard drive:
There are several reasons why someone might format a storage drive. In this section, we'll discuss some of them.
- Sluggish Speed: If your HDD is old, it may have a lot of cache memory or files you don't want. It's not hard to get rid of these files, but you can't find them. The system may not work well when this group of info is present. The only thing that will work is to reset the whole hard drive, which will get rid of all the files that aren't needed.
- Changing the File System: You must change your drive's file system to work with Macs to get a new computer or switch from Windows to macOS. You have to reset the disk to change the file system.
- Clean the HDD from Viruses: You can always get Malware on a Windows PC, which is bad because it can damage your data and personal information. If you don't have antivirus software on your computer, you must reset the whole drive to eliminate the Malware.
- Protect Your Privacy: Before you sell, donate or dispose of an old Windows 7 PC, you should securely and permanently erase all data from the hard drive.
Top 5 Windows 7 Disk Formatter Tools and How to Use
The best formatting tools have been talked about so far. Let's now look at how to use these tools to format a hard drive on Windows 7.
📒 Note: Formatting a hard drive will delete everything from the hard drive. Before formatting a hard drive, you'd better make a backup of your important files.
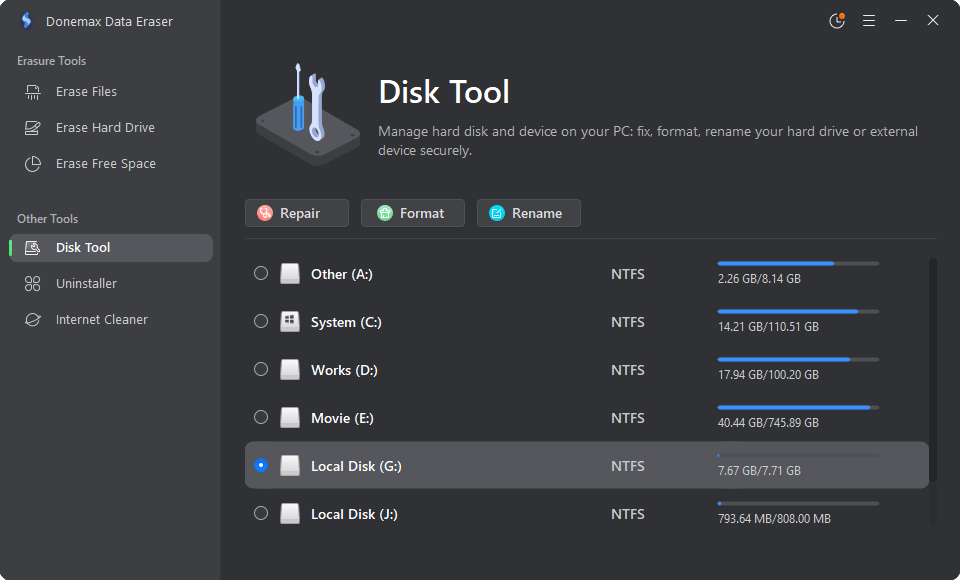
Option 1. Donemax Data Eraser
Donemax Data Eraser is one of the best Windows 7 formatting tools. It not only can help you format a hard drive to ExFAT, FAT32, NTFS, but it also can securely wipe a hard drive and permanently erase all data from the drive.
Donemax Data Eraser for Windows
- Securely and easily format HDD/SSD/USB drive/memory card on Windows 7.
- Format and wipe a hard drive on Windows 7.
- 100% safe and easy-to-use disk format and wipe tool.
If you only want to format a hard drive on Windows 7, just open Donemax Data Eraser, choose Disk Tool, select the target drive, click on Format button. Select a file system, then format the selected hard drive.
📒 Note: The formatted data on Windows 7 is not lost for good and can be recovered by data recovery software.
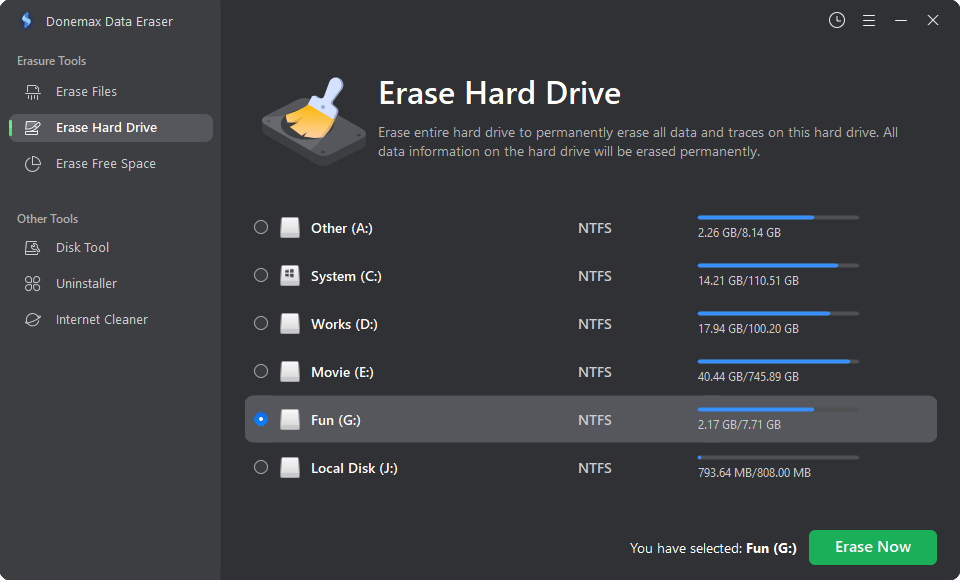
Wipe Data Permanently from the Formatted Drive
If you want to format and wipe a hard drive to permanently erase all data from the hard drive, just try Erase Hard Drive mode.
Step 1: Download and install Donemax Data Eraser on your computer, then open, choose Erase Hard Drive mode, select the target hard drive, click on Erase Now button.
Step 2: Select a erasure standard, click on Continue button to wipe all data from the hard drive.
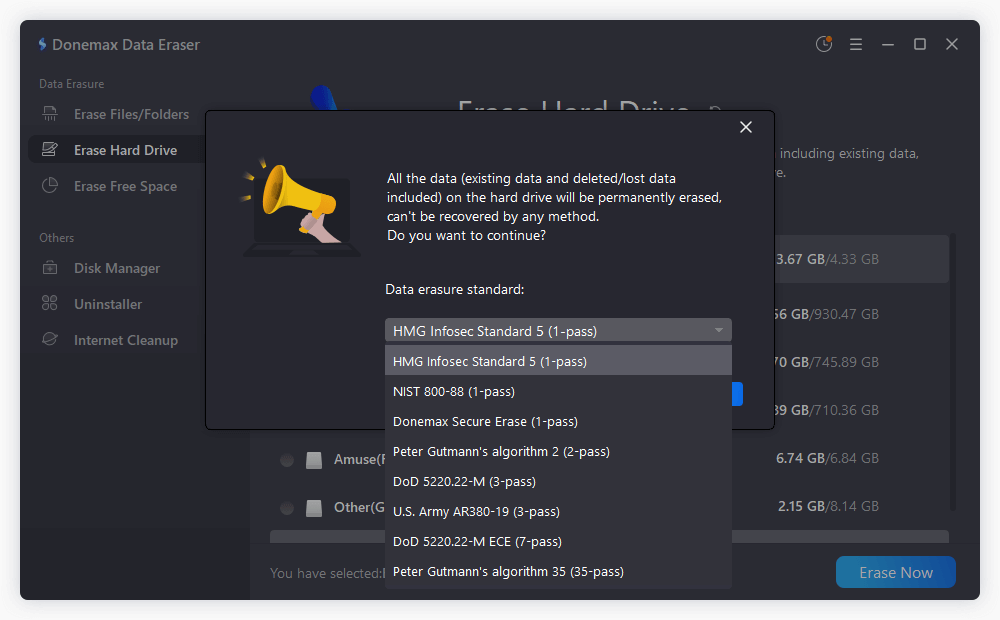
📒 Note: Once the data is erased by Donemax Data Eraser, the data is lost for good, cannot be recovered by any data recovery software.
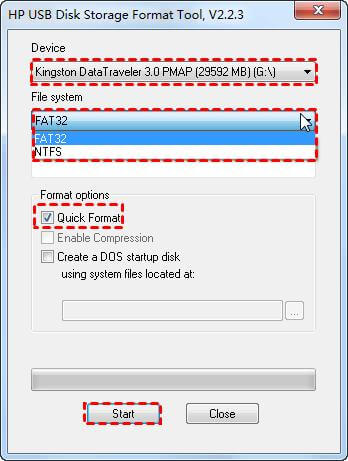
Option 2. HP USB Disk Storage Format Tool
Step 1: Attach the USB drive to your computer running Windows XP. Then, go to Devices and pick the USB drive you want to format.
Step 2: Choose a file system from the File System menu and name the erased disk in the Volume Label box.
Step 3: Click the "Quick Format" button for a quick format. A slower, lower-level version will be used if you don't check this box.
Step 4: Press "Start" to start formatting the USB.
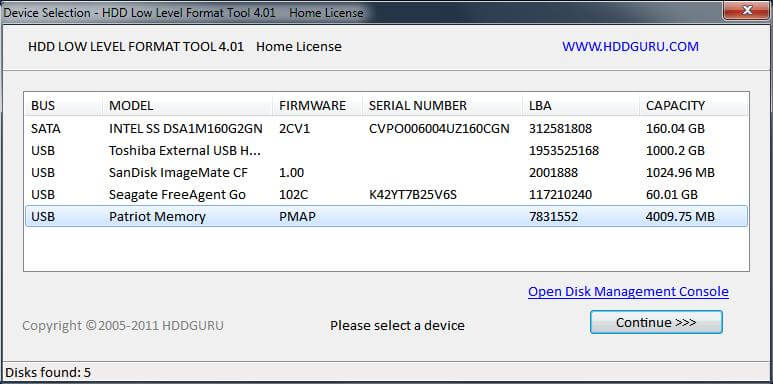
Option 3. HDD LLF Format Tool
Step 1: Get the HDD LLF Format Tool and run it on your machine.
Step 2: Connect your hard drive or USB to your computer and start the low-level reset tool.
Step 3: Select the drive you want and click "Continue." Then click "Yes" to confirm the choice.
Step 4: On the tab, choose Low-Level Format to begin the low-level editing process.
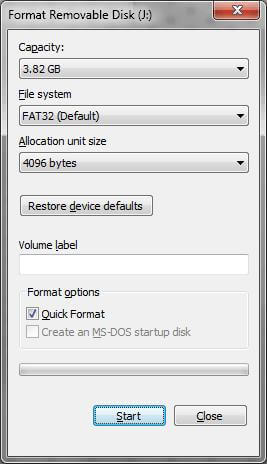
Option 4. Windows File Explorer
Step 1: Startup Windows File Explorer and look for the hard drive you want to erase. Pick "Format" from the menu when you right-click on it.
Step 2: Give the hard drive a new name and change its file system to NTFS or another type.
Step 3: Press "Start" to start formatting.
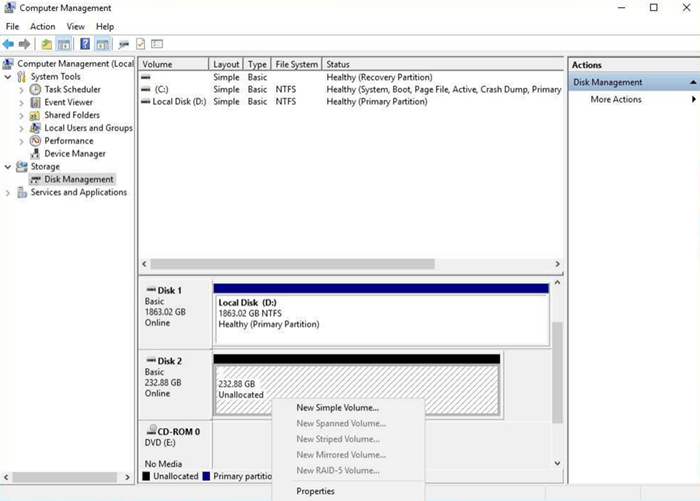
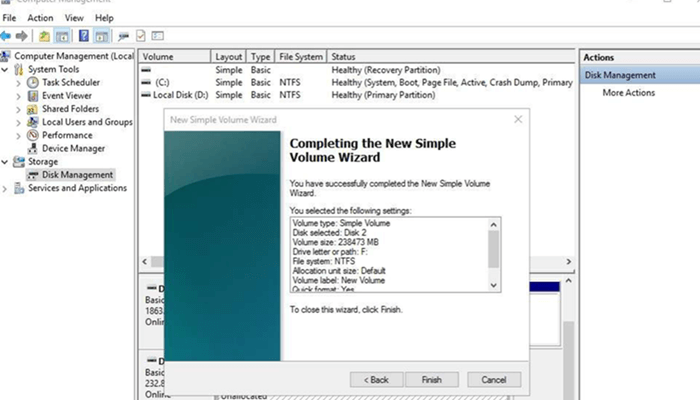
Option 5. Windows Disk Management
Step 1: In the bottom left area, click the Windows button and choose Disk Management from the menu that comes up.
Step 2: Right-click on the disk drive you want to "clean" and choose "Delete Volume" if you want to format it or get rid of things on it. Go straight to step 3 to format a brand-new disk drive.
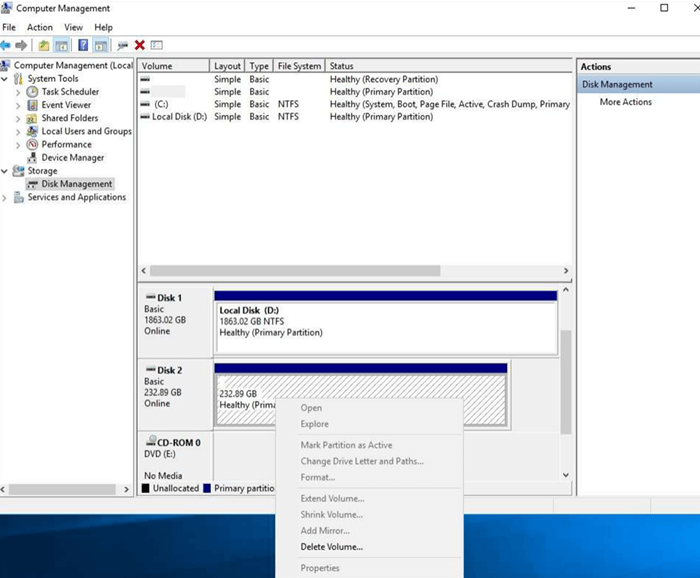
Step 3: To format a drive, right-click on it, choose Format, and select New Simple Volume.
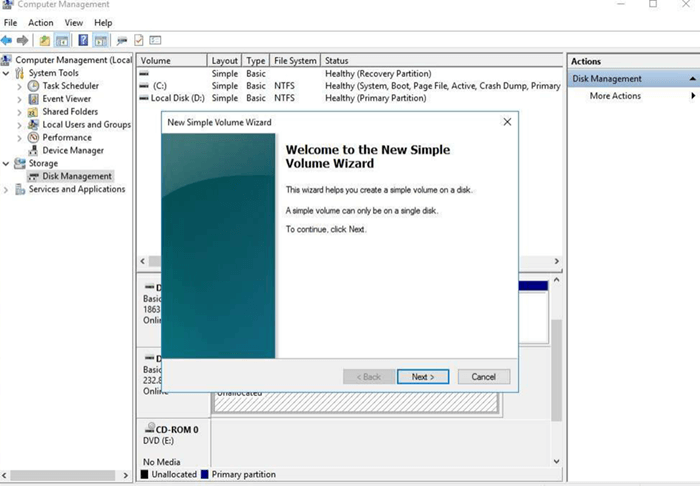
Step 4: Click Next to start a Wizard to help you finish this process.
Step 5: The Wizard asks you to choose a volume size. That will be done automatically based on the size of the disk drive, so hit Next.

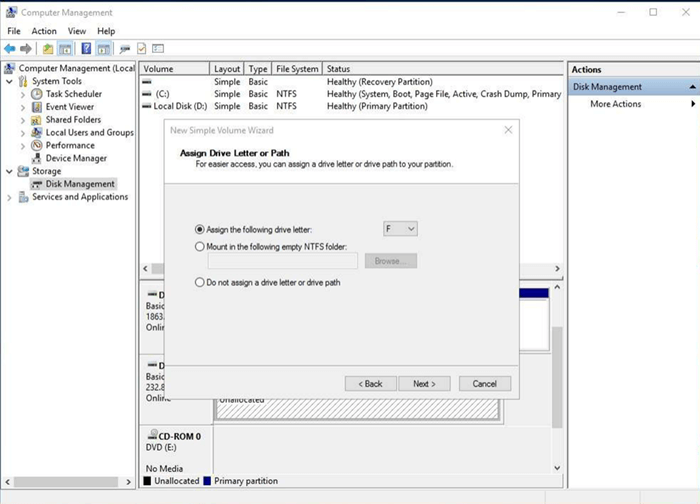
Step 6: The Wizard will ask you to Assign a Drive Letter or Path. If you're unsure what to do, let the Wizard choose for you, then click Next.
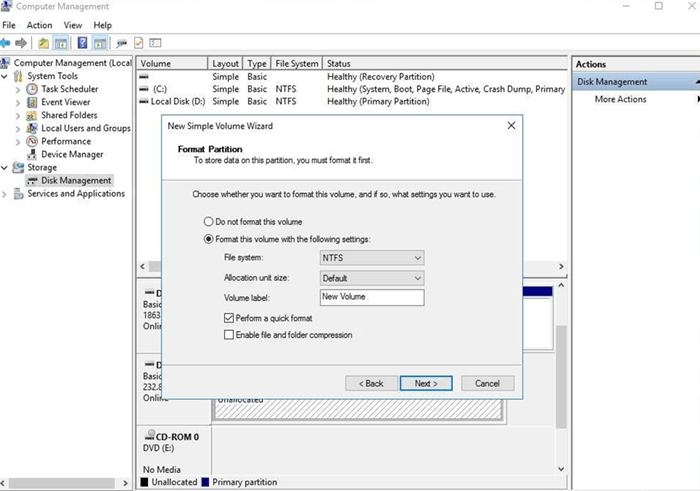
Step 7: The Wizard will ask you to format the partition. If you want computers running Windows to be able to read the disk drive only, choose NTFS. If you want computers running Mac and other operating systems to be able to read it, too, choose exFAT.
You can also change the Volume Label to something more relevant, like "My Videos and Images," then click Next. That will help you find and name the drive.
Step 8: Hit "Finish" to start formatting your new hard drive.
How to Unformat A Hard Drive on Windows 7?
If you lose data due to formatting a hard drive on Windows 7, just use a data recovery program to help you unformat the drive & get all lost data back.
Step 1: Download and install Windows 7 data recovery program - Donemax Data Recovery.
Step 2: Open Donemax Data Recovery, select the formatted hard drive to start data recovery.

Step 3: Click on Scan button to deeply scan the formatted hard drive and find all recoverable files.
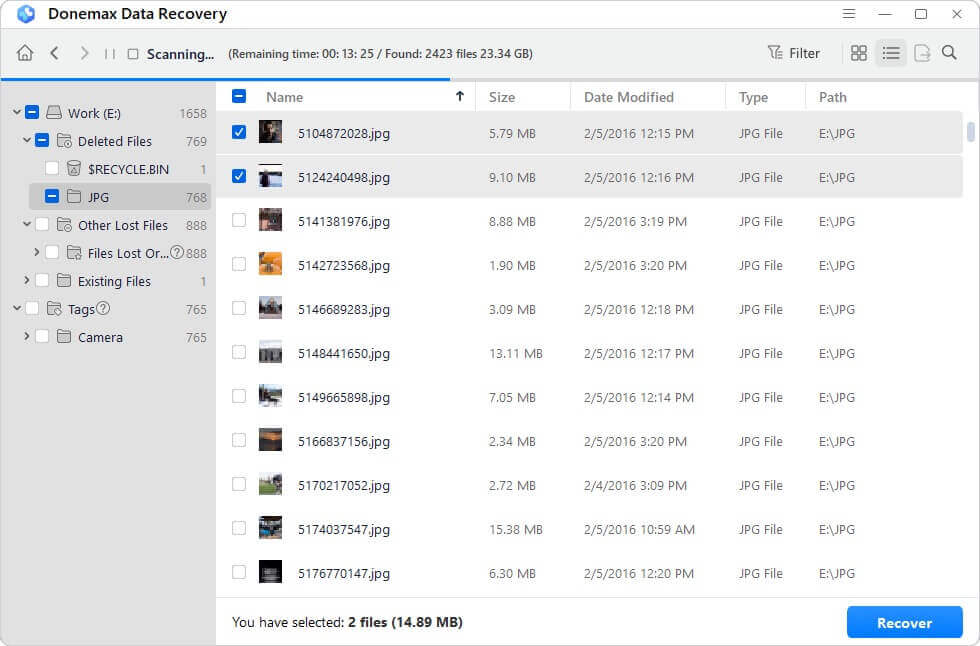
Step 4: Once the scan is completed, select the wanted files, then click on Recover button to save them.

Conclusion:
If you know what you're doing and have the right tools, formatting a hard drive on Windows 7 is easy. Whether you use the built-in Disk Management tool or a third-party program, choosing the drive, setting up choices, and running the format are steps.
A smooth experience is guaranteed by knowing about the different file systems and how to fix common problems. If you follow the steps in this article, you should be able to safely format your hard drive, making the most of your storage space and keeping your system healthy.
Donemax Data Eraser
One of the best data erasure programs for permanently erase data from PC, Mac, HDD, SSD, USB drive, digital camera and other devices. Once the data is erased, it is lost for good, cannot be recovered by any method.
Related Articles
- May 28, 2025How to Fix Data Error Cyclic Redundancy Check Without Losing Data?
- Nov 29, 2024How to Automatically Empty Recycle Bin on Windows 11/10?
- Oct 27, 2024How to Wipe Recycle Bin on Windows: A Complete Guide
- Jun 24, 2025Files Become Shortcuts: How to Fix and Prevent It?
- Feb 19, 2025Best 5 Methods to Format a Hard Drive on Windows 11 – A Comprehensive Guide
- Apr 29, 2025How to Fix BitLocker Not Working? [6 Solutions]

Contributing Writer
Maria
Maria is one of the senior writers & editors of Donemax who lives and works in Sydney, Australia. She loves PC, Mac and Internet Technology. She has 6 years of writing articles about data recovery on PC/Mac, disk cloning solution, data eraser and computer OS optimization, etc. She is also interested in testing various software and digital products.

Editor in chief
Gerhard Chou
In order to effectively solve the problems for our customers, every article and troubleshooting solution published on our website has been strictly tested and practiced. Our editors love researching and using computers and testing software, and are willing to help computer users with their problems