Before we start: Before fixing "The device is not ready" error, you can use data recovery software - such as Donemax Data Recovery to recover or export all files from the inaccessible drive to your computer.
PAGE CONTENT:
Have you ever encountered the frustrating error message "The Device Is Not Ready"? This error typically appears when trying to access an external device like a USB drive, external hard disk, printer, or any other connected hardware. It can occur unexpectedly and hinder your ability to work, transfer files, or use devices that you rely on. Fortunately, this error is often fixable, and understanding its causes and solutions can save you time and stress.
In this article, we will explore the possible reasons behind the "The Device Is Not Ready" error and provide a comprehensive guide to troubleshoot and fix the issue. From simple connection checks to more advanced solutions, we'll cover everything you need to get your devices working properly again.
Understand the Error: The Device Is Not Ready
What Does "The Device Is Not Ready" Mean?
The "The Device Is Not Ready" error message generally appears when the operating system is unable to access or recognize a device connected to your computer. This issue could be due to problems with the physical connection, device drivers, system configurations, or even hardware failure. In essence, the device in question is not responding or ready for use by the system.
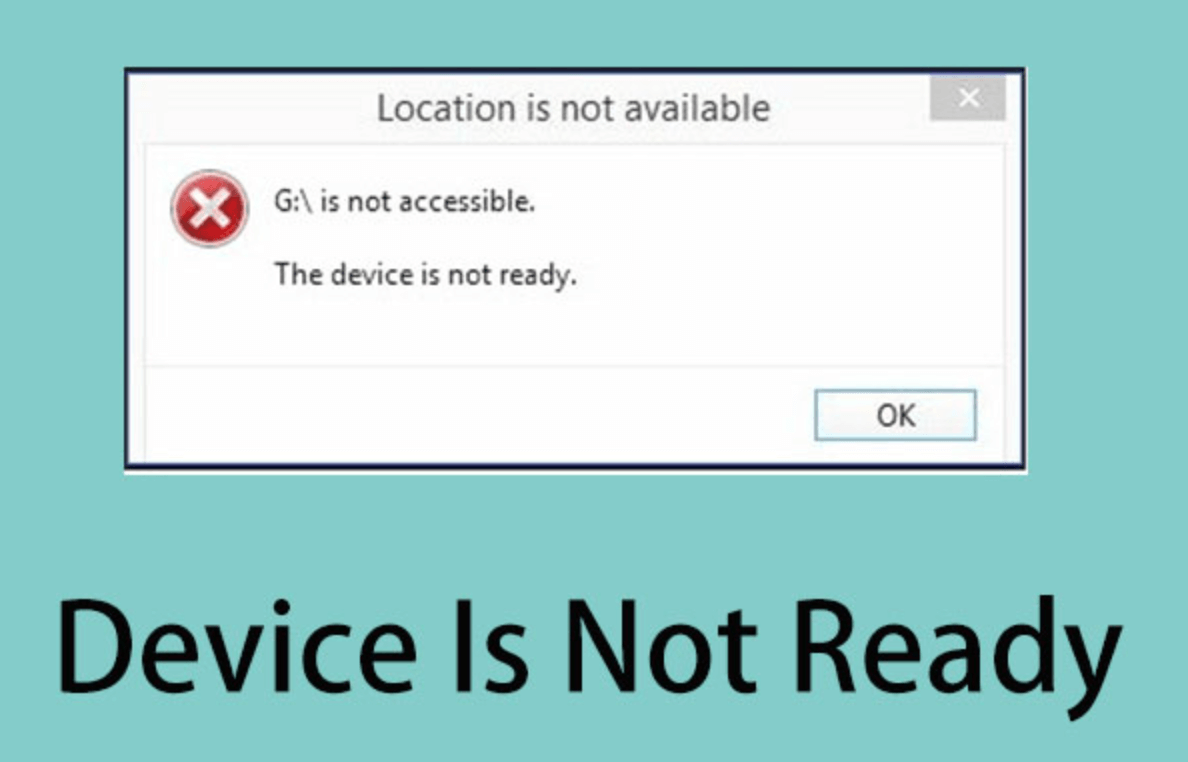
This error is most commonly associated with external storage devices such as USB drives, external hard drives, or SD cards. However, it can also occur with peripherals like printers, scanners, and even network devices. When this error occurs, the device may not show up in File Explorer (on Windows) or Finder (on macOS), or it might show up with a warning message indicating the device is unavailable.
Common Devices Affected
- External Storage Devices: External storage devices are frequent culprits for this error. These devices rely heavily on proper connection, power supply, and system recognition to function.
- Printers and Scanners: These peripherals can also generate the "The Device Is Not Ready" message, often because of driver issues or communication failures between the printer and the computer.
- Other Peripherals: Cameras, monitors, and other external devices might encounter this issue if there's a problem with their connection, configuration, or hardware.
Typical Symptoms
- The device doesn't show up in File Explorer (Windows) or Finder (macOS).
- You see a pop-up message or an error code indicating the device is not ready or accessible.
- Devices might show up with a warning icon or message saying "Device not ready" when trying to access them.
- External devices may show as "unallocated" or "unformatted" in Disk Management.
Recover Lost Data from the Device or Drive Which Is Not Ready or Inaccessible
Data recovery software, such as Donemax Data Recovery, can help you export or recover data from the inaccessible or formatted drive on Windows and macOS.
Step 1. Download and install the reliable data recovery program - Donemax Data Recovery on your computer.
Step 2. Open Donemax Data Recovery and select the drive which is not ready to start data recovery.

Step 3. Click on Scan button. Donemax Data Recovery deeply scans the drive and find all recoverable files including existing files, deleted/formatted/lost files, inaccessible files, etc.

Step 4. After scan, you can see all recoverable files. Select the wanted ones, click on Recover button to save them.

Troubleshooting Steps to Fix The Device Is Not Ready
Basic Solutions
1. Check the Physical Connection
The first thing to check when facing the "The Device Is Not Ready" error is the physical connection. A loose or damaged cable is one of the most common reasons for the device being inaccessible.
- Try Different USB Ports: If you are using a USB device, ensure that the cable is securely connected. If you've been using a USB 3.0 port, try switching to a USB 2.0 port, or vice versa.
- Test the Cable: If the cable appears worn or damaged, try a different one to rule out cable issues.
- Try Another Computer: To check if the issue still exists, try connecting the device to a different computer if you can. This will assist in identifying whether the problem is with your computer or the device.
- External Power Supply: If your device requires an external power source, ensure that the power adapter is functioning correctly and supplying power.
2. Restart the Computer
A simple restart can sometimes resolve connectivity issues. Restarting the computer helps reset the operating system and any temporary issues that might be causing the device not to be recognized.
3. Power Cycle the Device
For devices that require external power (e.g., external hard drives or printers), performing a power cycle can sometimes help reset the connection. Turn off the device, unplug it, wait for about 10-15 seconds, and then plug it back in and power it on again.
Software-Based Solutions
1. Update Device Drivers
Outdated or corrupted drivers can prevent a device from being recognized by the system. Device drivers serve as a communication bridge between your operating system and hardware, so it's essential to keep them up to date.
Update Drivers in Windows:
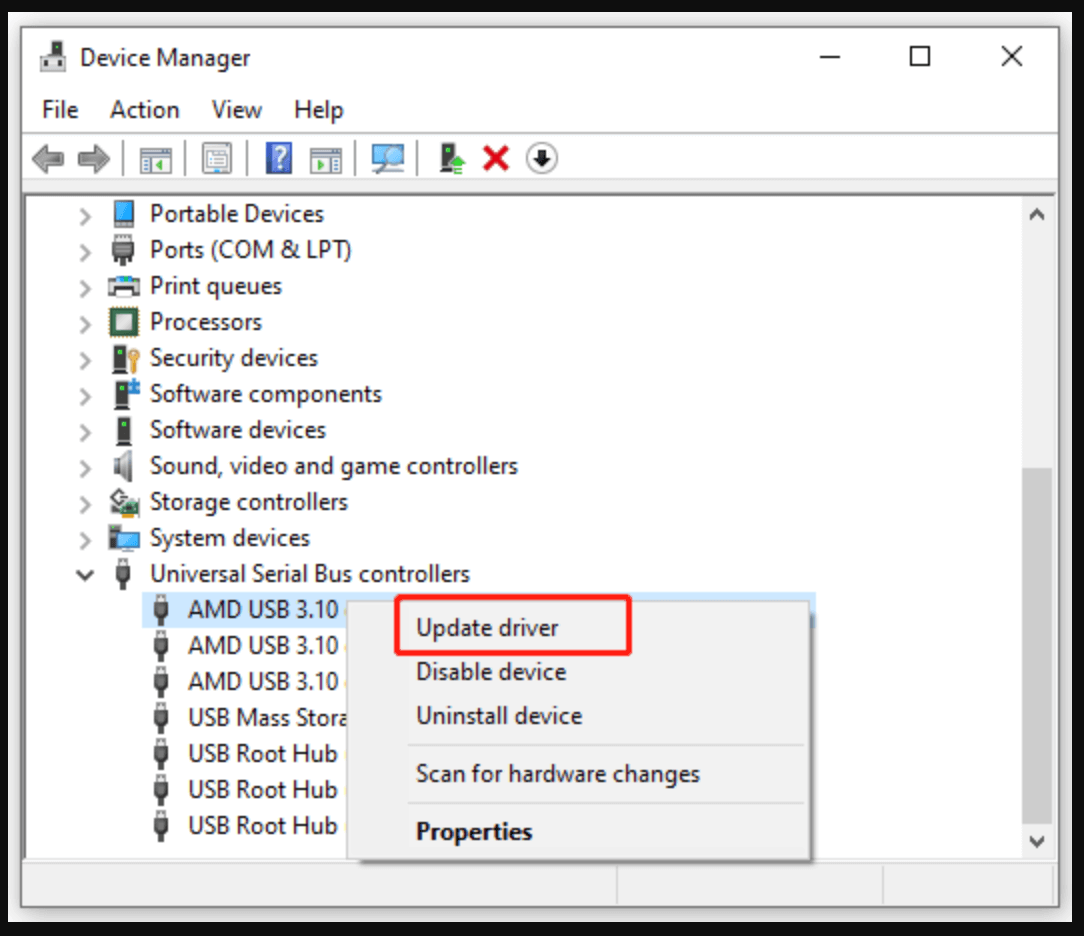
- Select Device Manager by pressing Windows + X.
- Then, expand the appropriate category (such as Disk Drives for storage devices).
- Right-click on the device and select "Update Driver."
![Fix The Device Is Not Ready Issue]()
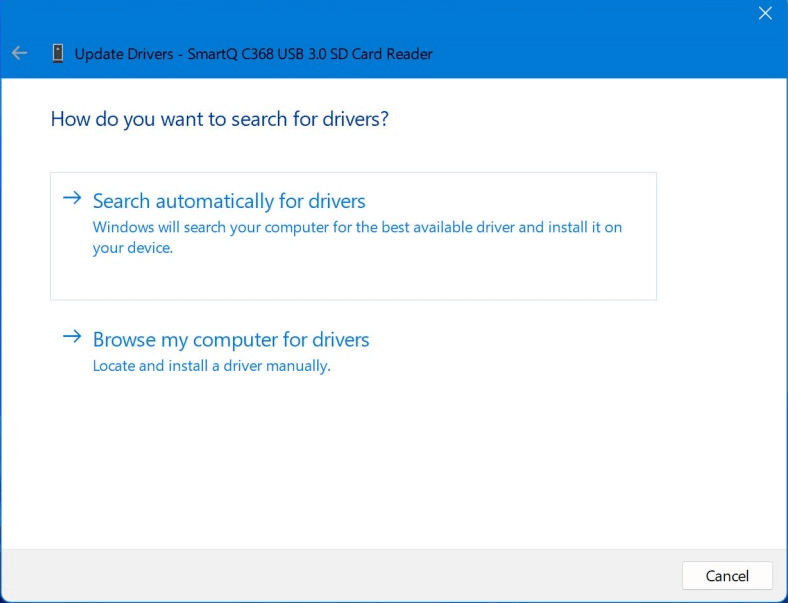
- Finally, choose "Search Automatically for drivers" and adhere to the instructions.
![Fix The Device Is Not Ready Issue]()
Update Drivers in macOS:
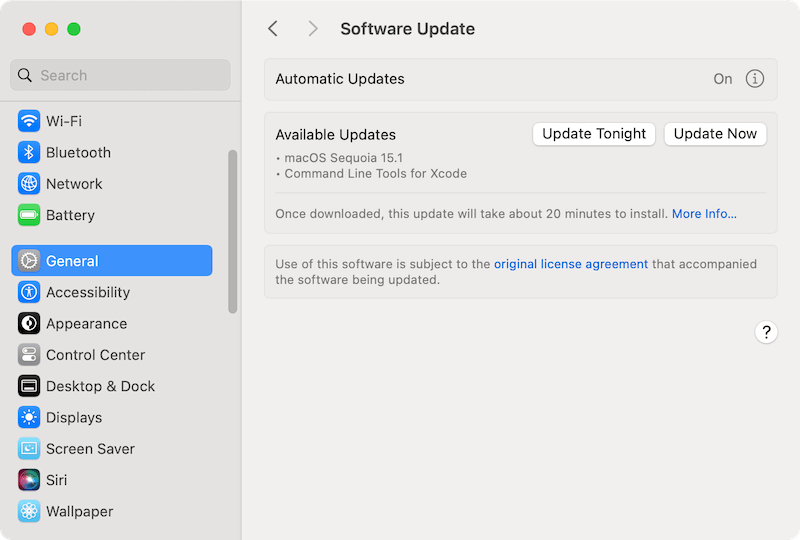
macOS typically handles driver updates automatically, but you can check for system updates by going to System Settings > General > Software Update (or System Preferences > Software Update).
2. Run the Hardware and Devices Troubleshooter
Windows offers a built-in troubleshooter to detect and fix issues with hardware devices. This tool can automatically detect common problems with devices and resolve them.
To run the troubleshooter on Windows:
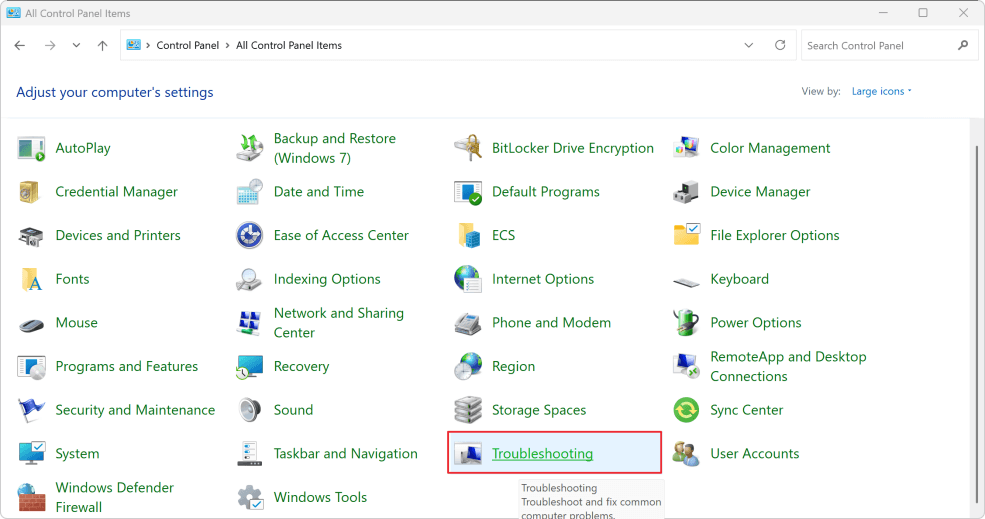
- Open the Control Panel and go to Troubleshooting.
![Fix The Device Is Not Ready Issue]()
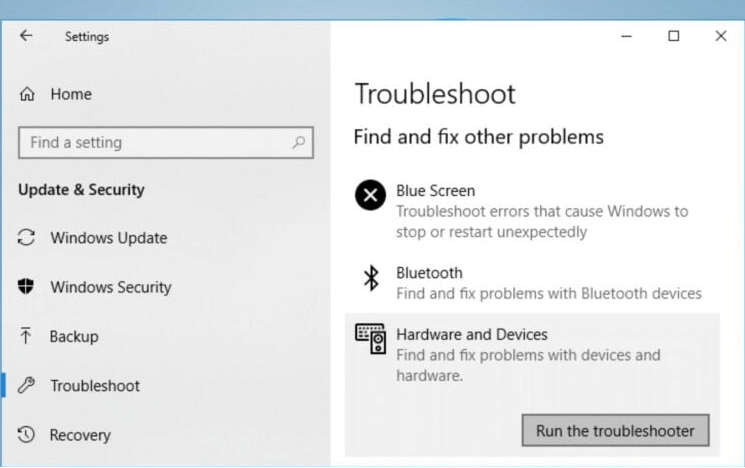
- Select Hardware and Devices and click "Run the troubleshooter" to continue.
![Fix The Device Is Not Ready Issue]()
- Follow the on-screen instructions to let Windows scan and fix potential issues.
For some users, you may find the option "Hardware and Devices" option is missing on your PC. In such a case, you can run the check via command. Here is how:
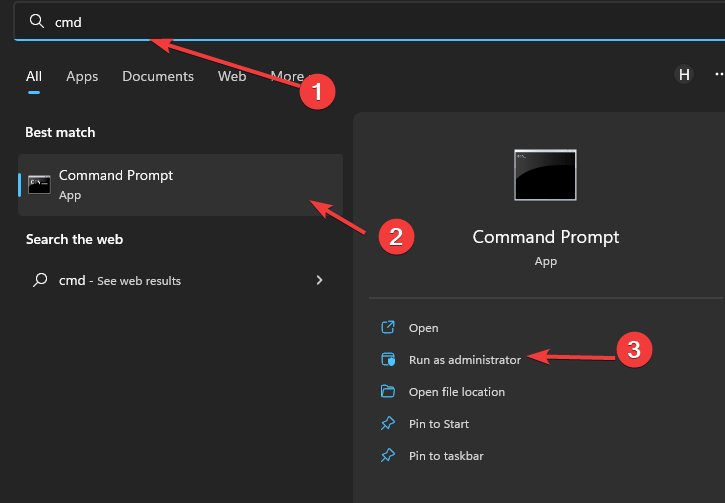
1. Click the start menu and enter "cmd" to search, select "Command Prompt" and click "Run as administrator" to start.
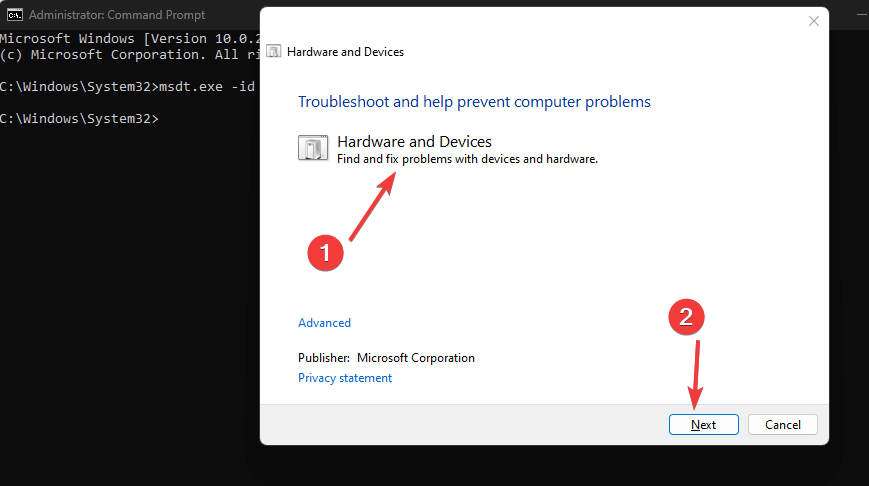
2. Type the following command to start the hardware checking and it will pop up a window. Just click "Next" to run it and follow the wizard to fix any found issues.
msdt.exe -id DeviceDiagnostic
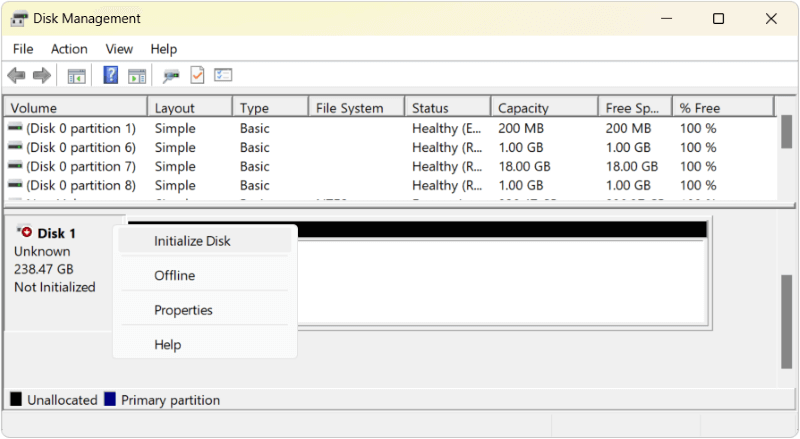
3. Check Disk Management
Sometimes, the device may be connected but not properly initialized or assigned a drive letter. Checking Disk Management can help identify if this is the case.
- Press Windows + X and select Disk Management.
- Look for the device in the list. If the device shows as Unallocated or Offline, you may need to initialize or format it to make it accessible.
![Fix The Device Is Not Ready Issue]()
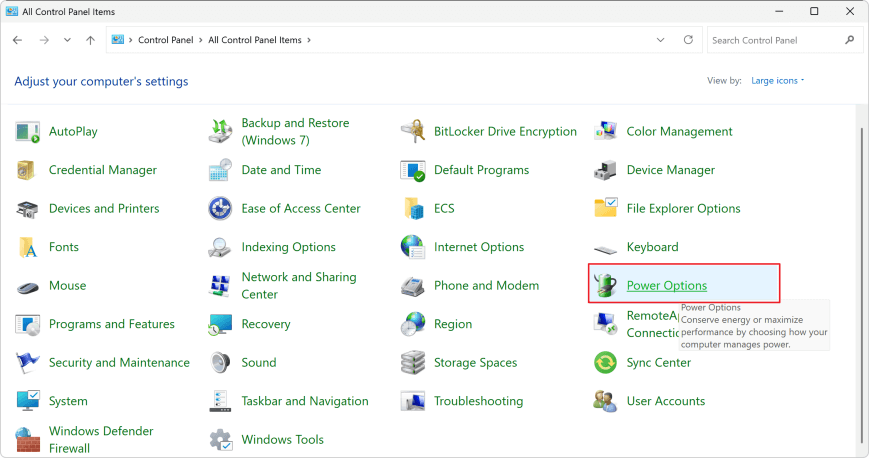
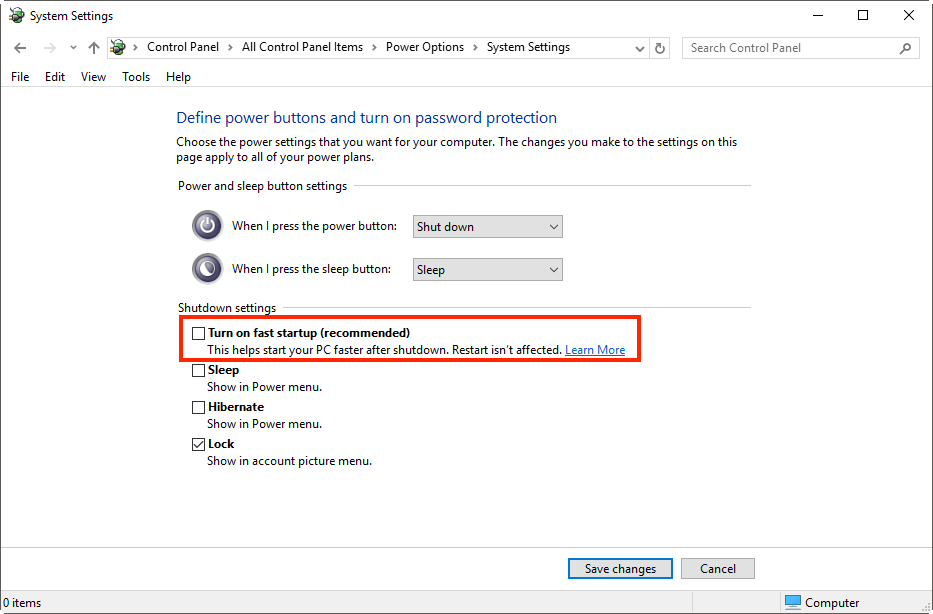
4. Disable Fast Startup (Windows)
Windows' Fast Startup feature can sometimes cause conflicts with external devices. This feature allows your system to boot faster but may prevent devices from being recognized on startup. To disable Fast Startup:
- Open the Control Panel and select Power Options.
![Fix The Device Is Not Ready Issue]()
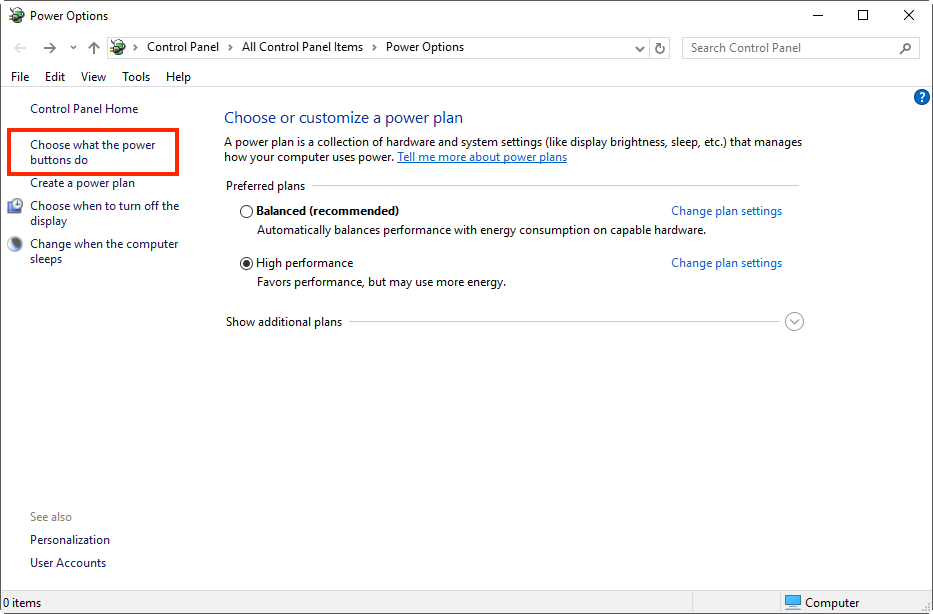
- Click on "Choose waht the power buttons do."
![Fix The Device Is Not Ready Issue]()
- To modify settings that are not available at the moment, click on "Change plan settings". Uncheck the option "Turn fast startup," click "Save changes" to save the modifications and enable rapid startup.
![Fix The Device Is Not Ready Issue]()
Advanced Solutions
1. Check for Disk Errors
If you're dealing with a storage device (USB drive, external hard drive), file system corruption could be the cause of the error. Running a disk check utility can help detect and repair issues with the device.
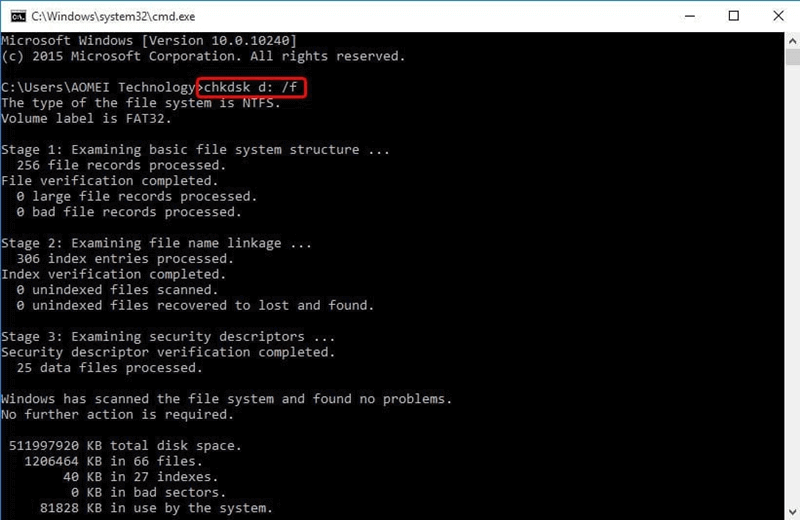
Run chkdsk in Windows:
- Right-click on the Start menu and choose Command Prompt (Admin) to launch Command Prompt as Administrator.
- Type chkdsk X: /f, substituting the drive letter for X:, then hit Enter.
- Let the system scan and repair any disk errors.
![Fix The Device Is Not Ready Issue]()
2. Reinstall the Device
If the device is not functioning despite the drivers being updated, it might help to uninstall and reinstall the device. This process forces the operating system to reset its connection with the device.
To reinstall in Windows:
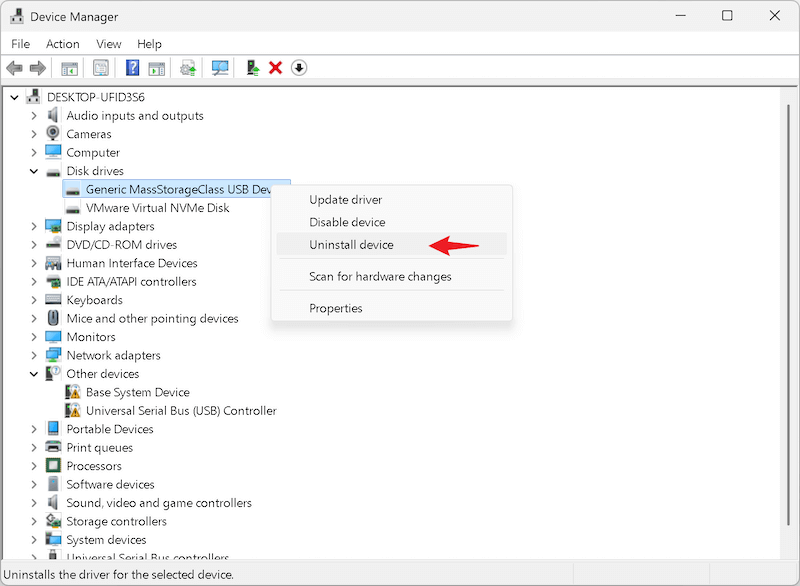
- Launch the Device Manager.
- Choose "Uninstall device" from the menu when you right-click the device.
![Fix The Device Is Not Ready Issue]()
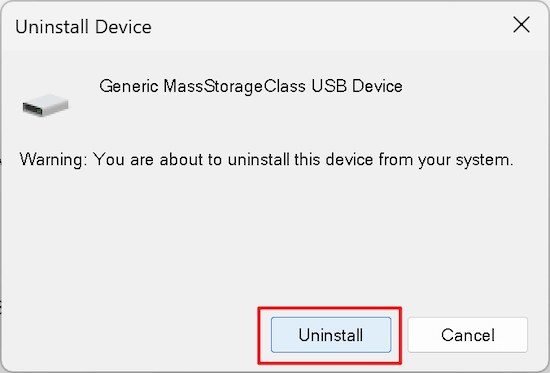
- Click on "Uninstall" button in the confirmation window. Then the drive will be uninstalled from the PC.
![Fix The Device Is Not Ready Issue]()
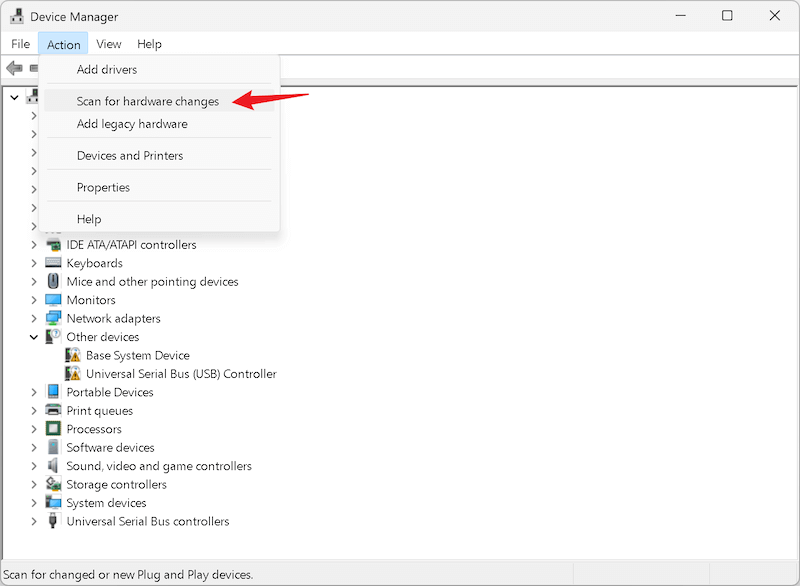
- Disconnect and reconnect the device, and Windows should automatically reinstall the drivers. You can also click "Activation" and select Scan for hardware changes in Device Manager. Then the driver for the drive will be reinstalled and you can see the drive again.
![Fix The Device Is Not Ready Issue]()
3. Try Alternative Ports or Connections
If the device is still not recognized, try using a different connection method or port. For instance, if you're using a USB hub, try connecting the device directly to the computer. Similarly, for network devices, switch between Ethernet and Wi-Fi connections to see if the error persists.
4. Format the Device (for storage devices)
As a last resort, if the device is a storage drive (e.g., external hard drive or USB stick) and none of the other steps have worked, formatting the device might fix the issue. However, formatting will erase all data, so ensure that you have backups before proceeding.
To format a device in Windows:
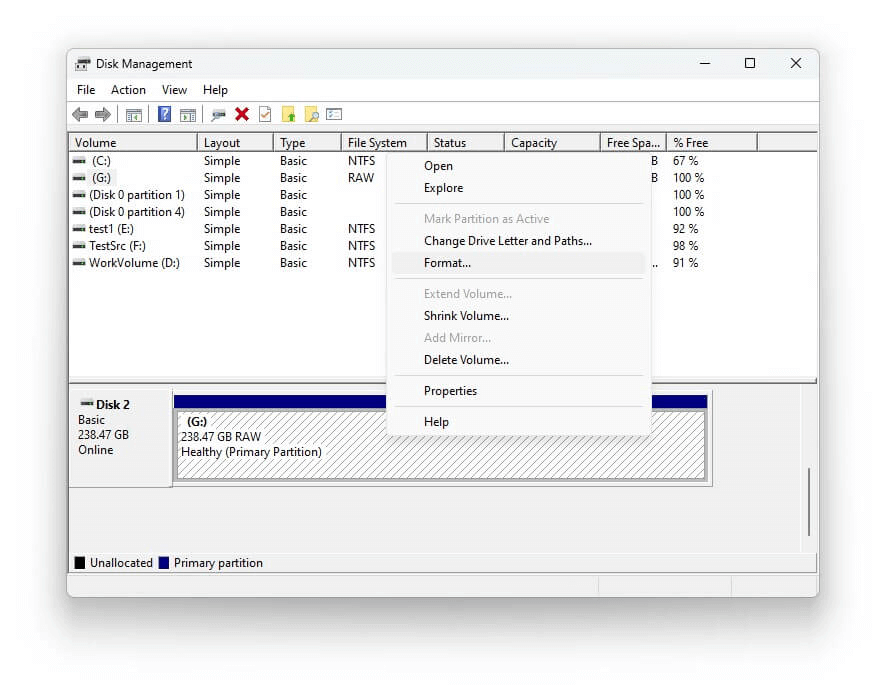
- Right-click on the device in Disk Management and select Format.
![Fix The Device Is Not Ready Issue]()
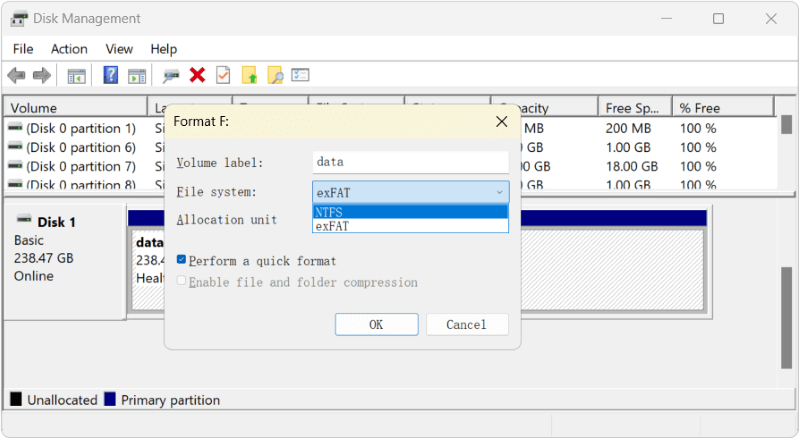
- Choose the file system (NTFS, exFAT, etc.) and follow the prompts to format the device.
![Fix The Device Is Not Ready Issue]()
Prevention Tips: Prevent from The Device Is Not Ready Issue
To avoid encountering the "The Device Is Not Ready" error in the future, here are some useful preventive measures:
1. Regularly Update Drivers and Software
Keeping your device drivers up to date ensures compatibility and smooth operation. Regular software updates can also fix potential bugs that could lead to errors.
2. Safely Eject External Devices
Always use the "Safely Remove Hardware" option when disconnecting external devices. This ensures the device is properly unmounted, preventing file system corruption.
3. Backup Data Regularly
Data loss is a risk when devices malfunction. Always keep backups of important files, either using cloud storage or external backup devices.
4. Use Reliable Devices and Cables
Low-quality cables or devices can lead to connectivity issues. Invest in high-quality, durable hardware for a smoother experience.
When to Seek Professional Help
While many of the issues behind the "The Device Is Not Ready" error are fixable through troubleshooting, there are times when the problem might be beyond DIY repairs.
- If the device consistently fails to work across multiple systems and after troubleshooting, it may be physically damaged.
- If none of the solutions work, or if the device is a critical component (like a work-related printer or storage device), consulting technical support might be necessary.
Conclusion
"The Device Is Not Ready" error can be a frustrating issue, but with the right troubleshooting steps, it's often a fixable problem. Start by checking the physical connection, then proceed to software solutions like updating drivers or running built-in troubleshooters. If needed, more advanced steps such as checking disk errors or reinstalling the device can help resolve the issue.
By taking care of your devices and ensuring regular updates, you can minimize the chances of encountering this error. Always remember to backup your data and seek professional help if the device shows signs of permanent failure. With the right approach, you can get your devices working and avoid unnecessary downtime.


Donemax Data Recovery
Powerful, safe & easy-to-use data recovery software to easily and completely recover deleted, formatted, inaccessible and lost data from PC, Mac, HDD, SSD, USB drive, camera, SD card, RAID and other storage devices.
Related Articles
- Dec 23, 20247 Solutions to Fix 'Cannot Reinstall macOS' – Troubleshooting and Solutions
- Dec 04, 2025How to Fix Bad Pool Header (0x00000019) Error on Windows
- Jan 06, 2025How to Quickly Fix RAW External Hard Drive without Losing Data?
- May 28, 2025[9 Fixes] Fix External Hard Drive Not Accessible on Windows 10
- Feb 17, 2025Fix SanDisk Device Won't Format Error on Windows 11/10/8
- Jan 12, 20257 Solutions to Solve The 'WD Drive Unlock Will Damage Your Computer' Error

Christina
Christina is the senior editor of Donemax software who has worked in the company for 4+ years. She mainly writes the guides and solutions about data erasure, data transferring, data recovery and disk cloning to help users get the most out of their Windows and Mac. She likes to travel, enjoy country music and play games in her spare time.

Gerhard Chou
In order to effectively solve the problems for our customers, every article and troubleshooting solution published on our website has been strictly tested and practiced. Our editors love researching and using computers and testing software, and are willing to help computer users with their problems
Hot Donemax Products

Clone hard drive with advanced clone technology or create bootable clone for Windows/Mac OS.

Completely and easily recover deleted, formatted, hidden or lost files from hard drive and external storage device.

Certified data erasure software - permanently erase data before selling or donating your disk or any digital device.

