Written byCharlesUpdated on Apr 11, 2025
Recover Deleted Files from QNAP Drive [4 Methods]
Approved byGerhard Chou
PAGE CONTENT:
QNAP (Quality Network Appliance Provider) NAS drives are an essential tool for personal and business use, offering network-attached storage solutions that provide centralized storage, backups, and easy data access across multiple devices. Despite the reliability of QNAP systems, file deletion is a common issue that many users face, whether it's due to accidental deletion, system crashes, or even RAID failure. Fortunately, there are several methods available to recover lost or deleted files from QNAP NAS devices, and in this article, we'll walk you through each of them in detail, covering everything from simple recovery steps to more advanced solutions.
Whether you're a novice user or an IT administrator, this guide will help you efficiently recover your deleted files and avoid future data loss.
Introduction to QNAP and File Deletion
QNAP NAS drives are used extensively for storing everything from personal files to sensitive business data. They offer a variety of benefits, including multiple drive bays for larger storage capacity, RAID support for data redundancy, and various security features. Despite their reliability, users can still face the frustration of losing data.
Deleted files may not always be lost permanently. In fact, when files are deleted from a QNAP NAS, they often remain recoverable for some time, provided they haven't been overwritten by new data. Depending on the type of deletion and your QNAP configuration, there are several approaches you can take to recover those files.
This guide will focus on helping you understand the recovery process based on various scenarios such as accidental file deletion, RAID failure, and more.
Understanding QNAP Storage and File Deletion
Before diving into the recovery methods, it's essential to understand how QNAP systems handle file storage and deletion. QNAP drives often use RAID (Redundant Array of Independent Disks) configurations, which combine multiple physical drives into one logical unit to improve data protection and performance. However, RAID configurations also introduce complexities when recovering lost files.
Most QNAP NAS drives use one of two file systems: EXT4 (Linux-based) or Btrfs (which also has built-in snapshot capabilities). When you delete a file from a QNAP drive, it's typically removed from the system's directory, but the actual data often remains intact on the drive until it is overwritten by new data.
Understanding these concepts is crucial because the method of file recovery can depend on whether the file deletion was logical (i.e., accidental deletion) or physical (i.e., the data sectors have been overwritten or corrupted).
Pre-Recovery Checklist
Before you start trying to recover deleted files, there are several things you should check and consider to increase your chances of successful data recovery:
1. Stop Using the NAS
- The most important thing to do is stop using the NAS immediately. When you delete files, the system marks the space as available for new data, but the old data isn't truly erased until new files overwrite it. By continuing to use the NAS, you risk overwriting the deleted files.
2. Identify the File Loss Scenario
- Determine the nature of the data loss: Did you accidentally delete a file? Did you experience a system crash or RAID failure? Understanding the scenario will help you choose the most appropriate recovery method.
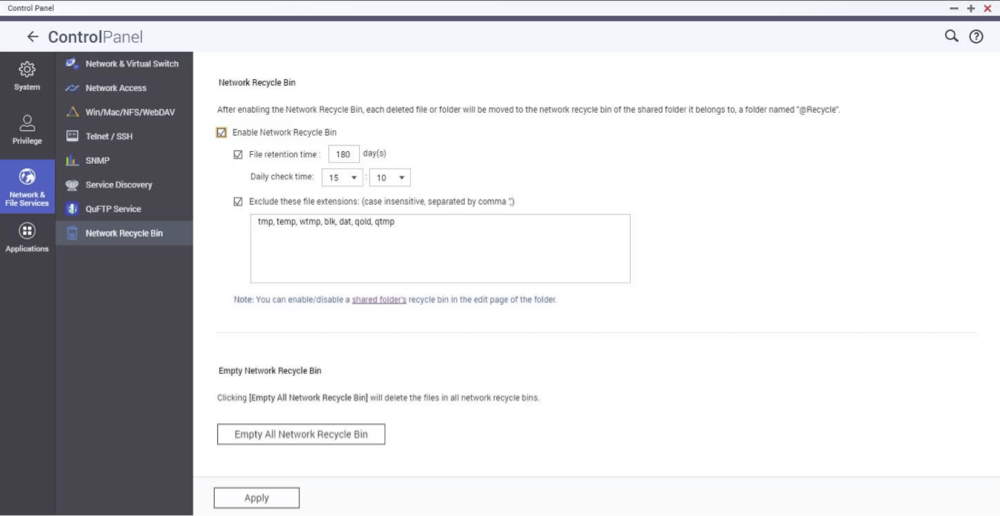
3. Check the QNAP Recycle Bin
- The QNAP NAS has a built-in feature called the Recycle Bin, which temporarily stores deleted files. If the Recycle Bin is enabled, you can quickly restore files that were deleted through the File Station or other file management tools.
4. Verify Permissions
- If you're accessing the NAS remotely, ensure you have the necessary permissions to restore the deleted files. Also, ensure that the network connection is stable during recovery.
Methods to Recover Deleted Files from QNAP NAS Drive
Method 1: Restore Files from QNAP Recycle Bin
The simplest way to recover deleted files from QNAP NAS is by using the Recycle Bin feature. However, this method only works if the Recycle Bin is enabled for the shared folder where the files were originally located.
Steps to Restore Files from the QNAP Recycle Bin:
- Access the QNAP File Station:
- Log into your QNAP NAS using the web interface (QTS).
- Open File Station, which is the file management tool for QNAP devices.
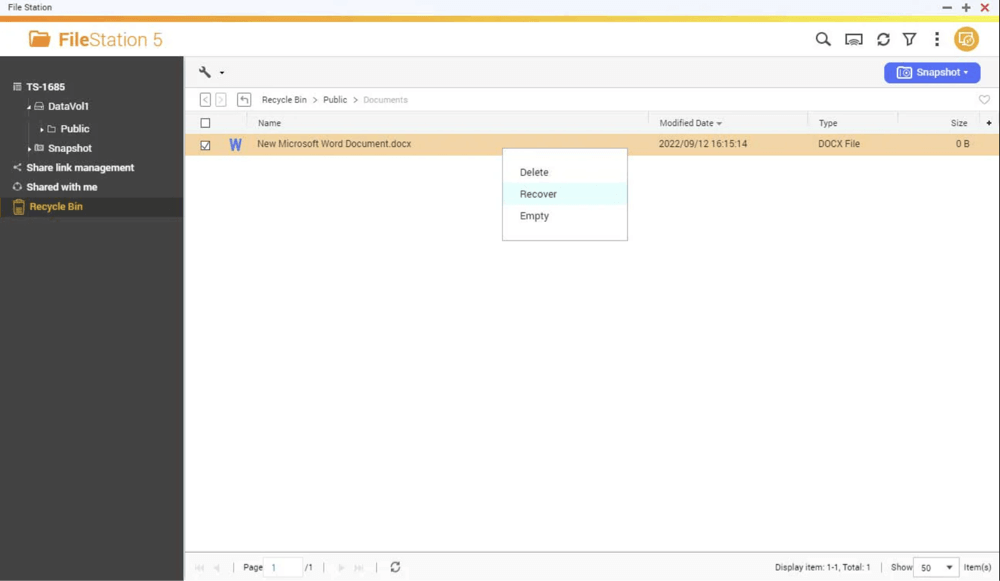
- Locate the Recycle Bin:
- In File Station, find the Recycle Bin icon, typically displayed in the left sidebar under the folder structure. If files have been deleted recently, they should be found here.
![recover lost or deleted files from QNAP NAS devices]()
- In File Station, find the Recycle Bin icon, typically displayed in the left sidebar under the folder structure. If files have been deleted recently, they should be found here.
- Select and Restore Files:
- Browse through the Recycle Bin to locate the files you want to restore.
- Right-click the files and select Recover. The files will be returned to their original location.
![recover lost or deleted files from QNAP NAS devices]()
Limitations:
- If the Recycle Bin is not enabled or if the files were deleted too long ago, they may not be recoverable through this method.
Method 2: Recover Using QNAP Snapshot Manager
QNAP Snapshot Manager is another powerful tool available for users with specific configurations. Snapshots are essentially backups of the system at a specific point in time, allowing users to restore files from previous versions without impacting the current system.
Steps to Restore Files Using QNAP Snapshot Manager:
- Access Snapshot Manager:
- Log into the QNAP interface and navigate to Backup Station.
- Select Snapshot from the menu.
- Select Snapshot:
- Browse through the available snapshots and select the one closest to the date of your file loss.
- Restore Files:
- Choose Restore and select the files or folders you want to recover. You can restore the entire snapshot or just individual files.
Conditions for Success:
- The Snapshot feature must be enabled on your QNAP device, and snapshots must be created regularly for this method to work.
Method 3: Use Data Recovery Software
If the files are not recoverable through the Recycle Bin or Snapshot Manager, you can turn to third-party data recovery software. Several software tools are compatible with QNAP NAS drives and can help recover deleted files, even after a system crash or RAID failure.
Steps for Using Data Recovery Software:
- Remove the Hard Drives:
- Shut down the QNAP device and carefully remove the hard drives from the NAS.
- Use a SATA-to-USB adapter or an external docking station to connect the drives to a computer.
- Use Data Recovery Software:
- Install data recovery software such as Donemax Data Recovery, EaseUS Data Recovery Wizard, R-Studio, or DiskInternals. These programs support RAID recovery and can scan the drives for deleted files.
- Scan the drives thoroughly to recover lost files. The software will provide a preview of recoverable data.
- Recover Files:
- After scanning, select the files you want to recover and save them to a different storage device (never save them back to the same drive you're recovering from).
Important Tips:
- If you're using RAID, ensure that the RAID array is intact and configured correctly in the recovery software.
- Be patient, as the recovery process may take a considerable amount of time, especially for large drives or RAID arrays.
Method 4: Contact QNAP Support or Professional Data Recovery Services
In cases where the above methods do not yield satisfactory results, you may need to seek professional help. QNAP provides support for its users, and there are also specialized data recovery services that can handle more complex scenarios, such as RAID failure or physical damage to the drives.
When to Contact QNAP Support or Professionals:
- When the RAID array is damaged or inaccessible.
- If your NAS system shows signs of hardware failure.
- If you're unable to recover files despite using available tools.
Professional data recovery services can often recover data that software solutions can't, though they may be more expensive.
How to Prevent Future Data Loss on QNAP Drives?
To avoid the hassle of file recovery in the future, it's crucial to implement preventive measures. Here are some best practices:
- Enable the Recycle Bin:
- Always enable the Recycle Bin feature to temporarily store deleted files for easy restoration.
- Schedule Regular Snapshots:
- Set up a schedule to take regular snapshots of your system. This ensures that you can recover files from a specific point in time.
- Use Backup Solutions:
- Set up automated backups to external drives, cloud storage, or a remote NAS to create a redundant copy of your data.
- Monitor Disk Health:
- Regularly monitor the health of your disks using QNAP's monitoring tools. Early detection of failing drives can help you take preventative action.
Conclusion
File loss on a QNAP NAS doesn't always mean permanent data loss. By using the Recycle Bin, Snapshot Manager, or data recovery software, you have multiple options to restore your deleted files. If those methods don't work, professional data recovery services can help retrieve files from damaged or corrupted drives.
To prevent future data loss, it's crucial to enable preventative measures like snapshots, regular backups, and disk health monitoring. By following these steps, you can protect your valuable data and minimize the chances of file deletion disasters.
Donemax Data Recovery
One of the best data recovery programs to recover deleted, formatted or lost data from PC, Mac, HDD, SSD, USB drive, SD card, camera, RAID, Sever or other storage devices.
Related Articles
- Feb 18, 2025[3 Methods] Recover Images and Videos from a Corrupted SD Card on Windows or macOS
- Mar 01, 2025Multimedia Card (MMC) Data Recovery: A Comprehensive Guide
- Oct 31, 2023Recover Data from External Hard Drive with Best Data Recovery Software
- Jan 14, 2025Is It Possible to Recover Lost Data from a Wiped or Erased Hard Drive?
- Mar 07, 2024How to Recover Lost Data from Lexar Memory Card?
- Jul 01, 2024How to Recover Lost Data from Samsung Laptop?

Contributing Writer
Charles
Charles, who lives in Sydney, Australia, is an editor & writer of Donemax Team. He is good at writing articles related with Apple Mac computers, Windows operating systems, data recovery, data erasure, disk clone and data backup, etc. He loves reading and playing tennis in his spare time and is interested in testing new digital devices such as mobile phones, Macs, HDDs, SSDs, digital cameras, etc.

Editor in chief
Gerhard Chou
In order to effectively solve the problems for our customers, every article and troubleshooting solution published on our website has been strictly tested and practiced. Our editors love researching and using computers and testing software, and are willing to help computer users with their problems