Written byMariaUpdated on Jul 20, 2024
How to Clone Hard Drive to SanDisk SSD?
Approved byGerhard Chou
Upgrading to a SanDisk SSD can make your computer run much faster, with shorter boot times, faster file access, and better overall system speed. When you clone your old hard drive to a SanDisk SSD, you copy all your data to the new one.
This includes the operating system, all of your programs, and all of your files. This process ensures you keep all of your info and settings without installing everything over again. This guide will show you every step of the cloning process, from making a copy of your data to setting up the SSD and using the cloning software.
If you follow these steps, the switch will go smoothly, and you'll enjoy the speed and stability of your new SanDisk SSD with little downtime.
Why Clone A Hard Drive to An SanDisk SSD?
If you want to clone your hard drive or old SSD to a SanDisk SSD SSD, here are some reasons why you might want to do it:
- Performance Boost: SSDs make a big difference in how fast your computer is. Their read and write speeds are faster, so your computer will start up, and apps will load faster.
- Reliability: Since SSDs don't have any moving parts, they last longer and are less likely to break down mechanically than regular hard drives.
- Energy Efficiency: Laptop batteries can last longer when SSDs are used because they use less power.
- Quiet Operation: SSDs don't have any moving parts, so they work quietly, making your computer quieter.
Preparing Your System:
- Defragment your HDD (Windows only): Defragmentation moves around broken data on your HDD, which speeds up cloning. Then, use the search bar to find "Defragment and Optimize Drives" and run the tool on your HDD.
- Check for Disk Errors: Tools built into Windows and macOS can detect and fix disk problems. Use these tools to ensure the cloning process goes smoothly.
- Free Up Space: If your SSD is running low on room, you can free up space on your HDD by eliminating programs you don't use and files you don't need.
Step-by-Step Guide to Cloning Your Hard Drive to SanDisk SSD
Please note that disk clone will delete everything from the destination drive before cloning data from the source drive to it. If you have important files stored on the SanDisk SSD, make a backup before you start to clone the old hard drive to the SanDisk SSD.
Then follow the steps below to clone hard drive or old SSD to your SanDisk SSD:
Step 1. Install the SanDisk SSD.
If you have a desktop computer:
- Take your computer's power off and plug it into something else.
- Find an open SATA spot inside the computer case when you open it up.
- Use a SATA wire to connect the SSD to the SATA slot.
- Use the right mounting clamps or screws to keep the SSD inside the case.
- Connect the power cord again and turn on your machine.
If you are using a laptop:
- Turn off your laptop and take it away from the power source.
- It depends on the type of laptop and whether you need to take off the bottom panel or a certain hard drive access panel.
- Connect the SSD to the SATA port.
- Use the right mounting device to keep the SSD in place.
- Reassemble your laptop and power it on.
If you want to clone your computer’s hard drive to an external SanDisk SSD, just connect the SSD to your computer via USB cable.
Step 2. Install Cloning Software.
The cloning program needs to be installed after the SanDisk SSD has been set up and your computer has recognized it.
Donemax Disk Clone is one of the best SanDisk SSD cloning programs. It can help you clone hard drive to SanDisk SSD on Windows PC or Mac and it supports to create bootable clone for your computer.
Just download and install this cloning program on your computer, then run it to clone the hard drive to the SanDisk SSD.
Donemax Disk Clone
- Clone HDD/SSD/USB Device to a SanDisk SSD.
- Create bootable clone for Windows PC and Mac.
- Support sector-by-sector clone.
Step 3. Clone the Hard Drive to SanDisk SSD.
The real cloning process can now begin when everything is ready.
1. Select the source disk and the destination disk.
Open Donemax Disk Clone, choose Disk Clone mode. Then select the computer hard drive as the source disk, select the SanDisk SSD as the destination disk. If you want to perform a sector by sector clone, tick Sector by sector clone (if there are bad sectors on the hard drive, you should tick it). Then click Next.

2. Check clone layout.
Now, you can preview the clone layout. If needed, change the size of the partitions. With the Donemax Disk Clone, you can change the size of sections to fit the new SSD.
Tick “Check the option if the destination is SSD.”

3. Clone data from the hard drive to the SanDisk SSD.
Click on Clone button. It will start to clone the hard drive to the SanDisk SSD. The time this takes will depend on how much data is being copied.

If you are using a Mac and want to clone everything from your Mac to the external SanDisk SSD, making a bootable clone, just follow the steps below:
Step 1. Download and install Donemax Disk Clone for Mac on your Mac and connect the SanDisk SSD to your Mac.
Step 2. Open Donemax Disk Clone for Mac, choose OS Clone mode. Then select the SanDisk SSD as the destination drive.
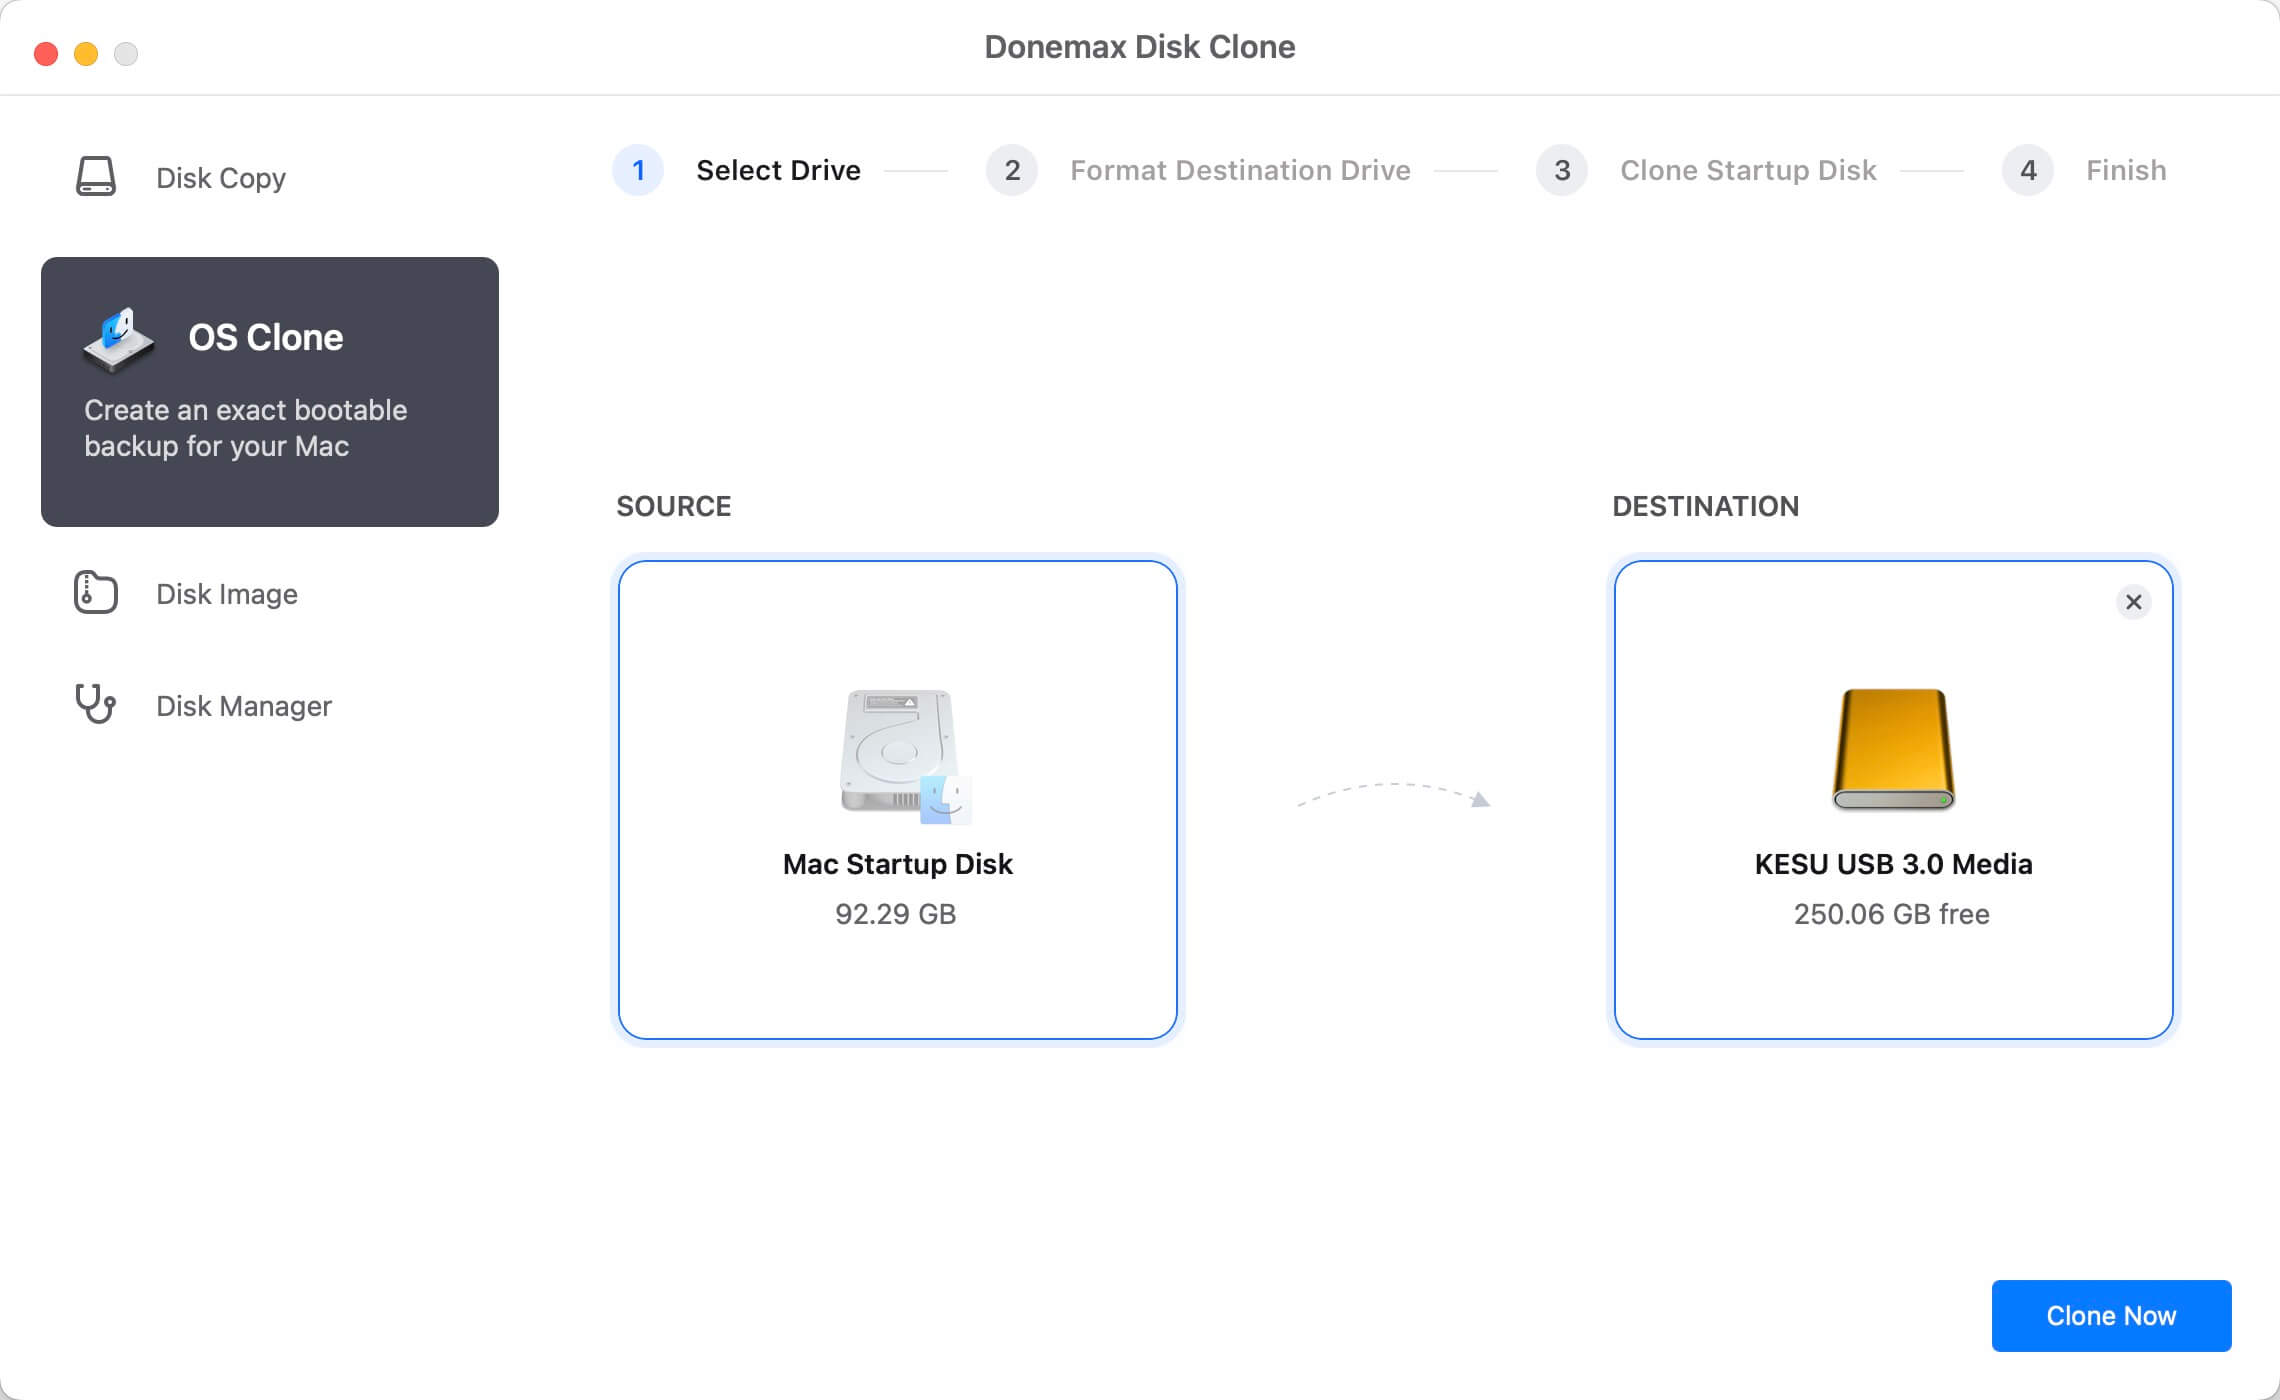
Step 3. Click on Clone Now button to clone all data including macOS operating system, user files, apps, settings and other data from Mac internal disk to the SanDisk SSD, then create a full bootable clone backup.
Step 4. Verify the Clone.
Once the cloning is done, it's important to ensure everything is transferred properly.
1. Boot from the SSD:
Start up your system again and go to the BIOS/UEFI settings. Switch the order of the boots to give the SanDisk SSD more power. If you are using a Mac, boot it into macOS Recovery mode, then select the SanDisk SSD as the startup disk.
2. Check System Functionality:
Ensure that your operating system loads properly and that you can access all your files. Also, make sure that the SSD is seen as the main drive.
Step 5. Optimize and Finalize
After your system is up and running on the SanDisk SSD, there are a few more things you can do to make the setting even better:
1 .Enable TRIM:
With the TRIM command, you can help an SSD keep working well over time. It's worth checking, but most modern working systems turn on TRIM by default.
For Windows:
If you are a user, open the Command Prompt and type fsutil behavior query DisableDeleteNotify. TRIM is turned on if the answer is 0.
For macOS:
Apple SSDs have TRIM turned on by default. However, you might have to turn it on manually for SSDs made by someone else.
2. Update Drivers and Firmware:
Check to see if any changes are available to your SanDisk SSD. Updating the drivers and software can improve the system's performance and reliability.
3. Configure Power Settings:
Since SSDs use less power, you should change your power settings to get the most out of this.
Conclusion:
Cloning your hard drive to a SanDisk SSD is easy and can greatly improve the speed of your computer. If you follow this guide, the change will go smoothly, and you'll keep your info and settings.
After cloning, don't forget to back up your info, check the copy, and make your system run better. You'll be able to boot up and view files faster with your new SanDisk SSD, and your computer will respond more quickly. Enjoy the better reliability, lower energy use, and quiet performance of getting a good SSD.
Related Articles
- Sep 19, 2023Clone A Hard Drive With Bad Sectors
- Jun 10, 2025Clone SD Card: A Comprehensive Guide
- Apr 27, 2024How to Clone Hard Drive to Samsung Portable SSD?
- Jan 25, 2024How to Clone SATA SSD to NVMe SSD?
- Jun 03, 2025How to Clone an exFAT Drive to a FAT32 Drive?
- Sep 09, 2023Solution: Samsung 850 EVO Data Migration Failed

Contributing Writer
Maria
Maria is one of the senior writers & editors of Donemax who lives and works in Sydney, Australia. She loves PC, Mac and Internet Technology. She has 6 years of writing articles about data recovery on PC/Mac, disk cloning solution, data eraser and computer OS optimization, etc. She is also interested in testing various software and digital products.

Editor in chief
Gerhard Chou
In order to effectively solve the problems for our customers, every article and troubleshooting solution published on our website has been strictly tested and practiced. Our editors love researching and using computers and testing software, and are willing to help computer users with their problems