Written byStevenUpdated on Apr 25, 2025
What is Disk Cleanup, What to Do if It Is Not Working?
Approved byGerhard Chou
PAGE CONTENT:
When your computer begins to run sluggishly, freezes more often, or you receive low disk space warnings, it may be time for a digital cleanup. Windows comes equipped with a handy built-in utility called Disk Cleanup that helps users free up space and maintain system performance. However, like any software feature, it can sometimes malfunction or fail to launch altogether.
In this article, we will explore what Disk Cleanup is, how it works, the issues users commonly face, and provide a comprehensive guide on how to fix it when it's not working properly.
What is Disk Cleanup?
A Microsoft Windows maintenance tool called Disk Cleanup was created to increase the amount of disk space on a computer's hard drive. It scans the selected drive for files that are no longer needed and can be safely deleted. These files accumulate over time from daily computer usage and can eventually take up a significant amount of storage.
Types of Files Removed by Disk Cleanup
Here are some common categories of files that Disk Cleanup can remove:
- Temporary Internet Files: Cached files stored by web browsers to load pages faster.
- System Error Memory Dump Files: Files created after system crashes that are typically used for debugging.
- Recycle Bin Contents: Files you’ve deleted but not permanently removed from the system.
- Windows Update Cleanup: Outdated or superseded system update files.
- Thumbnails: Small versions of image or video previews stored for quicker access.
Benefits of Using Disk Cleanup
Using Disk Cleanup regularly brings several advantages:
- Frees up disk space: Especially helpful on systems with smaller drives.
- Improves performance: Less clutter means quicker access and processing.
- Helps with troubleshooting: Clears files that may be causing software conflicts.
- Maintains system health: Contributes to long-term efficiency and reliability.
How to Use Disk Cleanup?
Accessing Disk Cleanup
There are multiple ways to launch the Disk Cleanup utility:
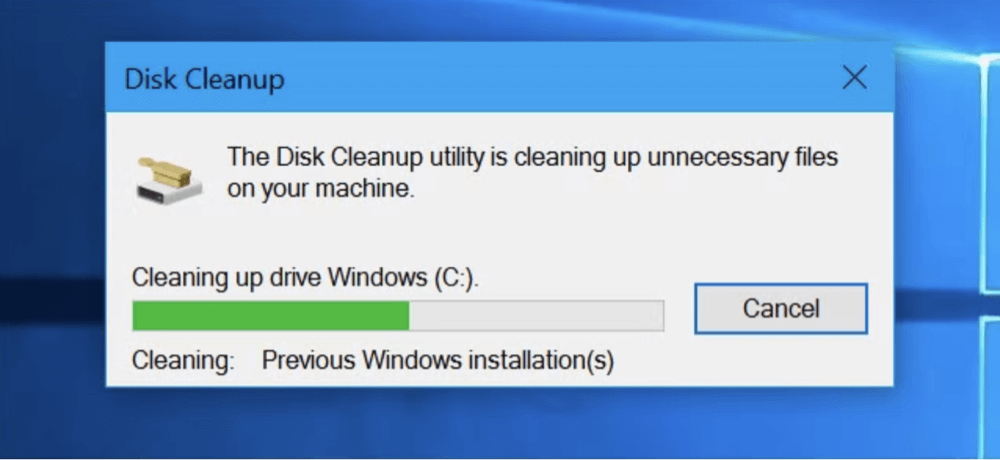
Method 1:
- Type "Disk Cleanup" into the keyboard by pressing Windows + S.
![Disk Cleanup]()
- From the list of results, select the app.
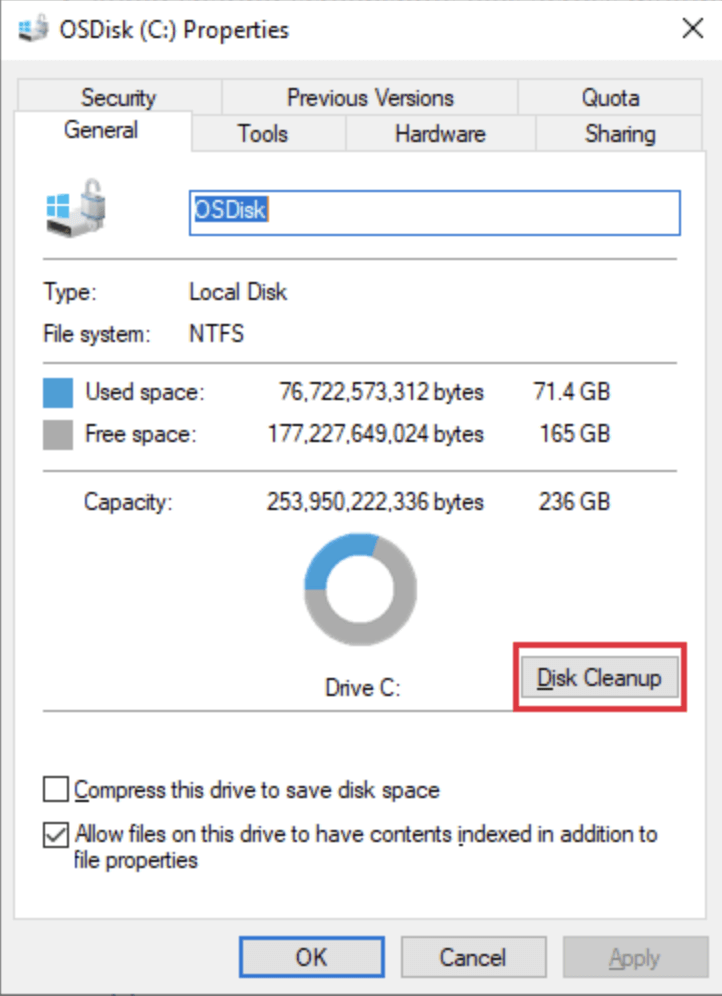
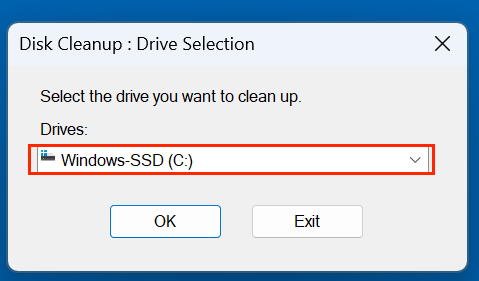
- Decide which drive (often C:) you wish to clean.
![Disk Cleanup]()

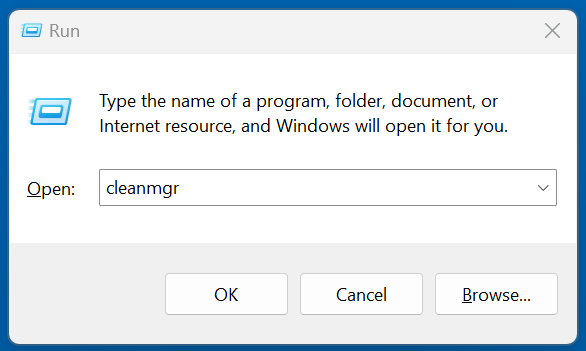
Method 2:
- Hit Windows + R to open the Run dialog box.
- Type cleanmgr and hit Enter.
![Disk Cleanup]()
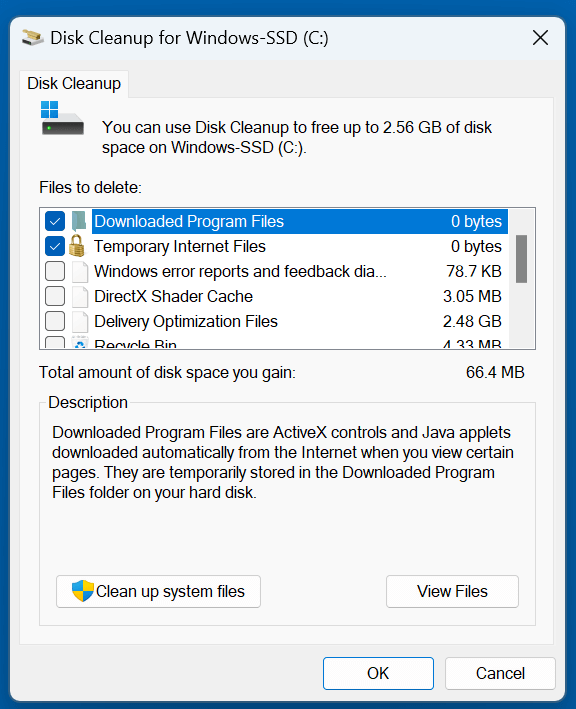
Advanced Settings
After the initial scan, you’ll be presented with a list of file types that can be deleted. For deeper cleanup, click "Clean up system files" to include more categories like:
- Previous Windows installations
- Device driver packages
- Windows Defender logs
![Disk Cleanup]()
Best Practices
- Run it monthly to prevent storage buildup.
- Always review what you're deleting, especially system files.
- Back up important data before performing deep cleanup.
Common Issues with Disk Cleanup
Despite its usefulness, Disk Cleanup can sometimes run into problems. Here are some of the most frequently reported issues:
Symptoms of Disk Cleanup Not Working
- The tool doesn't launch at all.
- The scanning process freezes or gets stuck.
- Disk Cleanup runs but doesn’t free up any space.
- The utility crashes or closes unexpectedly.
Common Causes
- Corrupt system files that interfere with normal operation.
- Permissions issues, especially on standard user accounts.
- Conflicts with background processes or third-party software.
- Outdated Windows versions or pending system updates.
- Disk errors or malware infections.
What to Do If Disk Cleanup Is Not Working?
Step 1: Preliminary Checks
Restart Your Computer
Many short-term issues can be fixed with a simple restart.
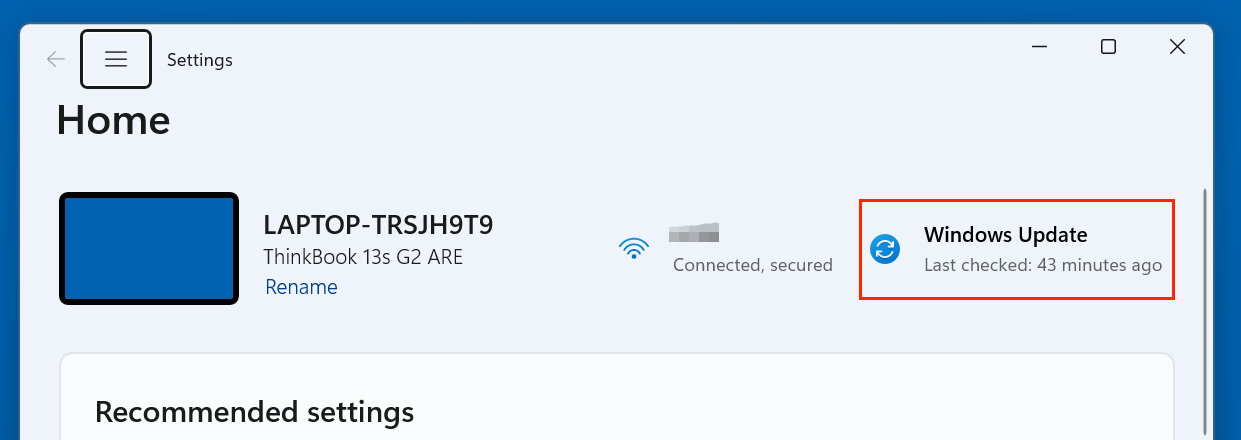
Check for Windows Updates
Outdated system files can cause compatibility problems. Go to:
- Settings > Windows Update and install all available updates.
![Disk Cleanup]()
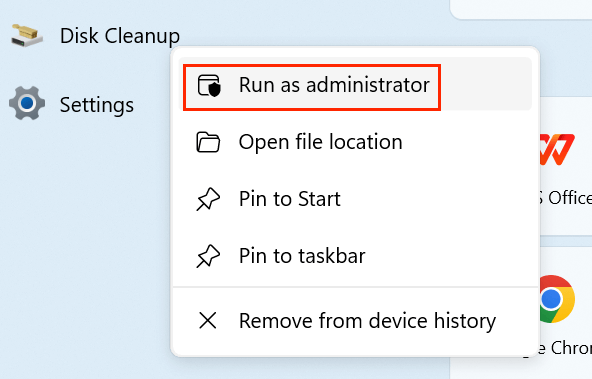
Run as Administrator
Right-click on the Disk Cleanup shortcut and select "Run as administrator" to ensure it has full system access.
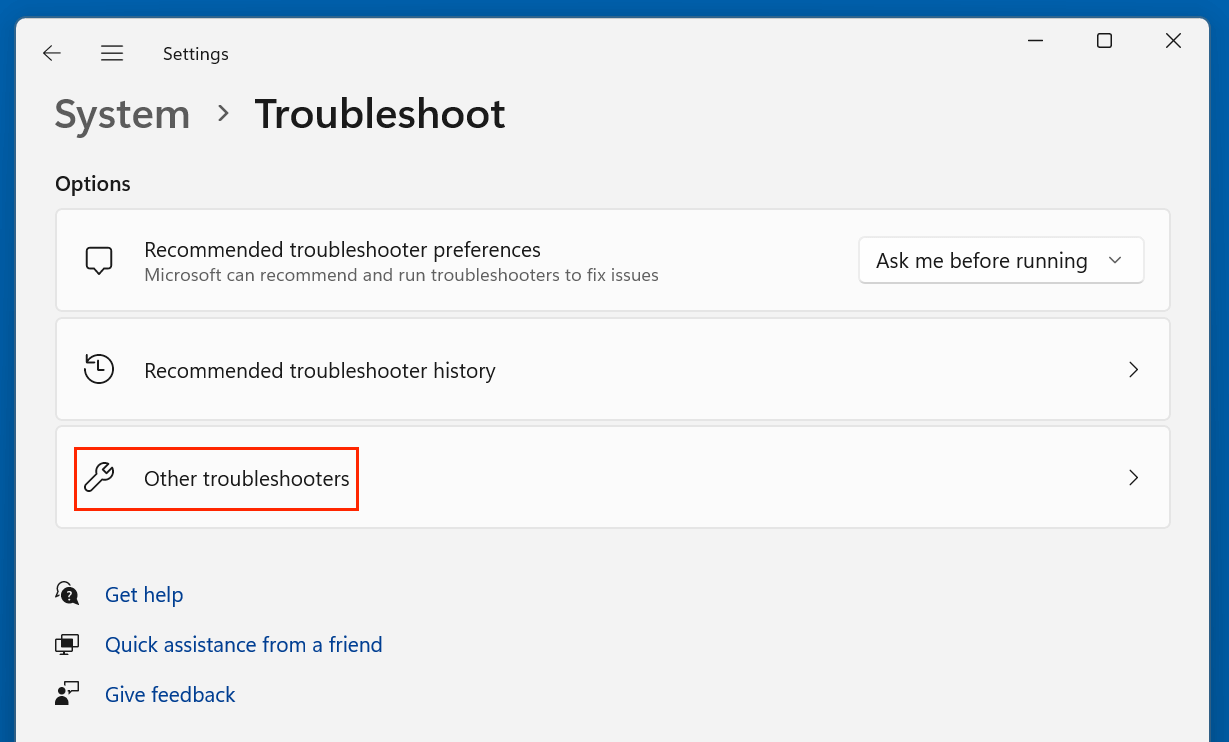
Step 2: Use the Windows Troubleshooter
Windows offers built-in troubleshooters for various issues:
- Go to Settings > System > Troubleshoot > Other troubleshooters.
![Disk Cleanup]()
- Look for Maintenance or Performance troubleshooter and run it.
- Follow on-screen instructions.
These troubleshooters can automatically detect and resolve system-related issues affecting Disk Cleanup.
Step 3: Try Alternative Methods
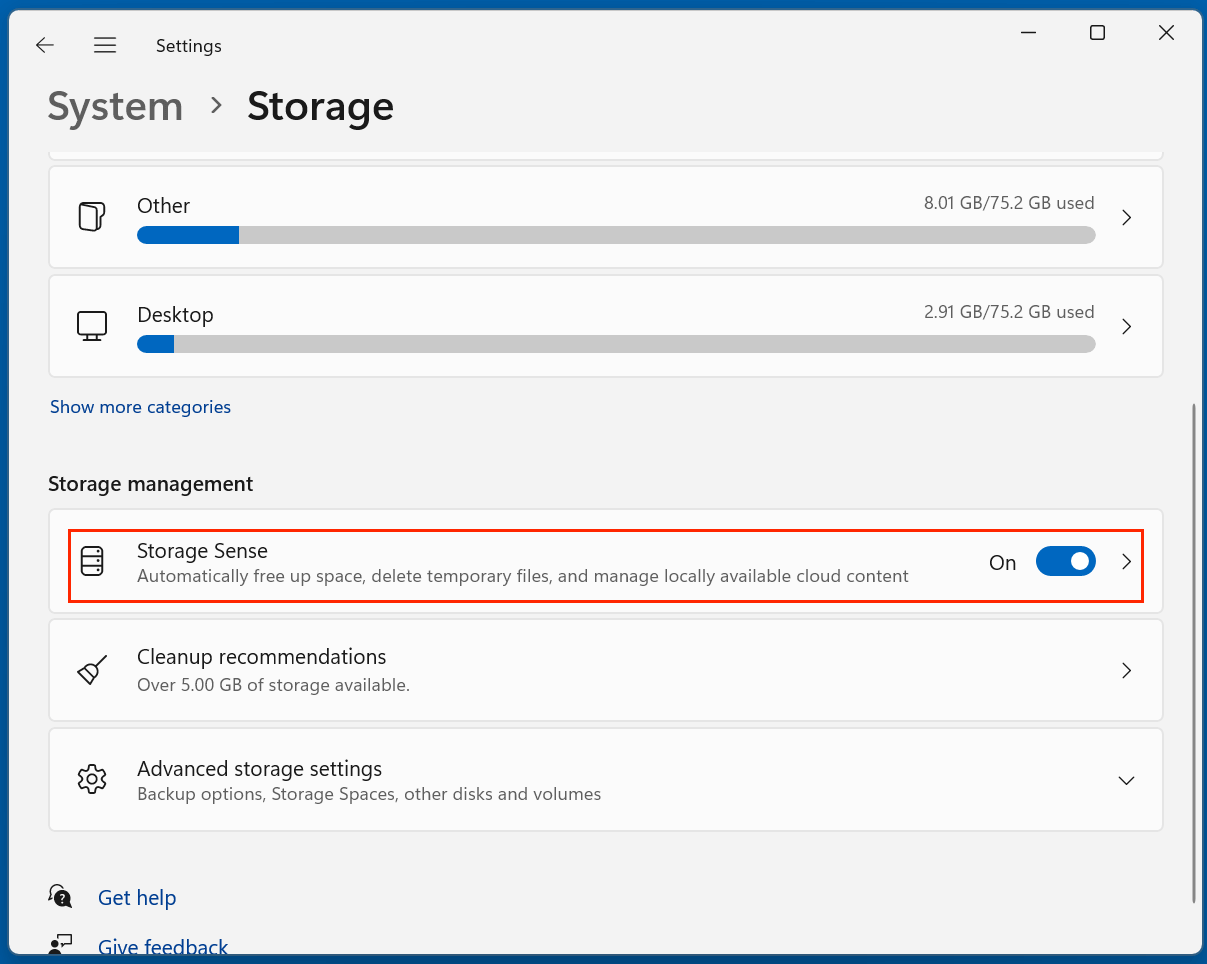
1. Use Storage Sense
Storage Sense is Windows 10/11’s more modern, automated disk cleaning utility.
- Go to Settings > System > Storage.
- Enable Storage Sense.
![Disk Cleanup]()
- Configure how often it should run and what it should clean.
2. Use Cleanmgr via Command Prompt
Sometimes, running Disk Cleanup with special parameters works better.
- As an administrator, open the Command Prompt.
- Type the below command:
cleanmgr /sageset:1
- Decide which file types you wish to remove.
- Then run:
cleanmgr /sagerun:1
![Disk Cleanup]()
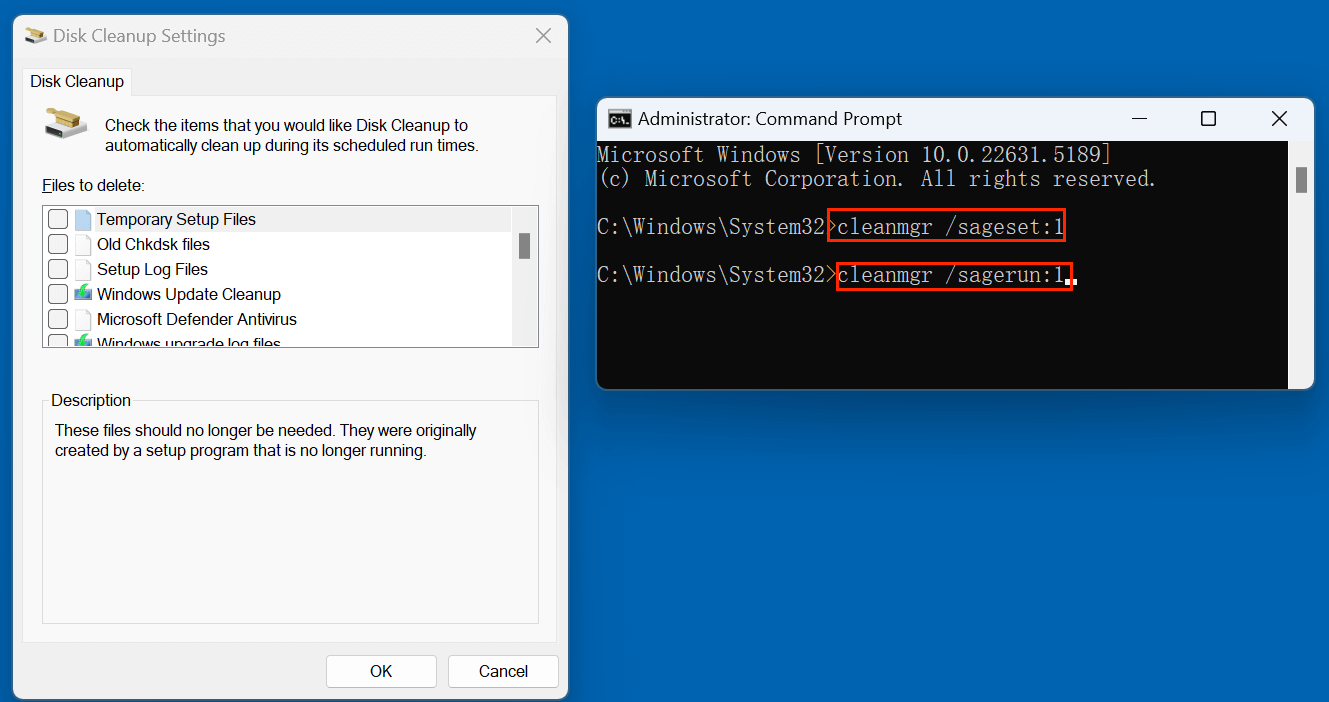
This can help when the GUI version fails.
3. Use Third-Party Tools
If native options don't work, consider alternatives like:
- CCleaner: Well-known tool with many cleaning options.
- BleachBit: Open-source and privacy-focused.
- Glary Utilities: Offers one-click optimization.
💡 Note: Be cautious and only download from official sources to avoid malware.
Step 4: Check and Repair System Files
When Disk Cleanup fails to launch, hangs during operation, or doesn't remove any files, there's a strong possibility that your system files are corrupted or damaged. This could be due to an abrupt shutdown, a failed Windows update, malware infections, or simply long-term wear from extended use. Thankfully, Windows provides two robust tools; SFC and DISM - that can scan for and repair such issues.
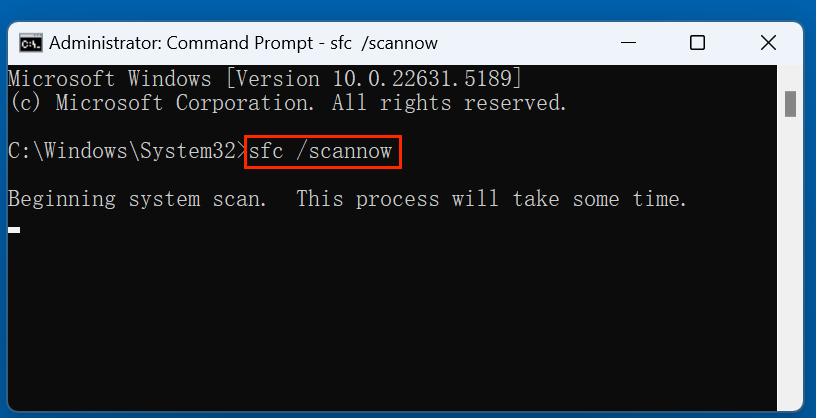
Using SFC (System File Checker)
SFC is a command-line utility that scans for corrupted or missing system files and automatically replaces them with correct versions from the system cache.
How to Run SFC:
- Select "Run as administrator" by right-clicking on the Command Prompt after typing cmd into the Start Menu.
- Type the below command into the Command Prompt window and hit Enter:
sfc /scannow
![Disk Cleanup]()
- The system will begin scanning your protected system files. This process might take 5 - 15 minutes, depending on your system.
- Once completed, you will see one of the following messages:
- Windows Resource Protection did not find any integrity violations. → No issues found.
- Windows Resource Protection found corrupt files and successfully repaired them. → The utility has resolved the problems.
- Windows Resource Protection found corrupt files but was unable to fix some of them. → In this case, you'll need to proceed to use DISM.
💡 Tips:
- Make sure you close all programs before running this scan.
- It's safe to continue using your PC while it runs, but performance may temporarily slow.
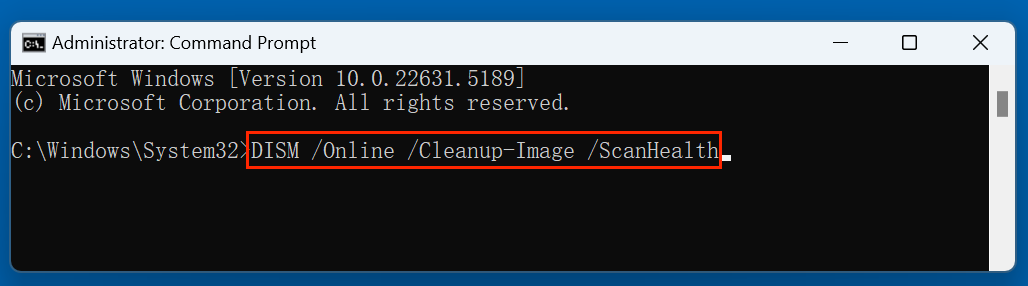
Using DISM (Deployment Imaging Service and Management Tool)
If SFC is unable to resolve the problem, DISM can help by repairing the Windows system image itself. It's especially useful when the component store that SFC relies on is corrupted.
How to Run DISM:
- Again, as an administrator, open the Command Prompt.
- Type the below command to check the system image:
DISM /Online /Cleanup-Image /ScanHealth
![Disk Cleanup]()
This command checks whether the system image is healthy or corrupted.
- Then run the following command to restore the image if issues are detected:
DISM /Online /Cleanup-Image /RestoreHealth
![Disk Cleanup]()
This will fetch clean files from Windows Update servers to replace the corrupted ones. It may take 10 - 30 minutes depending on system performance and internet speed.
- Once it finishes, restart your computer and try running Disk Cleanup again.

Offline Repair Option (Advanced):
If you don't have a reliable internet connection or DISM fails to download the required files, you can use a Windows installation ISO as the source:
DISM /Online /Cleanup-Image /RestoreHealth /Source:D:\sources\install.wim /LimitAccess
Replace D: with the correct path to your mounted Windows installation media.
Why These Tools Matter
Corrupted system files can have ripple effects across your Windows environment:
- Applications may fail to launch or crash frequently.
- Core features like Disk Cleanup, Windows Update, or even the Start Menu might misbehave.
- Security and stability risks increase if integrity violations go unchecked.
By running SFC and DISM, you're ensuring that the core system files remain intact and functional. These tools are not just fixes—they're proactive maintenance options that should be run periodically, especially after system crashes, power outages, or malware attacks.
Step 5: Check Disk Health with CHKDSK
Disk errors might also prevent Disk Cleanup from running correctly.
- Open Command Prompt as Administrator.
- Enter:
chkdsk C: /f /r
![Disk Cleanup]()
- Confirm when prompted to schedule on next reboot.
- Restart your computer.
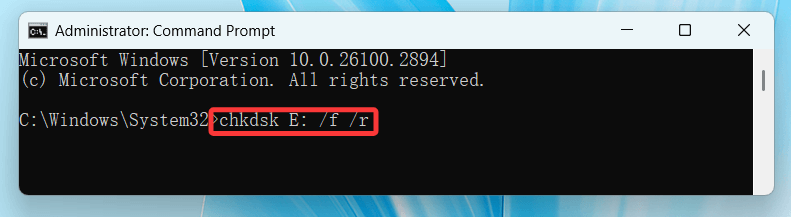
This utility will scan and fix bad sectors or disk errors that may hinder performance.
Step 6: Boot into Safe Mode
If background processes or third-party apps interfere with Disk Cleanup, Safe Mode provides a clean environment.
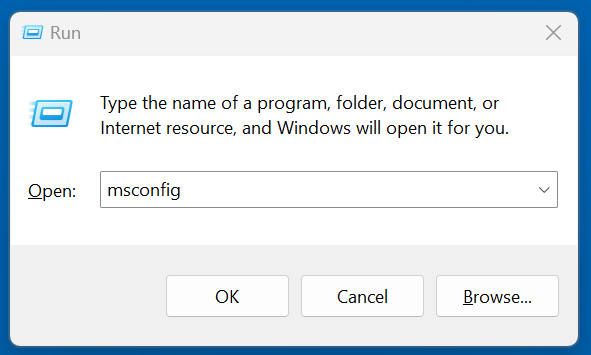
How to Boot into Safe Mode:
- Type msconfig using Windows + R, then hit Enter.
![Disk Cleanup]()
- Go to the Boot tab.
- Check Minimal under Safe boot.
![Disk Cleanup]()
- Restart your PC.
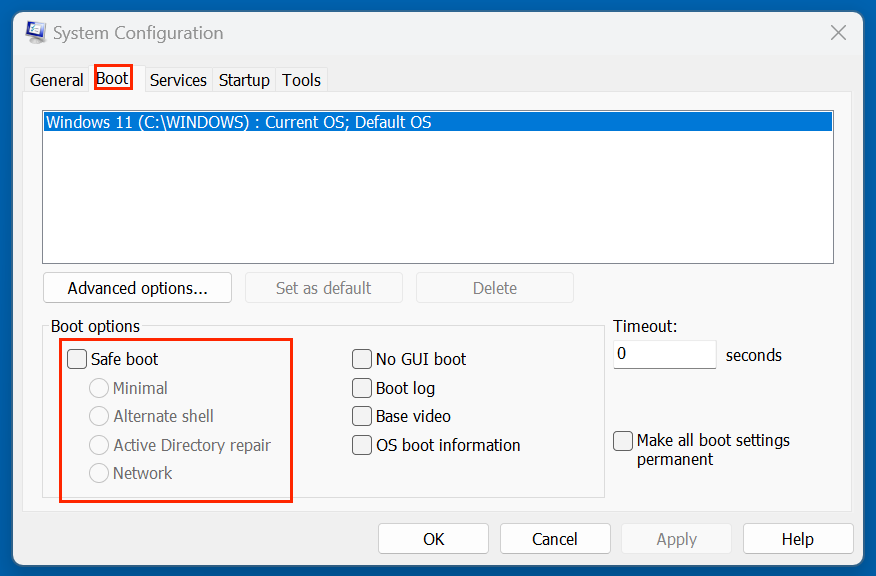
Try running Disk Cleanup in this environment. Don't forget to uncheck Safe boot afterward to return to normal mode.
When All Else Fails: Reinstallation or Restore
If none of the above solutions work, you might need more intensive options.
Reinstall Disk Cleanup (Windows Components)
While not typically removable, corrupted components can sometimes be re-registered.
Try this:
- Open Command Prompt as Admin.
- Run:
dism /online /Add-Capability /CapabilityName:Cleanmgr.Client~~~~0.0.1.0
This will reinstall the Disk Cleanup feature.
Perform a System Restore
If the issue began recently:
- Go to Control Panel > Recovery > Open System Restore.
- Choose a restore point before Disk Cleanup stopped working.
This process can undo recent changes without affecting your personal files.
💡 Note: The files which are deleted by Disk Cleanup is not lost for good and can be recovered by data recovery software. If you want to deeply clean a disk and permanently erase all data from it, just try data erasure software - such as Donemax Data Eraser.
Step 1. Download and install Donemax Data Eraser.
Step 2. Open Donemax Data Eraser, choose Erase Hard Drive mode, then select the target drive, click on Erase Now button.
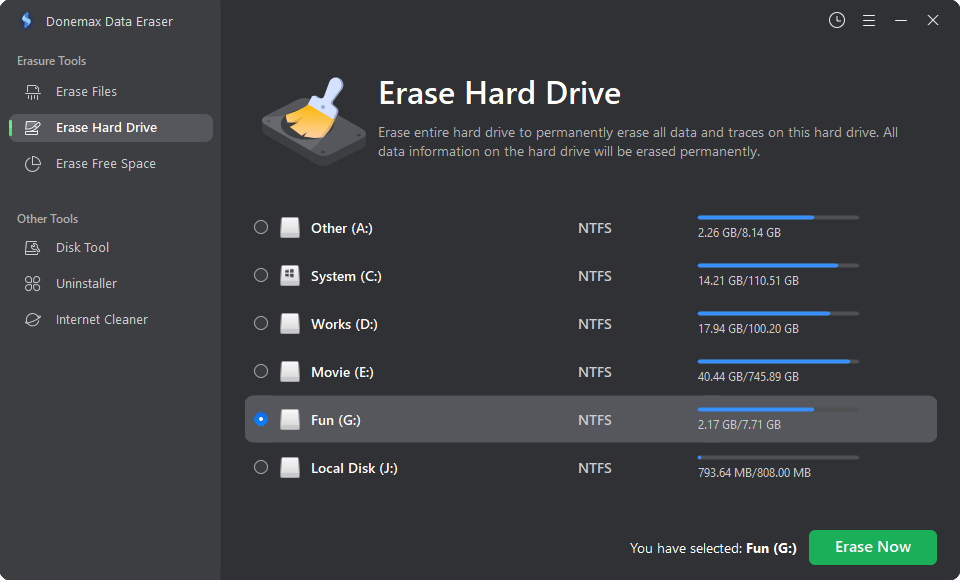
It will securely and permanently erase everything from the drive. No trace left behind.
Conclusion
Disk Cleanup is an invaluable tool for keeping your Windows PC lean, efficient, and clutter-free. It provides a straightforward way to remove unnecessary files, which can otherwise eat up valuable disk space and slow down performance.
However, like any other system utility, Disk Cleanup isn't immune to issues. If you find that it's not working as expected, there are a variety of solutions - from simple reboots to advanced command-line repairs - that can restore its functionality. And in the event that all else fails, Windows offers alternative methods like Storage Sense, system restore points, and trusted third-party cleanup tools.
Maintaining a healthy system isn't just about having good antivirus protection; it's also about managing your storage wisely. So whether you're trying to free up space or troubleshoot a malfunction, knowing how to deal with Disk Cleanup can help you keep your computer running like new.
Donemax Data Eraser
One of the best data erasure programs for permanently erase data from PC, Mac, HDD, SSD, USB drive, digital camera and other devices. Once the data is erased, it is lost for good, cannot be recovered by any method.
Related Articles
- Nov 13, 2024Can't Format System Hard Drive Partition? Find A Solution
- Oct 27, 2024How to Wipe Recycle Bin on Windows: A Complete Guide
- Mar 13, 2025[5 Fixes] Fix Seagate One Touch SSD Not Showing Up on My Computer
- Nov 12, 2024What is Desktop.ini & Can I Delete it?
- Jul 12, 2024How to Replace A Failed Hard Drive?
- Oct 09, 2024Fix Error Code 43 on Windows: A Comprehensive Guide

Contributing Writer
Steven
Steven has been a senior writer & editor of Donemax software since 2020. He's a super nerd and can't imagine the life without a computer. Over 6 years of experience of writing technical solutions and software tesing, he is passionate about providing solutions and tips for Windows and Mac users.

Editor in chief
Gerhard Chou
In order to effectively solve the problems for our customers, every article and troubleshooting solution published on our website has been strictly tested and practiced. Our editors love researching and using computers and testing software, and are willing to help computer users with their problems